User Manual (ENGLISH)
Page 13
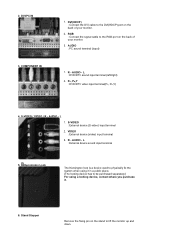
... AUDIO - R - L : External device sound input terminal 5. RGB : Connect the signal cable to the DVI(HDCP) port on the back of your monitor. 3. S-VIDEO : External device (S-video) input terminal 2. Kensington Lock The Kensington lock is a device used to physically fix the system when using it in... - AUDIO - 2. COMPONENT IN 1. DVI(HDCP) : Connect the DVI cable to the RGB port on the back of your monitor. 2. Stand Stopper Remove the fixing pin on the stand to be purchased separately.) For using a locking device, contact where you purchase it. 6. PR, PB,Y : DVD/DTV video ...
... AUDIO - R - L : External device sound input terminal 5. RGB : Connect the signal cable to the DVI(HDCP) port on the back of your monitor. 3. S-VIDEO : External device (S-video) input terminal 2. Kensington Lock The Kensington lock is a device used to physically fix the system when using it in... - AUDIO - 2. COMPONENT IN 1. DVI(HDCP) : Connect the DVI cable to the RGB port on the back of your monitor. 2. Stand Stopper Remove the fixing pin on the stand to be purchased separately.) For using a locking device, contact where you purchase it. 6. PR, PB,Y : DVD/DTV video ...
User Manual (ENGLISH)
Page 17
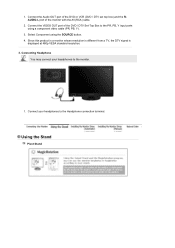
... to the Headphone connection terminal. Connecting Headphone You may connect your headphones to the monitor. 1. Since this product is a monitor whose resolution is different from a TV, the DTV signal is displayed at 480p VESA standard resolution. 3. Using the Stand Pivot Stand Connect the Audio OUT port of the DVD or VCR (DVD / DTV set...
... to the Headphone connection terminal. Connecting Headphone You may connect your headphones to the monitor. 1. Since this product is a monitor whose resolution is different from a TV, the DTV signal is displayed at 480p VESA standard resolution. 3. Using the Stand Pivot Stand Connect the Audio OUT port of the DVD or VCR (DVD / DTV set...

User Manual (ENGLISH)
Page 18
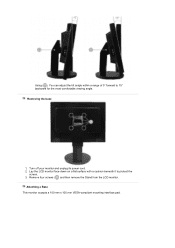
... and right at an angle of 175° to set the monitor lengthwise. Swivel stand Using ( ),You can adjust the height of the screen would hit the floor. To rotate the LCD panel to the Portrait position, first lift it up to its maximum height, tilt it backwards and then rotate ...it backwards may be rotated clockwise by 90 degrees, users can view the LCD screen in the Landscape or Portrait position according to avoid the monitor slide. If you rotate the screen without tilting it clockwise. Rotating the LCD panel without lifting it to its maximum height, the screen may damage ...
... and right at an angle of 175° to set the monitor lengthwise. Swivel stand Using ( ),You can adjust the height of the screen would hit the floor. To rotate the LCD panel to the Portrait position, first lift it up to its maximum height, tilt it backwards and then rotate ...it backwards may be rotated clockwise by 90 degrees, users can view the LCD screen in the Landscape or Portrait position according to avoid the monitor slide. If you rotate the screen without tilting it clockwise. Rotating the LCD panel without lifting it to its maximum height, the screen may damage ...
User Manual (ENGLISH)
Page 19
Turn off your monitor and unplug its power cord. 2. Attaching a Base This monitor accepts a 100 mm x 100 mm VESA-compliant mounting interface pad. Remove four screws ( ) and then remove the Stand from the LCD monitor. Using ( ), You can adjust the tilt anlgle within a range of 5° forward to protect the screen. 3. Lay the LCD monitor face-down on a flat surface with a cushion beneath it to 15° backward for the most comfortable viewing angle. Removing the base 1.
Turn off your monitor and unplug its power cord. 2. Attaching a Base This monitor accepts a 100 mm x 100 mm VESA-compliant mounting interface pad. Remove four screws ( ) and then remove the Stand from the LCD monitor. Using ( ), You can adjust the tilt anlgle within a range of 5° forward to protect the screen. 3. Lay the LCD monitor face-down on a flat surface with a cushion beneath it to 15° backward for the most comfortable viewing angle. Removing the base 1.
User Manual (ENGLISH)
Page 20
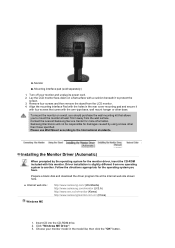
...is slightly different from the LCD monitor. 4. Monitor B. Prepare a blank disk and download the driver program file at least 10cm away from the wall surface. z Internet web site : http://www.samsung.com/ (Worldwide) http://www.samsung.com/monitor (U.S.A) http://www.sec.co.kr/monitor (Korea) http://www.samsungmonitor...monitor and unplug its power cord. 2. Mounting interface pad (sold separately) 1. Align the mounting interface Pad with the holes in the model list, then click the "OK" button. Please use Wall Mount according to another. Remove four screws and then remove the stand...
...is slightly different from the LCD monitor. 4. Monitor B. Prepare a blank disk and download the driver program file at least 10cm away from the wall surface. z Internet web site : http://www.samsung.com/ (Worldwide) http://www.samsung.com/monitor (U.S.A) http://www.sec.co.kr/monitor (Korea) http://www.samsungmonitor...monitor and unplug its power cord. 2. Mounting interface pad (sold separately) 1. Align the mounting interface Pad with the holes in the model list, then click the "OK" button. Please use Wall Mount according to another. Remove four screws and then remove the stand...
User Manual (ENGLISH)
Page 25
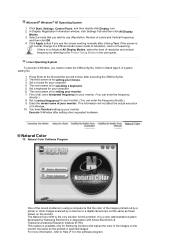
...(Resolution, Number of all, set a horizontal frequency for Samsung monitors and makes the color of your monitor. (You can enter the frequency directly.) 9. If the screen is available only for your monitor. You have finished setting up your monitor. 7. This system is not normal, change to the ...Preset Timing Modes in using a computer is Stand type A of resolution, colors or frequency). The third screen is for...
...(Resolution, Number of all, set a horizontal frequency for Samsung monitors and makes the color of your monitor. (You can enter the frequency directly.) 9. If the screen is available only for your monitor. You have finished setting up your monitor. 7. This system is not normal, change to the ...Preset Timing Modes in using a computer is Stand type A of resolution, colors or frequency). The third screen is for...

User Manual (ENGLISH)
Page 58
...in your System has the latest Service Pack installed. z MagicRotation™ program can not be done as Simple Stand does not support Pivot function. z For Windows™ NT 4.0, it should be provided as below. z The permitted angle of rotation of the... monitor is registered trademark of the monitor. Overview | Installation | Interface | Uninstall | ͑ ͑ Troubleshooting z When Rotation is recommended that your computer. Interface Task ...
...in your System has the latest Service Pack installed. z MagicRotation™ program can not be done as Simple Stand does not support Pivot function. z For Windows™ NT 4.0, it should be provided as below. z The permitted angle of rotation of the... monitor is registered trademark of the monitor. Overview | Installation | Interface | Uninstall | ͑ ͑ Troubleshooting z When Rotation is recommended that your computer. Interface Task ...
User Manual (ENGLISH)
Page 69
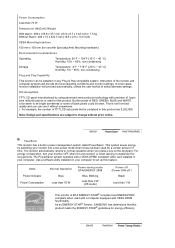
...energy efficiency. As an ENERGY STAR® Partner, SAMSUNG has determined that is not needed, or when leaving it has not been used for a certain amount of TFT LCD sub pixels that this product. Power Consumption Less than 1 W This monitor is not from bad quality and you press a...2000 Blue, Blinking Less than 2 W (Off-mode) Power off (Power S/W off ) Black Less than 70 W Dimensions (WxDxH)/ Weight With stand : 490 x 219.8 x 377 mm (19.3 x 8.7 x 14.8 inch) / 7.5 kg Without Stand : 490 x 72 x 342.5 mm (19.3 x 2.8 x 13.5 inch) VESA Mounting Interface 100 mm x 100 mm (for use it...
...energy efficiency. As an ENERGY STAR® Partner, SAMSUNG has determined that is not needed, or when leaving it has not been used for a certain amount of TFT LCD sub pixels that this product. Power Consumption Less than 1 W This monitor is not from bad quality and you press a...2000 Blue, Blinking Less than 2 W (Off-mode) Power off (Power S/W off ) Black Less than 70 W Dimensions (WxDxH)/ Weight With stand : 490 x 219.8 x 377 mm (19.3 x 8.7 x 14.8 inch) / 7.5 kg Without Stand : 490 x 72 x 342.5 mm (19.3 x 2.8 x 13.5 inch) VESA Mounting Interface 100 mm x 100 mm (for use it...
Service Manual
Page 3
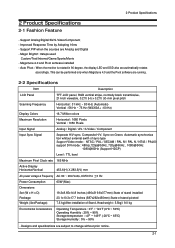
...Pivot : When the monitor is rotated in 90 degree, the display LED and OSD also are running. 2-2 Specifications Item Description LCD Panel Scanning Frequency Display Colors Maximum Resolution TFT-LCD panel, RGB vertical stripe, normally black transmissive, 21-Inch viewable, 0.270... x H x D) Package Weight (Set/Package) 19.3x8.65x14.8 Inches (490x219.8x377mm) State of stand installed 23.1x10.3x17.7 Inches (587x262x450mm) State of stand pivoted 7.5 kg(After installation of Stand, Head weight : 5.5kg)/ 9.0 kg Environmental Considerations Operating Temperature : 0˚F ~ 122˚F (0℃...
...Pivot : When the monitor is rotated in 90 degree, the display LED and OSD also are running. 2-2 Specifications Item Description LCD Panel Scanning Frequency Display Colors Maximum Resolution TFT-LCD panel, RGB vertical stripe, normally black transmissive, 21-Inch viewable, 0.270... x H x D) Package Weight (Set/Package) 19.3x8.65x14.8 Inches (490x219.8x377mm) State of stand installed 23.1x10.3x17.7 Inches (587x262x450mm) State of stand pivoted 7.5 kg(After installation of Stand, Head weight : 5.5kg)/ 9.0 kg Environmental Considerations Operating Temperature : 0˚F ~ 122˚F (0℃...
Service Manual
Page 17
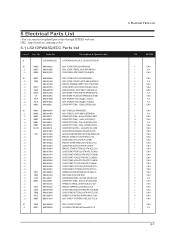
...215TW,WSA1/S21A2-LDP,21,LCD... ...3 T0132 BN73-00077A ...3 M0007 BN96-01524A ASSY STAND;LS21DPWASQ/EDC ASSY STAND P;LS21DP,ABS HB,GR70+BK24 SCREW-TAPTITE;BH,+,B,M3... S.N.A 2 S.N.A 1 S.N.A 1 S.N.A 1 S.N.A 1 S.N.A 1 S.N.A 1 S.N.A 1 S.N.A 1 S.N.A 1 S.N.A 1 S.N.A 1 S.N.A 1 S.N.A 2 S.A 2 S.N.A 2 S.N.A 1 S.N.A 1 S.N.A 1 S.N.A 4 S.N.A 1 S.N.A 1 S.N.A 1 S.A 6-1 6 Electrical Parts List -You can search for updated part codes through ITSELF web site. No. Code No. URL : http://itself.sec.samsung.co.kr/ 6-1 LS21DPWASQ/EDC Parts list Level Loc.
...215TW,WSA1/S21A2-LDP,21,LCD... ...3 T0132 BN73-00077A ...3 M0007 BN96-01524A ASSY STAND;LS21DPWASQ/EDC ASSY STAND P;LS21DP,ABS HB,GR70+BK24 SCREW-TAPTITE;BH,+,B,M3... S.N.A 2 S.N.A 1 S.N.A 1 S.N.A 1 S.N.A 1 S.N.A 1 S.N.A 1 S.N.A 1 S.N.A 1 S.N.A 1 S.N.A 1 S.N.A 1 S.N.A 1 S.N.A 2 S.A 2 S.N.A 2 S.N.A 1 S.N.A 1 S.N.A 1 S.N.A 4 S.N.A 1 S.N.A 1 S.N.A 1 S.A 6-1 6 Electrical Parts List -You can search for updated part codes through ITSELF web site. No. Code No. URL : http://itself.sec.samsung.co.kr/ 6-1 LS21DPWASQ/EDC Parts list Level Loc.

Service Manual
Page 45
... input terminal (left/right) 2. S-VIDEO / VIDEO / R - S-VIDEO : External device (S-video) input terminal 2. R - PR, PB,Y : DVD/DTV video input terminal(PR, PB,Y) 4. Stand Stopper Remove the fixing pin on the stand to be purchased separately.) For using a locking device, contact where you purchase it in a public place. (The locking device has to lift...
... input terminal (left/right) 2. S-VIDEO / VIDEO / R - S-VIDEO : External device (S-video) input terminal 2. R - PR, PB,Y : DVD/DTV video input terminal(PR, PB,Y) 4. Stand Stopper Remove the fixing pin on the stand to be purchased separately.) For using a locking device, contact where you purchase it in a public place. (The locking device has to lift...
Service Manual
Page 46
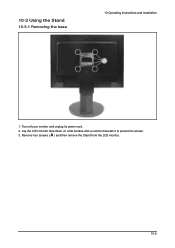
Remove four screws ( A ) and then remove the Stand from the LCD monitor. 10-5 Turn off your monitor and unplug its power cord. 2. 10-3 Using the Stand 10-3-1 Removing the base 10 Operating Instructions and Installation 1. Lay the LCD monitor face-down on a flat surface with a cushion beneath it to protect the screen. 3.
Remove four screws ( A ) and then remove the Stand from the LCD monitor. 10-5 Turn off your monitor and unplug its power cord. 2. 10-3 Using the Stand 10-3-1 Removing the base 10 Operating Instructions and Installation 1. Lay the LCD monitor face-down on a flat surface with a cushion beneath it to protect the screen. 3.
Service Manual
Page 47
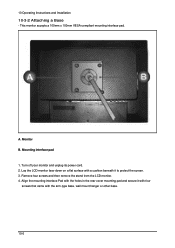
... unplug its power cord. 2. Remove four screws and then remove the stand from the LCD monitor. 4. 10 Operating Instructions and Installation 10-3-2 Attaching a Base - Monitor B. This monitor accepts a 100mm x 100mm VESA-compliant mounting interface pad. Lay the LCD monitor face-down on a flat surface with a cushion beneath it with four screws that came with the holes in...
... unplug its power cord. 2. Remove four screws and then remove the stand from the LCD monitor. 4. 10 Operating Instructions and Installation 10-3-2 Attaching a Base - Monitor B. This monitor accepts a 100mm x 100mm VESA-compliant mounting interface pad. Lay the LCD monitor face-down on a flat surface with a cushion beneath it with four screws that came with the holes in...
Service Manual
Page 48
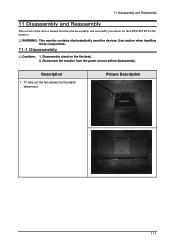
Disassembly stand on the flat desk. 2. To take out the two screws for the LDP21WS TFT-LCD monitors. Use caution when handling these components. 11-1 Disassembly Cautions: 1. Description 1. WARNING: This monitor contains electrostatically sensitive devices. Disconnect the monitor from the power source before disassembly. Picture Description 11-1 11 Disassembly and Reassembly 11 Disassembly and Reassembly This section of the service manual describes the disassembly and reassembly procedures for the stand disconnect.
Disassembly stand on the flat desk. 2. To take out the two screws for the LDP21WS TFT-LCD monitors. Use caution when handling these components. 11-1 Disassembly Cautions: 1. Description 1. WARNING: This monitor contains electrostatically sensitive devices. Disconnect the monitor from the power source before disassembly. Picture Description 11-1 11 Disassembly and Reassembly 11 Disassembly and Reassembly This section of the service manual describes the disassembly and reassembly procedures for the stand disconnect.


