Operating Instructions
Page 3
... an electric shock might occur. Good ventilation is especially important when the machine is used : Indicates a potentially hazardous situation which , if instructions are using your printer, the following important symbols are used heavily. Otherwise a fire or an electric shock might occur. If it well ventilated. 3 Keep the area around the socket...
... an electric shock might occur. Good ventilation is especially important when the machine is used : Indicates a potentially hazardous situation which , if instructions are using your printer, the following important symbols are used heavily. Otherwise a fire or an electric shock might occur. If it well ventilated. 3 Keep the area around the socket...
Operating Instructions
Page 5
...cords can cause an electrical or fire hazard. • Unplug the power cord from the wall outlet. The printer will break or cause injury if dropped. • When moving the printer after disconnecting the power plug before you should take out any of the machine to a network that may result... the machine, you move the machine. While moving the machine, unplug the power cord from the wall outlet before removing the transfer unit. The printer will break or cause injury if dropped. • Be careful not to trap your fingers when opening or closing the top cover. 5 Handling ...
...cords can cause an electrical or fire hazard. • Unplug the power cord from the wall outlet. The printer will break or cause injury if dropped. • When moving the printer after disconnecting the power plug before you should take out any of the machine to a network that may result... the machine, you move the machine. While moving the machine, unplug the power cord from the wall outlet before removing the transfer unit. The printer will break or cause injury if dropped. • Be careful not to trap your fingers when opening or closing the top cover. 5 Handling ...

Operating Instructions
Page 6
... back on the machine before closing the memory unit cover. • Take care to close the memory unit cover, and then turn off the printer's power switch and unplug the power cable. Some internal parts become hot and are a burn hazard. Caution should be very hot. Do not ...touch parts labelled "v" (indicating a hot surface). • The fusing section of this printer becomes very hot. R CAUTION: • The inside the printer when the input tray is removed. If you do, the tray might be taken when removing misfed paper. • Lifting the...
... back on the machine before closing the memory unit cover. • Take care to close the memory unit cover, and then turn off the printer's power switch and unplug the power cable. Some internal parts become hot and are a burn hazard. Caution should be very hot. Do not ...touch parts labelled "v" (indicating a hot surface). • The fusing section of this printer becomes very hot. R CAUTION: • The inside the printer when the input tray is removed. If you do, the tray might be taken when removing misfed paper. • Lifting the...

Operating Instructions
Page 10
...We recommend use of products that feature energy saving functions. For more information about how to configure Energy Saver mode, see "Making Printer Settings Using the Control Panel", Software Guide as a HTML file on the control panel. It is not compliant with ENERGY STAR Program.... ENERGY STAR Program Important ❒ The SP C231N model printer is an open program in which is environmentally friendly. The program backs the development and dissemination of recycled paper which manufacturers participate ...
...We recommend use of products that feature energy saving functions. For more information about how to configure Energy Saver mode, see "Making Printer Settings Using the Control Panel", Software Guide as a HTML file on the control panel. It is not compliant with ENERGY STAR Program.... ENERGY STAR Program Important ❒ The SP C231N model printer is an open program in which is environmentally friendly. The program backs the development and dissemination of recycled paper which manufacturers participate ...
Operating Instructions
Page 12
... NMB-003 du Canada. Copyright © 2008 EN USA M035-7508 12 Responsible party: Ricoh Americas Corporation Address: 5 Dedrick Place, West Caldwell, NJ 07006 Telephone number: 973-882-2000 Product Name: Laser Printer Model Number: SP C231N / Aficio SP C231N, SP C232DN / Aficio SP C232DN • Properly shielded and grounded cables and connectors must accept any interference received, including interference...
... NMB-003 du Canada. Copyright © 2008 EN USA M035-7508 12 Responsible party: Ricoh Americas Corporation Address: 5 Dedrick Place, West Caldwell, NJ 07006 Telephone number: 973-882-2000 Product Name: Laser Printer Model Number: SP C231N / Aficio SP C231N, SP C232DN / Aficio SP C232DN • Properly shielded and grounded cables and connectors must accept any interference received, including interference...

Operating Instructions
Page 13
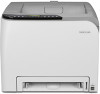
Operating Instructions Hardware Guide 1 Guide to read "Safety Information" before you use this machine and keep it handy for future reference. For safe and correct use, be sure to the Printer 2 Installing the Printer and Options 3 Connecting the Printer 4 Configuration 5 Paper and Other Media 6 Replacing Consumables 7 Cleaning the Printer 8 Troubleshooting 9 Removing Misfed Paper 10 Appendix Read this manual carefully before using the machine.
Operating Instructions Hardware Guide 1 Guide to read "Safety Information" before you use this machine and keep it handy for future reference. For safe and correct use, be sure to the Printer 2 Installing the Printer and Options 3 Connecting the Printer 4 Configuration 5 Paper and Other Media 6 Replacing Consumables 7 Cleaning the Printer 8 Troubleshooting 9 Removing Misfed Paper 10 Appendix Read this manual carefully before using the machine.
Operating Instructions
Page 18
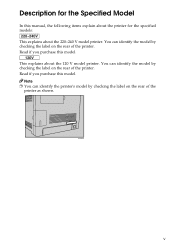
Note ❒ You can identify the printer's model by checking the label on the rear of the printer. ASH074S v This explains about the 220-240 V model printer. Read if you purchase this model. You can identify the model by checking the label on the rear of the printer. Description for the Specified Model In this manual, the following items explain about the printer for the specified models: This explains about the 120 V model printer. You can identify the model by checking the label on the rear of the printer as shown. Read if you purchase this model.
Note ❒ You can identify the printer's model by checking the label on the rear of the printer. ASH074S v This explains about the 220-240 V model printer. Read if you purchase this model. You can identify the model by checking the label on the rear of the printer. Description for the Specified Model In this manual, the following items explain about the printer for the specified models: This explains about the 120 V model printer. You can identify the model by checking the label on the rear of the printer as shown. Read if you purchase this model.
Operating Instructions
Page 19
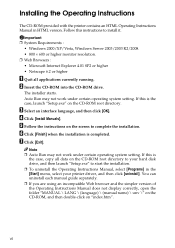
... or higher A Quit all data on the CD-ROM root directory. G Click [Exit]. Installing the Operating Instructions The CD-ROM provided with the printer contains an HTML Operating Instructions Manual in the [Start] menu, select your hard disk drive, and then launch "Setup.exe" to start the installation.... is the case, launch "Setup.exe" on the CD-ROM root directory to install it. The installer starts. If this instructions to your printer driver, and then click [uninstall]. vi Auto Run may not work under certain operating system setting. C Select an interface language, and then ...
... or higher A Quit all data on the CD-ROM root directory. G Click [Exit]. Installing the Operating Instructions The CD-ROM provided with the printer contains an HTML Operating Instructions Manual in the [Start] menu, select your hard disk drive, and then launch "Setup.exe" to start the installation.... is the case, launch "Setup.exe" on the CD-ROM root directory to install it. The installer starts. If this instructions to your printer driver, and then click [uninstall]. vi Auto Run may not work under certain operating system setting. C Select an interface language, and then ...
Operating Instructions
Page 20
... Specified Model v Installing the Operating Instructions vi 1. Paper and Other Media Paper and Other Media Supported by This Printer 37 Paper Recommendations 39 Loading Paper...39 Storing Paper ...39 Types of RWARNING and RCAUTION Labels i Manuals for This... Connection 23 Reading the LED Lamps 24 USB Connection 25 4. Installing the Printer and Options Installing the Printer 5 Where to the Printer Exterior: Front View 1 Exterior: Rear View 2 Inside...3 Control Panel...4 2. Guide to Put the Printer 5 Unpacking ...8 Turning the Power On 14 Selecting the Display Language 15 ...
... Specified Model v Installing the Operating Instructions vi 1. Paper and Other Media Paper and Other Media Supported by This Printer 37 Paper Recommendations 39 Loading Paper...39 Storing Paper ...39 Types of RWARNING and RCAUTION Labels i Manuals for This... Connection 23 Reading the LED Lamps 24 USB Connection 25 4. Installing the Printer and Options Installing the Printer 5 Where to the Printer Exterior: Front View 1 Exterior: Rear View 2 Inside...3 Control Panel...4 2. Guide to Put the Printer 5 Unpacking ...8 Turning the Power On 14 Selecting the Display Language 15 ...

Operating Instructions
Page 21
...47 Loading Paper in Tray 1 47 Loading Paper in the Bypass Tray 63 Loading Paper in the Optional Paper Feed Unit 68 6. Cleaning the Printer Cautions to a Computer via USB Cable 98 Other Printing Problems 101 Additional Troubleshooting 108 9. Removing Misfed Paper When Paper is Jammed 109 When ... Tray 2" Appears 114 When "Paper Misfeed Duplex Unit" Appears 115 When "Remove Misfeed Paper Exit" Appears 116 10.Appendix If the Printer is Directly Connected to Take When Cleaning 83 Cleaning the Toner Density Sensor 84 Cleaning the Friction Pad and the Paper Feed Roller 86 Cleaning...
...47 Loading Paper in Tray 1 47 Loading Paper in the Bypass Tray 63 Loading Paper in the Optional Paper Feed Unit 68 6. Cleaning the Printer Cautions to a Computer via USB Cable 98 Other Printing Problems 101 Additional Troubleshooting 108 9. Removing Misfed Paper When Paper is Jammed 109 When ... Tray 2" Appears 114 When "Paper Misfeed Duplex Unit" Appears 115 When "Remove Misfeed Paper Exit" Appears 116 10.Appendix If the Printer is Directly Connected to Take When Cleaning 83 Cleaning the Toner Density Sensor 84 Cleaning the Friction Pad and the Paper Feed Roller 86 Cleaning...
Operating Instructions
Page 22
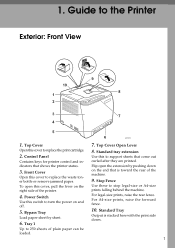
...this cover to replace the waste toner bottle or remove jammed paper. Stop Fence Use these to the Printer Exterior: Front View ASH022S 1. Power Switch Use this cover to support sheets that shows the printer status. 3. Front Cover Open this to replace the print cartridge. 2. Top Cover Open Lever Open ...this switch to 250 sheets of the printer. 4. For legal-size prints, raise the rear fence. Top Cover 7. Guide to stop legal-size or A4-size prints falling behind the machine. For...
...this cover to replace the waste toner bottle or remove jammed paper. Stop Fence Use these to the Printer Exterior: Front View ASH022S 1. Power Switch Use this cover to support sheets that shows the printer status. 3. Front Cover Open this to replace the print cartridge. 2. Top Cover Open Lever Open ...this switch to 250 sheets of the printer. 4. For legal-size prints, raise the rear fence. Top Cover 7. Guide to stop legal-size or A4-size prints falling behind the machine. For...
Operating Instructions
Page 23
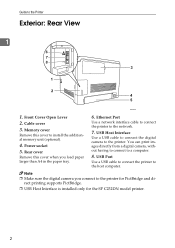
Memory cover Remove this cover when you connect to the printer for the SP C232DN model printer. 2 USB Host Interface Use a USB cable to connect the digital camera to install the additional memory unit (optional). 4. Power socket 5. You can print images directly ...; USB Host Interface is installed only for PictBridge and di- Front Cover Open Lever 2. Rear cover Remove this cover to the printer. USB Port Use a USB cable to connect the printer to a computer. 8. Guide to the network. 7. Note ❒ Make sure the digital camera you load paper larger than A4 in the...
Memory cover Remove this cover when you connect to the printer for the SP C232DN model printer. 2 USB Host Interface Use a USB cable to connect the digital camera to install the additional memory unit (optional). 4. Power socket 5. You can print images directly ...; USB Host Interface is installed only for PictBridge and di- Front Cover Open Lever 2. Rear cover Remove this cover to the printer. USB Port Use a USB cable to connect the printer to a computer. 8. Guide to the network. 7. Note ❒ Make sure the digital camera you load paper larger than A4 in the...
Operating Instructions
Page 24
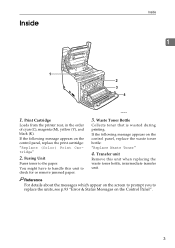
... Messages on the screen to prompt you to the paper. Waste Toner Bottle Collects toner that is wasted during printing. Print Cartridge Loads from the printer rear, in the order of cyan (C), magenta (M), yellow (Y), and black (K). Reference For details about the messages which appear on the Control Panel". 3 You might have...
... Messages on the screen to prompt you to the paper. Waste Toner Bottle Collects toner that is wasted during printing. Print Cartridge Loads from the printer rear, in the order of cyan (C), magenta (M), yellow (Y), and black (K). Reference For details about the messages which appear on the Control Panel". 3 You might have...

Operating Instructions
Page 25
...5. {Menu} key Press this key, the printer stops receiving data, and printing is printing out. Flashes when the printer is warming up whenever a printer error occurs. Display Display current printer status and error message 7. {Escape} key Press this key to the Printer Control Panel 1 1. Scroll Keys Press to... step. 9. {#Enter} key Press this key to return to the previous condition on . 4 Use Display to make and check the current printer settings. 6. Guide to execute menu items selection on the display. 8. Alert Indicator Lights up or receiving data. 3. {Stop/Start} key ...
...5. {Menu} key Press this key, the printer stops receiving data, and printing is printing out. Flashes when the printer is warming up whenever a printer error occurs. Display Display current printer status and error message 7. {Escape} key Press this key to the Printer Control Panel 1 1. Scroll Keys Press to... step. 9. {#Enter} key Press this key to return to the previous condition on . 4 Use Display to make and check the current printer settings. 6. Guide to execute menu items selection on the display. 8. Alert Indicator Lights up or receiving data. 3. {Stop/Start} key ...

Operating Instructions
Page 26
... do not use with other power sources. Doing so may result in this equipment only. Connect the power cord directly to install the printer and perform settings after installation. Power sources not specified in fire, electric shock, or injury. • Keep the machine away from ... shall be installed near the machine and shall be carefully chosen because environmental conditions greatly affect its performance. Installing the Printer and Options Installing the Printer This section describes how to a wall outlet and do not use with this manual and extension cords are electric shock...
... do not use with other power sources. Doing so may result in this equipment only. Connect the power cord directly to install the printer and perform settings after installation. Power sources not specified in fire, electric shock, or injury. • Keep the machine away from ... shall be installed near the machine and shall be carefully chosen because environmental conditions greatly affect its performance. Installing the Printer and Options Installing the Printer This section describes how to a wall outlet and do not use with this manual and extension cords are electric shock...

Operating Instructions
Page 27
... that is outside the recom- tions. If it is placed is well ventilated and spacious. Accumulated dust can cause an electrical fire 2 hazard. Installing the Printer and Options R CAUTION: • Keep the machine away from humidity and dust. mended ranges of dust. Operating the machine in an area that is within...
... that is outside the recom- tions. If it is placed is well ventilated and spacious. Accumulated dust can cause an electrical fire 2 hazard. Installing the Printer and Options R CAUTION: • Keep the machine away from humidity and dust. mended ranges of dust. Operating the machine in an area that is within...
Operating Instructions
Page 28
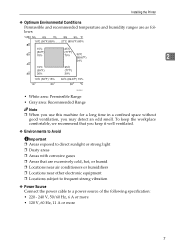
To keep the workplace comfortable, we recommend that you may detect an odd smell. Installing the Printer ❖ Optimum Environmental Conditions Permissible and recommended temperature and humidity ranges are excessively cold, hot, or humid ❒ Locations near air conditioners or humidifiers ❒ ...
To keep the workplace comfortable, we recommend that you may detect an odd smell. Installing the Printer ❖ Optimum Environmental Conditions Permissible and recommended temperature and humidity ranges are excessively cold, hot, or humid ❒ Locations near air conditioners or humidifiers ❒ ...
Operating Instructions
Page 29
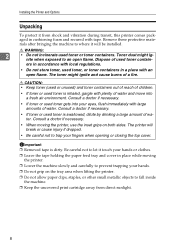
... it touch your hands. ❒ Do not grip on both sides. Consult a doctor if necessary. • When moving the printer. ❒ Lower the machine slowly and carefully to trap your eyes, flush immediately with large amounts of used toner contain- The... printer will be installed. Installing the Printer and Options Unpacking To protect it from direct sunlight. 8 R CAUTION: • Keep toner (used or unused) and toner containers out...
... it touch your hands. ❒ Do not grip on both sides. Consult a doctor if necessary. • When moving the printer. ❒ Lower the machine slowly and carefully to trap your eyes, flush immediately with large amounts of used toner contain- The... printer will be installed. Installing the Printer and Options Unpacking To protect it from direct sunlight. 8 R CAUTION: • Keep toner (used or unused) and toner containers out...
Operating Instructions
Page 30
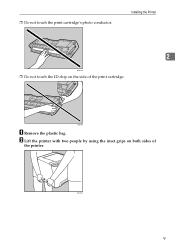
ASH051S 9 ASI600S A Remove the plastic bag. B Lift the printer with two people by using the inset grips on the side of the printer. Installing the Printer 2 BAA162S ❒ Do not touch the ID chip on both sides of the print cartridge. ❒ Do not touch the print cartridge's photo conductor.
ASH051S 9 ASI600S A Remove the plastic bag. B Lift the printer with two people by using the inset grips on the side of the printer. Installing the Printer 2 BAA162S ❒ Do not touch the ID chip on both sides of the print cartridge. ❒ Do not touch the print cartridge's photo conductor.

Operating Instructions
Page 31
move them from the printer at the same time. 10 ASH109S Installing the Printer and Options C Pull Front Cover Open Lever, and then open the front cover with both tapes gently upward to re- ASH108S E Hold each tape near its joint, and then pull both hands carefully. 2 ASH107S D Lower the blue fusing unit lever.
move them from the printer at the same time. 10 ASH109S Installing the Printer and Options C Pull Front Cover Open Lever, and then open the front cover with both tapes gently upward to re- ASH108S E Hold each tape near its joint, and then pull both hands carefully. 2 ASH107S D Lower the blue fusing unit lever.


