Operating Instructions
Page 19
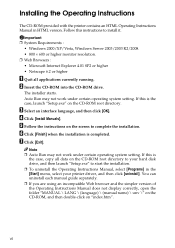
... manual guide separately. ❒ If you are using an incompatible Web browser and the simpler version of the Operating Instructions Manual does not display correctly, open the folder "MANUAL \ LANG \ (language) \ (manual name) \ unv \" on the CD-ROM, and then double-click on the CD-ROM root directory to your hard disk drive, and then launch "Setup.exe" to start the installation. ❒ To uninstall the Operating Instructions Manual...
... manual guide separately. ❒ If you are using an incompatible Web browser and the simpler version of the Operating Instructions Manual does not display correctly, open the folder "MANUAL \ LANG \ (language) \ (manual name) \ unv \" on the CD-ROM, and then double-click on the CD-ROM root directory to your hard disk drive, and then launch "Setup.exe" to start the installation. ❒ To uninstall the Operating Instructions Manual...

Operating Instructions
Page 115
... printing page. Troubleshooting Message Explanation Recommended Action Controller FW download failed Controller FW could not be Print again. Turn off the main power, and then turn it on the controller. Hardware Problem DIMM There is out of paper. Replace the toner to insufficient memory. pass) is an abnormality in the duplex unit. See p.47 "Loading Paper". Load Paper: # or Stop/Start The printer detected that the actual paper type and size are not the same as the paper tray # (1, 2, bypass) size setting...
... printing page. Troubleshooting Message Explanation Recommended Action Controller FW download failed Controller FW could not be Print again. Turn off the main power, and then turn it on the controller. Hardware Problem DIMM There is out of paper. Replace the toner to insufficient memory. pass) is an abnormality in the duplex unit. See p.47 "Loading Paper". Load Paper: # or Stop/Start The printer detected that the actual paper type and size are not the same as the paper tray # (1, 2, bypass) size setting...

Operating Instructions
Page 125
... using a Windows operating system, the ed tray. See p.61 "Specifying a paper type for tray 1 and the optional paper feed unit" or p.65 "Specifying custom size paper for a while. See the printer driver Help. A printed image is adjusting the color registration. It takes too much time to reduce the image, and then print. To resume from the select- • When you cannot load paper of the correct size, use some functions, such as that displayed in the id black print. Changing...
... using a Windows operating system, the ed tray. See p.61 "Specifying a paper type for tray 1 and the optional paper feed unit" or p.65 "Specifying custom size paper for a while. See the printer driver Help. A printed image is adjusting the color registration. It takes too much time to reduce the image, and then print. To resume from the select- • When you cannot load paper of the correct size, use some functions, such as that displayed in the id black print. Changing...

Operating Instructions
Page 151
... Feed Unit TK1010, 17, 128 Paper not supported, 44 Paper recommendations, 39 Paper type, 40 Power socket, 2 Print area, 45 Print cartridge, 71, 123 Printer does not print, 97 Printing configuration page, 16 Printing test page, 16 R Ready indicator, 4 Rear cover, 2 Rear view, 2 Registration roller, 89 Remove misfed internal path, 111 Remove misfeed duplex unit, 115 Remove misfeed paper exit, 116 Remove misfeed tray 1, 113 Remove misfeed tray 2, 114 Removing misfed paper, 109 Replacing the print cartridge, 71 Replacing the waste toner bottle, 76 S Scroll keys, 4 Selecting the display language...
... Feed Unit TK1010, 17, 128 Paper not supported, 44 Paper recommendations, 39 Paper type, 40 Power socket, 2 Print area, 45 Print cartridge, 71, 123 Printer does not print, 97 Printing configuration page, 16 Printing test page, 16 R Ready indicator, 4 Rear cover, 2 Rear view, 2 Registration roller, 89 Remove misfed internal path, 111 Remove misfeed duplex unit, 115 Remove misfeed paper exit, 116 Remove misfeed tray 1, 113 Remove misfeed tray 2, 114 Removing misfed paper, 109 Replacing the print cartridge, 71 Replacing the waste toner bottle, 76 S Scroll keys, 4 Selecting the display language...
Operating Instructions
Page 160
... Confirming the Connection Method 1 Network Connection 1 USB Connection...2 Installing the Printer Driver in a Network Environment 3 Installing the PCL Printer Driver 3 Installing the PostScript 3 Printer Driver 5 Installing the Printer Driver to Read This Manual iii Symbols ...iii 1. Canceling a Print Job from the Computer 31 Collate ...32 Cover ...33 Watermark ...34 iv Other Print Operations Form Feed...29 Performing Form Feed 29 Changing the Paper Input Setting 30 Canceling a Print Job 30 Canceling a Print Job 31 Canceling a Print Job Using the Control Panel 31 Windows -
... Confirming the Connection Method 1 Network Connection 1 USB Connection...2 Installing the Printer Driver in a Network Environment 3 Installing the PCL Printer Driver 3 Installing the PostScript 3 Printer Driver 5 Installing the Printer Driver to Read This Manual iii Symbols ...iii 1. Canceling a Print Job from the Computer 31 Collate ...32 Cover ...33 Watermark ...34 iv Other Print Operations Form Feed...29 Performing Form Feed 29 Changing the Paper Input Setting 30 Canceling a Print Job 30 Canceling a Print Job 31 Canceling a Print Job Using the Control Panel 31 Windows -
Operating Instructions
Page 169
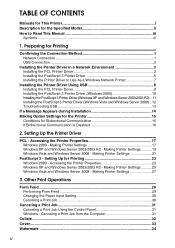
Log on the configuration page. The installer starts. E Click [Next >]. H In the drop-down menu, select [Standard TCP/IP Port], and then click [Next >]. You can select [Autodetect], [TCP/IP Device], or [Web Services Device]. C If necessary, enter an port name in a Network Environment Installing the PostScript 3 Printer Driver Important ❒ Before installing the PostScript 3 printer driver, obtain the printer's IP address 1 settings. G Click [Create a new port]. The [Add Standard TCP/IP Printer Port Wizard] dialog box appears...
Log on the configuration page. The installer starts. E Click [Next >]. H In the drop-down menu, select [Standard TCP/IP Port], and then click [Next >]. You can select [Autodetect], [TCP/IP Device], or [Web Services Device]. C If necessary, enter an port name in a Network Environment Installing the PostScript 3 Printer Driver Important ❒ Before installing the PostScript 3 printer driver, obtain the printer's IP address 1 settings. G Click [Create a new port]. The [Add Standard TCP/IP Printer Port Wizard] dialog box appears...

Operating Instructions
Page 173
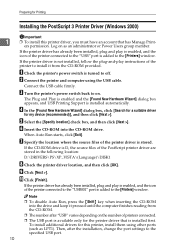
... installation was success- If this printer, install them using other ports (such as LPT1). Then the [New Hardware Found], [Device Driver Wizard], or [Add New Hardware Wizard] dialog box appears, depending on security settings, the [User 1 Account Control] dialog box might appear after you that is enabled and the printer connected to the specified USB port. 9 Note ❒ In a Windows Vista environment, depending on the operating system. ❒ To disable Auto...
... installation was success- If this printer, install them using other ports (such as LPT1). Then the [New Hardware Found], [Device Driver Wizard], or [Add New Hardware Wizard] dialog box appears, depending on security settings, the [User 1 Account Control] dialog box might appear after you that is enabled and the printer connected to the specified USB port. 9 Note ❒ In a Windows Vista environment, depending on the operating system. ❒ To disable Auto...
Operating Instructions
Page 174
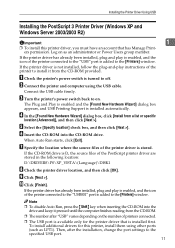
... the following location: D:\DRIVERS\PS\XP_VISTA\(Language)\DISK1 H Check the printer driver location, and then click [OK]. If the printer driver is D, the source files of the printer connected to the [Printers] window. J Click [Finish]. The Plug and Play is enabled and the [Found New Hardware Wizard] dialog box appears, and USB Printing Support is added to the "USB001" port is installed automatically. F Insert the CD-ROM into the drive and keep it...
... the following location: D:\DRIVERS\PS\XP_VISTA\(Language)\DISK1 H Check the printer driver location, and then click [OK]. If the printer driver is D, the source files of the printer connected to the [Printers] window. J Click [Finish]. The Plug and Play is enabled and the [Found New Hardware Wizard] dialog box appears, and USB Printing Support is added to the "USB001" port is installed automatically. F Insert the CD-ROM into the drive and keep it...
Operating Instructions
Page 175
... computer using other ports (such as an administrator or Power Users group member. To install additional drivers for the printer driver that has Manage Printers permission. C Turn the printer's power switch back to off. When Auto Run starts, click [Exit]. Connect the USB cable firmly. A Check the printer's power switch is installed first. The Plug and Play is enabled and the [Found New Hardware Wizard] dialog box appears, and USB Printing Support is stored. Note ❒ To disable Auto...
... computer using other ports (such as an administrator or Power Users group member. To install additional drivers for the printer driver that has Manage Printers permission. C Turn the printer's power switch back to off. When Auto Run starts, click [Exit]. Connect the USB cable firmly. A Check the printer's power switch is installed first. The Plug and Play is enabled and the [Found New Hardware Wizard] dialog box appears, and USB Printing Support is stored. Note ❒ To disable Auto...
Operating Instructions
Page 176
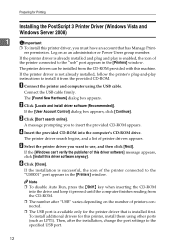
... installation, change the port settings to use, and then click [Next]. B Click [Locate and install driver software (Recommended)]. D Insert the provided CD-ROM into the drive and keep it from the CD-ROM provided with this printer, install them using the USB cable. If the printer driver is already installed and plug and play instructions to the "USB001" port appears in the [Printers] window. The printer driver search begins, and a list of this driver software] message appears, click [Install this driver software...
... installation, change the port settings to use, and then click [Next]. B Click [Locate and install driver software (Recommended)]. D Insert the provided CD-ROM into the drive and keep it from the CD-ROM provided with this printer, install them using the USB cable. If the printer driver is already installed and plug and play instructions to the "USB001" port appears in the [Printers] window. The printer driver search begins, and a list of this driver software] message appears, click [Install this driver software...

Operating Instructions
Page 178
... Windows Server 2008: A On the [Start] menu, click [Control Panel]. B Click [Install Printer]. C Click [Add a printer]. D Follow the instructions in "Hardware and Sound". For Windows XP Home Editions: A On the [Start] menu, click [Control Panel]. B Click [Printer] in the Add Printer Wizard. 14 C Follow the instructions in the Add Printer Wizard. Preparing for Printing If a Message Appears during Installation When a message that shows the number 58 or 34 appears during the installation, 1 the printer driver can not be installed using Auto...
... Windows Server 2008: A On the [Start] menu, click [Control Panel]. B Click [Install Printer]. C Click [Add a printer]. D Follow the instructions in "Hardware and Sound". For Windows XP Home Editions: A On the [Start] menu, click [Control Panel]. B Click [Printer] in the Add Printer Wizard. 14 C Follow the instructions in the Add Printer Wizard. Preparing for Printing If a Message Appears during Installation When a message that shows the number 58 or 34 appears during the installation, 1 the printer driver can not be installed using Auto...

Operating Instructions
Page 213
...Page Prints a test page for checking the printing condition. Page 5 Prints the current configuration and installed PostScript font list. The test page contains network settings and counter information. ❖ PCL Config.Page Prints the current configuration and installed PCL font list. ❖ PS Config. Note ❒ Due to print layout limitations, the menu order of the menu list might not match to that can be set on the List/Test Print menu. ❖ Config. List/Test Print Menu List/Test Print Menu Parameters This section explains about parameter that of the display panel...
...Page Prints a test page for checking the printing condition. Page 5 Prints the current configuration and installed PostScript font list. The test page contains network settings and counter information. ❖ PCL Config.Page Prints the current configuration and installed PCL font list. ❖ PS Config. Note ❒ Due to print layout limitations, the menu order of the menu list might not match to that can be set on the List/Test Print menu. ❖ Config. List/Test Print Menu List/Test Print Menu Parameters This section explains about parameter that of the display panel...

Operating Instructions
Page 226
... You can specify the number of A4 portrait paper by reducing side margin width. This setting is effective only for the default font between 4 and 999.75 in 0.25 increments. Available sets are as follows: Roman-8, ...print text data clearly. A4 Width You can select a courier-type font. Default: Regular • Regular • Dark ❖ Ext. Default: Off • Off • On ❖ Append CR to use for fixed-space fonts. Default: 10.00 pitch ❖ Symbol Set You can specify whether or not to append a CR code to each LF code to use for the default font. Default...
... You can specify the number of A4 portrait paper by reducing side margin width. This setting is effective only for the default font between 4 and 999.75 in 0.25 increments. Available sets are as follows: Roman-8, ...print text data clearly. A4 Width You can select a courier-type font. Default: Regular • Regular • Dark ❖ Ext. Default: Off • Off • On ❖ Append CR to use for fixed-space fonts. Default: 10.00 pitch ❖ Symbol Set You can specify whether or not to append a CR code to each LF code to use for the default font. Default...

Operating Instructions
Page 229
... and Configuring the Printer Using Web Image Monitor Using Web Image Monitor, you are not enabled with the Web browser used, display and operation problems may be established. 65 Contact your network administrator for paper loaded into each input tray • Making input tray settings • Printing a list of the Web browser is required. Click [Refresh] in the main area to the printer using Web Image Monitor from a client computer: • Display printer status and supply information • Displaying the counter information • Making settings...
... and Configuring the Printer Using Web Image Monitor Using Web Image Monitor, you are not enabled with the Web browser used, display and operation problems may be established. 65 Contact your network administrator for paper loaded into each input tray • Making input tray settings • Printing a list of the Web browser is required. Click [Refresh] in the main area to the printer using Web Image Monitor from a client computer: • Display printer status and supply information • Displaying the counter information • Making settings...
Operating Instructions
Page 233
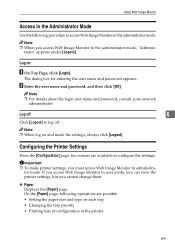
...; To make printer settings, you cannot change them. ❖ Paper Displays the [Paper] page. Note ❒ For details about the login user name and password, consult your network administrator. On the [Paper] page, following procedure to access Web Image Monitor in the administrator mode. The dialog box for entering the user name and password appears. trator" appears under [Logout]. Using Web Image Monitor Access in the Administrator Mode Use the following operations are available to configure the settings.
...; To make printer settings, you cannot change them. ❖ Paper Displays the [Paper] page. Note ❒ For details about the login user name and password, consult your network administrator. On the [Paper] page, following procedure to access Web Image Monitor in the administrator mode. The dialog box for entering the user name and password appears. trator" appears under [Logout]. Using Web Image Monitor Access in the Administrator Mode Use the following operations are available to configure the settings.

Operating Instructions
Page 235
...Thin Paper, Plain Paper 1, Plain Paper 2, Recycled Paper, Color Paper, Letterhead, Preprinted Paper, Prepunched Paper, Labels, Bond Paper, Cardstock, Thick Paper 1, Thick Paper 2, Envelope, Any Type ❖ Paper Tray Priority The tray selected here is used when no tray is attached to print. Note ❒ Tray 2 is available only when the optional paper feed unit is specified for a print job. You can print lists of the printer. ❖ Menu List Prints the menu list showing all available menus ❖ Test Page Prints a test page for the bypass tray. Using Web Image Monitor...
...Thin Paper, Plain Paper 1, Plain Paper 2, Recycled Paper, Color Paper, Letterhead, Preprinted Paper, Prepunched Paper, Labels, Bond Paper, Cardstock, Thick Paper 1, Thick Paper 2, Envelope, Any Type ❖ Paper Tray Priority The tray selected here is used when no tray is attached to print. Note ❒ Tray 2 is available only when the optional paper feed unit is specified for a print job. You can print lists of the printer. ❖ Menu List Prints the menu list showing all available menus ❖ Test Page Prints a test page for the bypass tray. Using Web Image Monitor...

Operating Instructions
Page 238
... automatically installed along with Smart Organizing Monitor: • Displaying printer status or settings • Checking locations where errors have occurred and error recovery methods • Displaying the printer status and supply information • Printing a list of printer configurations • Specifying the printer's IP address • Making settings for paper loaded into each input tray • Making input tray settings • Changing the factory-set default settings • Making system, access code and language settings • Making network protocol settings...
... automatically installed along with Smart Organizing Monitor: • Displaying printer status or settings • Checking locations where errors have occurred and error recovery methods • Displaying the printer status and supply information • Printing a list of printer configurations • Specifying the printer's IP address • Making settings for paper loaded into each input tray • Making input tray settings • Changing the factory-set default settings • Making system, access code and language settings • Making network protocol settings...

Operating Instructions
Page 239
...printer model. 75 Printer graphic If an input tray error occurs, appears. Comments Displays current printer status and instructions for this tab. 8. [Job Log] tab Displays the information related to select a network printer. 7. [User Tools] tab Prints the test page or configuration page. The problem tray is displayed using graphics and comments. 6 ASH107S 1. Note ❒ [Continue] and [Cancel] button are always disabled for resolving problems. 3. [Continue] button Click to display the [Form Feed] dialog box which you can use to change input tray settings. 4. [Cancel] button...
...printer model. 75 Printer graphic If an input tray error occurs, appears. Comments Displays current printer status and instructions for this tab. 8. [Job Log] tab Displays the information related to select a network printer. 7. [User Tools] tab Prints the test page or configuration page. The problem tray is displayed using graphics and comments. 6 ASH107S 1. Note ❒ [Continue] and [Cancel] button are always disabled for resolving problems. 3. [Continue] button Click to display the [Form Feed] dialog box which you can use to change input tray settings. 4. [Cancel] button...
Operating Instructions
Page 255
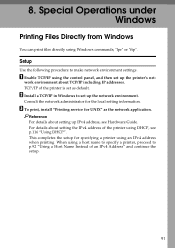
A Enable TCP/IP using the control panel, and then set up IPv4 address, see p.116 "Using DHCP". This completes the setup for the local setting information. "lpr" or "ftp". Consult the network administrator for specifying a printer using DHCP, see Hardware Guide. C To print, install "Printing service for UNIX" as default. For details about setting the IPv4 address of the printer using an IPv4 address when printing. work environment about setting up the printer's net- Reference For details about TCP/IP...
A Enable TCP/IP using the control panel, and then set up IPv4 address, see p.116 "Using DHCP". This completes the setup for the local setting information. "lpr" or "ftp". Consult the network administrator for specifying a printer using DHCP, see Hardware Guide. C To print, install "Printing service for UNIX" as default. For details about setting the IPv4 address of the printer using an IPv4 address when printing. work environment about setting up the printer's net- Reference For details about TCP/IP...
Operating Instructions
Page 283
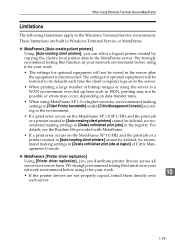
... strongly recommend testing this function in your network environment before using it for your work . • The settings for optional equipment will not be deleted, we recommend making settings in [Delete unfinished print jobs at logout] of bitmap images or using the server in a WAN environment over dial-up lines such as ISDN, printing may not be possible or errors may occur, depending on data transfer rates. •...
... strongly recommend testing this function in your network environment before using it for your work . • The settings for optional equipment will not be deleted, we recommend making settings in [Delete unfinished print jobs at logout] of bitmap images or using the server in a WAN environment over dial-up lines such as ISDN, printing may not be possible or errors may occur, depending on data transfer rates. •...


