
Operating Instructions
Page 21
... it has been Inactive for a Long Period 119 Moving and Transporting the Printer 121 Moving the Printer 122 Consumables ...123 Print Cartridge ...123 Waste Toner Bottle 124 Specifications...125 Main Unit ...125 Options ...128 INDEX...129 viii Removing Misfed Paper When Paper is Jammed...Cleaning the Printer Cautions to a Computer via USB Cable 98 Other Printing Problems 101 Additional Troubleshooting 108 9. Replacing Consumables Replacing the Print Cartridge 71 Replacing the Waste Toner Bottle 76 7. Loading Paper ...47 Loading Paper in Tray 1 47 Loading Paper in the Bypass Tray 63...
... it has been Inactive for a Long Period 119 Moving and Transporting the Printer 121 Moving the Printer 122 Consumables ...123 Print Cartridge ...123 Waste Toner Bottle 124 Specifications...125 Main Unit ...125 Options ...128 INDEX...129 viii Removing Misfed Paper When Paper is Jammed...Cleaning the Printer Cautions to a Computer via USB Cable 98 Other Printing Problems 101 Additional Troubleshooting 108 9. Replacing Consumables Replacing the Print Cartridge 71 Replacing the Waste Toner Bottle 76 7. Loading Paper ...47 Loading Paper in Tray 1 47 Loading Paper in the Bypass Tray 63...
Operating Instructions
Page 22
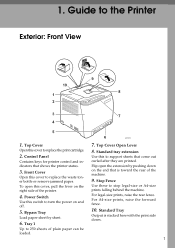
... falling behind the machine. Standard Tray Output is toward the rear of the machine. 9. 1. Top Cover 7. Power Switch Use this cover to replace the print cartridge. 2. Stop Fence Use these to turn the power on the end that is stacked here with the print side down on and off. 5. Up to...
... falling behind the machine. Standard Tray Output is toward the rear of the machine. 9. 1. Top Cover 7. Power Switch Use this cover to replace the print cartridge. 2. Stop Fence Use these to turn the power on the end that is stacked here with the print side down on and off. 5. Up to...
Operating Instructions
Page 24
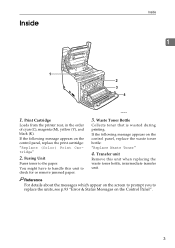
If the following message appears on the control panel, replace the print cartridge: "Replace (Color) Print Cartridge" 2. If the following message appears on the control panel, replace the waste toner bottle: "Replace Waste Toner" 4. Transfer unit Remove this unit to handle this ... Collects toner that is wasted during printing. Fusing Unit Fuses toner to replace the units, see p.93 "Error & Status Messages on the Control Panel". 3 Print Cartridge Loads from the printer rear, in the order of cyan (C), magenta (M), yellow (Y), and black (K).
If the following message appears on the control panel, replace the print cartridge: "Replace (Color) Print Cartridge" 2. If the following message appears on the control panel, replace the waste toner bottle: "Replace Waste Toner" 4. Transfer unit Remove this unit to handle this ... Collects toner that is wasted during printing. Fusing Unit Fuses toner to replace the units, see p.93 "Error & Status Messages on the Control Panel". 3 Print Cartridge Loads from the printer rear, in the order of cyan (C), magenta (M), yellow (Y), and black (K).
Operating Instructions
Page 29
... direct sunlight. 8 The toner might ignite when exposed to an open flame. Be careful not to fall inside the machine. ❒ Keep the uncovered print cartridge away from shock and vibration during transit, this printer comes packaged in accordance with local regulations. • Do not store toner, used toner gets into...
... direct sunlight. 8 The toner might ignite when exposed to an open flame. Be careful not to fall inside the machine. ❒ Keep the uncovered print cartridge away from shock and vibration during transit, this printer comes packaged in accordance with local regulations. • Do not store toner, used toner gets into...
Operating Instructions
Page 30
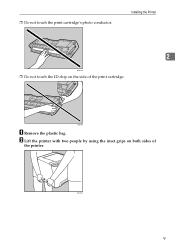
Installing the Printer 2 BAA162S ❒ Do not touch the ID chip on both sides of the print cartridge. ASH051S 9 ❒ Do not touch the print cartridge's photo conductor. ASI600S A Remove the plastic bag. B Lift the printer with two people by using the inset grips on the side of the printer.
Installing the Printer 2 BAA162S ❒ Do not touch the ID chip on both sides of the print cartridge. ASH051S 9 ❒ Do not touch the print cartridge's photo conductor. ASI600S A Remove the plastic bag. B Lift the printer with two people by using the inset grips on the side of the printer.
Operating Instructions
Page 33
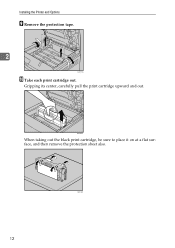
ASH005S When taking out the black print cartridge, be sure to place it on at a flat surface, and then remove the protection sheet also. 12 ASI106S Gripping its center, carefully pull the print cartridge upward and out. Installing the Printer and Options I Remove the protection tape. 2 ASH110S J Take each print cartridge out.
ASH005S When taking out the black print cartridge, be sure to place it on at a flat surface, and then remove the protection sheet also. 12 ASI106S Gripping its center, carefully pull the print cartridge upward and out. Installing the Printer and Options I Remove the protection tape. 2 ASH110S J Take each print cartridge out.
Operating Instructions
Page 34
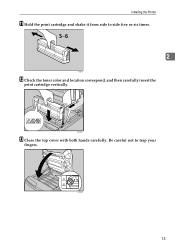
Installing the Printer K Hold the print cartridge and shake it from side to trap your fingers. ASH009S M Close the top cover with both hands carefully. Be careful not to side five or six times. 2 ASI601S L Check the toner color and location correspond, and then carefully insert the print cartridge vertically. ASI102S 13
Installing the Printer K Hold the print cartridge and shake it from side to trap your fingers. ASH009S M Close the top cover with both hands carefully. Be careful not to side five or six times. 2 ASI601S L Check the toner color and location correspond, and then carefully insert the print cartridge vertically. ASI102S 13
Operating Instructions
Page 92
... large amount of water. Toner dust might be responsible for any damage or expense that might ignite and cause burns of the print cartridge might ig- Early replacement of a fire. The toner might result from the use genuine toner from the supplier with cold water. ... such as temperature and humidity. Consult a doctor if necessary. • Be careful not to an open flame. Replacing Consumables Replacing the Print Cartridge R WARNING: • Do not incinerate used toner gets into contact with toner, wash the affected area thoroughly with soap and water. •...
... large amount of water. Toner dust might be responsible for any damage or expense that might ignite and cause burns of the print cartridge might ig- Early replacement of a fire. The toner might result from the use genuine toner from the supplier with cold water. ... such as temperature and humidity. Consult a doctor if necessary. • Be careful not to an open flame. Replacing Consumables Replacing the Print Cartridge R WARNING: • Do not incinerate used toner gets into contact with toner, wash the affected area thoroughly with soap and water. •...
Operating Instructions
Page 93
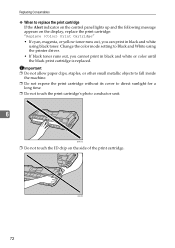
...❒ Do not allow paper clips, staples, or other small metallic objects to fall inside the machine. ❒ Do not expose the print cartridge without its cover to Black and White using the printer driver. • If black toner runs out, you can print in black and white or...mode setting to direct sunlight for a long time. ❒ Do not touch the print cartridge's photo conductor unit. 6 BAA162S ❒ Do not touch the ID chip on the display, replace the print cartridge: "Replace (Color) Print Cartridge" • If cyan, magenta, or yellow toner runs out, you cannot print in black...
...❒ Do not allow paper clips, staples, or other small metallic objects to fall inside the machine. ❒ Do not expose the print cartridge without its cover to Black and White using the printer driver. • If black toner runs out, you can print in black and white or...mode setting to direct sunlight for a long time. ❒ Do not touch the print cartridge's photo conductor unit. 6 BAA162S ❒ Do not touch the ID chip on the display, replace the print cartridge: "Replace (Color) Print Cartridge" • If cyan, magenta, or yellow toner runs out, you cannot print in black...
Operating Instructions
Page 94
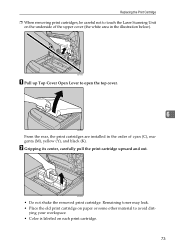
... Top Cover Open Lever to open the top cover. 6 ASH004S From the rear, the print cartridges are installed in the illustration below). ASH005S • Do not shake the removed print cartridge. ying your workspace. • Color is labeled on paper or some other material to avoid ...dirt- Remaining toner may leak. • Place the old print cartridge on each print cartridge. 73 B Gripping its center, carefully pull the print cartridge upward and out. Replacing the Print Cartridge ❒ When removing print cartridges, be careful not to touch the Laser Scanning Unit on the underside...
... Top Cover Open Lever to open the top cover. 6 ASH004S From the rear, the print cartridges are installed in the illustration below). ASH005S • Do not shake the removed print cartridge. ying your workspace. • Color is labeled on paper or some other material to avoid ...dirt- Remaining toner may leak. • Place the old print cartridge on each print cartridge. 73 B Gripping its center, carefully pull the print cartridge upward and out. Replacing the Print Cartridge ❒ When removing print cartridges, be careful not to touch the Laser Scanning Unit on the underside...
Operating Instructions
Page 95
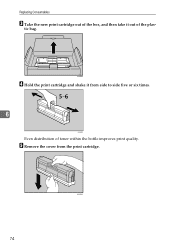
E Remove the cover from side to side five or six times. 6 ASI601S Even distribution of toner within the bottle improves print quality. tic bag. ASH006S D Hold the print cartridge and shake it out of the plas- Replacing Consumables C Take the new print cartridge out of the box, and then take it from the print cartridge. 74 ASH008S
E Remove the cover from side to side five or six times. 6 ASI601S Even distribution of toner within the bottle improves print quality. tic bag. ASH006S D Hold the print cartridge and shake it out of the plas- Replacing Consumables C Take the new print cartridge out of the box, and then take it from the print cartridge. 74 ASH008S
Operating Instructions
Page 96
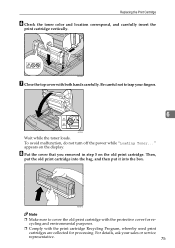
... the protective cover for processing. ASH061S Note ❒ Make sure to trap your sales or service representative. 75 appears on the old print cartridge. H Put the cover that you removed in step 5 on the display. For details, ask your fingers. 6 ASI102S Wait while the... toner loads. ASH009S G Close the top cover with the print cartridge Recycling Program, whereby used print cartridges are collected for recycling and environmental purposes. ❒ Comply with both hands carefully. To avoid malfunction, do not turn off ...
... the protective cover for processing. ASH061S Note ❒ Make sure to trap your sales or service representative. 75 appears on the old print cartridge. H Put the cover that you removed in step 5 on the display. For details, ask your fingers. 6 ASI102S Wait while the... toner loads. ASH009S G Close the top cover with the print cartridge Recycling Program, whereby used print cartridges are collected for recycling and environmental purposes. ❒ Comply with both hands carefully. To avoid malfunction, do not turn off ...
Operating Instructions
Page 105
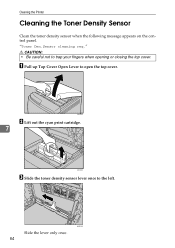
BAA079S Slide the lever only once. 84 "Toner Den.Sensor cleaning req." Cleaning the Printer Cleaning the Toner Density Sensor Clean the toner density sensor when the following message appears on the control panel. R CAUTION: • Be careful not to open the top cover. A Pull up Top Cover Open Lever to trap your fingers when opening or closing the top cover. ASH004S B Lift out the cyan print cartridge. 7 ASH005S C Slide the toner density sensor lever once to the left.
BAA079S Slide the lever only once. 84 "Toner Den.Sensor cleaning req." Cleaning the Printer Cleaning the Toner Density Sensor Clean the toner density sensor when the following message appears on the control panel. R CAUTION: • Be careful not to open the top cover. A Pull up Top Cover Open Lever to trap your fingers when opening or closing the top cover. ASH004S B Lift out the cyan print cartridge. 7 ASH005S C Slide the toner density sensor lever once to the left.
Operating Instructions
Page 106
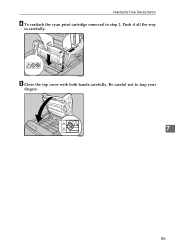
Cleaning the Toner Density Sensor D To reattach the cyan print cartridge removed in carefully. ASH009S E Close the top cover with both hands carefully. Push it all the way in step 2. Be careful not to trap your fingers. 7 ASI102S 85
Cleaning the Toner Density Sensor D To reattach the cyan print cartridge removed in carefully. ASH009S E Close the top cover with both hands carefully. Push it all the way in step 2. Be careful not to trap your fingers. 7 ASI102S 85
Operating Instructions
Page 116
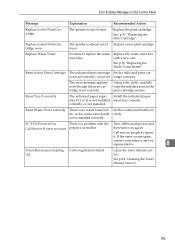
... toner bottle rectly. is no waste toner bot- SC XXX Power off on the print cartridge surface. Error & Status Messages on again. toner. Reset (color) Print Cartridge The indicated print cartridge Set the indicated print caris not set correctly, or not set correctly. The error message ...# correctly The indicated paper input Install the indicated paper tray # (1 or 2) is out of Prepare a new print cartridge. then turn it . Replace (color) Print Cartridge soon The printer is set . See p.76 "Replacing the Waste Toner Bottle". Replace Waste Toner It is time to ...
... toner bottle rectly. is no waste toner bot- SC XXX Power off on the print cartridge surface. Error & Status Messages on again. toner. Reset (color) Print Cartridge The indicated print cartridge Set the indicated print caris not set correctly, or not set correctly. The error message ...# correctly The indicated paper input Install the indicated paper tray # (1 or 2) is out of Prepare a new print cartridge. then turn it . Replace (color) Print Cartridge soon The printer is set . See p.76 "Replacing the Waste Toner Bottle". Replace Waste Toner It is time to ...
Operating Instructions
Page 124
p.47 "Loading Paper". Remove all print cartridges from impact at all the print cartridges. Then, perform the print job again. ASH104S The intermediate transfer belt is on again. Follow the procedure below to appear on the printed paper. • ...
p.47 "Loading Paper". Remove all print cartridges from impact at all the print cartridges. Then, perform the print job again. ASH104S The intermediate transfer belt is on again. Follow the procedure below to appear on the printed paper. • ...
Operating Instructions
Page 127
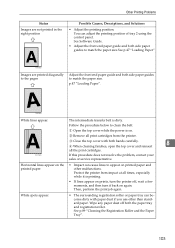
...next printed sheet may have collected. Press the {Menu} key on the control panel, replace the print cartridge: "Replace (Color) Print Cartridge" See p.71 "Replacing the Print Cartridge". • Condensation may be dirtied. 106 Print several sheets until they come out clean. • ...printing is damp. Use paper that has been stored properly. A4 document on the display, replace the print cartridge: "Replace (Color) Print Cartridge" See p.71 "Replacing the Print Cartridge". • Condensation may have collected. White streaks or color streaks appear. • Toner is damp. ...
...next printed sheet may have collected. Press the {Menu} key on the control panel, replace the print cartridge: "Replace (Color) Print Cartridge" See p.71 "Replacing the Print Cartridge". • Condensation may be dirtied. 106 Print several sheets until they come out clean. • ...printing is damp. Use paper that has been stored properly. A4 document on the display, replace the print cartridge: "Replace (Color) Print Cartridge" See p.71 "Replacing the Print Cartridge". • Condensation may have collected. White streaks or color streaks appear. • Toner is damp. ...
Operating Instructions
Page 144
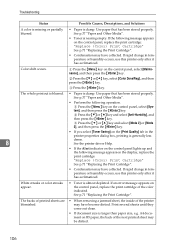
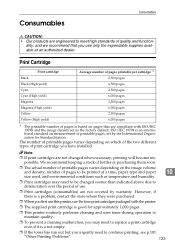
... routinely performs cleaning and uses toner during operation to continue printing, see p.101 "Other Printing Problems". 123 Note ❒ If print cartridges are engineered to meet high standards of pages is a not empty. ❒ If the toner has run out but you use only... supplies available at a time, paper type and paper 10 size used, and environmental conditions such as temperature and humidity. ❒ Print cartridges may need to deterioration over the period of printable pages, set as the factory default. Consumables Consumables R CAUTION: • Our products...
... routinely performs cleaning and uses toner during operation to continue printing, see p.101 "Other Printing Problems". 123 Note ❒ If print cartridges are engineered to meet high standards of pages is a not empty. ❒ If the toner has run out but you use only... supplies available at a time, paper type and paper 10 size used, and environmental conditions such as temperature and humidity. ❒ Print cartridges may need to deterioration over the period of printable pages, set as the factory default. Consumables Consumables R CAUTION: • Our products...

Operating Instructions
Page 147
... Printer only (tray not 400 mm (15.8 inches) 450 mm (17.8 inches) 320 mm (12.8 inches) extended) ❖ Weight Approximately 23 kg (50.6 lb.) (print cartridges included) 10 126 Appendix ❖ Paper Input Capacity Standard Paper Tray Bypass Tray Optional Paper Feed Units *1 Paper weight: 80 g/m2 (20 lb.
... Printer only (tray not 400 mm (15.8 inches) 450 mm (17.8 inches) 320 mm (12.8 inches) extended) ❖ Weight Approximately 23 kg (50.6 lb.) (print cartridges included) 10 126 Appendix ❖ Paper Input Capacity Standard Paper Tray Bypass Tray Optional Paper Feed Units *1 Paper weight: 80 g/m2 (20 lb.

Operating Instructions
Page 151
...roller, 86 Paper Feed Unit TK1010, 17, 128 Paper not supported, 44 Paper recommendations, 39 Paper type, 40 Power socket, 2 Print area, 45 Print cartridge, 71, 123 Printer does not print, 97 Printing configuration page, 16 Printing test page, 16 R Ready indicator, 4 Rear cover, 2 Rear view, 2 ...misfeed duplex unit, 115 Remove misfeed paper exit, 116 Remove misfeed tray 1, 113 Remove misfeed tray 2, 114 Removing misfed paper, 109 Replacing the print cartridge, 71 Replacing the waste toner bottle, 76 S Scroll keys, 4 Selecting the display language, 15 Setting a paper size (tray 1), 59 Setting the ...
...roller, 86 Paper Feed Unit TK1010, 17, 128 Paper not supported, 44 Paper recommendations, 39 Paper type, 40 Power socket, 2 Print area, 45 Print cartridge, 71, 123 Printer does not print, 97 Printing configuration page, 16 Printing test page, 16 R Ready indicator, 4 Rear cover, 2 Rear view, 2 ...misfeed duplex unit, 115 Remove misfeed paper exit, 116 Remove misfeed tray 1, 113 Remove misfeed tray 2, 114 Removing misfed paper, 109 Replacing the print cartridge, 71 Replacing the waste toner bottle, 76 S Scroll keys, 4 Selecting the display language, 15 Setting a paper size (tray 1), 59 Setting the ...


