
Quick Installation Guide
Page 3
Table of the User's Guide on the CD-ROM 1 Setting Up the Machine Installing the drum unit and toner cartridge assembly 12 Loading paper in the paper tray ...13 Printing a test page ...14 STEP 2 - Installing the Printer Driver For USB interface cable users ...16 ...
Table of the User's Guide on the CD-ROM 1 Setting Up the Machine Installing the drum unit and toner cartridge assembly 12 Loading paper in the paper tray ...13 Printing a test page ...14 STEP 2 - Installing the Printer Driver For USB interface cable users ...16 ...
Quick Installation Guide
Page 4
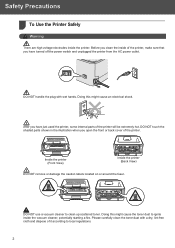
After you open the front or back cover of the printer. Doing this might cause the toner dust to ignite inside the printer. DO NOT touch the shaded parts shown in the illustration when you have turned off the power switch and ... local regulations. 2 DO NOT handle the plug with a dry, lint-free cloth and dispose of the printer will be extremely hot. Please carefully clean the toner dust with wet hands. Doing this might cause an electrical shock. Before you clean the inside of the printer, make sure that you have just...
After you open the front or back cover of the printer. Doing this might cause the toner dust to ignite inside the printer. DO NOT touch the shaded parts shown in the illustration when you have turned off the power switch and ... local regulations. 2 DO NOT handle the plug with a dry, lint-free cloth and dispose of the printer will be extremely hot. Please carefully clean the toner dust with wet hands. Doing this might cause an electrical shock. Before you clean the inside of the printer, make sure that you have just...
Quick Installation Guide
Page 11
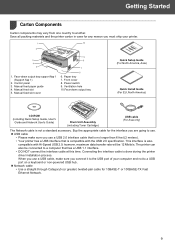
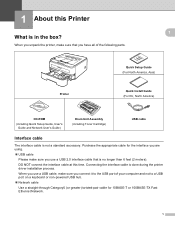
... America, Asia) Quick Install Guide (For EU, North America) CD-ROM (including Quick Setup Guide, User's Guide and Network User's Guide) Drum Unit Assembly (including Toner Cartridge) USB cable (For Asia only) The Network cable is compatible with Hi-Speed USB 2.0; Connecting the interface cable is also compatible with the USB...
... America, Asia) Quick Install Guide (For EU, North America) CD-ROM (including Quick Setup Guide, User's Guide and Network User's Guide) Drum Unit Assembly (including Toner Cartridge) USB cable (For Asia only) The Network cable is compatible with Hi-Speed USB 2.0; Connecting the interface cable is also compatible with the USB...
Quick Installation Guide
Page 12
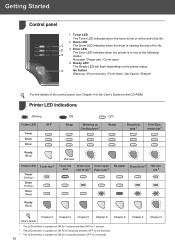
... the printer status. 4 Go button Wake-up Cooling down 1 Ready Receiving data 2 Print Data remaining 2 Ready (Blue) Printer LED Toner low 3 Toner (Yellow) Drum (Yellow) Error (Red) Dimmed Toner life end Drum near Cover open end of life 3 Paper jam 2 No paper Drum Error 2 Service call 2 Ready (Blue) User...blink in one of ON for 2 seconds and then OFF for 3 seconds. 10 Chapter 4 Chapter 4 Getting Started Control panel 2 1 Toner LED The Toner LED indicates when the toner is low or at the end of its life. 2 Drum LED 1 The Drum LED indicates when the drum is nearing the end...
... the printer status. 4 Go button Wake-up Cooling down 1 Ready Receiving data 2 Print Data remaining 2 Ready (Blue) Printer LED Toner low 3 Toner (Yellow) Drum (Yellow) Error (Red) Dimmed Toner life end Drum near Cover open end of life 3 Paper jam 2 No paper Drum Error 2 Service call 2 Ready (Blue) User...blink in one of ON for 2 seconds and then OFF for 3 seconds. 10 Chapter 4 Chapter 4 Getting Started Control panel 2 1 Toner LED The Toner LED indicates when the toner is low or at the end of its life. 2 Drum LED 1 The Drum LED indicates when the drum is nearing the end...
Quick Installation Guide
Page 14
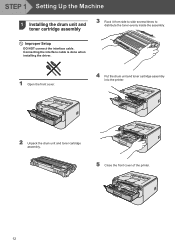
Connecting the interface cable is done when installing the driver. 1 Open the front cover. 4 Put the drum unit and toner cartridge assembly into the printer. 2 Unpack the drum unit and toner cartridge assembly. 5 Close the front cover of the printer. 12 Improper Setup DO NOT connect the interface cable. STEP 1 Setting Up the Machine 1 1 Installing the drum unit and toner cartridge assembly 3 Rock it from side to side several times to distribute the toner evenly inside the assembly.
Connecting the interface cable is done when installing the driver. 1 Open the front cover. 4 Put the drum unit and toner cartridge assembly into the printer. 2 Unpack the drum unit and toner cartridge assembly. 5 Close the front cover of the printer. 12 Improper Setup DO NOT connect the interface cable. STEP 1 Setting Up the Machine 1 1 Installing the drum unit and toner cartridge assembly 3 Rock it from side to side several times to distribute the toner evenly inside the assembly.
Quick Installation Guide
Page 25
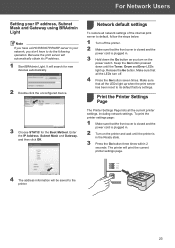
... three times within 2 seconds. Print the Printer Settings 3 Page The Printer Settings Page lists all the LEDs turn on the printer and wait until the Toner, Drum and Error LEDs light up when the print server has been reset to default, follow the steps below. 1 Turn off . 4 Press the Go button...
... three times within 2 seconds. Print the Printer Settings 3 Page The Printer Settings Page lists all the LEDs turn on the printer and wait until the Toner, Drum and Error LEDs light up when the print server has been reset to default, follow the steps below. 1 Turn off . 4 Press the Go button...
Quick Installation Guide
Page 26
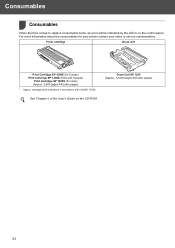
.... For more information about the consumables for Europe) Print Cartridge SP 1200A (USA and Canada) Print Cartridge SP 1200S (For Asia) (Approx. 2,600 pages A4/Letter pages) 1 Approx. Toner cartridge Drum unit Print Cartridge SP 1200E (for your printer,contact your sales or service representative. Drum... Unit SP 1200 (Approx. 12,000 pages A4/Letter pages) 24 cartridge yield is declared in accordance with ISO/IEC...
.... For more information about the consumables for Europe) Print Cartridge SP 1200A (USA and Canada) Print Cartridge SP 1200S (For Asia) (Approx. 2,600 pages A4/Letter pages) 1 Approx. Toner cartridge Drum unit Print Cartridge SP 1200E (for your printer,contact your sales or service representative. Drum... Unit SP 1200 (Approx. 12,000 pages A4/Letter pages) 24 cartridge yield is declared in accordance with ISO/IEC...
Quick Installation Guide
Page 27
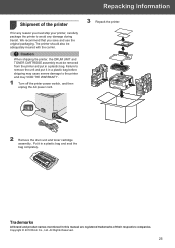
Copyright © 2010 Ricoh Co., Ltd. Caution When shipping the printer, the DRUM UNIT and TONER CARTRIDGE assembly must ship your printer, carefully package the printer to the printer and may cause severe damage to avoid any reason you save and ... may VOID THE WARRANTY. 1 Turn off the printer power switch, and then unplug the AC power cord. 3 Repack the printer. 2 Remove the drum unit and toner cartridge assembly. Put it in a plastic bag. Repacking Information 1 Shipment of their respective companies.
Copyright © 2010 Ricoh Co., Ltd. Caution When shipping the printer, the DRUM UNIT and TONER CARTRIDGE assembly must ship your printer, carefully package the printer to the printer and may cause severe damage to avoid any reason you save and ... may VOID THE WARRANTY. 1 Turn off the printer power switch, and then unplug the AC power cord. 3 Repack the printer. 2 Remove the drum unit and toner cartridge assembly. Put it in a plastic bag. Repacking Information 1 Shipment of their respective companies.
User's Guide
Page 3
...use the printer safely Please keep these instructions for how to ignite inside the vacuum cleaner, potentially starting a fire. Doing this might cause the toner dust to clean the machine. WARNING There are high voltage electrodes inside of the printer, make sure the plug is fully inserted. DO NOT ...handle the plug with a dry, lint-free cloth and dispose of the machine. Carefully clean the toner dust with wet hands. Before you clean the inside the printer. Refer to Cleaning on page 65 for later reference and read them before attempting...
...use the printer safely Please keep these instructions for how to ignite inside the vacuum cleaner, potentially starting a fire. Doing this might cause the toner dust to clean the machine. WARNING There are high voltage electrodes inside of the printer, make sure the plug is fully inserted. DO NOT ...handle the plug with a dry, lint-free cloth and dispose of the machine. Carefully clean the toner dust with wet hands. Before you clean the inside the printer. Refer to Cleaning on page 65 for later reference and read them before attempting...
User's Guide
Page 7
... a test page ...47 Print a Printer Settings page...48 Print Fonts ...49 Network default settings ...50 5 Routine Maintenance 51 Replacing the consumable items...52 Consumables...52 Toner cartridge ...53 Drum unit ...60 Cleaning ...65 vi
... a test page ...47 Print a Printer Settings page...48 Print Fonts ...49 Network default settings ...50 5 Routine Maintenance 51 Replacing the consumable items...52 Consumables...52 Toner cartridge ...53 Drum unit ...60 Cleaning ...65 vi
User's Guide
Page 10
... America, Asia) Quick Install Guide (For EU, North America) CD-ROM (including Quick Setup Guide, User's Guide and Network User's Guide) Drum Unit Assembly (including Toner Cartridge) USB cable Interface cable 1 The interface cable is no longer than 6 feet (2 meters). Purchase the appropriate cable for the interface you are using. „...
... America, Asia) Quick Install Guide (For EU, North America) CD-ROM (including Quick Setup Guide, User's Guide and Network User's Guide) Drum Unit Assembly (including Toner Cartridge) USB cable Interface cable 1 The interface cable is no longer than 6 feet (2 meters). Purchase the appropriate cable for the interface you are using. „...
User's Guide
Page 35
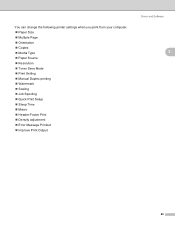
You can change the following printer settings when you print from your computer. „ Paper Size „ Multiple Page „ Orientation „ Copies „ Media Type „ Paper Source „ Resolution „ Toner Save Mode „ Print Setting „ Manual Duplex printing „ Watermark „ Scaling „ Job Spooling „ Quick Print Setup „ Sleep Time „ Macro „ Header-Footer Print „ Density adjustment „ Error Message Printout „ Improve Print Output Driver and Software 3 26
You can change the following printer settings when you print from your computer. „ Paper Size „ Multiple Page „ Orientation „ Copies „ Media Type „ Paper Source „ Resolution „ Toner Save Mode „ Print Setting „ Manual Duplex printing „ Watermark „ Scaling „ Job Spooling „ Quick Print Setup „ Sleep Time „ Macro „ Header-Footer Print „ Density adjustment „ Error Message Printout „ Improve Print Output Driver and Software 3 26
User's Guide
Page 38
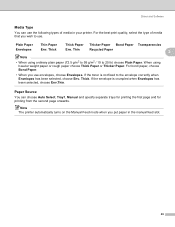
... trays for printing the first page and for printing from the second page onwards. Thick Thick Paper Thicker Paper Bond Paper Transparencies Env. If the toner is crumpled when Envelopes has been selected, choose Env.Thin. For bond paper, choose Bond Paper. • When you wish to use. Thick. For the...
... trays for printing the first page and for printing from the second page onwards. Thick Thick Paper Thicker Paper Bond Paper Transparencies Env. If the toner is crumpled when Envelopes has been selected, choose Env.Thin. For bond paper, choose Bond Paper. • When you wish to use. Thick. For the...
User's Guide
Page 39
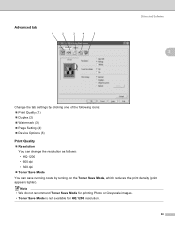
...; Device Options (5) Print Quality 3 „ Resolution You can change the resolution as follows: • HQ 1200 • 600 dpi • 300 dpi „ Toner Save Mode You can save running costs by turning on the Toner Save Mode, which reduces the print density (print appears lighter). Note • We do not recommend...
...; Device Options (5) Print Quality 3 „ Resolution You can change the resolution as follows: • HQ 1200 • 600 dpi • 300 dpi „ Toner Save Mode You can save running costs by turning on the Toner Save Mode, which reduces the print density (print appears lighter). Note • We do not recommend...

User's Guide
Page 42
... you don't press the Go button within 2 seconds, a single copy will be altered in the quick print setting. • Multiple Page • Manual Duplex • Toner Save Mode • Paper Source • Media Type „ Sleep Time When the printer does not receive data for the following functions you can use... the word Sleep Time again. To reprint the last document, press the Go button and hold it enters sleep mode. By placing a check in order (Toner, Drum, Error, Ready), and then release the Go button.
... you don't press the Go button within 2 seconds, a single copy will be altered in the quick print setting. • Multiple Page • Manual Duplex • Toner Save Mode • Paper Source • Media Type „ Sleep Time When the printer does not receive data for the following functions you can use... the word Sleep Time again. To reprint the last document, press the Go button and hold it enters sleep mode. By placing a check in order (Toner, Drum, Error, Ready), and then release the Go button.
User's Guide
Page 43
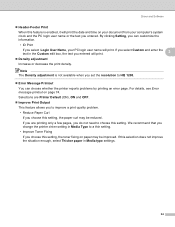
...Curl If you entered. If you select Custom and enter the text in the Custom edit box, the text you choose this setting, the toner fixing on paper may be improved. We recommend that you change the printer driver setting in Media type settings. 34 If you are Printer ...an error page. By clicking Setting, you can customize the information. • ID Print If you set the resolution to a thin setting. • Improve Toner Fixing If you entered will print. Driver and Software „ Header-Footer Print When this feature is not available when you select Login User Name...
...Curl If you entered. If you select Custom and enter the text in the Custom edit box, the text you choose this setting, the toner fixing on paper may be improved. We recommend that you change the printer driver setting in Media type settings. 34 If you are Printer ...an error page. By clicking Setting, you can customize the information. • ID Print If you set the resolution to a thin setting. • Improve Toner Fixing If you entered will print. Driver and Software „ Header-Footer Print When this feature is not available when you select Login User Name...
User's Guide
Page 48
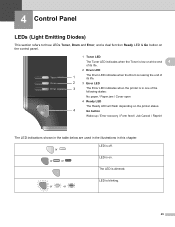
The LED is off. 4 Control Panel 4 LEDs (Light Emitting Diodes) 4 This section refers to three LEDs Toner, Drum and Error, and a dual function Ready LED & Go button on the control panel. 1 Toner LED The Toner LED indicates when the Toner is low or at the end 4 of its life. 2 Drum LED 1 The Drum LED indicates...
The LED is off. 4 Control Panel 4 LEDs (Light Emitting Diodes) 4 This section refers to three LEDs Toner, Drum and Error, and a dual function Ready LED & Go button on the control panel. 1 Toner LED The Toner LED indicates when the Toner is low or at the end 4 of its life. 2 Drum LED 1 The Drum LED indicates...

User's Guide
Page 50
... Data remaining in memory There is blinking for a few seconds until the inside of the machine and put it ready for 3 seconds. The Toner LED will turn on page 54. Cartridge error The drum unit assembly is warming up The printer is not installed correctly. See Replacing the... toner cartridge on for 2 seconds and off for when Toner life end is nearly empty. Cooling down The printer is cooling down . LED Control Panel Printer status Warming up...
... Data remaining in memory There is blinking for a few seconds until the inside of the machine and put it ready for 3 seconds. The Toner LED will turn on page 54. Cartridge error The drum unit assembly is warming up The printer is not installed correctly. See Replacing the... toner cartridge on for 2 seconds and off for when Toner life end is nearly empty. Cooling down The printer is cooling down . LED Control Panel Printer status Warming up...

User's Guide
Page 53
... error remains after switching the printer back on and try to your dealer or Ricoh Customer Service. 44 Leave the printer for 10 minutes with the power on again. LED indications while pressing the Go button LEDs Toner Main PCB failure Fuser unit failure 1 Laser unit failure Main motor failure High voltage... that cannot be cleared by lighting up all the LEDs as shown in the table below . 4 If you see the service call your dealer or Ricoh Customer Service.
... error remains after switching the printer back on and try to your dealer or Ricoh Customer Service. 44 Leave the printer for 10 minutes with the power on again. LED indications while pressing the Go button LEDs Toner Main PCB failure Fuser unit failure 1 Laser unit failure Main motor failure High voltage... that cannot be cleared by lighting up all the LEDs as shown in the table below . 4 If you see the service call your dealer or Ricoh Customer Service.
User's Guide
Page 56
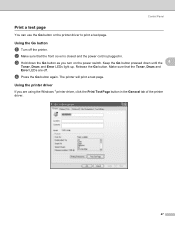
... you are off the printer. Using the printer driver 4 If you turn on the power switch. d Press the Go button again. c Hold down until the 4 Toner, Drum and Error LEDs light up. Release the Go button. The printer will print a test page. Make sure that the front cover is closed and... the power cord is plugged in the General tab of the printer driver. 47 b Make sure that the Toner, Drum and Error LEDs are using the Windows ィ printer driver, click the Print Test Page button in . Control Panel Print a test page 4 You can...
... you are off the printer. Using the printer driver 4 If you turn on the power switch. d Press the Go button again. c Hold down until the 4 Toner, Drum and Error LEDs light up. Release the Go button. The printer will print a test page. Make sure that the front cover is closed and... the power cord is plugged in the General tab of the printer driver. 47 b Make sure that the Toner, Drum and Error LEDs are using the Windows ィ printer driver, click the Print Test Page button in . Control Panel Print a test page 4 You can...


