
Quick Installation Guide
Page 7
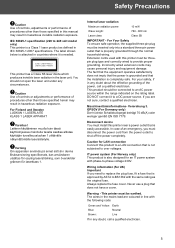
... any circumstances. DO NOT connect it is not subjected to a DC power source. In case of an emergency, you are coloured in line with this manual may result in hazardous invisible radiation exposure. Wiring information (for an IT power system with the same rating as defined in IEC 60825-1:2007 specifications...
... any circumstances. DO NOT connect it is not subjected to a DC power source. In case of an emergency, you are coloured in line with this manual may result in hazardous invisible radiation exposure. Wiring information (for an IT power system with the same rating as defined in IEC 60825-1:2007 specifications...
Quick Installation Guide
Page 11
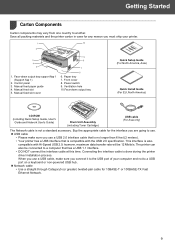
...reason you connect it to another. The printer can also be 12 Mbits/s. Manual feed paper guide 4. Ventilation hole 10.Face-down output tray support flap 1 (Support flap 1) 2. Manual feed slot 5. Front cover 8. Connecting the interface cable is also compatible with ... and Network User's Guide) Drum Unit Assembly (including Toner Cartridge) USB cable (For Asia only) The Network cable is compatible with Hi-Speed USB 2.0; Manual feed slot cover 9 8 7 6 6. Getting Started 1 Carton Components 1 Carton components may vary from one country to the USB port of your printer....
...reason you connect it to another. The printer can also be 12 Mbits/s. Manual feed paper guide 4. Ventilation hole 10.Face-down output tray support flap 1 (Support flap 1) 2. Manual feed slot 5. Front cover 8. Connecting the interface cable is also compatible with ... and Network User's Guide) Drum Unit Assembly (including Toner Cartridge) USB cable (For Asia only) The Network cable is compatible with Hi-Speed USB 2.0; Manual feed slot cover 9 8 7 6 6. Getting Started 1 Carton Components 1 Carton components may vary from one country to the USB port of your printer....
Quick Installation Guide
Page 27
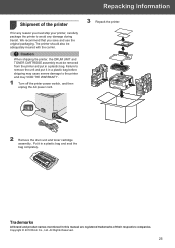
... power cord. 3 Repack the printer. 2 Remove the drum unit and toner cartridge assembly. Put it in this manual are registered trademarks of the printer 1 If for any damage during transit. Copyright © 2010 Ricoh Co., Ltd. The printer should also be removed from the printer and put it in a plastic bag. Repacking...
... power cord. 3 Repack the printer. 2 Remove the drum unit and toner cartridge assembly. Put it in this manual are registered trademarks of the printer 1 If for any damage during transit. Copyright © 2010 Ricoh Co., Ltd. The printer should also be removed from the printer and put it in a plastic bag. Repacking...

User's Guide
Page 1
SP 1210N User's Guide Read this manual carefully before you use , be sure to read the Important Information in this machine and keep it handy for future reference. For safe and correct use this manual before using the machine.
SP 1210N User's Guide Read this manual carefully before you use , be sure to read the Important Information in this machine and keep it handy for future reference. For safe and correct use this manual before using the machine.

User's Guide
Page 6
... whose software title is either a registered trademark or a trademark of Microsoft Corporation in this manual has a Software License Agreement specific to make changes without notice. Ricoh reserves the right to its proprietary programs. All other countries. v Windows Vista is mentioned ... Inc. Microsoft, Windows and Windows Server are subject to the publication. © 2007 Ricoh Company., Ltd. The contents of this manual and the specifications of this manual has been compiled and published, covering the latest product's descriptions and specifications. We recommend ...
... whose software title is either a registered trademark or a trademark of Microsoft Corporation in this manual has a Software License Agreement specific to make changes without notice. Ricoh reserves the right to its proprietary programs. All other countries. v Windows Vista is mentioned ... Inc. Microsoft, Windows and Windows Server are subject to the publication. © 2007 Ricoh Company., Ltd. The contents of this manual and the specifications of this manual has been compiled and published, covering the latest product's descriptions and specifications. We recommend ...
User's Guide
Page 7
... paper, labels and envelopes 17 Duplex printing...21 Guidelines for printing on both sides of the paper 21 Printing on both sides of the paper (manual duplex printing 21 3 Driver and Software 25 Printer driver ...25 Features in the printer driver ...27 Uninstalling the printer driver ...37 Printer driver for Windows...
... paper, labels and envelopes 17 Duplex printing...21 Guidelines for printing on both sides of the paper 21 Printing on both sides of the paper (manual duplex printing 21 3 Driver and Software 25 Printer driver ...25 Features in the printer driver ...27 Uninstalling the printer driver ...37 Printer driver for Windows...
User's Guide
Page 11
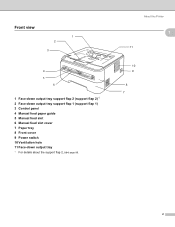
About this Printer 1 1 11 10 9 8 7 2 Front view 1 2 3 4 5 6 1 Face-down output tray support flap 2 (support flap 2) 1 2 Face-down output tray support flap 1 (support flap 1) 3 Control panel 4 Manual feed paper guide 5 Manual feed slot 6 Manual feed slot cover 7 Paper tray 8 Front cover 9 Power switch 10 Ventilation hole 11 Face-down output tray 1 For details about the support flap 2, see page 88.
About this Printer 1 1 11 10 9 8 7 2 Front view 1 2 3 4 5 6 1 Face-down output tray support flap 2 (support flap 2) 1 2 Face-down output tray support flap 1 (support flap 1) 3 Control panel 4 Manual feed paper guide 5 Manual feed slot 6 Manual feed slot cover 7 Paper tray 8 Front cover 9 Power switch 10 Ventilation hole 11 Face-down output tray 1 For details about the support flap 2, see page 88.

User's Guide
Page 14
... paper trays in the table. The names for each printing method by clicking p in the printer driver and this guide are as follows: 2 2 2 Paper tray Manual feed slot Tray 1 Manual When looking at this page on the CD-ROM, you can jump to 43 lb) Transparency Labels p p p p A4 or Letter Envelopes...
... paper trays in the table. The names for each printing method by clicking p in the printer driver and this guide are as follows: 2 2 2 Paper tray Manual feed slot Tray 1 Manual When looking at this page on the CD-ROM, you can jump to 43 lb) Transparency Labels p p p p A4 or Letter Envelopes...
User's Guide
Page 15
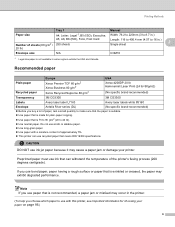
... a rough surface or paper that is wrinkled or creased, the paper may cause a paper jam or damage your paper on page 95.) 6 Printing Methods Tray 1 Manual Paper size A4, Letter, Legal 1, B5 (ISO), Executive, Width: 76.2 to 220mm (3 to 8.7 in.) A5, A6, B6 (ISO), Folio, Post Card Number of paper, test...
... a rough surface or paper that is wrinkled or creased, the paper may cause a paper jam or damage your paper on page 95.) 6 Printing Methods Tray 1 Manual Paper size A4, Letter, Legal 1, B5 (ISO), Executive, Width: 76.2 to 220mm (3 to 8.7 in.) A5, A6, B6 (ISO), Folio, Post Card Number of paper, test...
User's Guide
Page 16
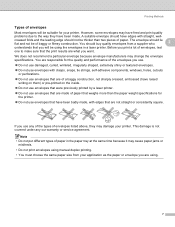
... envelopes that have edges with straight, well- Printing Methods Types of envelopes 2 Most envelopes will be of baggy or flimsy construction. If you are using manual duplex printing. • You must choose the same paper size from a supplier who 2 understands that you will be thicker than the paper weight specifications for...
... envelopes that have edges with straight, well- Printing Methods Types of envelopes 2 Most envelopes will be of baggy or flimsy construction. If you are using manual duplex printing. • You must choose the same paper size from a supplier who 2 understands that you will be thicker than the paper weight specifications for...
User's Guide
Page 22
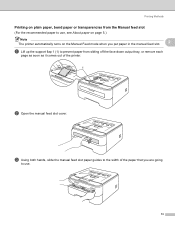
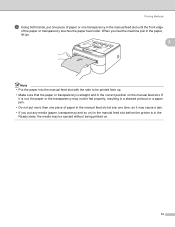
c Using both hands, slide the manual feed slot paper guides to the width of the paper that you put paper in the manual feed slot. 2 a Lift up the support flap 1 (1) to prevent paper from the Manual feed slot 2 (For the recommended paper to use, see About paper on page 5.) Note The printer automatically turns on the Manual Feed mode when you are going to use. 13 Printing Methods Printing on plain paper, bond paper or transparencies from sliding off the face-down output tray, or remove each page as soon as it comes out of the printer. 1 b Open the manual feed slot cover.
c Using both hands, slide the manual feed slot paper guides to the width of the paper that you put paper in the manual feed slot. 2 a Lift up the support flap 1 (1) to prevent paper from the Manual feed slot 2 (For the recommended paper to use, see About paper on page 5.) Note The printer automatically turns on the Manual Feed mode when you are going to use. 13 Printing Methods Printing on plain paper, bond paper or transparencies from sliding off the face-down output tray, or remove each page as soon as it comes out of the printer. 1 b Open the manual feed slot cover.
User's Guide
Page 23
... one time, as it is straight and in the paper, let go. 2 Note • Put the paper into the manual feed slot with the side to be ejected without being printed on the manual feed slot. If it may not be fed properly, resulting in a skewed printout or a paper jam. • Do... not put one piece of paper or one transparency in the manual feed slot until the front edge of paper in the manual feed slot at any media (paper, transparency and so on) in the manual feed slot before the printer is in the Ready state, the media may be...
... one time, as it is straight and in the paper, let go. 2 Note • Put the paper into the manual feed slot with the side to be ejected without being printed on the manual feed slot. If it may not be fed properly, resulting in a skewed printout or a paper jam. • Do... not put one piece of paper or one transparency in the manual feed slot until the front edge of paper in the manual feed slot at any media (paper, transparency and so on) in the manual feed slot before the printer is in the Ready state, the media may be...
User's Guide
Page 25
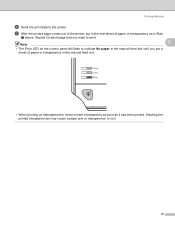
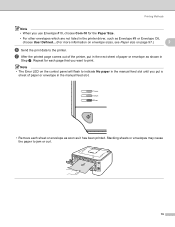
Repeat for each page that you want to print. 2 Note • The Error LED on the control panel will flash to indicate No paper in the manual feed slot until you put in the next sheet of paper or transparency in the manual feed slot. • When printing on transparencies, remove each transparency as soon as in Step d above. Stacking the printed transparencies may cause a paper jam or transparency to the printer. Printing Methods f Send the print data to curl. 16 g After the printed page comes out of the printer, put a sheet of paper or transparency as it has been printed.
Repeat for each page that you want to print. 2 Note • The Error LED on the control panel will flash to indicate No paper in the manual feed slot until you put in the next sheet of paper or transparency in the manual feed slot. • When printing on transparencies, remove each transparency as soon as in Step d above. Stacking the printed transparencies may cause a paper jam or transparency to the printer. Printing Methods f Send the print data to curl. 16 g After the printed page comes out of the printer, put a sheet of paper or transparency as it has been printed.
User's Guide
Page 26
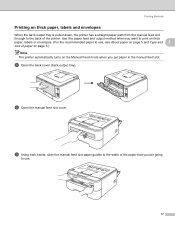
... slot paper guides to the width of the paper that you put paper in the manual feed slot. b Open the manual feed slot cover. a Open the back cover (back output tray). Printing Methods Printing on thick paper, labels and envelopes 2 When the back output tray is ...pulled down, the printer has a straight paper path from the manual feed slot through to the back of paper on page 5.) Note The printer automatically turns on the Manual Feed mode when you are going to use , see About paper on thick paper, labels or envelopes...
... slot paper guides to the width of the paper that you put paper in the manual feed slot. b Open the manual feed slot cover. a Open the back cover (back output tray). Printing Methods Printing on thick paper, labels and envelopes 2 When the back output tray is ...pulled down, the printer has a straight paper path from the manual feed slot through to the back of paper on page 5.) Note The printer automatically turns on the Manual Feed mode when you are going to use , see About paper on thick paper, labels or envelopes...
User's Guide
Page 27
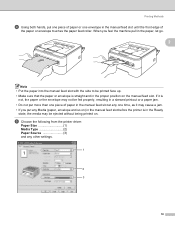
.... 1 2 3 18 If it may cause a jam. • If you feel the machine pull in the paper, let go. 2 Note • Put the paper into the manual feed slot with the side to be printed face up. • Make sure that the paper or envelope is straight and in the proper position... on . Printing Methods d Using both hands, put more than one piece of paper in the manual feed slot at any one envelope in the manual feed slot until the front edge of paper or one time, as it is not, the paper or the envelope may...
.... 1 2 3 18 If it may cause a jam. • If you feel the machine pull in the paper, let go. 2 Note • Put the paper into the manual feed slot with the side to be printed face up. • Make sure that the paper or envelope is straight and in the proper position... on . Printing Methods d Using both hands, put more than one piece of paper in the manual feed slot at any one envelope in the manual feed slot until the front edge of paper or one time, as it is not, the paper or the envelope may...
User's Guide
Page 28
... sheets or envelopes may cause the paper to the printer. Repeat for the Paper Size. • For other envelopes which are not listed in the manual feed slot. • Remove each page that you put in the next sheet of paper or envelope in the printer driver, such as Envelope #9 or... C6, choose User Defined... (For more information on envelope sizes, see Paper size on the control panel will flash to indicate No paper in the manual feed slot until you want to print. Note • The Error LED on page 97.) 2 f Send the print data to jam or curl. 19 g After...
... sheets or envelopes may cause the paper to the printer. Repeat for the Paper Size. • For other envelopes which are not listed in the manual feed slot. • Remove each page that you put in the next sheet of paper or envelope in the printer driver, such as Envelope #9 or... C6, choose User Defined... (For more information on envelope sizes, see Paper size on the control panel will flash to indicate No paper in the manual feed slot until you want to print. Note • The Error LED on page 97.) 2 f Send the print data to jam or curl. 19 g After...
User's Guide
Page 29
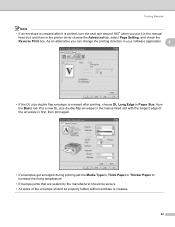
Put a new DL size double-flap envelope in the manual feed slot with the longest edge of the envelope in first, then print again. • If envelopes get smudged during printing set the Media Type ... the Basic tab. Printing Methods Note • If an envelope is printed, turn the next one around 180° when you put it in the manual feed slot, and then in the printer driver choose the Advanced tab, select Page Setting, and check the Reverse Print box.
Put a new DL size double-flap envelope in the manual feed slot with the longest edge of the envelope in first, then print again. • If envelopes get smudged during printing set the Media Type ... the Basic tab. Printing Methods Note • If an envelope is printed, turn the next one around 180° when you put it in the manual feed slot, and then in the printer driver choose the Advanced tab, select Page Setting, and check the Reverse Print box.
User's Guide
Page 30
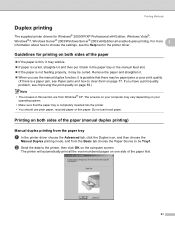
... Paper Source to choose the settings, see Paper jams and how to the printer, then click OK on the computer screen. If you use the manual duplex function, it is possible that the paper tray is not feeding properly, it back in the printer driver. Printing Methods Duplex printing 2 The supplied... put it may be paper jams or poor print quality. (If there is a paper jam, see the Help text in the paper tray or the manual feed slot. „ If the paper is completely inserted into the printer. • You should use bond paper. For more 2 information about how to be...
... Paper Source to choose the settings, see Paper jams and how to the printer, then click OK on the computer screen. If you use the manual duplex function, it is possible that the paper tray is not feeding properly, it back in the printer driver. Printing Methods Duplex printing 2 The supplied... put it may be paper jams or poor print quality. (If there is a paper jam, see the Help text in the paper tray or the manual feed slot. „ If the paper is completely inserted into the printer. • You should use bond paper. For more 2 information about how to be...
User's Guide
Page 31
... the printed pages in the tray, with the side to be printed on the other side of unprinted paper.) Manual duplex printing from the Basic tab choose the Paper Source to be Manual feed. Next, put paper in the paper tray with the printed side face up. (Do not add the printed... pages to the top of a stack of the paper. b Open the manual feed slot cover. 22 a In the printer driver choose the Advanced tab, click the Duplex icon, then choose the Manual Duplex printing mode, and then from the manual feed slot 2 Note You should use bond paper. Do not use plain...
... the printed pages in the tray, with the side to be printed on the other side of unprinted paper.) Manual duplex printing from the Basic tab choose the Paper Source to be Manual feed. Next, put paper in the paper tray with the printed side face up. (Do not add the printed... pages to the top of a stack of the paper. b Open the manual feed slot cover. 22 a In the printer driver choose the Advanced tab, click the Duplex icon, then choose the Manual Duplex printing mode, and then from the manual feed slot 2 Note You should use bond paper. Do not use plain...
User's Guide
Page 32
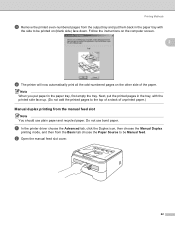
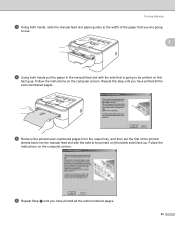
... have printed all the odd-numbered pages. 23 e Remove the printed even-numbered pages from the output tray, and then put the paper in the manual feed slot with the side to be printed on (the blank side) face up . Printing Methods c Using both hands, slide the... to the width of the paper that you are going to use. 2 d Using both hands put the first of the printed sheets back into the manual feed slot with the side that is going to be printed on first facing up . Follow the instructions on the computer screen. Repeat this step...
... have printed all the odd-numbered pages. 23 e Remove the printed even-numbered pages from the output tray, and then put the paper in the manual feed slot with the side to be printed on (the blank side) face up . Printing Methods c Using both hands, slide the... to the width of the paper that you are going to use. 2 d Using both hands put the first of the printed sheets back into the manual feed slot with the side that is going to be printed on first facing up . Follow the instructions on the computer screen. Repeat this step...


