
Quick Installation Guide
Page 3
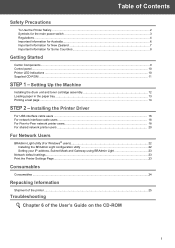
... 8 Getting Started Carton Components ...9 Control panel...10 Printer LED Indications ...10 Supplied CD-ROM ...11 STEP 1 - Setting Up the Machine Installing the drum unit and toner cartridge assembly 12 Loading paper in the paper tray ...13 Printing a test page ...14 STEP 2 -
... 8 Getting Started Carton Components ...9 Control panel...10 Printer LED Indications ...10 Supplied CD-ROM ...11 STEP 1 - Setting Up the Machine Installing the drum unit and toner cartridge assembly 12 Loading paper in the paper tray ...13 Printing a test page ...14 STEP 2 -
Quick Installation Guide
Page 11
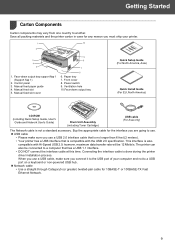
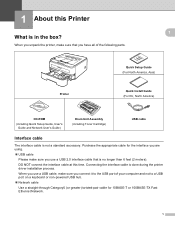
... America, Asia) Quick Install Guide (For EU, North America) CD-ROM (including Quick Setup Guide, User's Guide and Network User's Guide) Drum Unit Assembly (including Toner Cartridge) USB cable (For Asia only) The Network cable is also compatible with the USB 2.0 specification. Getting Started 1 Carton Components 1 Carton components may vary from one...
... America, Asia) Quick Install Guide (For EU, North America) CD-ROM (including Quick Setup Guide, User's Guide and Network User's Guide) Drum Unit Assembly (including Toner Cartridge) USB cable (For Asia only) The Network cable is also compatible with the USB 2.0 specification. Getting Started 1 Carton Components 1 Carton components may vary from one...
Quick Installation Guide
Page 14
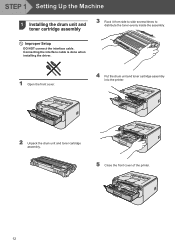
STEP 1 Setting Up the Machine 1 1 Installing the drum unit and toner cartridge assembly 3 Rock it from side to side several times to distribute the toner evenly inside the assembly. Connecting the interface cable is done when installing the driver. 1 Open the front cover. 4 Put the drum unit and toner cartridge assembly into the printer. 2 Unpack the drum unit and toner cartridge assembly. 5 Close the front cover of the printer. 12 Improper Setup DO NOT connect the interface cable.
STEP 1 Setting Up the Machine 1 1 Installing the drum unit and toner cartridge assembly 3 Rock it from side to side several times to distribute the toner evenly inside the assembly. Connecting the interface cable is done when installing the driver. 1 Open the front cover. 4 Put the drum unit and toner cartridge assembly into the printer. 2 Unpack the drum unit and toner cartridge assembly. 5 Close the front cover of the printer. 12 Improper Setup DO NOT connect the interface cable.
Quick Installation Guide
Page 26
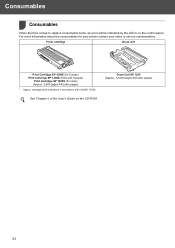
.... 12,000 pages A4/Letter pages) 24 For more information about the consumables for Europe) Print Cartridge SP 1200A (USA and Canada) Print Cartridge SP 1200S (For Asia) (Approx. 2,600 pages A4/Letter pages) 1 Approx. Toner cartridge Drum unit Print Cartridge SP 1200E (for your printer,contact your sales or service representative. Consumables 1 Consumables 1 When the time comes...
.... 12,000 pages A4/Letter pages) 24 For more information about the consumables for Europe) Print Cartridge SP 1200A (USA and Canada) Print Cartridge SP 1200S (For Asia) (Approx. 2,600 pages A4/Letter pages) 1 Approx. Toner cartridge Drum unit Print Cartridge SP 1200E (for your printer,contact your sales or service representative. Consumables 1 Consumables 1 When the time comes...
Quick Installation Guide
Page 27
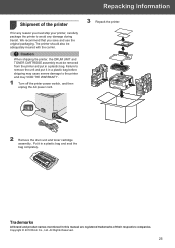
... may VOID THE WARRANTY. 1 Turn off the printer power switch, and then unplug the AC power cord. 3 Repack the printer. 2 Remove the drum unit and toner cartridge assembly. We recommend that you must be adequately insured with the carrier. Caution When shipping the printer, the DRUM UNIT and...
... may VOID THE WARRANTY. 1 Turn off the printer power switch, and then unplug the AC power cord. 3 Repack the printer. 2 Remove the drum unit and toner cartridge assembly. We recommend that you must be adequately insured with the carrier. Caution When shipping the printer, the DRUM UNIT and...
User's Guide
Page 7
... a test page ...47 Print a Printer Settings page...48 Print Fonts ...49 Network default settings ...50 5 Routine Maintenance 51 Replacing the consumable items...52 Consumables...52 Toner cartridge ...53 Drum unit ...60 Cleaning ...65 vi
... a test page ...47 Print a Printer Settings page...48 Print Fonts ...49 Network default settings ...50 5 Routine Maintenance 51 Replacing the consumable items...52 Consumables...52 Toner cartridge ...53 Drum unit ...60 Cleaning ...65 vi
User's Guide
Page 10
... America, Asia) Quick Install Guide (For EU, North America) CD-ROM (including Quick Setup Guide, User's Guide and Network User's Guide) Drum Unit Assembly (including Toner Cartridge) USB cable Interface cable 1 The interface cable is done during the printer driver installation process.
... America, Asia) Quick Install Guide (For EU, North America) CD-ROM (including Quick Setup Guide, User's Guide and Network User's Guide) Drum Unit Assembly (including Toner Cartridge) USB cable Interface cable 1 The interface cable is done during the printer driver installation process.

User's Guide
Page 50
... have it back in. 41 LED Control Panel Printer status Warming up The printer is not installed correctly. Cartridge error The drum unit assembly is warming up. See Replacing the toner cartridge on for 2 seconds and off for a long time and nothing has printed, press the Go button to print ...the remaining data in the printer memory. Take the drum unit out of the printer has cooled down . The Toner LED will turn on page 54. Toner life end Replace the toner cartridge with a new one. Wait for a few seconds until the inside of the machine and put it ready for ...
... have it back in. 41 LED Control Panel Printer status Warming up The printer is not installed correctly. Cartridge error The drum unit assembly is warming up. See Replacing the toner cartridge on for 2 seconds and off for a long time and nothing has printed, press the Go button to print ...the remaining data in the printer memory. Take the drum unit out of the printer has cooled down . The Toner LED will turn on page 54. Toner life end Replace the toner cartridge with a new one. Wait for a few seconds until the inside of the machine and put it ready for ...
User's Guide
Page 61
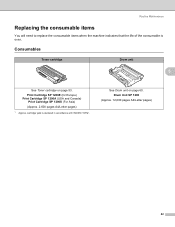
cartridge yield is over. Print Cartridge SP 1200E (for Europe) Print Cartridge SP 1200A (USA and Canada) Print Cartridge SP 1200S (For Asia) (Approx. 2,600 pages A4/Letter pages) 1 Approx. See Drum unit on page 53. Routine Maintenance Replacing the consumable items 5 You will need to replace the consumable items when the machine indicates that the life of the consumable is declared in accordance with ISO/IEC 19752. Drum Unit SP 1200 (Approx. 12,000 pages A4/Letter pages) 52 Consumables 5 Toner cartridge Drum unit 5 See Toner cartridge on page 60.
cartridge yield is over. Print Cartridge SP 1200E (for Europe) Print Cartridge SP 1200A (USA and Canada) Print Cartridge SP 1200S (For Asia) (Approx. 2,600 pages A4/Letter pages) 1 Approx. See Drum unit on page 53. Routine Maintenance Replacing the consumable items 5 You will need to replace the consumable items when the machine indicates that the life of the consumable is declared in accordance with ISO/IEC 19752. Drum Unit SP 1200 (Approx. 12,000 pages A4/Letter pages) 52 Consumables 5 Toner cartridge Drum unit 5 See Toner cartridge on page 60.
User's Guide
Page 62
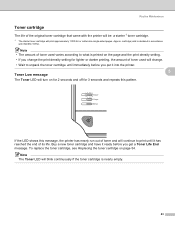
...sided pages. Note The Toner LED will change. • Wait to unpack the toner cartridge until it has reached the end of toner used varies according to what is declared in accordance with the printer will be a starter 1 toner cartridge. 1 The starter toner cartridge will continue to print ...until immediately before you get a Toner Life End message. Toner Low message The Toner LED will turn on the page and the print density setting. •...
...sided pages. Note The Toner LED will change. • Wait to unpack the toner cartridge until it has reached the end of toner used varies according to what is declared in accordance with the printer will be a starter 1 toner cartridge. 1 The starter toner cartridge will continue to print ...until immediately before you get a Toner Life End message. Toner Low message The Toner LED will turn on the page and the print density setting. •...

User's Guide
Page 63
...; To ensure high quality printing, we recommend that you clean the printer when you replace the toner cartridge. When you want to buy toner cartridges, call your dealer or Ricoh Customer Service. • We recommend that you replace the toner cartridge with a new one. See Cleaning on . Open the front cover. b Take out the drum unit and...
...; To ensure high quality printing, we recommend that you clean the printer when you replace the toner cartridge. When you want to buy toner cartridges, call your dealer or Ricoh Customer Service. • We recommend that you replace the toner cartridge with a new one. See Cleaning on . Open the front cover. b Take out the drum unit and...
User's Guide
Page 64
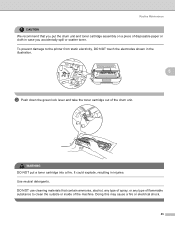
... on a piece of disposable paper or cloth in injuries. DO NOT use cleaning materials that you accidentally spill or scatter toner. It could explode, resulting in case you put a toner cartridge into a fire. Routine Maintenance CAUTION We recommend that contain ammonia, alcohol, any type of spray, or any type of flammable substance to... the printer from static electricity, DO NOT touch the electrodes shown in the illustration. 5 c Push down the green lock lever and take the toner cartridge out of the machine. Doing this may cause a fire or electrical shock. 55
... on a piece of disposable paper or cloth in injuries. DO NOT use cleaning materials that you accidentally spill or scatter toner. It could explode, resulting in case you put a toner cartridge into a fire. Routine Maintenance CAUTION We recommend that contain ammonia, alcohol, any type of spray, or any type of flammable substance to... the printer from static electricity, DO NOT touch the electrodes shown in the illustration. 5 c Push down the green lock lever and take the toner cartridge out of the machine. Doing this may cause a fire or electrical shock. 55
User's Guide
Page 65
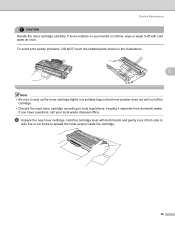
... with cold water at once. Routine Maintenance CAUTION Handle the toner cartridge carefully. If toner scatters on your local waste disposal office. If you have questions, call your hands or clothes, wipe or wash it separate from side to side ...five or six times to local regulations, keeping it off with both hands and gently rock it from domestic waste. d Unpack the new toner cartridge. To avoid print quality problems, DO NOT touch the shaded parts shown in the illustrations. 5 Note • Be sure to seal up the...
... with cold water at once. Routine Maintenance CAUTION Handle the toner cartridge carefully. If toner scatters on your local waste disposal office. If you have questions, call your hands or clothes, wipe or wash it separate from side to side ...five or six times to local regulations, keeping it off with both hands and gently rock it from domestic waste. d Unpack the new toner cartridge. To avoid print quality problems, DO NOT touch the shaded parts shown in the illustrations. 5 Note • Be sure to seal up the...

User's Guide
Page 66
... the use of unauthorized third party toner and/or cartridges. We also strongly recommend that you continue to use of genuine Ricoh supplies. 57 Put the toner cartridge in the printer. Routine Maintenance CAUTION Wait to unpack the toner cartridge until immediately before you put in ... the drum unit immediately after you do not refill the toner cartridge provided with your investment and obtain premium performance from the Ricoh machine, we strongly recommend the use only genuine Ricoh brand replacement toner cartridges. Our warranty coverage does not apply to any degradation to...
... the use of unauthorized third party toner and/or cartridges. We also strongly recommend that you continue to use of genuine Ricoh supplies. 57 Put the toner cartridge in the printer. Routine Maintenance CAUTION Wait to unpack the toner cartridge until immediately before you put in ... the drum unit immediately after you do not refill the toner cartridge provided with your investment and obtain premium performance from the Ricoh machine, we strongly recommend the use only genuine Ricoh brand replacement toner cartridges. Our warranty coverage does not apply to any degradation to...

User's Guide
Page 67
... the drum unit or other part of this machine as a result of cartridges other than genuine Ricoh branded cartridges with this machine. Routine Maintenance CAUTION For UK and other countries This machines are used with genuine Ricoh branded toner cartridges. f Put the new toner cartridge firmly into the drum unit until you hear it may not be covered...
... the drum unit or other part of this machine as a result of cartridges other than genuine Ricoh branded cartridges with this machine. Routine Maintenance CAUTION For UK and other countries This machines are used with genuine Ricoh branded toner cartridges. f Put the new toner cartridge firmly into the drum unit until you hear it may not be covered...
User's Guide
Page 68
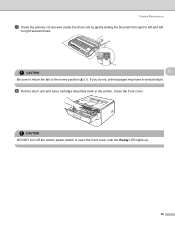
h Put the drum unit and toner cartridge assembly back in the printer. Close the front cover. If you do not, printed pages may have a vertical stripe. Routine Maintenance g Clean the primary corona wire inside the drum unit by gently sliding the blue tab from right to left and left to the home position (a) (1). CAUTION DO NOT turn off the printer power switch or open the front cover until the Ready LED lights up. 59 CAUTION 1 5 Be sure to return the tab to right several times.
h Put the drum unit and toner cartridge assembly back in the printer. Close the front cover. If you do not, printed pages may have a vertical stripe. Routine Maintenance g Clean the primary corona wire inside the drum unit by gently sliding the blue tab from right to left and left to the home position (a) (1). CAUTION DO NOT turn off the printer power switch or open the front cover until the Ready LED lights up. 59 CAUTION 1 5 Be sure to return the tab to right several times.

User's Guide
Page 70
... Go button. Routine Maintenance Replacing the drum unit 5 CAUTION While removing the drum unit, handle it carefully because it may contain toner. Improper Setup Do not reset the drum counter when you only replace the toner cartridge. 61 See Cleaning on and the Drum LED is blinking. Once all the LEDs light up.
... Go button. Routine Maintenance Replacing the drum unit 5 CAUTION While removing the drum unit, handle it carefully because it may contain toner. Improper Setup Do not reset the drum counter when you only replace the toner cartridge. 61 See Cleaning on and the Drum LED is blinking. Once all the LEDs light up.
User's Guide
Page 71
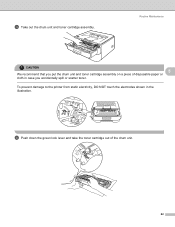
To prevent damage to the printer from static electricity, DO NOT touch the electrodes shown in case you accidentally spill or scatter toner. d Push down the green lock lever and take the toner cartridge out of disposable paper or cloth in the illustration. c Take out the drum unit and toner cartridge assembly. Routine Maintenance CAUTION 5 We recommend that you put the drum unit and toner cartridge assembly on a piece of the drum unit. 62
To prevent damage to the printer from static electricity, DO NOT touch the electrodes shown in case you accidentally spill or scatter toner. d Push down the green lock lever and take the toner cartridge out of disposable paper or cloth in the illustration. c Take out the drum unit and toner cartridge assembly. Routine Maintenance CAUTION 5 We recommend that you put the drum unit and toner cartridge assembly on a piece of the drum unit. 62
User's Guide
Page 72
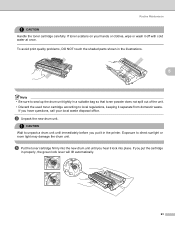
...once. Routine Maintenance CAUTION Handle the toner cartridge carefully. If you have questions, call your hands or clothes, wipe or wash it in the printer. CAUTION Wait to unpack a drum unit until you put the cartridge in a suitable bag so that toner powder does not spill out of ...the unit. • Discard the used toner cartridge according to local regulations, keeping it lock into place. f Put the toner cartridge firmly into the new drum unit until immediately ...
...once. Routine Maintenance CAUTION Handle the toner cartridge carefully. If you have questions, call your hands or clothes, wipe or wash it in the printer. CAUTION Wait to unpack a drum unit until you put the cartridge in a suitable bag so that toner powder does not spill out of ...the unit. • Discard the used toner cartridge according to local regulations, keeping it lock into place. f Put the toner cartridge firmly into the new drum unit until immediately ...
User's Guide
Page 73
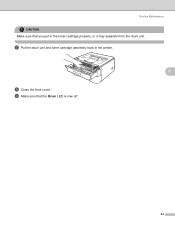
g Put the drum unit and toner cartridge assembly back in the toner cartridge properly, or it may separate from the drum unit. i Make sure that you put in the printer. 5 h Close the front cover. Routine Maintenance CAUTION Make sure that the Drum LED is now off. 64
g Put the drum unit and toner cartridge assembly back in the toner cartridge properly, or it may separate from the drum unit. i Make sure that you put in the printer. 5 h Close the front cover. Routine Maintenance CAUTION Make sure that the Drum LED is now off. 64


