
Quick Installation Guide
Page 1
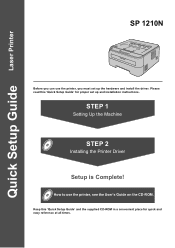
STEP 1 Setting Up the Machine STEP 2 Installing the Printer Driver Setup is Complete! Keep this 'Quick Setup Guide' for quick and easy reference at all times. Quick Setup Guide Laser Printer SP 1210N Before you can use the printer, see the User's Guide on the CD-ROM. How to use the printer, you must set up the hardware and install the driver. Please read this 'Quick Setup Guide' and the supplied CD-ROM in a convenient place for proper set up and installation instructions.
STEP 1 Setting Up the Machine STEP 2 Installing the Printer Driver Setup is Complete! Keep this 'Quick Setup Guide' for quick and easy reference at all times. Quick Setup Guide Laser Printer SP 1210N Before you can use the printer, see the User's Guide on the CD-ROM. How to use the printer, you must set up the hardware and install the driver. Please read this 'Quick Setup Guide' and the supplied CD-ROM in a convenient place for proper set up and installation instructions.
Quick Installation Guide
Page 2
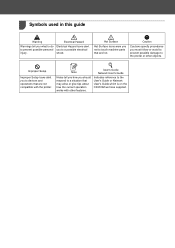
... Setup Improper Setup icons alert you should respond to a situation that may arise or give tips about how the current operation works with the printer. User's Guide Network User's Guide Indicates reference to prevent possible personal injury. Symbols used in this guide 1 Warning Warnings tell you to ... must follow or avoid to prevent possible damage to touch machine parts that are hot. Caution Cautions specify procedures you not to the printer or other features. Electrical Hazard Electrical Hazard icons alert you what to do to the User's Guide or Network User's Guide which...
... Setup Improper Setup icons alert you should respond to a situation that may arise or give tips about how the current operation works with the printer. User's Guide Network User's Guide Indicates reference to prevent possible personal injury. Symbols used in this guide 1 Warning Warnings tell you to ... must follow or avoid to prevent possible damage to touch machine parts that are hot. Caution Cautions specify procedures you not to the printer or other features. Electrical Hazard Electrical Hazard icons alert you what to do to the User's Guide or Network User's Guide which...
Quick Installation Guide
Page 3
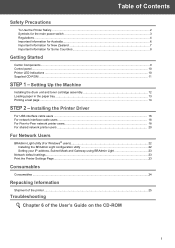
... For USB interface cable users ...16 For network interface cable users ...18 For Peer-to-Peer network printer users...18 For shared network printer users ...20 For Network Users BRAdmin Light utility (For Windows® users 22 Installing the BRAdmin Light ......4 Important Information for Australia...6 Important Information for New Zealand 7 Important Information for Some Countries 8 Getting Started Carton Components ...9 Control panel...10 Printer LED Indications ...10 Supplied CD-ROM ...11 STEP 1 - Setting Up the Machine Installing the drum unit and toner cartridge assembly 12 Loading ...
... For USB interface cable users ...16 For network interface cable users ...18 For Peer-to-Peer network printer users...18 For shared network printer users ...20 For Network Users BRAdmin Light utility (For Windows® users 22 Installing the BRAdmin Light ......4 Important Information for Australia...6 Important Information for New Zealand 7 Important Information for Some Countries 8 Getting Started Carton Components ...9 Control panel...10 Printer LED Indications ...10 Supplied CD-ROM ...11 STEP 1 - Setting Up the Machine Installing the drum unit and toner cartridge assembly 12 Loading ...
Quick Installation Guide
Page 4
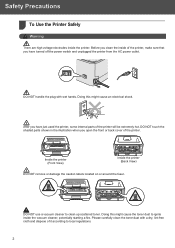
... local regulations. 2 Before you have turned off the power switch and unplugged the printer from the AC power outlet. Doing this might cause an electrical shock. Inside the printer (Front View) Inside the printer (Back View) DO NOT remove or damage the caution labels located on or around... the fuser. After you have just used the printer, some internal parts of the printer, make sure that you clean the inside the printer. DO NOT use a vacuum cleaner to ignite inside the vacuum cleaner, potentially starting a fire. ...
... local regulations. 2 Before you have turned off the power switch and unplugged the printer from the AC power outlet. Doing this might cause an electrical shock. Inside the printer (Front View) Inside the printer (Back View) DO NOT remove or damage the caution labels located on or around... the fuser. After you have just used the printer, some internal parts of the printer, make sure that you clean the inside the printer. DO NOT use a vacuum cleaner to ignite inside the vacuum cleaner, potentially starting a fire. ...
Quick Installation Guide
Page 6
...(FCC) Declaration of Conformity (For USA) Responsible Party: Ricoh Americas Corporation Address: 5 Dedrick Place, West Caldwell,NJ 07006 USA Telephone number: 973-882-2000 declares, that the products Product Name: Laser Printer Model Number: SP 1210N comply with Part 15 of the following measures: ... la classe B est conforme à la norme NMB-003 du Canada. 4 Radio interference (220-240 volt model only) This printer follows EN55022 (CISPR Publication 22)/Class B. International ENERGY STAR® Qualification Statement The purpose of the International ENERGY STAR® Program is...
...(FCC) Declaration of Conformity (For USA) Responsible Party: Ricoh Americas Corporation Address: 5 Dedrick Place, West Caldwell,NJ 07006 USA Telephone number: 973-882-2000 declares, that the products Product Name: Laser Printer Model Number: SP 1210N comply with Part 15 of the following measures: ... la classe B est conforme à la norme NMB-003 du Canada. 4 Radio interference (220-240 volt model only) This printer follows EN55022 (CISPR Publication 22)/Class B. International ENERGY STAR® Qualification Statement The purpose of the International ENERGY STAR® Program is...
Quick Installation Guide
Page 7
...cover. The wires in the mains lead are not sure, contact a qualified electrician. CLASS 1 LASER PRODUCT LASER KLASSE 1 PRODUKT This printer has a Class 3B laser diode which produces invisible laser radiation in IEC 60825-1:2007 specifications. Laitteen käyttäminen muulla kuin ...-phase voltage 230V. Maschinenlärminformations- The label shown below is attached in any circumstances. Disconnect device You must install this printer must be earthed. Incorrectly wired extension cords may result in this product to a LAN connection that is easily accessible. If you...
...cover. The wires in the mains lead are not sure, contact a qualified electrician. CLASS 1 LASER PRODUCT LASER KLASSE 1 PRODUKT This printer has a Class 3B laser diode which produces invisible laser radiation in IEC 60825-1:2007 specifications. Laitteen käyttäminen muulla kuin ...-phase voltage 230V. Maschinenlärminformations- The label shown below is attached in any circumstances. Disconnect device You must install this printer must be earthed. Incorrectly wired extension cords may result in this product to a LAN connection that is easily accessible. If you...
Quick Installation Guide
Page 11
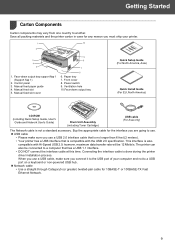
... 7. Ventilation hole 10.Face-down output tray support flap 1 (Support flap 1) 2. however, maximum data transfer rate will be connected to another. The printer can also be 12 Mbits/s. Getting Started 1 Carton Components 1 Carton components may vary from one country to a computer that is not a standard accessory....must ship your computer and not to use a USB 2.0 interface cable that is no longer than 6 feet (2 meters). • Your printer has a USB interface that has a USB 1.1 interface. • DO NOT connect the interface cable at this time. Save all packing materials and the...
... 7. Ventilation hole 10.Face-down output tray support flap 1 (Support flap 1) 2. however, maximum data transfer rate will be connected to another. The printer can also be 12 Mbits/s. Getting Started 1 Carton Components 1 Carton components may vary from one country to a computer that is not a standard accessory....must ship your computer and not to use a USB 2.0 interface cable that is no longer than 6 feet (2 meters). • Your printer has a USB interface that has a USB 1.1 interface. • DO NOT connect the interface cable at this time. Save all packing materials and the...
Quick Installation Guide
Page 12
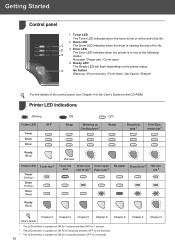
... life. 2 Drum LED 1 The Drum LED indicates when the drum is nearing the end of its life. 2 3 Error LED The Error LED indicates when the printer is in one of the following 3 states: No paper / Paper jam / Cover open end of life 3 Paper jam 2 No paper Drum Error 2 Service call 2 ...) Error (Red) Dimmed Toner life end Drum near Cover open 4 Ready LED The Ready LED will blink in a pattern of the User's Guide on the printer status. 4 Go button Wake-up / Error recovery / Form feed / Job Cancel / Reprint For the details of the control panel, see Chapter 4 of ON for 2 seconds...
... life. 2 Drum LED 1 The Drum LED indicates when the drum is nearing the end of its life. 2 3 Error LED The Error LED indicates when the printer is in one of the following 3 states: No paper / Paper jam / Cover open end of life 3 Paper jam 2 No paper Drum Error 2 Service call 2 ...) Error (Red) Dimmed Toner life end Drum near Cover open 4 Ready LED The Ready LED will blink in a pattern of the User's Guide on the printer status. 4 Go button Wake-up / Error recovery / Form feed / Job Cancel / Reprint For the details of the control panel, see Chapter 4 of ON for 2 seconds...
Quick Installation Guide
Page 13
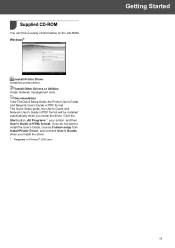
The Quick Setup guide, the User's Guide and Network User's Guide in HTML format. Click the Start button, All Programs 1, your printer, and then User's Guide in PDF format will be installed automatically when you install the driver. 1 Programs for Windows® 2000 users Getting Started ...11 Documentation View The Quick Setup Guide,the Printer User's Guide and Network User's Guide in PDF format. If you do not want to install the User's Guide, choose Custom setup from Install...
The Quick Setup guide, the User's Guide and Network User's Guide in HTML format. Click the Start button, All Programs 1, your printer, and then User's Guide in PDF format will be installed automatically when you install the driver. 1 Programs for Windows® 2000 users Getting Started ...11 Documentation View The Quick Setup Guide,the Printer User's Guide and Network User's Guide in PDF format. If you do not want to install the User's Guide, choose Custom setup from Install...
Quick Installation Guide
Page 14
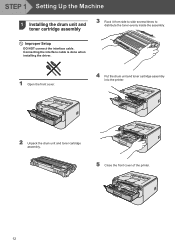
STEP 1 Setting Up the Machine 1 1 Installing the drum unit and toner cartridge assembly 3 Rock it from side to side several times to distribute the toner evenly inside the assembly. Improper Setup DO NOT connect the interface cable. Connecting the interface cable is done when installing the driver. 1 Open the front cover. 4 Put the drum unit and toner cartridge assembly into the printer. 2 Unpack the drum unit and toner cartridge assembly. 5 Close the front cover of the printer. 12
STEP 1 Setting Up the Machine 1 1 Installing the drum unit and toner cartridge assembly 3 Rock it from side to side several times to distribute the toner evenly inside the assembly. Improper Setup DO NOT connect the interface cable. Connecting the interface cable is done when installing the driver. 1 Open the front cover. 4 Put the drum unit and toner cartridge assembly into the printer. 2 Unpack the drum unit and toner cartridge assembly. 5 Close the front cover of the printer. 12
Quick Installation Guide
Page 15
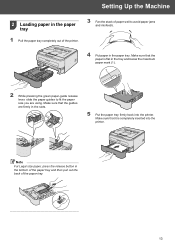
... out the back of paper well to fit the paper size you are firmly in the slots. 5 Put the paper tray firmly back into the printer. Make sure that the guides are using. Make sure that it is flat in the tray and below the maximum paper mark (1). 1 2 While pressing the... the paper guides to avoid paper jams and misfeeds. 4 Put paper in the paper tray. Make sure that the paper is completely inserted into the printer. Setting Up the Machine 2 Loading paper in the paper tray 1 Pull the paper tray completely out of the...
... out the back of paper well to fit the paper size you are firmly in the slots. 5 Put the paper tray firmly back into the printer. Make sure that the guides are using. Make sure that it is flat in the tray and below the maximum paper mark (1). 1 2 While pressing the... the paper guides to avoid paper jams and misfeeds. 4 Put paper in the paper tray. Make sure that the paper is completely inserted into the printer. Setting Up the Machine 2 Loading paper in the paper tray 1 Pull the paper tray completely out of the...

Quick Installation Guide
Page 16
STEP 1 Setting Up the Machine 3 Printing a test page Improper Setup DO NOT connect the interface cable yet. 4 After the printer has finished warming up, the Ready LED / Go button (1) stops blinking and stays blue. 1 Make sure that the test page has printed correctly. 2 Plug the... AC power cord into an AC power outlet. Connect the AC power cord to the printer. 1 5 Press the Go button. Check that the printer power switch is off. The printer prints a test page. Turn on the printer power switch. 3 Unfold support flap 1. Note This function will not be available after the first ...
STEP 1 Setting Up the Machine 3 Printing a test page Improper Setup DO NOT connect the interface cable yet. 4 After the printer has finished warming up, the Ready LED / Go button (1) stops blinking and stays blue. 1 Make sure that the test page has printed correctly. 2 Plug the... AC power cord into an AC power outlet. Connect the AC power cord to the printer. 1 5 Press the Go button. Check that the printer power switch is off. The printer prints a test page. Turn on the printer power switch. 3 Unfold support flap 1. Note This function will not be available after the first ...
Quick Installation Guide
Page 17
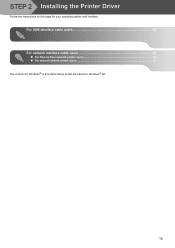
STEP 2 Installing the Printer Driver Follow the instructions on this page for Windows® in this Quick Setup Guide are based on Windows® XP. 15 For USB interface cable users 16 For network interface cable users 18 „ For Peer-to-Peer network printer users 18 „ For shared network printer users ...20 The screens for your operating system and interface.
STEP 2 Installing the Printer Driver Follow the instructions on this page for Windows® in this Quick Setup Guide are based on Windows® XP. 15 For USB interface cable users 16 For network interface cable users 18 „ For Peer-to-Peer network printer users 18 „ For shared network printer users ...20 The screens for your operating system and interface.
Quick Installation Guide
Page 18
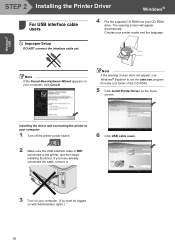
... Windows® 1 For USB interface cable 1 users 4 Put the supplied CD-ROM into your printer model and the language. The opening screen does not appear, use Windows® Explorer to the printer, and then begin installing the driver. Note If the Found New Hardware Wizard appears on with Administrator ... If you have already connected the cable, remove it. 3 Turn on your computer. (You must be logged on your computer 1 Turn off the printer power switch. 6 Click USB cable users. 2 Make sure the USB interface cable is NOT connected to run the start.exe program from the root ...
... Windows® 1 For USB interface cable 1 users 4 Put the supplied CD-ROM into your printer model and the language. The opening screen does not appear, use Windows® Explorer to the printer, and then begin installing the driver. Note If the Found New Hardware Wizard appears on with Administrator ... If you have already connected the cable, remove it. 3 Turn on your computer. (You must be logged on your computer 1 Turn off the printer power switch. 6 Click USB cable users. 2 Make sure the USB interface cable is NOT connected to run the start.exe program from the root ...
Quick Installation Guide
Page 19
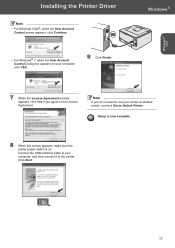
...Connect the USB interface cable to your computer, and then connect it to set your computer, click YES. 9 Click Finish. Installing the Printer Driver Note • For Windows Vista®, when the User Account Control screen appears, click Continue. • For Windows® 7, ... Account Control Dialog box appears on . Setup is now complete. 8 When this screen appears, make sure the printer power switch is on your printer as Default printer, uncheck Set as Default Printer. Note If you agree to the License Agreement. Windows® Windows® USB 7 When the License Agreement ...
...Connect the USB interface cable to your computer, and then connect it to set your computer, click YES. 9 Click Finish. Installing the Printer Driver Note • For Windows Vista®, when the User Account Control screen appears, click Continue. • For Windows® 7, ... Account Control Dialog box appears on . Setup is now complete. 8 When this screen appears, make sure the printer power switch is on your printer as Default printer, uncheck Set as Default Printer. Note If you agree to the License Agreement. Windows® Windows® USB 7 When the License Agreement ...
Quick Installation Guide
Page 20
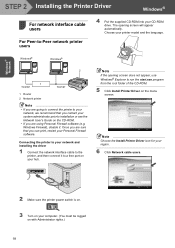
...disable it to installation or see the Network User's Guide on the menu screen. Note Choose the Install Printer Driver icon for your region. 6 Click Network cable users. 2 Make sure the printer power switch is on. 3 Turn on your Personal Firewall software. Note If the opening screen will ...prior to a free port on your CD-ROM drive. Windows R Windows R 2 1 TCP/IP TCP/IP 1 Router 2 Network printer Note • If you are sure that you can print, restart your hub. Connecting the printer to your network and installing the driver 1 Connect the network interface cable to the...
...disable it to installation or see the Network User's Guide on the menu screen. Note Choose the Install Printer Driver icon for your region. 6 Click Network cable users. 2 Make sure the printer power switch is on. 3 Turn on your Personal Firewall software. Note If the opening screen will ...prior to a free port on your CD-ROM drive. Windows R Windows R 2 1 TCP/IP TCP/IP 1 Router 2 Network printer Note • If you are sure that you can print, restart your hub. Connecting the printer to your network and installing the driver 1 Connect the network interface cable to the...
Quick Installation Guide
Page 21
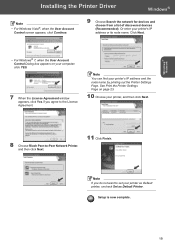
... is now complete. 19 Click Next. Note If you agree to the License Agreement. Installing the Printer Driver Windows® Note • For Windows Vista®, when the User Account Control screen appears, click Continue. 9 Choose Search the network for devices and...do not want to -Peer Network Printer, and then click Next. 11 Click Finish. See Print the Printer Settings Page on your printer, and then click Next. 8 Choose Ricoh Peer-to set your printer's IP address and the node name by printing out the Printer Settings Page. Or enter your printer's IP address or its node name...
... is now complete. 19 Click Next. Note If you agree to the License Agreement. Installing the Printer Driver Windows® Note • For Windows Vista®, when the User Account Control screen appears, click Continue. 9 Choose Search the network for devices and...do not want to -Peer Network Printer, and then click Next. 11 Click Finish. See Print the Printer Settings Page on your printer, and then click Next. 8 Choose Ricoh Peer-to set your printer's IP address and the node name by printing out the Printer Settings Page. Or enter your printer's IP address or its node name...
Quick Installation Guide
Page 22
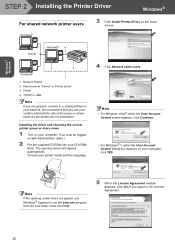
... computer. (You must be logged on the menu screen. Windows® Network STEP 2 Installing the Printer Driver Windows® For shared network printer users 3 Click Install Printer Driver on with Administrator rights.) 2 Put the supplied CD-ROM into your CD-ROM drive. The...For Windows® 7, when the User Account Control Dialog box appears on your system administrator about the queue or share name for the printer prior to a shared printer on your printer model and the language. 4 Click Network cable users. Windows R TCP/IP WindowsR 4 2 3 Windows R 1 1 Network Shared ...
... computer. (You must be logged on the menu screen. Windows® Network STEP 2 Installing the Printer Driver Windows® For shared network printer users 3 Click Install Printer Driver on with Administrator rights.) 2 Put the supplied CD-ROM into your CD-ROM drive. The...For Windows® 7, when the User Account Control Dialog box appears on your system administrator about the queue or share name for the printer prior to a shared printer on your printer model and the language. 4 Click Network cable users. Windows R TCP/IP WindowsR 4 2 3 Windows R 1 1 Network Shared ...
Quick Installation Guide
Page 23
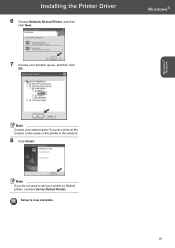
Windows® Network Note Contact your administrator if you do not know the location or the name of the printer in the network. 8 Click Finish. Installing the Printer Driver 6 Choose Network Shared Printer, and then click Next. Setup is now complete. 21 Note If you do not want to set your printer's queue, and then click OK. Windows® 7 Choose your printer as Default printer, uncheck Set as Default Printer.
Windows® Network Note Contact your administrator if you do not know the location or the name of the printer in the network. 8 Click Finish. Installing the Printer Driver 6 Choose Network Shared Printer, and then click Next. Setup is now complete. 21 Note If you do not want to set your printer's queue, and then click OK. Windows® 7 Choose your printer as Default printer, uncheck Set as Default Printer.
Quick Installation Guide
Page 25
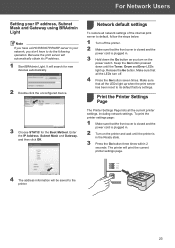
...the Go button. Make sure that the front cover is closed and the power cord is plugged in your network, you turn off the printer. 2 Make sure that all the LEDs light up . Because the print server will automatically obtain its default factory settings. Network default settings ...the print server has been reset to default, follow the steps below. 1 Turn off . 4 Press the Go button seven times. The printer will print the current printer settings page. 4 The address information will search for new devices automatically. 2 Double-click the unconfigured device. 3 Choose STATIC for the Boot...
...the Go button. Make sure that the front cover is closed and the power cord is plugged in your network, you turn off the printer. 2 Make sure that all the LEDs light up . Because the print server will automatically obtain its default factory settings. Network default settings ...the print server has been reset to default, follow the steps below. 1 Turn off . 4 Press the Go button seven times. The printer will print the current printer settings page. 4 The address information will search for new devices automatically. 2 Double-click the unconfigured device. 3 Choose STATIC for the Boot...


