
Quick Installation Guide
Page 1
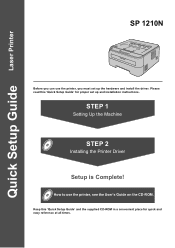
Quick Setup Guide Laser Printer SP 1210N Before you can use the printer, see the User's Guide on the CD-ROM. STEP 1 Setting Up the Machine STEP 2 Installing the Printer Driver Setup is Complete! How to use the printer, you must set up the hardware and install the driver. Keep this 'Quick Setup Guide' for quick and easy reference at all times. Please read this 'Quick Setup Guide' and the supplied CD-ROM in a convenient place for proper set up and installation instructions.
Quick Setup Guide Laser Printer SP 1210N Before you can use the printer, see the User's Guide on the CD-ROM. STEP 1 Setting Up the Machine STEP 2 Installing the Printer Driver Setup is Complete! How to use the printer, you must set up the hardware and install the driver. Keep this 'Quick Setup Guide' for quick and easy reference at all times. Please read this 'Quick Setup Guide' and the supplied CD-ROM in a convenient place for proper set up and installation instructions.
Quick Installation Guide
Page 3
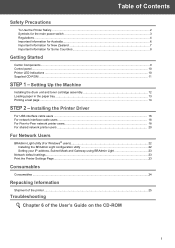
... User's Guide on the CD-ROM 1 Setting Up the Machine Installing the drum unit and toner cartridge assembly 12 Loading paper in the paper tray ...13 Printing a test page ...14 STEP 2 - Installing the Printer Driver For USB interface cable users ...16 For network interface cable users ...18 For Peer-to-Peer network printer users...18 For shared network printer users ...20 For Network Users BRAdmin Light utility (For Windows® users 22 Installing the BRAdmin Light configuration utility 22 Setting your IP address, Subnet Mask and Gateway using BRAdmin Light 23 Network default settings...
... User's Guide on the CD-ROM 1 Setting Up the Machine Installing the drum unit and toner cartridge assembly 12 Loading paper in the paper tray ...13 Printing a test page ...14 STEP 2 - Installing the Printer Driver For USB interface cable users ...16 For network interface cable users ...18 For Peer-to-Peer network printer users...18 For shared network printer users ...20 For Network Users BRAdmin Light utility (For Windows® users 22 Installing the BRAdmin Light configuration utility 22 Setting your IP address, Subnet Mask and Gateway using BRAdmin Light 23 Network default settings...
Quick Installation Guide
Page 6
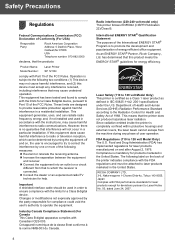
... (For USA) Responsible Party: Ricoh Americas Corporation Address: 5 Dedrick Place, West Caldwell,NJ 07006 USA Telephone number: 973-882-2000 declares, that the products Product Name: Laser Printer Model Number: SP 1210N comply with Part 15 of the FCC Rules. Laser Safety (110 to operate the equipment. FDA Regulations (110 to promote the development and popularization of user operation. This means that...
... (For USA) Responsible Party: Ricoh Americas Corporation Address: 5 Dedrick Place, West Caldwell,NJ 07006 USA Telephone number: 973-882-2000 declares, that the products Product Name: Laser Printer Model Number: SP 1210N comply with Part 15 of the FCC Rules. Laser Safety (110 to operate the equipment. FDA Regulations (110 to promote the development and popularization of user operation. This means that...
Quick Installation Guide
Page 11
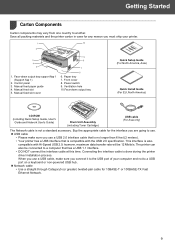
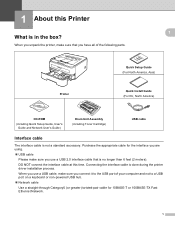
...ROM (including Quick Setup Guide, User's Guide and Network User's Guide) Drum Unit Assembly (including Toner Cartridge) USB cable (For Asia only) The Network cable is not a standard accessory. Control panel 3. Paper tray 7. Front cover 8. Buy the appropriate cable for the interface you are going to use. „ USB cable • Please make sure you use a USB cable, make sure you connect it to the USB port of your printer. 1 10 2 3 4 5 1. The printer can also be 12 Mbits/s. Connecting the interface cable is also compatible with the USB 2.0 specification. Manual feed slot cover...
...ROM (including Quick Setup Guide, User's Guide and Network User's Guide) Drum Unit Assembly (including Toner Cartridge) USB cable (For Asia only) The Network cable is not a standard accessory. Control panel 3. Paper tray 7. Front cover 8. Buy the appropriate cable for the interface you are going to use. „ USB cable • Please make sure you use a USB cable, make sure you connect it to the USB port of your printer. 1 10 2 3 4 5 1. The printer can also be 12 Mbits/s. Connecting the interface cable is also compatible with the USB 2.0 specification. Manual feed slot cover...
Quick Installation Guide
Page 17
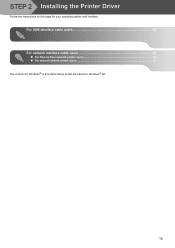
For USB interface cable users 16 For network interface cable users 18 „ For Peer-to-Peer network printer users 18 „ For shared network printer users ...20 The screens for Windows® in this page for your operating system and interface. STEP 2 Installing the Printer Driver Follow the instructions on this Quick Setup Guide are based on Windows® XP. 15
For USB interface cable users 16 For network interface cable users 18 „ For Peer-to-Peer network printer users 18 „ For shared network printer users ...20 The screens for Windows® in this page for your operating system and interface. STEP 2 Installing the Printer Driver Follow the instructions on this Quick Setup Guide are based on Windows® XP. 15
Quick Installation Guide
Page 18
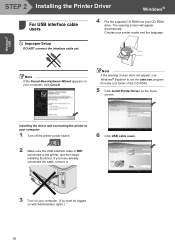
... CD-ROM drive. Installing the driver and connecting the printer to your printer model and the language. Choose your computer 1 Turn off the printer power switch. 6 Click USB cable users. 2 Make sure the USB interface cable is NOT connected to run the start.exe program from the root folder of the CD-ROM. 5 Click Install Printer Driver on the menu screen. Note If the opening screen will appear automatically. The opening screen does not appear, use Windows®...
... CD-ROM drive. Installing the driver and connecting the printer to your printer model and the language. Choose your computer 1 Turn off the printer power switch. 6 Click USB cable users. 2 Make sure the USB interface cable is NOT connected to run the start.exe program from the root folder of the CD-ROM. 5 Click Install Printer Driver on the menu screen. Note If the opening screen will appear automatically. The opening screen does not appear, use Windows®...
Quick Installation Guide
Page 19
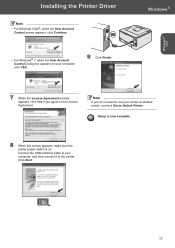
Click Next. 17 Installing the Printer Driver Note • For Windows Vista®, when the User Account Control screen appears, click Continue. • For Windows® 7, when the User Account Control Dialog box appears on . Note If you agree to the License Agreement. Connect the USB interface cable to your computer, and then connect it to set your computer, click YES. 9 Click Finish. Setup is now complete...
Click Next. 17 Installing the Printer Driver Note • For Windows Vista®, when the User Account Control screen appears, click Continue. • For Windows® 7, when the User Account Control Dialog box appears on . Note If you agree to the License Agreement. Connect the USB interface cable to your computer, and then connect it to set your computer, click YES. 9 Click Finish. Setup is now complete...
Quick Installation Guide
Page 20
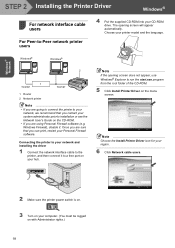
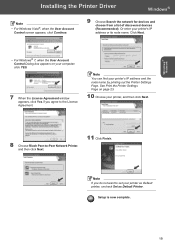
... folder of the CD-ROM. 5 Click Install Printer Driver on the menu screen. Windows Firewall), disable it to -Peer network printer users 4 Put the supplied CD-ROM into your CD-ROM drive. Connecting the printer to your network and installing the driver 1 Connect the network interface cable to the printer, and then connect it . Note Choose the Install Printer Driver icon for your region. 6 Click Network cable users. 2 Make sure the printer power switch is on. 3 Turn on your computer. (You must be...
... folder of the CD-ROM. 5 Click Install Printer Driver on the menu screen. Windows Firewall), disable it to -Peer network printer users 4 Put the supplied CD-ROM into your CD-ROM drive. Connecting the printer to your network and installing the driver 1 Connect the network interface cable to the printer, and then connect it . Note Choose the Install Printer Driver icon for your region. 6 Click Network cable users. 2 Make sure the printer power switch is on. 3 Turn on your computer. (You must be...
Quick Installation Guide
Page 21
... printer's IP address or its node name. Windows® Network • For Windows® 7, when the User Account Control Dialog box appears on page 23. 10 Choose your printer as Default printer, uncheck Set as Default Printer. Setup is now complete. 19 Installing the Printer Driver Windows® Note • For Windows Vista®, when the User Account Control screen appears, click Continue. 9 Choose Search the network for devices and choose from a list of discovered devices...
... printer's IP address or its node name. Windows® Network • For Windows® 7, when the User Account Control Dialog box appears on page 23. 10 Choose your printer as Default printer, uncheck Set as Default Printer. Setup is now complete. 19 Installing the Printer Driver Windows® Note • For Windows Vista®, when the User Account Control screen appears, click Continue. 9 Choose Search the network for devices and choose from a list of discovered devices...
Quick Installation Guide
Page 22
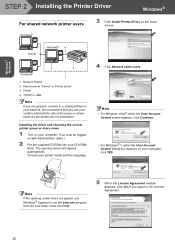
... User Account Control Dialog box appears on with Administrator rights.) 2 Put the supplied CD-ROM into your CD-ROM drive. Windows R TCP/IP WindowsR 4 2 3 Windows R 1 1 Network Shared 2 Also known as "Server" or "Printer server" 3 Printer 4 TCP/IP or USB Note If you are going to connect to a shared printer on the menu screen. Note If the opening screen will appear automatically. The opening screen does not appear, use Windows...
... User Account Control Dialog box appears on with Administrator rights.) 2 Put the supplied CD-ROM into your CD-ROM drive. Windows R TCP/IP WindowsR 4 2 3 Windows R 1 1 Network Shared 2 Also known as "Server" or "Printer server" 3 Printer 4 TCP/IP or USB Note If you are going to connect to a shared printer on the menu screen. Note If the opening screen will appear automatically. The opening screen does not appear, use Windows...
Quick Installation Guide
Page 25
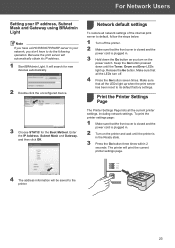
... Toner, Drum and Error LEDs light up when the print server has been reset to its IP address. 1 Start BRAdmin Light. Keep the Go button pressed down the Go button as you don't have a DHCP/BOOTP/RARP server in your network, you turn off the printer. 2 Make sure that all network settings of the internal print server to default, follow the steps below. 1 Turn off . 4 Press the Go button seven times. Release the Go button. Print the Printer Settings 3 Page The Printer Settings Page lists...
... Toner, Drum and Error LEDs light up when the print server has been reset to its IP address. 1 Start BRAdmin Light. Keep the Go button pressed down the Go button as you don't have a DHCP/BOOTP/RARP server in your network, you turn off the printer. 2 Make sure that all network settings of the internal print server to default, follow the steps below. 1 Turn off . 4 Press the Go button seven times. Release the Go button. Print the Printer Settings 3 Page The Printer Settings Page lists...
User's Guide
Page 7
... of the paper (manual duplex printing 21 3 Driver and Software 25 Printer driver ...25 Features in the printer driver ...27 Uninstalling the printer driver ...37 Printer driver for Windows® 2000/XP/7, Windows Vista® and Windows Server® 2003 37 Software ...38 Software for network models ...38 Automatic interface selection...38 4 Control Panel 39 LEDs (Light Emitting Diodes)...39 Service call indications ...44 Go button ...46 Print a test page ...47 Print a Printer Settings page...48 Print Fonts ...49 Network default settings ...50 5 Routine Maintenance 51 Replacing the...
... of the paper (manual duplex printing 21 3 Driver and Software 25 Printer driver ...25 Features in the printer driver ...27 Uninstalling the printer driver ...37 Printer driver for Windows® 2000/XP/7, Windows Vista® and Windows Server® 2003 37 Software ...38 Software for network models ...38 Automatic interface selection...38 4 Control Panel 39 LEDs (Light Emitting Diodes)...39 Service call indications ...44 Go button ...46 Print a test page ...47 Print a Printer Settings page...48 Print Fonts ...49 Network default settings ...50 5 Routine Maintenance 51 Replacing the...
User's Guide
Page 10
...; Network cable Use a straight-through Category5 (or greater) twisted-pair cable for the interface you are using. „ USB cable Please make sure you unpack the printer, make sure that is not a standard accessory. 1 About this time. When you connect it to the USB port of the following parts. 1 1 Printer Quick Setup Guide (For North America, Asia) Quick Install Guide (For EU, North America) CD-ROM (including Quick Setup Guide, User's Guide and Network User's Guide) Drum Unit Assembly (including Toner Cartridge) USB cable Interface cable 1 The interface cable...
...; Network cable Use a straight-through Category5 (or greater) twisted-pair cable for the interface you are using. „ USB cable Please make sure you unpack the printer, make sure that is not a standard accessory. 1 About this time. When you connect it to the USB port of the following parts. 1 1 Printer Quick Setup Guide (For North America, Asia) Quick Install Guide (For EU, North America) CD-ROM (including Quick Setup Guide, User's Guide and Network User's Guide) Drum Unit Assembly (including Toner Cartridge) USB cable Interface cable 1 The interface cable...
User's Guide
Page 80
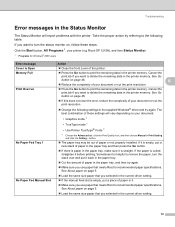
... the paper tray. „ The interface cable is securely connected to the correct printer port. Printer does not print: If you did not solve your problem with : „ Print quality (See Improving the print quality on page 83.) „ Printout is incorrect (See Solving print problems on . „ All of the protective parts have been removed. „ The toner cartridges and drum unit are installed properly. „ The front cover and fuser cover are problems with the above checks...
... the paper tray. „ The interface cable is securely connected to the correct printer port. Printer does not print: If you did not solve your problem with : „ Print quality (See Improving the print quality on page 83.) „ Printout is incorrect (See Solving print problems on . „ All of the protective parts have been removed. „ The toner cartridges and drum unit are installed properly. „ The front cover and fuser cover are problems with the above checks...
User's Guide
Page 81
... installed. No Paper Fed Manual Slot „ Load the same size paper that you selected in the current driver setting. „ If the manual feed slot is empty, put it back in the paper tray. „ Cut the amount of your printer (e.g Ricoh SP 1210N), and then Status Monitor. 1 Programs for Windows® 2000 users Error message Cover is straight. Cancel the print job if you want to print the remaining data in the printer memory. See Go button on page...
... installed. No Paper Fed Manual Slot „ Load the same size paper that you selected in the current driver setting. „ If the manual feed slot is empty, put it back in the paper tray. „ Cut the amount of your printer (e.g Ricoh SP 1210N), and then Status Monitor. 1 Programs for Windows® 2000 users Error message Cover is straight. Cancel the print job if you want to print the remaining data in the printer memory. See Go button on page...

User's Guide
Page 83
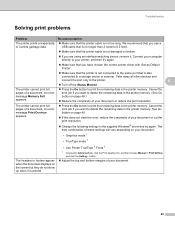
... supplied Windows® driver and try again. See Go button on page 46. „ If this does not clear the error, reduce the complexity of your document or reduce 6 the print resolution. „ Change the following settings in the printer memory. The best combination of your document: • Graphics mode 1 • TrueType mode 1 • Use Printer TrueType® Fonts 1 Resolution reduced to prevent automatic reduction in the printer memory. Cancel...
... supplied Windows® driver and try again. See Go button on page 46. „ If this does not clear the error, reduce the complexity of your document or reduce 6 the print resolution. „ Change the following settings in the printer memory. The best combination of your document: • Graphics mode 1 • TrueType mode 1 • Use Printer TrueType® Fonts 1 Resolution reduced to prevent automatic reduction in the printer memory. Cancel...
User's Guide
Page 84
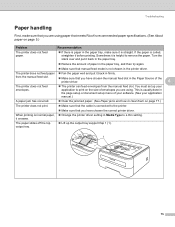
... set up the output tray support flap 1 (1). 1 75 it before printing. Troubleshooting Paper handling 6 First, make sure it back in the page setup or document setup menu of your software. (See your application manual.) A paper jam has occurred. „ Clear the jammed paper. (See Paper jams and how to clear them on page 77.) The printer does not print. „ Make sure that the cable is connected to print on the size of the printer driver. 6 The printer does not feed envelopes. „ The printer can feed envelopes...
... set up the output tray support flap 1 (1). 1 75 it before printing. Troubleshooting Paper handling 6 First, make sure it back in the page setup or document setup menu of your software. (See your application manual.) A paper jam has occurred. „ Clear the jammed paper. (See Paper jams and how to clear them on page 77.) The printer does not print. „ Make sure that the cable is connected to print on the size of the printer driver. 6 The printer does not feed envelopes. „ The printer can feed envelopes...

User's Guide
Page 93
... drum 6 unit on page 61. „ Clean the inside the printer covering the scanner window. „ Wipe the scanner window with a soft cloth. See Cleaning the inside of paper is not inside of poor print quality Hollow print Recommendation „ Make sure that meets our specifications. Put in a new drum unit. Put in a new toner cartridge. See Replacing the drum unit on page 61. „ The fuser unit may be damaged. See Replacing the drum unit on page 61. See Replacing the drum unit...
... drum 6 unit on page 61. „ Clean the inside the printer covering the scanner window. „ Wipe the scanner window with a soft cloth. See Cleaning the inside of paper is not inside of poor print quality Hollow print Recommendation „ Make sure that meets our specifications. Put in a new drum unit. Put in a new toner cartridge. See Replacing the drum unit on page 61. „ The fuser unit may be damaged. See Replacing the drum unit on page 61. See Replacing the drum unit...
User's Guide
Page 98
... the printer cable is not too long. Take away all other devices and connect the port only to print the remaining data in the printer memory. (See Go button on page 46. „ If this does not clear the error, reduce the complexity of your document. 89 The printer cannot print full „ Press the Go button to the printer. 6 „ Turn off the Status Monitor. See Go button on page...
... the printer cable is not too long. Take away all other devices and connect the port only to print the remaining data in the printer memory. (See Go button on page 46. „ If this does not clear the error, reduce the complexity of your document. 89 The printer cannot print full „ Press the Go button to the printer. 6 „ Turn off the Status Monitor. See Go button on page...
User's Guide
Page 127
..., 70 Cover open 42 D Device options 32 Dimensions 93 Domain 98 Drum error 43 Drum life end soon 42 Drum unit 60 Duplex printing 21 E Emulation 91 Envelopes 7, 17 Error messages 72, 74 F Fonts 49, 91 G Go buttons 46 I Interface 91 J Job cancel 46 L LEDs 39 M Manual feed slot 13 manual feed slot 22 Media specifications 92 Media type 5 Memory 91 Memory full 42 N Network 38 Network connectivity 91 Network default setting 50 No paper 42 O D OPC drum 85 P Paper 5, 95 Paper handling 92 Paper jams 42, 77 PCL printer driver 27 Plain paper 6 Power supply 4 Print overrun...
..., 70 Cover open 42 D Device options 32 Dimensions 93 Domain 98 Drum error 43 Drum life end soon 42 Drum unit 60 Duplex printing 21 E Emulation 91 Envelopes 7, 17 Error messages 72, 74 F Fonts 49, 91 G Go buttons 46 I Interface 91 J Job cancel 46 L LEDs 39 M Manual feed slot 13 manual feed slot 22 Media specifications 92 Media type 5 Memory 91 Memory full 42 N Network 38 Network connectivity 91 Network default setting 50 No paper 42 O D OPC drum 85 P Paper 5, 95 Paper handling 92 Paper jams 42, 77 PCL printer driver 27 Plain paper 6 Power supply 4 Print overrun...


