
Canadian English Manual
Page 1
If you have questions, or if parts are damaged or missing, PLEASE CONTACT OUR CUSTOMER SERVICE DEPARTMENT DIRECTLY. Serial Number Decal QUESTIONS? Write the serial number in this manual before using this manual for reference. www.proform.com CALL TOLL-FREE: 1-888-936-4266 Mon.-Fri., 7:30 until 16:30 ET (excluding holidays) OR E-MAIL US: [email protected] USER'S MANUAL CAUTION Read all precautions and instructions in the space above for future reference. Model No. 29859.0 Serial No. Keep this equipment.
If you have questions, or if parts are damaged or missing, PLEASE CONTACT OUR CUSTOMER SERVICE DEPARTMENT DIRECTLY. Serial Number Decal QUESTIONS? Write the serial number in this manual before using this manual for reference. www.proform.com CALL TOLL-FREE: 1-888-936-4266 Mon.-Fri., 7:30 until 16:30 ET (excluding holidays) OR E-MAIL US: [email protected] USER'S MANUAL CAUTION Read all precautions and instructions in the space above for future reference. Model No. 29859.0 Serial No. Keep this equipment.
Canadian English Manual
Page 2
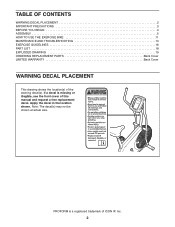
... trademark of this manual and request a free replacement decal. Note: The decal(s) may not be shown at actual size. TABLE OF CONTENTS WARNING DECAL PLACEMENT 2 IMPORTANT PRECAUTIONS 3 BEFORE YOU BEGIN 4 ASSEMBLY 5 HOW TO USE THE EXERCISE BIKE 11 MAINTENANCE AND TROUBLESHOOTING 14 EXERCISE GUIDELINES 16 PART LIST 18 EXPLODED DRAWING 19 ORDERING REPLACEMENT PARTS Back Cover LIMITED WARRANTY Back Cover WARNING DECAL PLACEMENT This drawing shows the location(s) of the...
... trademark of this manual and request a free replacement decal. Note: The decal(s) may not be shown at actual size. TABLE OF CONTENTS WARNING DECAL PLACEMENT 2 IMPORTANT PRECAUTIONS 3 BEFORE YOU BEGIN 4 ASSEMBLY 5 HOW TO USE THE EXERCISE BIKE 11 MAINTENANCE AND TROUBLESHOOTING 14 EXERCISE GUIDELINES 16 PART LIST 18 EXPLODED DRAWING 19 ORDERING REPLACEMENT PARTS Back Cover LIMITED WARRANTY Back Cover WARNING DECAL PLACEMENT This drawing shows the location(s) of the...
Canadian English Manual
Page 3
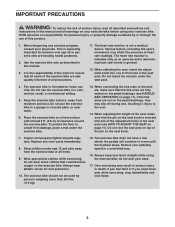
... any worn parts immediately. 8. The heart rate monitor is especially important for home use the exercise bike in a commercial, rental, or institutional setting. 5. Place the exercise bike on a level surface with pre-existing health problems. 2. Replace any exercise program, consult your exercise bike. Use the exercise bike only as an exercise aid in determining heart rate trends in serious injury or death. The exercise bike is inserted into one of the adjustment holes in the seat post (see...
... any worn parts immediately. 8. The heart rate monitor is especially important for home use the exercise bike in a commercial, rental, or institutional setting. 5. Place the exercise bike on a level surface with pre-existing health problems. 2. Replace any exercise program, consult your exercise bike. Use the exercise bike only as an exercise aid in determining heart rate trends in serious injury or death. The exercise bike is inserted into one of the adjustment holes in the seat post (see...
Canadian English Manual
Page 4
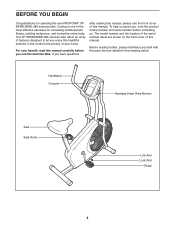
... assist you have questions after reading this manual, please see the front cover of the most effective exercises for selecting the new PROFORM® XP WHIRLWIND 280 exercise bike. Handlebar Console Handgrip Heart Rate Monitor Seat Seat Knob Link Arm Lock Rod Pedal 4 If you , note the product model number and serial number before you enjoy this manual. BEFORE YOU BEGIN Congratulations for increasing cardiovascular fitness, building endurance, and toning the entire body. For your home.
... assist you have questions after reading this manual, please see the front cover of the most effective exercises for selecting the new PROFORM® XP WHIRLWIND 280 exercise bike. Handlebar Console Handgrip Heart Rate Monitor Seat Seat Knob Link Arm Lock Rod Pedal 4 If you , note the product model number and serial number before you enjoy this manual. BEFORE YOU BEGIN Congratulations for increasing cardiovascular fitness, building endurance, and toning the entire body. For your home.
Canadian English Manual
Page 5
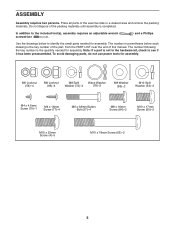
... the key number of the part, from the PART LIST near the end of this manual. To avoid damaging parts, do not use power tools for assembly. The number following the key number is completed. M6 Locknut (56)-4 M8 Locknut (66)-4 M8 Split Wave Washer Washer (72)-4 (78)-2 M8 Washer (85)-2 M10 Split Washer (54)-3 M4 x 4.5mm Screw (70)-1 M4 x 16mm Screw (77)-4 M6 x 38mm Button Bolt...
... the key number of the part, from the PART LIST near the end of this manual. To avoid damaging parts, do not use power tools for assembly. The number following the key number is completed. M6 Locknut (56)-4 M8 Locknut (66)-4 M8 Split Wave Washer Washer (72)-4 (78)-2 M8 Washer (85)-2 M10 Split Washer (54)-3 M4 x 4.5mm Screw (70)-1 M4 x 16mm Screw (77)-4 M6 x 38mm Button Bolt...

Canadian English Manual
Page 6
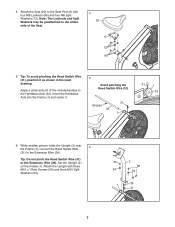
... Stabilizer (19) to make assembly easier, read the 1 information on the Seat Knob is engaged in the Seat Post. 1. Loosen the Seat Knob (29) a few turns. Next, push the Seat Guide (46) downward into the Frame (1), and then release the Seat Knob. Attach the Seat Guide with an M4 x 4.5mm Screw (70). Then, retighten the Seat Knob (29). 1 4 60 4 4 46 6 70 29 1 6 Move the Seat Post upward and downward slightly...
... Stabilizer (19) to make assembly easier, read the 1 information on the Seat Knob is engaged in the Seat Post. 1. Loosen the Seat Knob (29) a few turns. Next, push the Seat Guide (46) downward into the Frame (1), and then release the Seat Knob. Attach the Seat Guide with an M4 x 4.5mm Screw (70). Then, retighten the Seat Knob (29). 1 4 60 4 4 46 6 70 29 1 6 Move the Seat Post upward and downward slightly...
Canadian English Manual
Page 7
... of the included grease to the Extension Wire (39). While another person holds the Upright (2) near 6 the Frame (1), connect the Reed Switch Wire (31) to the Handlebar Axle (33). Apply a small amount of the Seat. 4 20 6 72 66 5. Insert the Handlebar Axle into the Frame (1) and center it as shown in the inset drawing. Set the Upright (2) on the Frame...
... of the included grease to the Extension Wire (39). While another person holds the Upright (2) near 6 the Frame (1), connect the Reed Switch Wire (31) to the Handlebar Axle (33). Apply a small amount of the Seat. 4 20 6 72 66 5. Insert the Handlebar Axle into the Frame (1) and center it as shown in the inset drawing. Set the Upright (2) on the Frame...
Canadian English Manual
Page 8
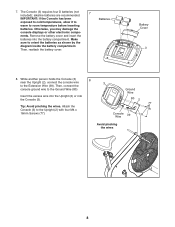
..., connect the console ground wire to the Extension Wire (39). The Console (3) requires four D batteries (not included); nents. Attach the Console (3) to orient the batteries as shown by the diagram inside the battery compartment. Remove the battery cover and insert the batteries into the Console (3). Otherwise, you may damage the console displays or other electronic compo- Tip: Avoid pinching the wires. Make sure to the Upright (2) with four M4 x 16mm Screws...
..., connect the console ground wire to the Extension Wire (39). The Console (3) requires four D batteries (not included); nents. Attach the Console (3) to orient the batteries as shown by the diagram inside the battery compartment. Remove the battery cover and insert the batteries into the Console (3). Otherwise, you may damage the console displays or other electronic compo- Tip: Avoid pinching the wires. Make sure to the Upright (2) with four M4 x 16mm Screws...
Canadian English Manual
Page 9
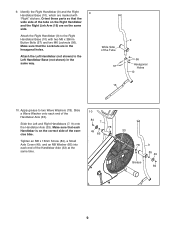
...Grease 84 9 Attach the Right Handlebar (9) to the Right Handlebar Base (10) with "Right" stickers. Attach the Left Handlebar (not shown) to two Wave Washers (78). Tighten an M8 x 16mm Screw (84), a Small Axle Cover...Arm (16) are marked with two M6 x 38mm Button Bolts (57) and two M6 Locknuts (56). 9. Wide Side of the exercise bike.... Identify the Right Handlebar (9) and the Right 9 Handlebar Base (10), which are on the correct side of the Tube 57 16 9 56 Hexagonal Holes 10 10. Orient these parts...
...Grease 84 9 Attach the Right Handlebar (9) to the Right Handlebar Base (10) with "Right" stickers. Attach the Left Handlebar (not shown) to two Wave Washers (78). Tighten an M8 x 16mm Screw (84), a Small Axle Cover...Arm (16) are marked with two M6 x 38mm Button Bolts (57) and two M6 Locknuts (56). 9. Wide Side of the exercise bike.... Identify the Right Handlebar (9) and the Right 9 Handlebar Base (10), which are on the correct side of the Tube 57 16 9 56 Hexagonal Holes 10 10. Orient these parts...
Canadian English Manual
Page 10
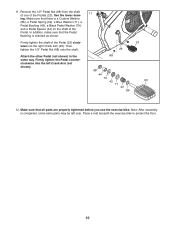
... left over. In addition, make sure that all parts are properly tightened before you use the exercise bike. Firmly tighten the Pedal counterclockwise into the right Crank Arm (26). Remove the 1/2" Pedal Nut (68) from the shaft of one of the Pedals (23). Make sure that the Pedal Bushing is completed, some extra parts may be left Crank Arm (not shown). 11 23 26 68 68...
... left over. In addition, make sure that all parts are properly tightened before you use the exercise bike. Firmly tighten the Pedal counterclockwise into the right Crank Arm (26). Remove the 1/2" Pedal Nut (68) from the shaft of one of the Pedals (23). Make sure that the Pedal Bushing is completed, some extra parts may be left Crank Arm (not shown). 11 23 26 68 68...
Canadian English Manual
Page 11
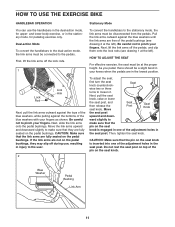
... adjust the seat, first turn the seat knob counterclock- Pull the link arms outward against the bottoms of the pin on top of the blue washers with your fingers. Move the link arms upward and downward slightly to make sure that the pin on the pedal bushings, they are free of the adjustment holes in injury to the stationary mode, the link arms must be connected...
... adjust the seat, first turn the seat knob counterclock- Pull the link arms outward against the bottoms of the pin on top of the blue washers with your fingers. Move the link arms upward and downward slightly to make sure that the pin on the pedal bushings, they are free of the adjustment holes in injury to the stationary mode, the link arms must be connected...

Canadian English Manual
Page 12
... CONSOLE DIAGRAM HOW TO USE THE CONSOLE Before using the console, make sure that you have pedaled, your pedaling speed, or the approximate number of calories you have burned. When you have pedaled. Press the Priority Display button repeatedly until the priority display shows the information that you are installed (see step 3 on page 13). Note: While information is the priority display. To turn on the console. Follow your heart rate (see assembly step 7 on the display, remove...
... CONSOLE DIAGRAM HOW TO USE THE CONSOLE Before using the console, make sure that you have pedaled, your pedaling speed, or the approximate number of calories you have burned. When you have pedaled. Press the Priority Display button repeatedly until the priority display shows the information that you are installed (see step 3 on page 13). Note: While information is the priority display. To turn on the console. Follow your heart rate (see assembly step 7 on the display, remove...

Canadian English Manual
Page 13
... heart rate is paused, the time will show speed and distance in either miles or kilometers. When you exercise, indicators will again begin to move for about 15 seconds. Avoid moving your heart rate if desired. If your pulse is detected, the heartshaped indicator in the lower right display will flash and one or two dashes will turn off automatically. If the pedals do not move...
... heart rate is paused, the time will show speed and distance in either miles or kilometers. When you exercise, indicators will again begin to move for about 15 seconds. Avoid moving your heart rate if desired. If your pulse is detected, the heartshaped indicator in the lower right display will flash and one or two dashes will turn off automatically. If the pedals do not move...
Canadian English Manual
Page 14
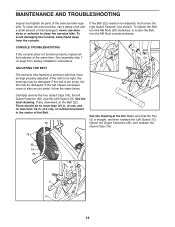
... (not shown). never use a damp cloth and a small amount of the exercise bike regularly. See assembly step 7 22 on the Belt (22). Press downward on page 8 for battery installation instructions. 53 ADJUSTING THE BELT The exercise bike features a precision belt that the Fan (5) is too loose, the fan may be damaged. To tighten the Belt, turn the M6 Nuts counterclockwise. MAINTENANCE AND TROUBLESHOOTING Inspect and tighten all the batteries at the left...
... (not shown). never use a damp cloth and a small amount of the exercise bike regularly. See assembly step 7 22 on the Belt (22). Press downward on page 8 for battery installation instructions. 53 ADJUSTING THE BELT The exercise bike features a precision belt that the Fan (5) is too loose, the fan may be damaged. To tighten the Belt, turn the M6 Nuts counterclockwise. MAINTENANCE AND TROUBLESHOOTING Inspect and tighten all the batteries at the left...
Canadian English Manual
Page 15
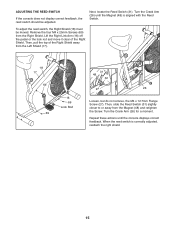
... the Reed Switch (31) slightly closer to or away from the Right Shield. To adjust the reed switch, the Right Shield (18) must be adjusted. ADJUSTING THE REED SWITCH If the console does not display correct feedback, the reed switch should be moved. Turn the Crank Arm (26) for a moment. Remove the four M4 x 25mm Screws (69) from the Magnet (48) and retighten the Screw. Turn the Crank Arm (26) until the console displays correct...
... the Reed Switch (31) slightly closer to or away from the Right Shield. To adjust the reed switch, the Right Shield (18) must be adjusted. ADJUSTING THE REED SWITCH If the console does not display correct feedback, the reed switch should be moved. Turn the Crank Arm (26) for a moment. Remove the four M4 x 25mm Screws (69) from the Magnet (48) and retighten the Screw. Turn the Crank Arm (26) until the console displays correct...
Canadian English Manual
Page 16
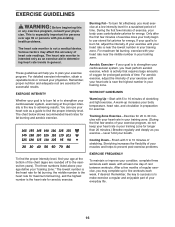
... pre-existing health problems. The heart rate monitor is near the middle number in general. The heart rate monitor is especially important for exercise. These guidelines will help you must exercise at the proper intensity is to strengthen your breath. Training Zone Exercise-Exercise for 20 to find your everyday life. 16 EXERCISE GUIDELINES WARNING: Before beginning this or any exercise program, consult your exercise program. You can use stored...
... pre-existing health problems. The heart rate monitor is near the middle number in general. The heart rate monitor is especially important for exercise. These guidelines will help you must exercise at the proper intensity is to strengthen your breath. Training Zone Exercise-Exercise for 20 to find your everyday life. 16 EXERCISE GUIDELINES WARNING: Before beginning this or any exercise program, consult your exercise program. You can use stored...
Canadian English Manual
Page 17
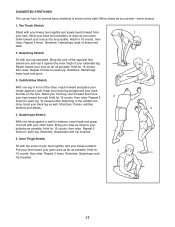
... Repeat 3 3 times for balance, reach back and grasp one leg extended. Quadriceps Stretch With one leg in front of your knees outward. Stretches: Quadriceps and hip muscles. 17 SUGGESTED STRETCHES The correct form for 15 counts, then relax. Hamstring Stretch Sit with the soles... foot flat on the floor. Repeat 3 times. Bring the sole of your feet together and your extended leg. Stretches: Hamstrings, lower back and groin. 3. To cause further stretching of knees and back. 2. Bend your front leg, lean forward and move your buttocks as possible.
... Repeat 3 3 times for balance, reach back and grasp one leg extended. Quadriceps Stretch With one leg in front of your knees outward. Stretches: Quadriceps and hip muscles. 17 SUGGESTED STRETCHES The correct form for 15 counts, then relax. Hamstring Stretch Sit with the soles... foot flat on the floor. Repeat 3 times. Bring the sole of your feet together and your extended leg. Stretches: Hamstrings, lower back and groin. 3. To cause further stretching of knees and back. 2. Bend your front leg, lean forward and move your buttocks as possible.
Canadian English Manual
Page 18
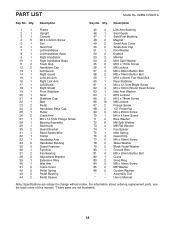
... 22 1 Belt 23 2 Pedal 24 2 Handlebar Base Cap 25 1 Pulley 26 2 Crank Arm 27 1 M4 x 12.7mm Flange Screw 28 1 Bearing Assembly 29 1 Seat Knob 30 2 Guard Bracket 31 1 Reed Switch/Wire 32 1 Clamp 33 1 Handlebar Axle 34 6 Handlebar Bushing 35 2 Guard Fastener 36 1 Fan Axle 37 2 Fan Bearing 38 2 Adjustment Bracket 39 1 Extension Wire 40 1 Idler Arm 41 2 Crank Cover 42 2 Pedal Spring 43 2 Pedal Bushing 44 2 Pedal Spacer...
... 22 1 Belt 23 2 Pedal 24 2 Handlebar Base Cap 25 1 Pulley 26 2 Crank Arm 27 1 M4 x 12.7mm Flange Screw 28 1 Bearing Assembly 29 1 Seat Knob 30 2 Guard Bracket 31 1 Reed Switch/Wire 32 1 Clamp 33 1 Handlebar Axle 34 6 Handlebar Bushing 35 2 Guard Fastener 36 1 Fan Axle 37 2 Fan Bearing 38 2 Adjustment Bracket 39 1 Extension Wire 40 1 Idler Arm 41 2 Crank Cover 42 2 Pedal Spring 43 2 Pedal Bushing 44 2 Pedal Spacer...
Canadian English Manual
Page 19
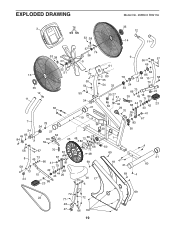
EXPLODED DRAWING Model No. 29859.0 R0911A 3 76 35 12 53 38 37 52 51 13 35 12 11 65 7 34 49 85 84 78 34 21 64 63 59 40 25 56 57 75 81 8 45 73 67 66 41 81 58 79 71 73 15 42 68 43 44 26 24 86 23 53 38 52 37 74 36 5 61 14 11 9 56 57 49 77 55 54 55 34 21 19 84 2 80 55 54 33 85 78 34 10 73 34 34 66 73 58 24 30 27 31 39 45 16 86 71 62 32 29 68 44 79 23 42 43 70 26 41 28 67 83 62 30 50 48 72 66 28 82 83 66 72 48 1 50 69 69 18 4 21 4 21 60 20 17 6 69 4 72 69 72 22 77 72 46 47 66 69 19
EXPLODED DRAWING Model No. 29859.0 R0911A 3 76 35 12 53 38 37 52 51 13 35 12 11 65 7 34 49 85 84 78 34 21 64 63 59 40 25 56 57 75 81 8 45 73 67 66 41 81 58 79 71 73 15 42 68 43 44 26 24 86 23 53 38 52 37 74 36 5 61 14 11 9 56 57 49 77 55 54 55 34 21 19 84 2 80 55 54 33 85 78 34 10 73 34 34 66 73 58 24 30 27 31 39 45 16 86 71 62 32 29 68 44 79 23 42 43 70 26 41 28 67 83 62 30 50 48 72 66 28 82 83 66 72 48 1 50 69 69 18 4 21 4 21 60 20 17 6 69 4 72 69 72 22 77 72 46 47 66 69 19
Canadian English Manual
Page 20
... following information when contacting us: • the model number and serial number of the product (see the front cover of this manual) • the name of the product (see the front cover of this manual) • the key number and description of the replacement part(s) (see the front cover of this warranty is limited to repairing or replacing, at ICONʼs option, the product through one of its authorized service...
... following information when contacting us: • the model number and serial number of the product (see the front cover of this manual) • the name of the product (see the front cover of this manual) • the key number and description of the replacement part(s) (see the front cover of this warranty is limited to repairing or replacing, at ICONʼs option, the product through one of its authorized service...


