
Canadian English Manual
Page 1
Write the serial number in this manual before using this manual for reference. If you have questions, or if parts are damaged or missing, PLEASE CONTACT OUR CUSTOMER SERVICE DEPARTMENT DIRECTLY. CALL TOLL-FREE: 1-888-936-4266 Mon.-Fri., 7:30 until 16:30 ET (excluding holidays) OR E-MAIL US: [email protected] USER'S MANUAL CAUTION Read all precautions and instructions in the space above for future reference. Serial Number Decal QUESTIONS? Model No. 29859.0 Serial No. Keep this equipment. www.proform.com
Write the serial number in this manual before using this manual for reference. If you have questions, or if parts are damaged or missing, PLEASE CONTACT OUR CUSTOMER SERVICE DEPARTMENT DIRECTLY. CALL TOLL-FREE: 1-888-936-4266 Mon.-Fri., 7:30 until 16:30 ET (excluding holidays) OR E-MAIL US: [email protected] USER'S MANUAL CAUTION Read all precautions and instructions in the space above for future reference. Serial Number Decal QUESTIONS? Model No. 29859.0 Serial No. Keep this equipment. www.proform.com
Canadian English Manual
Page 2
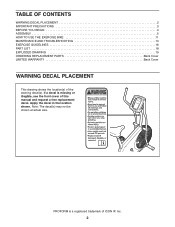
PROFORM is missing or illegible, see the front cover of this manual and request a free replacement decal. TABLE OF CONTENTS WARNING DECAL PLACEMENT 2 IMPORTANT PRECAUTIONS 3 BEFORE YOU BEGIN 4 ASSEMBLY 5 HOW TO USE THE EXERCISE BIKE 11 MAINTENANCE AND TROUBLESHOOTING 14 EXERCISE GUIDELINES 16 PART LIST 18 EXPLODED DRAWING 19 ORDERING REPLACEMENT PARTS Back Cover LIMITED...
PROFORM is missing or illegible, see the front cover of this manual and request a free replacement decal. TABLE OF CONTENTS WARNING DECAL PLACEMENT 2 IMPORTANT PRECAUTIONS 3 BEFORE YOU BEGIN 4 ASSEMBLY 5 HOW TO USE THE EXERCISE BIKE 11 MAINTENANCE AND TROUBLESHOOTING 14 EXERCISE GUIDELINES 16 PART LIST 18 EXPLODED DRAWING 19 ORDERING REPLACEMENT PARTS Back Cover LIMITED...
Canadian English Manual
Page 3
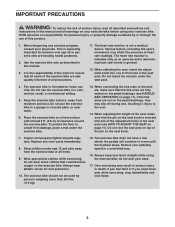
... injury, read all important precautions and instructions in this manual and all warnings on your exercise bike before using the exercise bike; Before beginning any worn parts immediately. 8. This is not a medical device. Use the exercise bike only as an exercise aid in determining heart rate trends in injury to ensure that could become...
... injury, read all important precautions and instructions in this manual and all warnings on your exercise bike before using the exercise bike; Before beginning any worn parts immediately. 8. This is not a medical device. Use the exercise bike only as an exercise aid in determining heart rate trends in injury to ensure that could become...
Canadian English Manual
Page 4
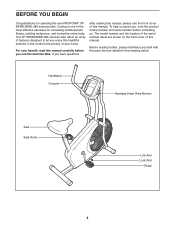
... the serial number decal are labeled in the comfort and privacy of the most effective exercises for selecting the new PROFORM® XP WHIRLWIND 280 exercise bike. Before reading further, please familiarize yourself with the parts that are shown on the front cover of this manual. Cycling is one of your benefit, read this manual carefully...
... the serial number decal are labeled in the comfort and privacy of the most effective exercises for selecting the new PROFORM® XP WHIRLWIND 280 exercise bike. Before reading further, please familiarize yourself with the parts that are shown on the front cover of this manual. Cycling is one of your benefit, read this manual carefully...
Canadian English Manual
Page 5
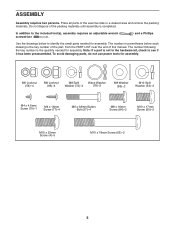
...below each drawing is not in the hardware kit, check to see if it has been preassembled. Note: If a part is the key number of the part, from the PART LIST near the end of this manual. The number in a cleared area and remove the packing materials. ASSEMBLY Assembly ...use power tools for assembly. The number following the key number is completed. Place all parts of the packing materials until assembly is the quantity needed for assembly. Do not dispose of the exercise bike in parentheses below to the included tool(s), assembly requires an adjustable wrench screwdriver . M6...
...below each drawing is not in the hardware kit, check to see if it has been preassembled. Note: If a part is the key number of the part, from the PART LIST near the end of this manual. The number in a cleared area and remove the packing materials. ASSEMBLY Assembly ...use power tools for assembly. The number following the key number is completed. Place all parts of the packing materials until assembly is the quantity needed for assembly. Do not dispose of the exercise bike in parentheses below to the included tool(s), assembly requires an adjustable wrench screwdriver . M6...
Canadian English Manual
Page 9
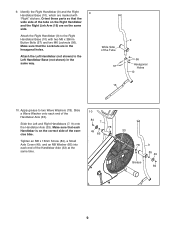
... shown) in the hexagonal holes. Make sure that the wide side of the tube on the correct side of the Handlebar Axle (33). Orient these parts so that each Handlebar is on the Right Handlebar and the Right Link Arm (16) are marked with two M6 x 38mm Button Bolts (57) and... (10) with "Right" stickers. Tighten an M8 x 16mm Screw (84), a Small Axle Cover (49), and an M8 Washer (85) into each end of the exercise bike. 9. Slide a Wave Washer onto each end of the Tube 57 16 9 56 Hexagonal Holes 10 10.
... shown) in the hexagonal holes. Make sure that the wide side of the tube on the correct side of the Handlebar Axle (33). Orient these parts so that each Handlebar is on the Right Handlebar and the Right Link Arm (16) are marked with two M6 x 38mm Button Bolts (57) and... (10) with "Right" stickers. Tighten an M8 x 16mm Screw (84), a Small Axle Cover (49), and an M8 Washer (85) into each end of the exercise bike. 9. Slide a Wave Washer onto each end of the Tube 57 16 9 56 Hexagonal Holes 10 10.
Canadian English Manual
Page 10
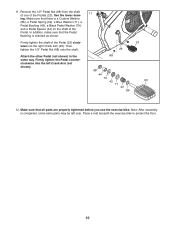
In addition, make sure that the Pedal Bushing is completed, some extra parts may be left Crank Arm (not shown). 11 23 26 68 68 44 79 43 23 71 42 ... assembly is oriented as shown. Attach the other Pedal (not shown) in the same way. 11. Make sure that all parts are properly tightened before you use the exercise bike. Then, tighten the 1/2" Pedal Nut (68) onto the shaft. Make sure that there is a Custom Washer (86), ... lower drawing. Firmly tighten the Pedal counterclockwise into the right Crank Arm (26). Place a mat beneath the exercise bike to protect the floor. 10
In addition, make sure that the Pedal Bushing is completed, some extra parts may be left Crank Arm (not shown). 11 23 26 68 68 44 79 43 23 71 42 ... assembly is oriented as shown. Attach the other Pedal (not shown) in the same way. 11. Make sure that all parts are properly tightened before you use the exercise bike. Then, tighten the 1/2" Pedal Nut (68) onto the shaft. Make sure that there is a Custom Washer (86), ... lower drawing. Firmly tighten the Pedal counterclockwise into the right Crank Arm (26). Place a mat beneath the exercise bike to protect the floor. 10
Canadian English Manual
Page 14
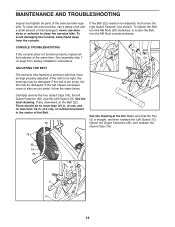
...Carefully remove the four Guard Clips (76), the left . There should be adjusted, first loosen the right Guard Fastener (not shown). To clean the exercise bike, use abrasives or solvents to be no more than 3/4 in. (2 cm), and no less than 1/4 in. (0.6 cm), of vertical movement in the ... Nuts counterclockwise. never use a damp cloth and a small amount of mild detergent; CONSOLE TROUBLESHOOTING If the console does not function properly, replace all parts of the Belt. 76 See the drawing at the same time. if the belt is straight, and then reattach the Left Guard (13), tighten...
...Carefully remove the four Guard Clips (76), the left . There should be adjusted, first loosen the right Guard Fastener (not shown). To clean the exercise bike, use abrasives or solvents to be no more than 3/4 in. (2 cm), and no less than 1/4 in. (0.6 cm), of vertical movement in the ... Nuts counterclockwise. never use a damp cloth and a small amount of mild detergent; CONSOLE TROUBLESHOOTING If the console does not function properly, replace all parts of the Belt. 76 See the drawing at the same time. if the belt is straight, and then reattach the Left Guard (13), tighten...
Canadian English Manual
Page 16
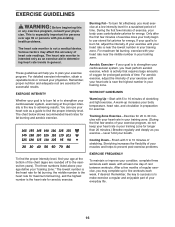
... guidelines will help you must exercise at the proper intensity is near the middle number in preparation for 20 to make exercise a regular and enjoyable part of time. You can use stored fat calories for prolonged periods of heart rate readings. If your everyday life. 16 WORKOUT GUIDELINES Warming Up-Start...
... guidelines will help you must exercise at the proper intensity is near the middle number in preparation for 20 to make exercise a regular and enjoyable part of time. You can use stored fat calories for prolonged periods of heart rate readings. If your everyday life. 16 WORKOUT GUIDELINES Warming Up-Start...
Canadian English Manual
Page 18
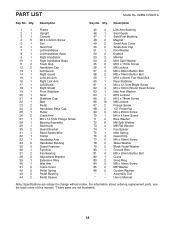
PART LIST Model No. 29859.0 R0911A Key No. Assembly Tool * - Userʼs Manual Note: Specifications are not illustrated. 18 Description 1 1 Frame 2 1 Upright 3 1 Console 4 5 M10 x 22mm Screw 5 1 ... 4 M8 x 20mm Button Bolt 82 1 Crank 83 2 Snap Ring 84 2 M8 x 16mm Screw 85 2 M8 Washer 86 2 Custom Washer * - Qty. For information about ordering replacement parts, see the back cover of this manual. *These parts are subject to change without notice. Qty. Description Key No.
PART LIST Model No. 29859.0 R0911A Key No. Assembly Tool * - Userʼs Manual Note: Specifications are not illustrated. 18 Description 1 1 Frame 2 1 Upright 3 1 Console 4 5 M10 x 22mm Screw 5 1 ... 4 M8 x 20mm Button Bolt 82 1 Crank 83 2 Snap Ring 84 2 M8 x 16mm Screw 85 2 M8 Washer 86 2 Custom Washer * - Qty. For information about ordering replacement parts, see the back cover of this manual. *These parts are subject to change without notice. Qty. Description Key No.
Canadian English Manual
Page 20
... its authorized service centers. or other warranty beyond that vary from province to the original purchaser (customer). ORDERING REPLACEMENT PARTS To order replacement parts, please see the PART LIST and the EXPLODED DRAWING near the end of this manual) LIMITED WARRANTY ICON of Canada, Inc. (ICON) warrants...For in their scope and duration to the terms set forth above limitation may have other warranties, and any kind. If replacement parts are warranted for which warranty claims are limited in -home service, the customer will be free from defects in connection with respect...
... its authorized service centers. or other warranty beyond that vary from province to the original purchaser (customer). ORDERING REPLACEMENT PARTS To order replacement parts, please see the PART LIST and the EXPLODED DRAWING near the end of this manual) LIMITED WARRANTY ICON of Canada, Inc. (ICON) warrants...For in their scope and duration to the terms set forth above limitation may have other warranties, and any kind. If replacement parts are warranted for which warranty claims are limited in -home service, the customer will be free from defects in connection with respect...


