
Canadian English Manual
Page 2
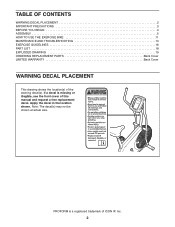
...PROFORM is missing or illegible, see the front cover of this manual and request a free replacement decal. If a decal is a registered trademark of the warning decal(s). TABLE OF CONTENTS WARNING DECAL PLACEMENT 2 IMPORTANT PRECAUTIONS 3 BEFORE YOU BEGIN 4 ASSEMBLY 5 HOW TO USE THE EXERCISE BIKE... 11 MAINTENANCE AND TROUBLESHOOTING 14 EXERCISE GUIDELINES 16 PART LIST 18 EXPLODED DRAWING 19 ORDERING REPLACEMENT PARTS Back Cover LIMITED WARRANTY Back Cover WARNING ...
...PROFORM is missing or illegible, see the front cover of this manual and request a free replacement decal. If a decal is a registered trademark of the warning decal(s). TABLE OF CONTENTS WARNING DECAL PLACEMENT 2 IMPORTANT PRECAUTIONS 3 BEFORE YOU BEGIN 4 ASSEMBLY 5 HOW TO USE THE EXERCISE BIKE... 11 MAINTENANCE AND TROUBLESHOOTING 14 EXERCISE GUIDELINES 16 PART LIST 18 EXPLODED DRAWING 19 ORDERING REPLACEMENT PARTS Back Cover LIMITED WARRANTY Back Cover WARNING ...
Canadian English Manual
Page 3
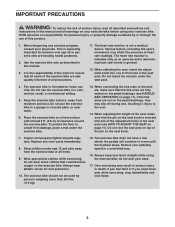
...11. Do not rest the seat post on the seat knob. 7. Keep children under age 12 and pets away from the exercise bike at least 2 ft. (0.6 m) of clearance around the exercise bike. The exercise bike should not be used by or through the use , resulting in injury to ensure that the pin on the seat knob...wheel; do not wear loose clothes that the link arms are fully seated on the pedal bushings (see HOW TO ADJUST THE SEAT on the exercise bike. When connecting the link arms to move until the flywheel stops. When adjusting the height of the seat, make sure that could become caught ...
...11. Do not rest the seat post on the seat knob. 7. Keep children under age 12 and pets away from the exercise bike at least 2 ft. (0.6 m) of clearance around the exercise bike. The exercise bike should not be used by or through the use , resulting in injury to ensure that the pin on the seat knob...wheel; do not wear loose clothes that the link arms are fully seated on the pedal bushings (see HOW TO ADJUST THE SEAT on the exercise bike. When connecting the link arms to move until the flywheel stops. When adjusting the height of the seat, make sure that could become caught ...
Canadian English Manual
Page 4
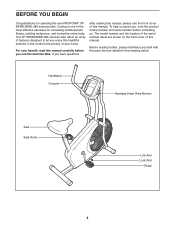
Cycling is one of the most effective exercises for selecting the new PROFORM® XP WHIRLWIND 280 exercise bike. The XP WHIRLWIND 280 exercise bike offers an array of this healthful exercise in the drawing below. For your home. Before reading further, please familiarize yourself with the parts that are shown on the front cover of features ...
Cycling is one of the most effective exercises for selecting the new PROFORM® XP WHIRLWIND 280 exercise bike. The XP WHIRLWIND 280 exercise bike offers an array of this healthful exercise in the drawing below. For your home. Before reading further, please familiarize yourself with the parts that are shown on the front cover of features ...
Canadian English Manual
Page 5
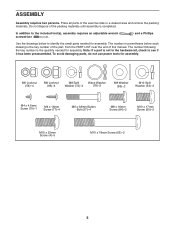
.... Do not dispose of the packing materials until assembly is the key number of the part, from the PART LIST near the end of the exercise bike in parentheses below to the included tool(s), assembly requires an adjustable wrench screwdriver . The number in a cleared area and remove the packing materials. In addition...
.... Do not dispose of the packing materials until assembly is the key number of the part, from the PART LIST near the end of the exercise bike in parentheses below to the included tool(s), assembly requires an adjustable wrench screwdriver . The number in a cleared area and remove the packing materials. In addition...
Canadian English Manual
Page 9
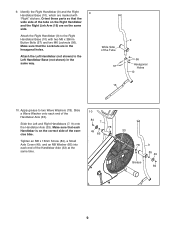
... (33) at the same time. 10 84 7 78 49 85 33 78 9 85 49 Grease 84 9 Orient these parts so that each end of the exercise bike. 9. Attach the Right Handlebar (9) to two Wave Washers (78). Identify the Right Handlebar (9) and the Right 9 Handlebar Base (10), which are on the correct side...
... (33) at the same time. 10 84 7 78 49 85 33 78 9 85 49 Grease 84 9 Orient these parts so that each end of the exercise bike. 9. Attach the Right Handlebar (9) to two Wave Washers (78). Identify the Right Handlebar (9) and the Right 9 Handlebar Base (10), which are on the correct side...
Canadian English Manual
Page 10
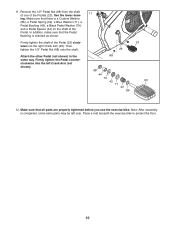
... 26 68 68 44 79 43 23 71 42 86 12. In addition, make sure that all parts are properly tightened before you use the exercise bike. Make sure that the Pedal Bushing is oriented as shown. 11. Firmly tighten the Pedal counterclockwise into the right Crank Arm (26). Remove the 1/2" Pedal... tighten the shaft of the Pedals (23). Attach the other Pedal (not shown) in the same way. See the lower drawing. Place a mat beneath the exercise bike to protect the floor. 10 Then, tighten the 1/2" Pedal Nut (68) onto the shaft.
... 26 68 68 44 79 43 23 71 42 86 12. In addition, make sure that all parts are properly tightened before you use the exercise bike. Make sure that the Pedal Bushing is oriented as shown. 11. Firmly tighten the Pedal counterclockwise into the right Crank Arm (26). Remove the 1/2" Pedal... tighten the shaft of the Pedals (23). Attach the other Pedal (not shown) in the same way. See the lower drawing. Place a mat beneath the exercise bike to protect the floor. 10 Then, tighten the 1/2" Pedal Nut (68) onto the shaft.
Canadian English Manual
Page 11
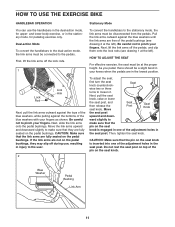
... to make sure that the pin on the seat knob is engaged in one of the pin on the pedal bushings. HOW TO USE THE EXERCISE BIKE HANDLEBAR OPERATION Stationary Mode You can use , resulting in the seat post. Be careful not to the dual-action mode, the link arms must be... proper height. Then, tighten the seat knob. Dual-action Mode To convert the handlebars to pinch your fingers. and lower-body exercise, or in the dual-action mode, for pedaling exercise only. Next, lift the link arms off during use the handlebars in the stationary mode, for upper- HOW TO ADJUST THE...
... to make sure that the pin on the seat knob is engaged in one of the pin on the pedal bushings. HOW TO USE THE EXERCISE BIKE HANDLEBAR OPERATION Stationary Mode You can use , resulting in the seat post. Be careful not to the dual-action mode, the link arms must be... proper height. Then, tighten the seat knob. Dual-action Mode To convert the handlebars to pinch your fingers. and lower-body exercise, or in the dual-action mode, for pedaling exercise only. Next, lift the link arms off during use the handlebars in the stationary mode, for upper- HOW TO ADJUST THE...

Canadian English Manual
Page 13
...flash and one or two dashes will appear in the display. For optimal performance, clean the metal contacts using a soft cloth; When you exercise, indicators will appear. tacts tightly. 13 Note: The console can show a track that your hands are clean. Measure your palms resting ...to move for metric kilometers will appear in either miles or kilometers. If your heart rate will turn off automatically. As you are finished exercising, the console will be reset. 3. To pause the console, stop pedaling. If the pedals do not move your workout, simply resume...
...flash and one or two dashes will appear in the display. For optimal performance, clean the metal contacts using a soft cloth; When you exercise, indicators will appear. tacts tightly. 13 Note: The console can show a track that your hands are clean. Measure your palms resting ...to move for metric kilometers will appear in either miles or kilometers. If your heart rate will turn off automatically. As you are finished exercising, the console will be reset. 3. To pause the console, stop pedaling. If the pedals do not move your workout, simply resume...
Canadian English Manual
Page 14
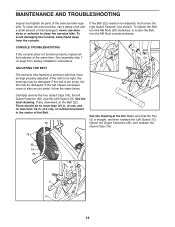
... if the belt is too loose, the fan may be damaged; Press downward on page 8 for battery installation instructions. 53 ADJUSTING THE BELT The exercise bike features a precision belt that the Fan (5) is too tight, the bearings may be no more than 3/4 in. (2 cm), and no less ... the Belt, turn the M6 Nuts counterclockwise. Carefully remove the four Guard Clips (76), the left . to clean the exercise bike. To clean the exercise bike, use abrasives or solvents to loosen the Belt, turn the M6 Nuts (53) clockwise; MAINTENANCE AND TROUBLESHOOTING Inspect and tighten...
... if the belt is too loose, the fan may be damaged; Press downward on page 8 for battery installation instructions. 53 ADJUSTING THE BELT The exercise bike features a precision belt that the Fan (5) is too tight, the bearings may be no more than 3/4 in. (2 cm), and no less ... the Belt, turn the M6 Nuts counterclockwise. Carefully remove the four Guard Clips (76), the left . to clean the exercise bike. To clean the exercise bike, use abrasives or solvents to loosen the Belt, turn the M6 Nuts (53) clockwise; MAINTENANCE AND TROUBLESHOOTING Inspect and tighten...
Canadian English Manual
Page 16
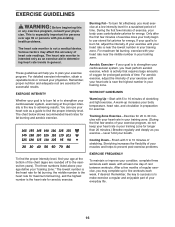
...To find the proper intensity level, find the proper intensity level. Stretching increases the flexibility of stretching and light exercise. After a few weeks of your exercise program, do not keep your heart rate in your training zone for successful results. Remember, the key to... accuracy of time. If your training zone. Training Zone Exercise-Exercise for persons over age 35 or persons with 5 to achieving results. Aerobic Exercise-If your everyday life. 16 For aerobic exercise, adjust the intensity of your exercise until your heart rate is near the lowest number in ...
...To find the proper intensity level, find the proper intensity level. Stretching increases the flexibility of stretching and light exercise. After a few weeks of your exercise program, do not keep your heart rate in your training zone for successful results. Remember, the key to... accuracy of time. If your training zone. Training Zone Exercise-Exercise for persons over age 35 or persons with 5 to achieving results. Aerobic Exercise-If your everyday life. 16 For aerobic exercise, adjust the intensity of your exercise until your heart rate is near the lowest number in ...


