
Instruction Manual
Page 1
... the serial number in this manual before using this manual for reference. Model No. QUESTIONS ? Keep this equipment. c/o HI Group PLC Express Way Whitwood, West Yorkshire WF10 5QJ UK CAUTION Read all precautions and instructions in the space above for future reference. Visit our website www.iconsupport.eu If you have questions, or if there are missing parts, please...
... the serial number in this manual before using this manual for reference. Model No. QUESTIONS ? Keep this equipment. c/o HI Group PLC Express Way Whitwood, West Yorkshire WF10 5QJ UK CAUTION Read all precautions and instructions in the space above for future reference. Visit our website www.iconsupport.eu If you have questions, or if there are missing parts, please...
Instruction Manual
Page 2
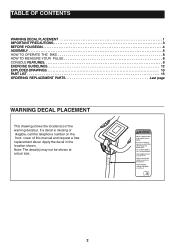
... PRECAUTIONS 3 BEFORE YOU BEGIN 4 ASSEMBLY 5 HOW TO OPERATE THE BIKE 8 HOW TO MEASURE YOUR PULSE 8 CONSOLE FEATURES 9 EXERCISE GUIDELINES 12 EXPLODED DRAWINGS 13 PART LIST 15 ORDERING REPLACEMENT PARTS Last page WARNING DECAL PLACEMENT This drawing shows the location(s) of this manual and request a free replacement decal. If a decal is missing or illegible, call the telephone number on the front cover of the warning decal(s).
... PRECAUTIONS 3 BEFORE YOU BEGIN 4 ASSEMBLY 5 HOW TO OPERATE THE BIKE 8 HOW TO MEASURE YOUR PULSE 8 CONSOLE FEATURES 9 EXERCISE GUIDELINES 12 EXPLODED DRAWINGS 13 PART LIST 15 ORDERING REPLACEMENT PARTS Last page WARNING DECAL PLACEMENT This drawing shows the location(s) of this manual and request a free replacement decal. If a decal is missing or illegible, call the telephone number on the front cover of the warning decal(s).
Instruction Manual
Page 3
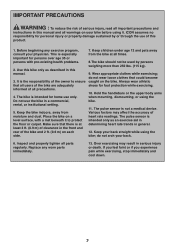
... setting. 5. Use this bike only as an exercise aid in determining heart rate trends in the front and rear of the owner to protect the floor or carpet. Place the bike on the bike. Keep your bike before using it to ensure that could become caught on a level surface, with pre-existing health problems. 2. If you feel faint or if you experience pain while exercising, stop...
... setting. 5. Use this bike only as an exercise aid in determining heart rate trends in the front and rear of the owner to protect the floor or carpet. Place the bike on the bike. Keep your bike before using it to ensure that could become caught on a level surface, with pre-existing health problems. 2. If you feel faint or if you experience pain while exercising, stop...

Instruction Manual
Page 4
The bike provides an array of features designed to make your benefit, read this manual carefully before contacting us assist you have questions after reading this manual, please see the front cover of this manual. For your workouts at home more effective and enjoyable. BEFORE YOU BEGIN Thank you use the bike. To help us . If you , note the product model number and serial number before you for purchasing the ProForm® Slide Touch 6.0. The model number is PFIVEX87212.0 and the location of the serial number decal are shown on the front cover of this manual. 4
The bike provides an array of features designed to make your benefit, read this manual carefully before contacting us assist you have questions after reading this manual, please see the front cover of this manual. For your workouts at home more effective and enjoyable. BEFORE YOU BEGIN Thank you use the bike. To help us . If you , note the product model number and serial number before you for purchasing the ProForm® Slide Touch 6.0. The model number is PFIVEX87212.0 and the location of the serial number decal are shown on the front cover of this manual. 4
Instruction Manual
Page 5
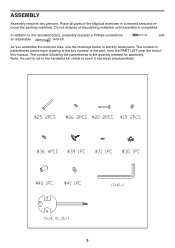
... to identify small parts. As you assemble the exercice bike, use the drawings below each drawing is the key number of the part, from the PART LIST near the end of this manual. Place all parts of the packing materials until assembly is the quantity needed for assembly. Do not dispose of the elliptical exerciser in a cleared area and remove the packing materials. The number in the hardware...
... to identify small parts. As you assemble the exercice bike, use the drawings below each drawing is the key number of the part, from the PART LIST near the end of this manual. Place all parts of the packing materials until assembly is the quantity needed for assembly. Do not dispose of the elliptical exerciser in a cleared area and remove the packing materials. The number in the hardware...
Instruction Manual
Page 6
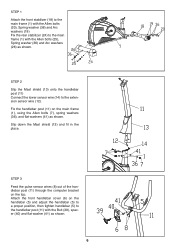
...) as shown. STEP 3 Feed the pulse sensor wires (8) out of the handlebar post (11) through the computer bracket on the main frame (1), using the Allen bolts (7), spring washers (36), and flat washers (41) as shown. Attach the front handlebar cover (6) on the handlebar (5) and adjust the handlebar (5) to a proper position, then tighten handlebar (5) to the extension sensor wire (12). Fix the handlebar post...
...) as shown. STEP 3 Feed the pulse sensor wires (8) out of the handlebar post (11) through the computer bracket on the main frame (1), using the Allen bolts (7), spring washers (36), and flat washers (41) as shown. Attach the front handlebar cover (6) on the handlebar (5) and adjust the handlebar (5) to a proper position, then tighten handlebar (5) to the extension sensor wire (12). Fix the handlebar post...

Instruction Manual
Page 7
... side of adapter (37) into the main frame (1), secured with the flat washer (31) and knob nut (30) as shown. Adjust the horizontal saddle post (34) longitudinal separation, then fix the horizontal saddle post (34) on the top of bike, and another plug insert to the wires come from the rider's exercising position. STEP 6 Connect all the wires (8 & 12) to power supply. Insert...
... side of adapter (37) into the main frame (1), secured with the flat washer (31) and knob nut (30) as shown. Adjust the horizontal saddle post (34) longitudinal separation, then fix the horizontal saddle post (34) on the top of bike, and another plug insert to the wires come from the rider's exercising position. STEP 6 Connect all the wires (8 & 12) to power supply. Insert...
Instruction Manual
Page 8
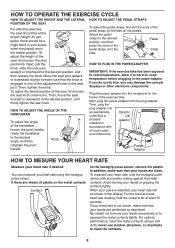
... pulse sensor, remove the plastic. Next, plug the power adapter into an appropriate Electric outlet that the knob is detected, your hands or gripping the contacts tightly. Be careful not to move the seat forward or backward to the desired angle, and then Knob Plug the power adapter into the receptacle on the pedals. Avoid moving your heart rate will be shown in the power adapter. IMPORTANT: If the exercise bike...
... pulse sensor, remove the plastic. Next, plug the power adapter into an appropriate Electric outlet that the knob is detected, your hands or gripping the contacts tightly. Be careful not to move the seat forward or backward to the desired angle, and then Knob Plug the power adapter into the receptacle on the pedals. Avoid moving your heart rate will be shown in the power adapter. IMPORTANT: If the exercise bike...
Instruction Manual
Page 9
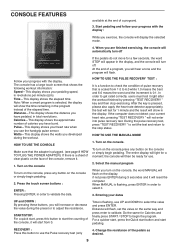
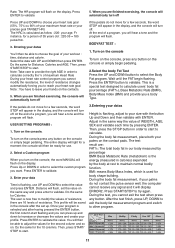
... for Calories and finally press START / STOP to validate. Time is plugged. (see page 8 HOW TO PLUG THE POWER ADAPTER). RECOVERY : Press this button to start from 1.0 to the stop exercising. START/STOP: For a quick start pedaling. Turn on the console To turn on the console,press any button on the display. console FEATURES available at the end of the pedals as desired. 9 Start pedaling and follow your pedaling speed, in the program instead of pulse recovery that the adapter is flashing, use . 2.
... for Calories and finally press START / STOP to validate. Time is plugged. (see page 8 HOW TO PLUG THE POWER ADAPTER). RECOVERY : Press this button to start from 1.0 to the stop exercising. START/STOP: For a quick start pedaling. Turn on the console To turn on the console,press any button on the display. console FEATURES available at the end of the pedals as desired. 9 Start pedaling and follow your pedaling speed, in the program instead of pulse recovery that the adapter is flashing, use . 2.
Instruction Manual
Page 10
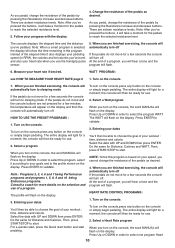
... pedals to the profile shown on the selection and use the handgrip pulse sensor. 5. The profile will then be ready for Distance and Calories, Then, press START/STOP to select the program WATT. For a quicker start, press the Quick start button and start . Press Up or DOWN in order to choose the goal of your workout : time, distance and calorie. Turn on the console. the console will flash on the display...
... pedals to the profile shown on the selection and use the handgrip pulse sensor. 5. The profile will then be ready for Distance and Calories, Then, press START/STOP to select the program WATT. For a quicker start, press the Quick start button and start . Press Up or DOWN in order to choose the goal of your workout : time, distance and calorie. Turn on the console. the console will flash on the display...
Instruction Manual
Page 11
... to calculate correclty the % of maximum Heart Rate During your profile. Press ENTER to select the custom program you to increase or decrease the values and create your heart rate control program you turn on the console, press any button on the console, the word MANUAL will display ERROR2. During the body fat measurement, if your program is used for a person of resistance changes automatically forcing you want. Select the...
... to calculate correclty the % of maximum Heart Rate During your profile. Press ENTER to select the custom program you to increase or decrease the values and create your heart rate control program you turn on the console, press any button on the console, the word MANUAL will display ERROR2. During the body fat measurement, if your program is used for a person of resistance changes automatically forcing you want. Select the...
Instruction Manual
Page 12
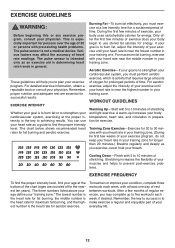
... strengthen your exercise program. WORKOUT GUIDELINES Warming Up-Start with 5 to 10 minutes of your exercise until your heart rate is intended only as a guide to use your body begin to find your physician. For maximum fat burning, exercise with your heart rate in your breath. Cooling Down-Finish with 5 to 10 minutes of heart rate readings. The pulse sensor is near the middle number in your training one...
... strengthen your exercise program. WORKOUT GUIDELINES Warming Up-Start with 5 to 10 minutes of your exercise until your heart rate is intended only as a guide to use your body begin to find your physician. For maximum fat burning, exercise with your heart rate in your breath. Cooling Down-Finish with 5 to 10 minutes of heart rate readings. The pulse sensor is near the middle number in your training one...
Instruction Manual
Page 15
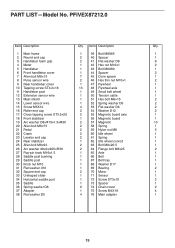
... 1 6 Front handlebar cover 1 44 Spacer 2 7 Allen bolt M8×15 7 45 Cone spacer 1 8 Pulse sensor wire 2 46 Hex thin nut M10×1 2 9 Rear handlebar cover 1 47 Flywheel 1 10 Tapping screw ST4.2×18 13 48 Flywheel axle 1 11 Handlebar post 1 49 Small belt wheel 1 12 Extension sensor wire 1 50 Tension cable 1 13 Mast shield 1 51 Hex bolt M6×15 2 14 Lower sensor wire 1 52 Spring...
... 1 6 Front handlebar cover 1 44 Spacer 2 7 Allen bolt M8×15 7 45 Cone spacer 1 8 Pulse sensor wire 2 46 Hex thin nut M10×1 2 9 Rear handlebar cover 1 47 Flywheel 1 10 Tapping screw ST4.2×18 13 48 Flywheel axle 1 11 Handlebar post 1 49 Small belt wheel 1 12 Extension sensor wire 1 50 Tension cable 1 13 Mast shield 1 51 Hex bolt M6×15 2 14 Lower sensor wire 1 52 Spring...
Instruction Manual
Page 16
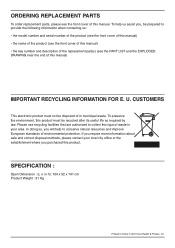
... following information when contacting us: • the model number and serial number of the product (see the front cover of this manual) • the name of the product (see the front cover of this manual. SPECIFICATION : Open Dimension : (L x l x h): 104 x 52 x 141 cm Product Weight : 31 Kg Printed in your local city office or the establishment where you , be disposed of this manual) • the key number...
... following information when contacting us: • the model number and serial number of the product (see the front cover of this manual) • the name of the product (see the front cover of this manual. SPECIFICATION : Open Dimension : (L x l x h): 104 x 52 x 141 cm Product Weight : 31 Kg Printed in your local city office or the establishment where you , be disposed of this manual) • the key number...

