
English Manual
Page 1
¨ Patent Pending Model No. 831.288272 Serial No. Save this equipment. USERÕS MANUAL SEARS, ROEBUCK AND CO., HOFFMAN ESTATES, IL 60179 Write the serial number in this manual before using this manual for future reference. Serial Number Decal CAUTION Read all precautions and instructions in the space above. The serial number is found in the location shown below.
¨ Patent Pending Model No. 831.288272 Serial No. Save this equipment. USERÕS MANUAL SEARS, ROEBUCK AND CO., HOFFMAN ESTATES, IL 60179 Write the serial number in this manual before using this manual for future reference. Serial Number Decal CAUTION Read all precautions and instructions in the space above. The serial number is found in the location shown below.
English Manual
Page 2
... around machine. Decal shown at 75% actual size WARNING: Before beginning this manual. 9. Use the 775s indoors on the 775s. Keep the 775s away from moving parts and contact points. When adjusting the seat, insert the seat knob through the use the 775s in this or any exercise program, consult your back straight when using . do not wear loose clothing that all users of the 775s are adequately informed of the owner...
... around machine. Decal shown at 75% actual size WARNING: Before beginning this manual. 9. Use the 775s indoors on the 775s. Keep the 775s away from moving parts and contact points. When adjusting the seat, insert the seat knob through the use the 775s in this or any exercise program, consult your back straight when using . do not wear loose clothing that all users of the 775s are adequately informed of the owner...
English Manual
Page 3
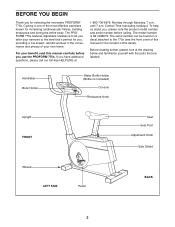
... Holder Water Bottle Holder (Bottle not included) Console Resistance Knob Upright FRONT Seat Seat Post Adjustment Knob Side Shield Wheels LEFT SIDE Pedal BACK 3 Central Time (excluding holidays). Cycling is 831.288272. To help us assist you, please note the product model number and serial number before you use the PROFORM 775s. The serial number can be found on a decal attached to the level that are labeled. If you...
... Holder Water Bottle Holder (Bottle not included) Console Resistance Knob Upright FRONT Seat Seat Post Adjustment Knob Side Shield Wheels LEFT SIDE Pedal BACK 3 Central Time (excluding holidays). Cycling is 831.288272. To help us assist you, please note the product model number and serial number before you use the PROFORM 775s. The serial number can be found on a decal attached to the level that are labeled. If you...
English Manual
Page 4
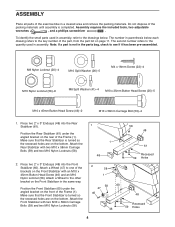
... are on page 11. Attach a Wheel (47) to the key number of the brackets on the bottom. Attach the Front Stabilizer with two M10 x 58mm Carriage Bolts (59) and two M10 Nylon Locknuts (58). 2. Do not dispose of the Frame (1). To identify the small parts used in parenthesis below . The number in assembly. Position the Rear Stabilizer (61) under the...
... are on page 11. Attach a Wheel (47) to the key number of the brackets on the bottom. Attach the Front Stabilizer with two M10 x 58mm Carriage Bolts (59) and two M10 Nylon Locknuts (58). 2. Do not dispose of the Frame (1). To identify the small parts used in parenthesis below . The number in assembly. Position the Rear Stabilizer (61) under the...
English Manual
Page 5
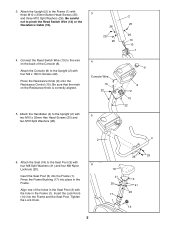
3. Be careful not to the Upright (2) with four M4 x 16mm Screws (22). Insert the Seat Post (3) into place in the Frame (1). Align one of the Console (8). Attach the Console (8) to pinch the Reed Switch Wire (13) or the Resistance Cable (10). 26 25 26 4. Connect the Reed Switch Wire (13) to the Seat Post (3) with the hole in the Frame. Press the Frame Bushing (17) into the Frame...
3. Be careful not to the Upright (2) with four M4 x 16mm Screws (22). Insert the Seat Post (3) into place in the Frame (1). Align one of the Console (8). Attach the Console (8) to pinch the Reed Switch Wire (13) or the Resistance Cable (10). 26 25 26 4. Connect the Reed Switch Wire (13) to the Seat Post (3) with the hole in the Frame. Press the Frame Bushing (17) into the Frame...
English Manual
Page 6
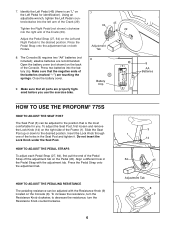
... the holes in the Pedal Strap with the Resistance Knob (9) located on the Console (8). To adjust the Seat Post, first loosen and remove the Lock Knob (14) on the Left Pedal for you use the exercise bike. 7 45 64 29 Adjustment Tab 8 Battery Clip 8 AA Batteries HOW TO USE THE PROFORM¨ 775S HOW TO ADJUST THE SEAT POST The Seat Post (3) can be adjusted to the desired position. Close the battery cover. 9. Make sure that...
... the holes in the Pedal Strap with the Resistance Knob (9) located on the Console (8). To adjust the Seat Post, first loosen and remove the Lock Knob (14) on the Left Pedal for you use the exercise bike. 7 45 64 29 Adjustment Tab 8 Battery Clip 8 AA Batteries HOW TO USE THE PROFORM¨ 775S HOW TO ADJUST THE SEAT POST The Seat Post (3) can be adjusted to the desired position. Close the battery cover. 9. Make sure that...
English Manual
Page 7
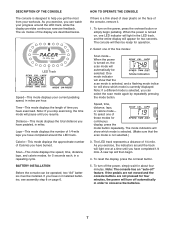
... console, remove it. 1. DistanceÑThis mode displays the total distance you have not installed batteries, see assembly step 8 on /reset button. 5. The console will appear for 5 seconds each, in miles. tor will show that the scan mode is designed to conserve the batteries. 7 If the pedals are not moved and the console buttons are described below. CalorieÑThis mode displays the approximate number of clear plastic on /reset button or simply begin . 4. LED Track Speed...
... console, remove it. 1. DistanceÑThis mode displays the total distance you have not installed batteries, see assembly step 8 on /reset button. 5. The console will appear for 5 seconds each, in miles. tor will show that the scan mode is designed to conserve the batteries. 7 If the pedals are not moved and the console buttons are described below. CalorieÑThis mode displays the approximate number of clear plastic on /reset button or simply begin . 4. LED Track Speed...
English Manual
Page 8
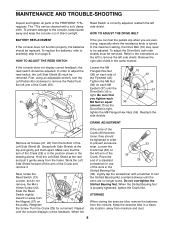
.... Turn the Crank (29) for a moment. To adjust the Drive Belt, both Side Shields at the rear and pull it . Do not overtighten the Slotted Bearing Nut. MAINTENANCE AND TROUBLE-SHOOTING Inspect and tighten all Screws (21, 22) from the bottom of the Left Side Shield (6). Reed Switch is turned to the maximum setting, the Drive Belt (19) may need to remove the Pedal from the console. HOW TO ADJUST THE DRIVE BELT BATTERY REPLACEMENT...
.... Turn the Crank (29) for a moment. To adjust the Drive Belt, both Side Shields at the rear and pull it . Do not overtighten the Slotted Bearing Nut. MAINTENANCE AND TROUBLE-SHOOTING Inspect and tighten all Screws (21, 22) from the bottom of the Left Side Shield (6). Reed Switch is turned to the maximum setting, the Drive Belt (19) may need to remove the Pedal from the console. HOW TO ADJUST THE DRIVE BELT BATTERY REPLACEMENT...

English Manual
Page 9
... largest number is the recommended heart rate for aerobic exercise. Each workout should include the following guidelines will help you , first find your training zone for energy. After a few minutes of exercise does your exercise program. If your goal is to burn fat, adjust the intensity of your exercise until your heart rate is used because your heart rate will drop rapidly when you stop exercising and place...
... largest number is the recommended heart rate for aerobic exercise. Each workout should include the following guidelines will help you , first find your training zone for energy. After a few minutes of exercise does your exercise program. If your goal is to burn fat, adjust the intensity of your exercise until your heart rate is used because your heart rate will drop rapidly when you stop exercising and place...
English Manual
Page 10
... Console Resistance Knob Resistance Cable/Control M5 x 30mm Screw M5 Nut Reed Switch/Wire Lock Knob Seat Post Bushing Seat Frame Bushing 1 1/4Ó Round Endcap Drive Belt M8 Nylon Locknut M4 x 38mm Screw M4 x 16mm Screw M8 x 62mm Hex Head Bolt Magnet Bracket M10 x 25mm Button Head Screw M10 Split Washer Right Pedal Strap Right Pedal Crank/Pulley Notched Bearing Nut Bearing Bearing Cup Slotted Bearing Nut Crank Washer Key No. See the back cover of this manual for information...
... Console Resistance Knob Resistance Cable/Control M5 x 30mm Screw M5 Nut Reed Switch/Wire Lock Knob Seat Post Bushing Seat Frame Bushing 1 1/4Ó Round Endcap Drive Belt M8 Nylon Locknut M4 x 38mm Screw M4 x 16mm Screw M8 x 62mm Hex Head Bolt Magnet Bracket M10 x 25mm Button Head Screw M10 Split Washer Right Pedal Strap Right Pedal Crank/Pulley Notched Bearing Nut Bearing Bearing Cup Slotted Bearing Nut Crank Washer Key No. See the back cover of this manual for information...
English Manual
Page 12
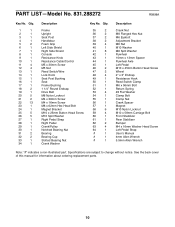
... repair or replace the BIKE EXERCISER, free of your nearest SEARS Service Center. If you find the location of the PART (see the PART LIST and the EXPLODED DRAWING on a decal attached to order parts by telephone, call the following information: ¥ The MODEL NUMBER of the product (831.288272). ¥ The NAME of the product (PROFORM¨ 775s). ¥ The KEY NUMBER and DESCRIPTION of the decal. All replacement parts are listed...
... repair or replace the BIKE EXERCISER, free of your nearest SEARS Service Center. If you find the location of the PART (see the PART LIST and the EXPLODED DRAWING on a decal attached to order parts by telephone, call the following information: ¥ The MODEL NUMBER of the product (831.288272). ¥ The NAME of the product (PROFORM¨ 775s). ¥ The KEY NUMBER and DESCRIPTION of the decal. All replacement parts are listed...

