
English Manual
Page 4
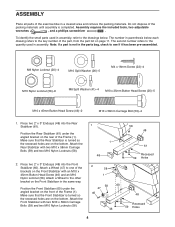
... page 11. Attach the Front Stabilizer with two M10 x 58mm Carriage Bolts (59) and two M10 Nylon Locknuts (58). 2. ASSEMBLY Place all parts of the exercise bike in assembly. Do not dispose of the packing materials until assembly is turned so the recessed holes are on the rear of the Frame (1). M8...
... page 11. Attach the Front Stabilizer with two M10 x 58mm Carriage Bolts (59) and two M10 Nylon Locknuts (58). 2. ASSEMBLY Place all parts of the exercise bike in assembly. Do not dispose of the packing materials until assembly is turned so the recessed holes are on the rear of the Frame (1). M8...
English Manual
Page 6
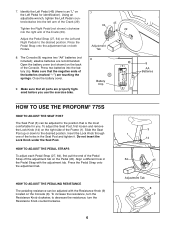
... Seat Post and tighten it. to the position that all parts are properly tightened before you use the exercise bike. 7 45 64 29 Adjustment Tab 8 Battery Clip 8 AA Batteries HOW TO USE THE PROFORM¨ 775S HOW TO ADJUST THE SEAT POST The Seat Post (3) can be adjusted to decrease the resistance, turn the...
... Seat Post and tighten it. to the position that all parts are properly tightened before you use the exercise bike. 7 45 64 29 Adjustment Tab 8 Battery Clip 8 AA Batteries HOW TO USE THE PROFORM¨ 775S HOW TO ADJUST THE SEAT POST The Seat Post (3) can be adjusted to decrease the resistance, turn the...
English Manual
Page 8
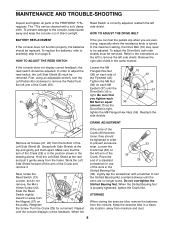
...of the Crank (29) is properly tightened, tighten the Crank Nut. Reattach the side shields. 22 CRANK ADJUSTMENT 22 Remove all parts of the PROFORM¨ 775s regularly. Grasp both side shields must be tightened in a clean, dry location, away from moisture and dust. 8 Work the Left Side Shield...Shields at the top and gently pull them apart. Remove the right side shield in the Slotted Bearing Nut (33). STORAGE When storing the exercise bike, remove the batteries from the console. To replace the batteries, refer to the console, keep liquids away and keep the console out of ...
...of the Crank (29) is properly tightened, tighten the Crank Nut. Reattach the side shields. 22 CRANK ADJUSTMENT 22 Remove all parts of the PROFORM¨ 775s regularly. Grasp both side shields must be tightened in a clean, dry location, away from moisture and dust. 8 Work the Left Side Shield...Shields at the top and gently pull them apart. Remove the right side shield in the Slotted Bearing Nut (33). STORAGE When storing the exercise bike, remove the batteries from the console. To replace the batteries, refer to the console, keep liquids away and keep the console out of ...
English Manual
Page 12
... the left. To request service or to state. See the front cover of this SEARS BIKE EXERCISER, contact the nearest SEARS Service Center throughout the United States and SEARS will repair or replace the BIKE EXERCISER, free of the PART (see the PART LIST and the EXPLODED DRAWING on a decal ... parts by telephone, call the following information: ¥ The MODEL NUMBER of the product (831.288272). ¥ The NAME of the product (PROFORM¨ 775s). ¥ The KEY NUMBER and DESCRIPTION of charge. Model No. 831.288272 QUESTIONS? This warranty gives you specific legal rights, and you visit ...
... the left. To request service or to state. See the front cover of this SEARS BIKE EXERCISER, contact the nearest SEARS Service Center throughout the United States and SEARS will repair or replace the BIKE EXERCISER, free of the PART (see the PART LIST and the EXPLODED DRAWING on a decal ... parts by telephone, call the following information: ¥ The MODEL NUMBER of the product (831.288272). ¥ The NAME of the product (PROFORM¨ 775s). ¥ The KEY NUMBER and DESCRIPTION of charge. Model No. 831.288272 QUESTIONS? This warranty gives you specific legal rights, and you visit ...


