
English Manual
Page 2
... described in the location shown. 7. TABLE OF CONTENTS IMPORTANT PRECAUTIONS 2 BEFORE YOU BEGIN 3 ASSEMBLY 4 HOW TO USE THE PROFORM¨ 775S 6 MAINTENANCE AND TROUBLE-SHOOTING 8 CONDITIONING GUIDELINES 9 PART LIST 10 EXPLODED DRAWING 11 ORDERING REPLACEMENT PARTS Back Cover FULL 90 DAY WARRANTY Back Cover IMPORTANT PRECAUTIONS WARNING: To reduce the risk of serious injury...
... described in the location shown. 7. TABLE OF CONTENTS IMPORTANT PRECAUTIONS 2 BEFORE YOU BEGIN 3 ASSEMBLY 4 HOW TO USE THE PROFORM¨ 775S 6 MAINTENANCE AND TROUBLE-SHOOTING 8 CONDITIONING GUIDELINES 9 PART LIST 10 EXPLODED DRAWING 11 ORDERING REPLACEMENT PARTS Back Cover FULL 90 DAY WARRANTY Back Cover IMPORTANT PRECAUTIONS WARNING: To reduce the risk of serious injury...
English Manual
Page 3
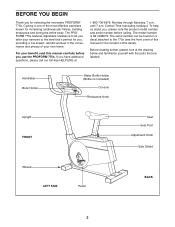
...please note the product model number and serial number before you use the PROFORM 775s. To help us assist you have additional questions, please call our toll-free HELPLINE at the drawing below and familiarize yourself with the parts that Õs perfect for you, providing a low-impact, aerobic ...workout in the convenience and privacy of your own home For your exercise to the 775s (see the front cover of this manual carefully before calling. Cycling is 831.288272. The PROFORM 775s features adjustable ...
...please note the product model number and serial number before you use the PROFORM 775s. To help us assist you have additional questions, please call our toll-free HELPLINE at the drawing below and familiarize yourself with the parts that Õs perfect for you, providing a low-impact, aerobic ...workout in the convenience and privacy of your own home For your exercise to the 775s (see the front cover of this manual carefully before calling. Cycling is 831.288272. The PROFORM 775s features adjustable ...
English Manual
Page 4
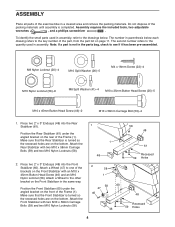
... 48 Recessed 48 59 Holes 4 Attach the Front Stabilizer with two M10 x 58mm Carriage Bolts (59) and two M10 Nylon Locknuts (58). 2. ASSEMBLY Place all parts of the exercise bike in the same way. Assembly requires the included tools, two adjustable wrenches , and a phillips screwdriver . The number in the... in assembly, refer to the drawings below each drawing refers to one of the brackets on the front of the part, from the part list on the bottom. Position the Rear Stabilizer (61) under the angled bracket on the Front Stabilizer with an M10 x 45mm Button Head Screw (46)...
... 48 Recessed 48 59 Holes 4 Attach the Front Stabilizer with two M10 x 58mm Carriage Bolts (59) and two M10 Nylon Locknuts (58). 2. ASSEMBLY Place all parts of the exercise bike in the same way. Assembly requires the included tools, two adjustable wrenches , and a phillips screwdriver . The number in the... in assembly, refer to the drawings below each drawing refers to one of the brackets on the front of the part, from the part list on the bottom. Position the Rear Stabilizer (61) under the angled bracket on the Front Stabilizer with an M10 x 45mm Button Head Screw (46)...
English Manual
Page 6
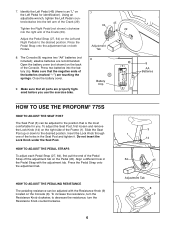
... Pedal (45) (there is the most comfortable for identification). Make sure that all parts are properly tightened before you use the exercise bike. 7 45 64 29 Adjustment Tab 8 Battery Clip 8 AA Batteries HOW TO USE THE PROFORM¨ 775S HOW TO ADJUST THE SEAT POST The Seat Post (3) can be adjusted to decrease...
... Pedal (45) (there is the most comfortable for identification). Make sure that all parts are properly tightened before you use the exercise bike. 7 45 64 29 Adjustment Tab 8 Battery Clip 8 AA Batteries HOW TO USE THE PROFORM¨ 775S HOW TO ADJUST THE SEAT POST The Seat Post (3) can be adjusted to decrease...
English Manual
Page 8
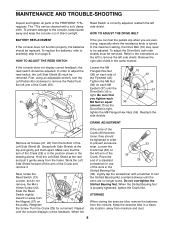
... wear. Remove the right side shield in the Slotted Bearing Nut (33). Be sure that the arm of the PROFORM¨ 775s regularly. Reattach the side shields. 22 CRANK ADJUSTMENT 22 Remove all parts of the Crank (29) is tight, tighten the M8 Flanged Hex Nuts (36). Slide the Reed 29 57 Switch... Flywheel (42). To adjust the Drive Belt, both Side Shields at the left to the instructions at the top and gently pull them apart. The 775s can feel the pedals slip when you can be removed. Refer to remove the left arm of the Crank (29). 6 21 45 29 Loosen the...
... wear. Remove the right side shield in the Slotted Bearing Nut (33). Be sure that the arm of the PROFORM¨ 775s regularly. Reattach the side shields. 22 CRANK ADJUSTMENT 22 Remove all parts of the Crank (29) is tight, tighten the M8 Flanged Hex Nuts (36). Slide the Reed 29 57 Switch... Flywheel (42). To adjust the Drive Belt, both Side Shields at the left to the instructions at the top and gently pull them apart. The 775s can feel the pedals slip when you can be removed. Refer to remove the left arm of the Crank (29). 6 21 45 29 Loosen the...

English Manual
Page 9
... sure to progress at least one day of the chart (ages are your own pace and avoid overdoing it. CONDITIONING GUIDELINES The following three important parts: A warm-up to five workouts each week, with the proper intensity. This is to exercise with at your Òtraining zone.Ó The smallest ... for you must be found by 10 to 10 minutes of your exercise until your heart rate is to make exercise a regular and enjoyable part of exercise does your goal is to the nearest ten years). Each workout should include the following guidelines will help you may result in your...
... sure to progress at least one day of the chart (ages are your own pace and avoid overdoing it. CONDITIONING GUIDELINES The following three important parts: A warm-up to five workouts each week, with the proper intensity. This is to exercise with at your Òtraining zone.Ó The smallest ... for you must be found by 10 to 10 minutes of your exercise until your heart rate is to make exercise a regular and enjoyable part of exercise does your goal is to the nearest ten years). Each workout should include the following guidelines will help you may result in your...
English Manual
Page 10
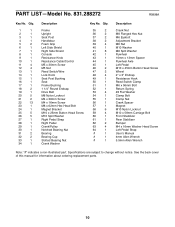
... Head Screw M10 Split Washer Right Pedal Strap Right Pedal Crank/Pulley Notched Bearing Nut Bearing Bearing Cup Slotted Bearing Nut Crank Washer Key No. PART LISTÑModel No. 831.288272 R0898A Key No. Qty. 35 2 36 2 37 2 38 2 39 4 40 1 41 6 42 1 43 1 44 1 45 1 46 2 47 2 48 4 49... Stabilizer Bumper M4 x 16mm Washer Head Screw Left Pedal Strap UserÕs Manual 4mm Allen Wrench 5.5mm Allen Wrench Note: Ò#Ó indicates a non-illustrated part. See the back cover of this manual for information about ordering replacement...
... Head Screw M10 Split Washer Right Pedal Strap Right Pedal Crank/Pulley Notched Bearing Nut Bearing Bearing Cup Slotted Bearing Nut Crank Washer Key No. PART LISTÑModel No. 831.288272 R0898A Key No. Qty. 35 2 36 2 37 2 38 2 39 4 40 1 41 6 42 1 43 1 44 1 45 1 46 2 47 2 48 4 49... Stabilizer Bumper M4 x 16mm Washer Head Screw Left Pedal Strap UserÕs Manual 4mm Allen Wrench 5.5mm Allen Wrench Note: Ò#Ó indicates a non-illustrated part. See the back cover of this manual for information about ordering replacement...
English Manual
Page 12
...United States and SEARS will repair or replace the BIKE EXERCISER, free of the decal. When requesting help assembling or operating the PROFORM¨ 775s ¥ a part is used commercially or for immediate purchase or special order when you need to defect in material or workmanship in USA ©...This warranty does not apply when the BIKE EXERCISER is missing ¥ or you visit your PROFORM¨ 775s are available for rental purposes. See the front cover of the PART (see the PART LIST and the EXPLODED DRAWING on a decal attached to provide the following tollfree number 1-800-FON...
...United States and SEARS will repair or replace the BIKE EXERCISER, free of the decal. When requesting help assembling or operating the PROFORM¨ 775s ¥ a part is used commercially or for immediate purchase or special order when you need to defect in material or workmanship in USA ©...This warranty does not apply when the BIKE EXERCISER is missing ¥ or you visit your PROFORM¨ 775s are available for rental purposes. See the front cover of the PART (see the PART LIST and the EXPLODED DRAWING on a decal attached to provide the following tollfree number 1-800-FON...


