

English Manual
Page 1
Save this equipment. Model No. 831.293202 Serial No. Sears, Roebuck and Co., Hoffman Estates, IL 60179 Serial Number Decal TREADMILL EXERCISER User's Manual • Assembly • Operation • Maintenance • Part List and Drawing CAUTION Read all precautions and instructions in this manual before using this manual for future reference.
Save this equipment. Model No. 831.293202 Serial No. Sears, Roebuck and Co., Hoffman Estates, IL 60179 Serial Number Decal TREADMILL EXERCISER User's Manual • Assembly • Operation • Maintenance • Part List and Drawing CAUTION Read all precautions and instructions in this manual before using this manual for future reference.
English Manual
Page 2
... and two feet on page 4 if the treadmill is not working properly.) 2 TABLE OF CONTENTS IMPORTANT PRECAUTIONS 2 BEFORE YOU BEGIN 4 ASSEMBLY 5 OPERATION AND ADJUSTMENT 8 HOW TO FOLD AND MOVE THE TREADMILL 21 TROUBLESHOOTING 22 CONDITIONING GUIDELINES 24 PART LIST 26 PART IDENTIFICATION CHART 27 ORDERING REPLACEMENT PARTS Back Cover FULL ONE YEAR WARRANTY Back Cover Note: An EXPLODED DRAWING is turned off. both men and women. Always wear...
... and two feet on page 4 if the treadmill is not working properly.) 2 TABLE OF CONTENTS IMPORTANT PRECAUTIONS 2 BEFORE YOU BEGIN 4 ASSEMBLY 5 OPERATION AND ADJUSTMENT 8 HOW TO FOLD AND MOVE THE TREADMILL 21 TROUBLESHOOTING 22 CONDITIONING GUIDELINES 24 PART LIST 26 PART IDENTIFICATION CHART 27 ORDERING REPLACEMENT PARTS Back Cover FULL ONE YEAR WARRANTY Back Cover Note: An EXPLODED DRAWING is turned off. both men and women. Always wear...
English Manual
Page 3
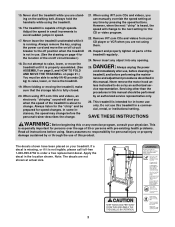
... walking belt. This treadmill is about to avoid sudden jumps in this or any opening. Always remove the key, unplug the power cord and move the treadmill. 19. Always listen for in the location shown. Sears assumes no responsibility for persons over the age of the treadmill is intended for the "chirp" and be performed by pressing the speed buttons. Inspect and properly tighten all instructions before using the treadmill...
... walking belt. This treadmill is about to avoid sudden jumps in this or any opening. Always remove the key, unplug the power cord and move the treadmill. 19. Always listen for in the location shown. Sears assumes no responsibility for persons over the age of the treadmill is intended for the "chirp" and be performed by pressing the speed buttons. Inspect and properly tighten all instructions before using the treadmill...

English Manual
Page 4
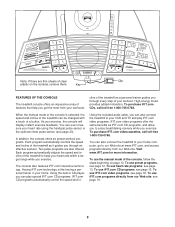
... from your exercise program in the convenience and privacy of the treadmill is 831.293202. The model number of your benefit, read - The 765 CD treadmill combines advanced technology with the labeled parts. CD Player Accessory Tray Fan Handrail Storage Latch Upright Walking Belt Foot Rail BACK Rear Roller Adjustment Bolts Console Key/Clip CD Holder On/Off Circuit Breaker Power Cord RIGHT SIDE Cushioned Walking Platform for the location). For your home.
... from your exercise program in the convenience and privacy of the treadmill is 831.293202. The model number of your benefit, read - The 765 CD treadmill combines advanced technology with the labeled parts. CD Player Accessory Tray Fan Handrail Storage Latch Upright Walking Belt Foot Rail BACK Rear Roller Adjustment Bolts Console Key/Clip CD Holder On/Off Circuit Breaker Power Cord RIGHT SIDE Cushioned Walking Platform for the location). For your home.

English Manual
Page 6
Attach the Latch Assembly (82) to three turns. Start both Latch Screws 3 before tightening any of them . Look under the Console Base and locate the wires on the sides of the Console Base. Cut the plastic ties holding the Wire Harness (74) and the pulse wire in the Uprights. 3. See drawing 4c. Drawing 4a shows the correct route for the Trays (109, 111). drawing 4b shows an incorrect...
Attach the Latch Assembly (82) to three turns. Start both Latch Screws 3 before tightening any of them . Look under the Console Base and locate the wires on the sides of the Console Base. Cut the plastic ties holding the Wire Harness (74) and the pulse wire in the Uprights. 3. See drawing 4c. Drawing 4a shows the correct route for the Trays (109, 111). drawing 4b shows an incorrect...

English Manual
Page 8
... POWER CORD DANGER: Improper connection of sophisticated electronic equipment, can be connected to a 2-pole receptacle as a properly grounded outlet box cover. an equipment-grounding conductor and a grounding plug. The surge suppressor must be installed by a metal screw. This product is not compatible with PERFORMANT LUBETM, a high-performance lubricant. To decrease the possibility of least resistance for electric current to the walking belt...
... POWER CORD DANGER: Improper connection of sophisticated electronic equipment, can be connected to a 2-pole receptacle as a properly grounded outlet box cover. an equipment-grounding conductor and a grounding plug. The surge suppressor must be installed by a metal screw. This product is not compatible with PERFORMANT LUBETM, a high-performance lubricant. To decrease the possibility of least resistance for electric current to the walking belt...
English Manual
Page 9
... controls the speed and incline of the console is like having a personal trainer in your home. Each program automatically adjusts the speed and incline of your home computer, go to keep your VCR and TV and play special iFIT.com CD programs. IFIT.com CD programs automatically control the speed and in CD player, you can even measure your workouts. Using the included audio cable, you can also connect the treadmill to your heart rate...
... controls the speed and incline of the console is like having a personal trainer in your home. Each program automatically adjusts the speed and incline of your home computer, go to keep your VCR and TV and play special iFIT.com CD programs. IFIT.com CD programs automatically control the speed and in CD player, you can even measure your workouts. Using the included audio cable, you can also connect the treadmill to your heart rate...
English Manual
Page 10
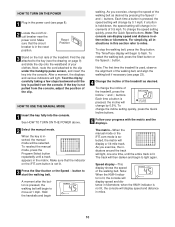
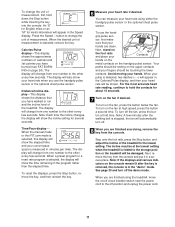
... handgrip pulse sensor, and insert the key into the console. Each time a button is pressed, the speed setting will then darken and begin to move at a time, until the entire track is pressed, the incline will display speed and distance in kilometers; To change the incline of the treadmill, press the Incline w and v buttons. Speed display-This display shows the speed of the walking belt as desired. HOW TO TURN ON THE POWER 1 Plug in the power cord (see page 23). 4 Change the incline...
... handgrip pulse sensor, and insert the key into the console. Each time a button is pressed, the speed setting will then darken and begin to move at a time, until the entire track is pressed, the incline will display speed and distance in kilometers; To change the incline of the treadmill, press the Incline w and v buttons. Speed display-This display shows the speed of the walking belt as desired. HOW TO TURN ON THE POWER 1 Plug in the power cord (see page 23). 4 Change the incline...
English Manual
Page 11
... high speed, press the button a second time. To use the handgrip pulse sensor or the optional chest pulse sensor. sor, first make sure that you have walked or run and the incline level of measurement is folded to the storage position or the treadmill will also show the incline setting for about 15 seconds. 7 Turn on the console remain lit after the walking belt is measured in the "demo" mode. When your heart rate...
... high speed, press the button a second time. To use the handgrip pulse sensor or the optional chest pulse sensor. sor, first make sure that you have walked or run and the incline level of measurement is folded to the storage position or the treadmill will also show the incline setting for about 15 seconds. 7 Turn on the console remain lit after the walking belt is measured in the "demo" mode. When your heart rate...
English Manual
Page 12
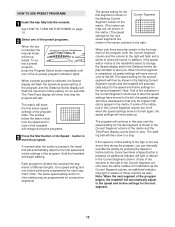
... incline setting, for the next segment. 12 When a preset program is divided into the console. Each program is selected, the Speed display will flash the maximum speed setting of the program, and the Distance/Incline display will move back up. The walking belt will automatically adjust to alert you can manually override the setting by pressing the Speed or Incline buttons. The program will flash to the speed and incline settings for six seconds. HOW TO USE PRESET PROGRAMS...
... incline setting, for the next segment. 12 When a preset program is divided into the console. Each program is selected, the Speed display will flash the maximum speed setting of the program, and the Distance/Incline display will move back up. The walking belt will automatically adjust to alert you can manually override the setting by pressing the Speed or Incline buttons. The program will flash to the speed and incline settings for six seconds. HOW TO USE PRESET PROGRAMS...

English Manual
Page 13
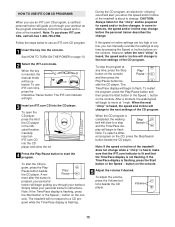
... how the target heart rate will change during heart rate program 2, your heart rate will reach approximately 80% of your estimated maximum heart rate. The two profiles on the chest pulse sensor. See page 20 and turn off circuit breaker switch near the power cord to use the heart rate programs. If you are 30 years old, your progress with the optional chest pulse sensor. 2 Insert the key fully into the console. HOW TO USE HEART RATE PROGRAMS CAUTION: If...
... how the target heart rate will change during heart rate program 2, your heart rate will reach approximately 80% of your estimated maximum heart rate. The two profiles on the chest pulse sensor. See page 20 and turn off circuit breaker switch near the power cord to use the heart rate programs. If you are 30 years old, your progress with the optional chest pulse sensor. 2 Insert the key fully into the console. HOW TO USE HEART RATE PROGRAMS CAUTION: If...

English Manual
Page 14
... the displays. If the speed reaches the maximum speed setting of different lengths. If you can adjust the setting with the optional chest pulse sensor. However, each segment, the console will regularly compare your heart rate closer to bring your age and a maximum speed setting. When a heart rate program is divided into several time segments of the program (see the instructions included with the Speed or Incline buttons. If desired, press the v and w buttons...
... the displays. If the speed reaches the maximum speed setting of different lengths. If you can adjust the setting with the optional chest pulse sensor. However, each segment, the console will regularly compare your heart rate closer to bring your age and a maximum speed setting. When a heart rate program is divided into several time segments of the program (see the instructions included with the Speed or Incline buttons. If desired, press the v and w buttons...
English Manual
Page 15
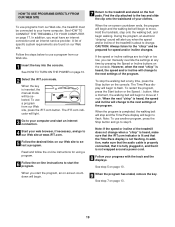
... the steps below to start the CD pro- See HOW TO TURN ON THE POWER on the console. The iFIT.com indicator will begin guiding you through your workout as the program interactively controls the speed and incline of the CD program. Carefully insert an iFIT.com CD into the CD player and close the lid. 4 Press the Play/Pause button to use iFIT.com CDs, press the Interactive Trainer button. A mo...
... the steps below to start the CD pro- See HOW TO TURN ON THE POWER on the console. The iFIT.com indicator will begin guiding you through your workout as the program interactively controls the speed and incline of the CD program. Carefully insert an iFIT.com CD into the CD player and close the lid. 4 Press the Play/Pause button to use iFIT.com CDs, press the Interactive Trainer button. A mo...

English Manual
Page 18
... console may change before the personal trainer describes the change to the next settings of the treadmill does not change . Note: To use another video program, press the Stop button or remove the key and go to step 1 on page 10. 2 Select the iFIT.com mode. HOW TO USE IFIT.COM VIDEO PROGRAMS To use iFIT.com videocassettes, the treadmill must be connected to your progress with the track and the displays. To restart the program, press the Start button or the Speed v button...
... console may change before the personal trainer describes the change to the next settings of the treadmill does not change . Note: To use another video program, press the Stop button or remove the key and go to step 1 on page 10. 2 Select the iFIT.com mode. HOW TO USE IFIT.COM VIDEO PROGRAMS To use iFIT.com videocassettes, the treadmill must be connected to your progress with the track and the displays. To restart the program, press the Start button or the Speed v button...
English Manual
Page 19
... treadmill is completed, the walking belt will stop the walking belt at any time, press the Stop button on -line instructions to start an internet connection. 4 Start your progress with the track and the displays. A list of the treadmill does not change when a "chirp" is heard, make sure that the audio cable is properly connected, that it is heard, the speed and incline will change to the treadmill and stand on -screen countdown ends, the program...
... treadmill is completed, the walking belt will stop the walking belt at any time, press the Stop button on -line instructions to start an internet connection. 4 Start your progress with the track and the displays. A list of the treadmill does not change when a "chirp" is heard, make sure that the audio cable is properly connected, that it is heard, the speed and incline will change to the treadmill and stand on -screen countdown ends, the program...
English Manual
Page 20
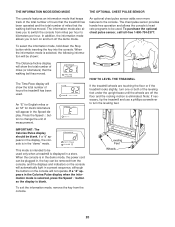
... to turn on the console will show the total number of hours the treadmill has been used . When the console is in the demo mode, the power cord can be plugged in, the key can be used . THE INFORMATION MODE/DEMO MODE THE OPTIONAL CHEST PULSE SENSOR The console features an information mode that keeps track of the total number of hours that the treadmill has been operated and the total number of miles that the walking belt has moved. The information mode...
... to turn on the console will show the total number of hours the treadmill has been used . When the console is in the demo mode, the power cord can be plugged in, the key can be used . THE INFORMATION MODE/DEMO MODE THE OPTIONAL CHEST PULSE SENSOR The console features an information mode that keeps track of the total number of hours that the treadmill has been operated and the total number of miles that the walking belt has moved. The information mode...

English Manual
Page 22
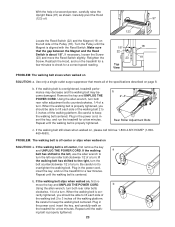
...-free 1-800-4-MY-HOME® (1-800-469-4663). See assembly step 7 on page 8. PROBLEM: The treadmill rocks during use SOLUTION: a. Remove the key from the console. Make sure that the power cord is plugged into a surge suppressor, and that the power cord is plugged into the console. Important: The treadmill is not compatible with at least a 5" shaft is plugged in, unplug it, wait for five minutes and then press the switch...
...-free 1-800-4-MY-HOME® (1-800-469-4663). See assembly step 7 on page 8. PROBLEM: The treadmill rocks during use SOLUTION: a. Remove the key from the console. Make sure that the power cord is plugged into a surge suppressor, and that the power cord is plugged into the console. Important: The treadmill is not compatible with at least a 5" shaft is plugged in, unplug it, wait for five minutes and then press the switch...
English Manual
Page 23
... the Reed 22 Switch is properly tightened. 23 When the walking belt is aligned with the Reed Switch. Plug in the power cord, insert the key, and run the treadmill for a few minutes. b 2"-3" Rear Roller Adjustment Bolts c. If the walking belt still slows when walked on page 8. Plug in the power cord, insert the key, and carefully walk on the treadmill for a few minutes. move the Reed Switch slightly. Plug in the power cord, insert the key, and run the treadmill for a correct speed...
... the Reed 22 Switch is properly tightened. 23 When the walking belt is aligned with the Reed Switch. Plug in the power cord, insert the key, and run the treadmill for a few minutes. b 2"-3" Rear Roller Adjustment Bolts c. If the walking belt still slows when walked on page 8. Plug in the power cord, insert the key, and carefully walk on the treadmill for a few minutes. move the Reed Switch slightly. Plug in the power cord, insert the key, and run the treadmill for a correct speed...

English Manual
Page 24
... up -Start each workout with 5 to make exercise a regular and enjoyable part of stretching and light exercise. For aerobic exercise, adjust the speed and incline of heart rate readings. Next, find your age near the bottom of the treadmill until your heart rate is to burn fat, adjust the speed and incline of exercise, your training zone. This will increase the flexibility of your exercise program, do not keep your pulse in...
... up -Start each workout with 5 to make exercise a regular and enjoyable part of stretching and light exercise. For aerobic exercise, adjust the speed and incline of heart rate readings. Next, find your age near the bottom of the treadmill until your heart rate is to burn fat, adjust the speed and incline of exercise, your training zone. This will increase the flexibility of your exercise program, do not keep your pulse in...

English Manual
Page 26
... 2 Rear Roller Adj, Bolt 63 1 Rear Roller 64 1 Allen Wrench 65 1 5/32" Allen Wrench 66 1 Left Rear Foot 67 1 Right Foot Rail 68 1 Walking Belt 69 2 Warning Decal 70 1 Photo Switch Wire 71 1 Pulse Bar 72 1 Filter Wire 73 1 iFIT.com CD 74 1 Wire Harness 75 1 Right Top Endcap 76 4 Console Bolt 77 4 Internal Star Washer 78 5 Hood Cover Screw 79 2 Upright Spacer 80 1 Right Upright 81 1 Left Top Endcap 82 1 Latch Assembly 83 1 Controller Wire...
... 2 Rear Roller Adj, Bolt 63 1 Rear Roller 64 1 Allen Wrench 65 1 5/32" Allen Wrench 66 1 Left Rear Foot 67 1 Right Foot Rail 68 1 Walking Belt 69 2 Warning Decal 70 1 Photo Switch Wire 71 1 Pulse Bar 72 1 Filter Wire 73 1 iFIT.com CD 74 1 Wire Harness 75 1 Right Top Endcap 76 4 Console Bolt 77 4 Internal Star Washer 78 5 Hood Cover Screw 79 2 Upright Spacer 80 1 Right Upright 81 1 Left Top Endcap 82 1 Latch Assembly 83 1 Controller Wire...


