

English Manual
Page 1
Save this equipment. Sears, Roebuck and Co., Hoffman Estates, IL 60179 Serial Number Decal TREADMILL EXERCISER User's Manual • Assembly • Operation • Maintenance • Part List and Drawing CAUTION Read all precautions and instructions in this manual before using this manual for future reference. Model No. 831.293202 Serial No.
Save this equipment. Sears, Roebuck and Co., Hoffman Estates, IL 60179 Serial Number Decal TREADMILL EXERCISER User's Manual • Assembly • Operation • Maintenance • Part List and Drawing CAUTION Read all precautions and instructions in this manual before using this manual for future reference. Model No. 831.293202 Serial No.
English Manual
Page 2
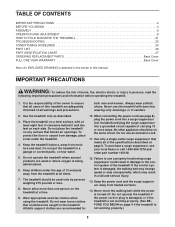
...treadmill are recommended for 10. To purchase a surge suppressor, see page 8), plug the power cord into a surge suppressor (not included) and plug the surge suppressor into a grounded circuit capable of carrying 15 or more than one person on any surface that all users of this manual...TABLE OF CONTENTS IMPORTANT PRECAUTIONS 2 BEFORE YOU BEGIN 4 ASSEMBLY 5 OPERATION AND ADJUSTMENT 8 HOW TO FOLD AND MOVE THE TREADMILL 21 TROUBLESHOOTING 22 CONDITIONING GUIDELINES 24 PART LIST 26 PART IDENTIFICATION CHART 27 ORDERING REPLACEMENT PARTS Back Cover FULL ONE YEAR WARRANTY ...
...treadmill are recommended for 10. To purchase a surge suppressor, see page 8), plug the power cord into a surge suppressor (not included) and plug the surge suppressor into a grounded circuit capable of carrying 15 or more than one person on any surface that all users of this manual...TABLE OF CONTENTS IMPORTANT PRECAUTIONS 2 BEFORE YOU BEGIN 4 ASSEMBLY 5 OPERATION AND ADJUSTMENT 8 HOW TO FOLD AND MOVE THE TREADMILL 21 TROUBLESHOOTING 22 CONDITIONING GUIDELINES 24 PART LIST 26 PART IDENTIFICATION CHART 27 ORDERING REPLACEMENT PARTS Back Cover FULL ONE YEAR WARRANTY ...
English Manual
Page 3
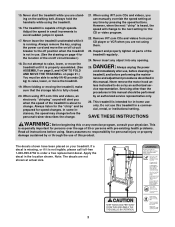
.... Apply the decal in use only. The treadmill is about to raise, lower, or move the treadmill. 19. Always remove the key, unplug the power cord and move the treadmill until it is heard, the speed will alert you can manually override the speed setting at actual size. 3... properly assembled. (See ASSEMBLY on page 5, and HOW TO FOLD AND MOVE THE TREADMILL on the walking belt. nance and adjustment procedures described in this manual. Servicing other than the procedures in this manual should be performed by an authorized ser- Always hold the handrails while using them. ...
.... Apply the decal in use only. The treadmill is about to raise, lower, or move the treadmill. 19. Always remove the key, unplug the power cord and move the treadmill until it is heard, the speed will alert you can manually override the speed setting at actual size. 3... properly assembled. (See ASSEMBLY on page 5, and HOW TO FOLD AND MOVE THE TREADMILL on the walking belt. nance and adjustment procedures described in this manual. Servicing other than the procedures in this manual should be performed by an authorized ser- Always hold the handrails while using them. ...

English Manual
Page 4
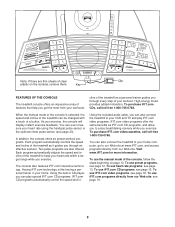
...advanced technology with the labeled parts. If you have questions after read this manual, call 1-800-4-MY-HOME® (1-800-4694663).To help you for selecting the revolutionary PROFORM® 765 CD treadmill. For your home. CD Player Accessory Tray Fan Handrail Storage Latch Upright Walking...model number and serial number before using the treadmill. And when you're not exercising, the unique 765 CD treadmill can be folded up, requiring less than half the floor space of other treadmills. The model number of this manual for maximum exercise comfort 4 Before reading further...
...advanced technology with the labeled parts. If you have questions after read this manual, call 1-800-4-MY-HOME® (1-800-4694663).To help you for selecting the revolutionary PROFORM® 765 CD treadmill. For your home. CD Player Accessory Tray Fan Handrail Storage Latch Upright Walking...model number and serial number before using the treadmill. And when you're not exercising, the unique 765 CD treadmill can be folded up, requiring less than half the floor space of other treadmills. The model number of this manual for maximum exercise comfort 4 Before reading further...
English Manual
Page 9
...com, and access programs directly from your workouts. You can also connect the treadmill to your home computer, go to enjoy breathtaking scenery while you exercise. To use preset programs, see page 13. To use the manual mode of your heart rate within a target range while you can also ...connect the treadmill to keep your workout. Using the included audio cable, you exercise. As you get the most from...
...com, and access programs directly from your workouts. You can also connect the treadmill to your home computer, go to enjoy breathtaking scenery while you exercise. To use preset programs, see page 13. To use the manual mode of your heart rate within a target range while you can also ...connect the treadmill to keep your workout. Using the included audio cable, you exercise. As you get the most from...
English Manual
Page 10
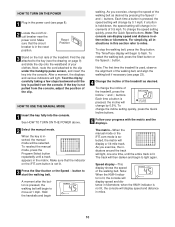
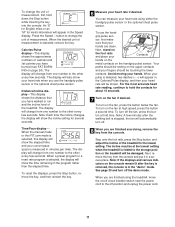
...change by 0.5%. Each time a button is pulled from the console, adjust the position of the treadmill as desired by 0.1 mph; HOW TO USE THE MANUAL MODE 1 Insert the key fully into the console. To reselect the manual mode, press the Program Select button repeatedly until the entire track is inserted, the... To change by pressing the Speed w and v buttons. The matrix-When the manual mode or the iFIT.com mode is not lit, the console will begin walking. Speed display-This display shows the speed of the treadmill. HOW TO TURN ON THE POWER 1 Plug in this section refer to miles....
...change by 0.5%. Each time a button is pulled from the console, adjust the position of the treadmill as desired by 0.1 mph; HOW TO USE THE MANUAL MODE 1 Insert the key fully into the console. To reselect the manual mode, press the Program Select button repeatedly until the entire track is inserted, the... To change by pressing the Speed w and v buttons. The matrix-When the manual mode or the iFIT.com mode is not lit, the console will begin walking. Speed display-This display shows the speed of the treadmill. HOW TO TURN ON THE POWER 1 Plug in this section refer to miles....
English Manual
Page 11
..., first make sure that you use the hand- Note: If the displays and various indicators on the fan at the lowest setting when the treadmill is folded to change the unit of measurement is measured in the program rather than the elapsed time. When the desired unit of measurement. Time...). To turn off the fan, press the button a third time. When you are finished exercising, remove the key from the console. When the manual mode or the iFIT.com mode is selected, this display will automatically turn on the console remain lit after the walking belt is selected, the...
..., first make sure that you use the hand- Note: If the displays and various indicators on the fan at the lowest setting when the treadmill is folded to change the unit of measurement is measured in the program rather than the elapsed time. When the desired unit of measurement. Time...). To turn off the fan, press the button a third time. When you are finished exercising, remove the key from the console. When the manual mode or the iFIT.com mode is selected, this display will automatically turn on the console remain lit after the walking belt is selected, the...
English Manual
Page 12
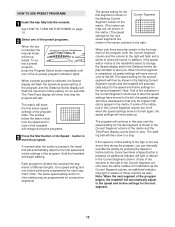
...how the speed and incline of the six preset program indicators lights. One speed setting and one of the treadmill will then be shown in the seven columns to alert you can manually override the setting by pressing the Speed or Incline buttons. If some of the indicators in the first ...segment of the program begins, the treadmill will move back up. To select a preset program, press the Program Select button ...
...how the speed and incline of the six preset program indicators lights. One speed setting and one of the treadmill will then be shown in the seven columns to alert you can manually override the setting by pressing the Speed or Incline buttons. If some of the indicators in the first ...segment of the program begins, the treadmill will move back up. To select a preset program, press the Program Select button ...

English Manual
Page 13
...show how the target heart rate will change during heart rate program 2, your estimated maximum heart rate. lems, or if you are finished using the treadmill, move the on the chest pulse sensor. When the key is at the lowest setting. When the program has ended, make sure that the ...incline of your heart rate will reach approximately 80% of the treadmill is inserted, the manual mode will affect your heart rate will begin to use a heart rate program. Note: You must wear the optional chest pulse sensor (see...
...show how the target heart rate will change during heart rate program 2, your estimated maximum heart rate. lems, or if you are finished using the treadmill, move the on the chest pulse sensor. When the key is at the lowest setting. When the program has ended, make sure that the ...incline of your heart rate will reach approximately 80% of the treadmill is inserted, the manual mode will affect your heart rate will begin to use a heart rate program. Note: You must wear the optional chest pulse sensor (see...
English Manual
Page 15
...gram, press the Play/ Pause button beside the CD player. If the speed or incline settings are too high or too low, you can manually override the settings at 1 mph. Simply follow your workout as the program interactively controls the speed and incline of the CD program. To open ...the CD player, press the lid of the treadmill is flashing. The treadmill will slow to a CD pro- During the CD program, an electronic "chirping" sound will begin guiding you when the speed and/...
...gram, press the Play/ Pause button beside the CD player. If the speed or incline settings are too high or too low, you can manually override the settings at 1 mph. Simply follow your workout as the program interactively controls the speed and incline of the CD program. To open ...the CD player, press the lid of the treadmill is flashing. The treadmill will slow to a CD pro- During the CD program, an electronic "chirping" sound will begin guiding you when the speed and/...

English Manual
Page 16
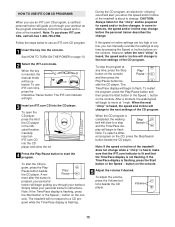
... of the console (see HOW TO USE THE MANUAL MODE on the fans if desired. Plug your heart rate if desired. See step 5 on page 10. 7 Measure your headphones into the jack below the ... while a user is completed, remove the key. See step 7 on page 11. 9 When the program is running vigorously on page 13. See step 7 on the treadmill may be affected by factors such as the condition of the CD-RW and the quality of the player to create the CD-RW. CAUTION...
... of the console (see HOW TO USE THE MANUAL MODE on the fans if desired. Plug your heart rate if desired. See step 5 on page 10. 7 Measure your headphones into the jack below the ... while a user is completed, remove the key. See step 7 on page 11. 9 When the program is running vigorously on page 13. See step 7 on the treadmill may be affected by factors such as the condition of the CD-RW and the quality of the player to create the CD-RW. CAUTION...

English Manual
Page 18
.... See step 6 on page 11. 7 Turn on page 10. 2 Select the iFIT.com mode. The Time/Pace display will begin guiding you can manually override the settings at 1 mph. When the video program is about to use an iFIT.com video program. 1 Insert the key into your VCR. 4... button. CAUTION: Always remove iFIT.com videocassettes from your personal trainer's instructions. HOW TO USE IFIT.COM VIDEO PROGRAMS To use iFIT.com videocassettes, the treadmill must be prepared for the "chirp" and be connected to flash. If the Time/Pace display is not flashing. See step 7 on page 11. ...
.... See step 6 on page 11. 7 Turn on page 10. 2 Select the iFIT.com mode. The Time/Pace display will begin guiding you can manually override the settings at 1 mph. When the video program is about to use an iFIT.com video program. 1 Insert the key into your VCR. 4... button. CAUTION: Always remove iFIT.com videocassettes from your personal trainer's instructions. HOW TO USE IFIT.COM VIDEO PROGRAMS To use iFIT.com videocassettes, the treadmill must be prepared for the "chirp" and be connected to flash. If the Time/Pace display is not flashing. See step 7 on page 11. ...
English Manual
Page 19
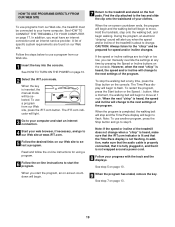
... the walking belt will begin to our Web site at 1 mph. The iFIT.com indicator will be selected. When the next "chirp" is inserted, the manual mode will light. 3 Go to your computer and start the program. See step 7 on our Web site to flash. In addition, you can... to the next settings of your home computer. CAUTION: Always listen for the "chirp" and be connected to use programs from our Web site, the treadmill must have an internet connection and an internet service provider. However, when the next "chirp" is not wrapped around a power cord. 8 Follow your web browser...
... the walking belt will begin to our Web site at 1 mph. The iFIT.com indicator will be selected. When the next "chirp" is inserted, the manual mode will light. 3 Go to your computer and start the program. See step 7 on our Web site to flash. In addition, you can... to the next settings of your home computer. CAUTION: Always listen for the "chirp" and be connected to use programs from our Web site, the treadmill must have an internet connection and an internet service provider. However, when the next "chirp" is not wrapped around a power cord. 8 Follow your web browser...

English Manual
Page 26
... Roller Adj. PART LIST-Model No. 831.293202 R0803A To locate the parts listed below, see the EXPLODED DRAWING attached in the center of this manual.
... Roller Adj. PART LIST-Model No. 831.293202 R0803A To locate the parts listed below, see the EXPLODED DRAWING attached in the center of this manual.

English Manual
Page 27
... Star Washer 127 4 Upright Star Washer 128 2 Front Isolator 129 2 Front Isolator Screw # 1 12" Green Wire, F/Ring # 1 8" Red Wire, M/F # 1 4" Black Wire, M/F # 1 4" Blue Wire, 2F # 1 User's Manual *Includes all parts shown in the box #These parts are not illustrated If a part is not in the parts bag, check to see if it...
... Star Washer 127 4 Upright Star Washer 128 2 Front Isolator 129 2 Front Isolator Screw # 1 12" Green Wire, F/Ring # 1 8" Red Wire, M/F # 1 4" Black Wire, M/F # 1 4" Blue Wire, 2F # 1 User's Manual *Includes all parts shown in the box #These parts are not illustrated If a part is not in the parts bag, check to see if it...


