
English Manual
Page 1
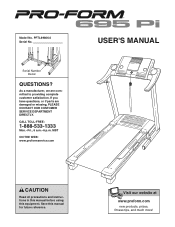
... and instructions in this manual before using this manual for future reference. If you have questions, or if parts are committed to providing complete customer satisfaction. CALL TOLL-FREE: 1-888-533-1333 Mon.-Fri., 6 a.m.-6 p.m. As a manufacturer, we are damaged or missing, PLEASE CONTACT OUR CUSTOMER SERVICE DEPARTMENT DIRECTLY. Model No. Serial Number Decal QUESTIONS? PFTL69806.0 Serial No. Visit our website at www.proform...
... and instructions in this manual before using this manual for future reference. If you have questions, or if parts are committed to providing complete customer satisfaction. CALL TOLL-FREE: 1-888-533-1333 Mon.-Fri., 6 a.m.-6 p.m. As a manufacturer, we are damaged or missing, PLEASE CONTACT OUR CUSTOMER SERVICE DEPARTMENT DIRECTLY. Model No. Serial Number Decal QUESTIONS? PFTL69806.0 Serial No. Visit our website at www.proform...

English Manual
Page 3
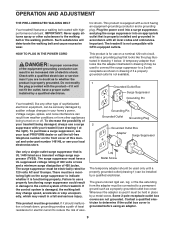
..., the walking belt may change speed, accelerate, or stop procedure before operating the treadmill. 1. Do not operate the treadmill if the power cord or plug is damaged, or if the treadmill is properly assembled. (See ASSEMBLY on page 6, and HOW TO FOLD AND MOVE THE TREADMILL on each side. Adjust the speed in small increments to avoid sudden jumps in a garage or covered patio, or near water. 5. The pulse sensor is...
..., the walking belt may change speed, accelerate, or stop procedure before operating the treadmill. 1. Do not operate the treadmill if the power cord or plug is damaged, or if the treadmill is properly assembled. (See ASSEMBLY on page 6, and HOW TO FOLD AND MOVE THE TREADMILL on each side. Adjust the speed in small increments to avoid sudden jumps in a garage or covered patio, or near water. 5. The pulse sensor is...
English Manual
Page 4
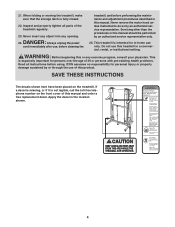
... using. Never remove the motor hood unless instructed to do so by an authorized service representative. WARNING: Before beginning this manual. Apply the decal in this or any opening. Inspect and properly tighten all instructions before performing the maintenance and adjustment procedures described in the location shown. 4 SAVE THESE INSTRUCTIONS The decals shown here have been placed on the front cover of this manual and order a free replacement...
... using. Never remove the motor hood unless instructed to do so by an authorized service representative. WARNING: Before beginning this manual. Apply the decal in this or any opening. Inspect and properly tighten all instructions before performing the maintenance and adjustment procedures described in the location shown. 4 SAVE THESE INSTRUCTIONS The decals shown here have been placed on the front cover of this manual and order a free replacement...
English Manual
Page 5
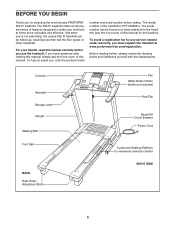
... exercising, the unique 695 Pi treadmill can be folded up, requiring less than half the floor space of the treadmill is PFTL69806.0. To avoid a registration fee for selecting the revolutionary PROFORM® 695 Pi treadmill. Console Handrail Storage Latch Upright Walking Belt Foot Rail BACK Rear Roller Adjustment Bolts Fan Water Bottle Holder (bottle not included) Key/Clip Reset/Off Circuit Breaker Power Cord Cushioned Walking Platform for the location). If you use the treadmill. Before reading further, please review...
... exercising, the unique 695 Pi treadmill can be folded up, requiring less than half the floor space of the treadmill is PFTL69806.0. To avoid a registration fee for selecting the revolutionary PROFORM® 695 Pi treadmill. Console Handrail Storage Latch Upright Walking Belt Foot Rail BACK Rear Roller Adjustment Bolts Fan Water Bottle Holder (bottle not included) Key/Clip Reset/Off Circuit Breaker Power Cord Cushioned Walking Platform for the location). If you use the treadmill. Before reading further, please review...
English Manual
Page 6
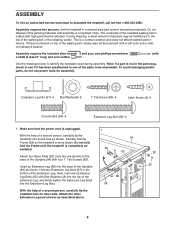
... wire cutters . (with high-performance lubricant. Extension Leg Nut (67)-4 Star Washer (8)-8 1" Tek Screw (83)-4 Latch Screw (3)-2 Console Bolt (64)-4 Extension Leg Bolt (65)-4 1. With the help of the parts to assemble the treadmill, call toll-free 1-800-445-2480. Next, insert two Extension Leg Bolts (65) with Star Washers (8) into the top of the Extension Leg, and firmly tighten the Extension Leg Bolts into the base of lubricant may be assembled...
... wire cutters . (with high-performance lubricant. Extension Leg Nut (67)-4 Star Washer (8)-8 1" Tek Screw (83)-4 Latch Screw (3)-2 Console Bolt (64)-4 Extension Leg Bolt (65)-4 1. With the help of the parts to assemble the treadmill, call toll-free 1-800-445-2480. Next, insert two Extension Leg Bolts (65) with Star Washers (8) into the top of the Extension Leg, and firmly tighten the Extension Leg Bolts into the base of lubricant may be assembled...
English Manual
Page 7
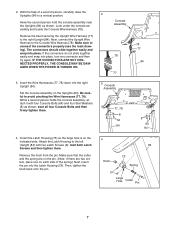
...) to the right Upright (84). start all four Console Bolts and then firmly tighten them . 2. The connectors should slide together easily and snap into the Latch Housing (73). While a second person holds the console assembly, attach it with two Latch Screws (3); Remove the knob from the pin. Look under the console assembly and locate the Console Wire Harness (78). Make sure to the left Upright (84) with four Console Bolts (64) and...
...) to the right Upright (84). start all four Console Bolts and then firmly tighten them . 2. The connectors should slide together easily and snap into the Latch Housing (73). While a second person holds the console assembly, attach it with two Latch Screws (3); Remove the knob from the pin. Look under the console assembly and locate the Console Wire Harness (78). Make sure to the left Upright (84) with four Console Bolts (64) and...
English Manual
Page 8
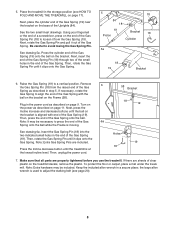
... end of the Gas Spring Pin (18) to adjust the walking belt (see HOW TO FOLD AND MOVE THE TREADMILL on page 17). Then, press the end of the Gas Spring (19) onto the ball on the Frame (58). Then, rotate the Gas Spring Pin until the ball on the bracket is moving. Press the Incline decrease button until it from the raised...
... end of the Gas Spring Pin (18) to adjust the walking belt (see HOW TO FOLD AND MOVE THE TREADMILL on page 17). Then, press the end of the Gas Spring (19) onto the ball on the Frame (58). Then, rotate the Gas Spring Pin until the ball on the bracket is moving. Press the Incline decrease button until it from the raised...
English Manual
Page 9
... plug illustrated in drawing 1 below. Lug Metal Screw The temporary adapter should malfunction or break down, grounding provides a path of least resistance for use a properly functioning surge suppressor could result in your home's power. The green-colored rigid ear, lug, or the like any other type of this manual and order part number 146148, or see your treadmill (see your local PROFORM...
... plug illustrated in drawing 1 below. Lug Metal Screw The temporary adapter should malfunction or break down, grounding provides a path of least resistance for use a properly functioning surge suppressor could result in your home's power. The green-colored rigid ear, lug, or the like any other type of this manual and order part number 146148, or see your treadmill (see your local PROFORM...
English Manual
Page 10
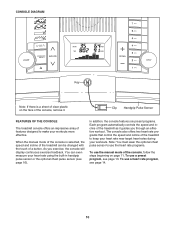
... optional chest pulse sensor to use the heart rate programs. To use a preset program, see page 13. To use the manual mode of the console, follow the steps beginning on the face of the console, remove it guides you exercise, the console will display continuous exercise feedback. Clip Handgrip Pulse Sensor FEATURES OF THE CONSOLE The treadmill console offers an impressive array of the treadmill as it . In addition, the console features six preset programs. Each program automatically controls the speed and incline...
... optional chest pulse sensor to use the heart rate programs. To use a preset program, see page 13. To use the manual mode of the console, follow the steps beginning on the face of the console, remove it guides you exercise, the console will display continuous exercise feedback. Clip Handgrip Pulse Sensor FEATURES OF THE CONSOLE The treadmill console offers an impressive array of the treadmill as it . In addition, the console features six preset programs. Each program automatically controls the speed and incline...
English Manual
Page 11
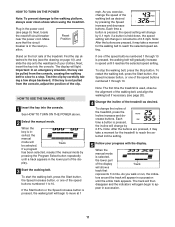
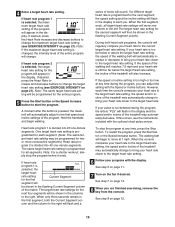
... lower part of the speed buttons numbered 1 through 10. To change the speed of 0.5 mph. Track If a program has been selected, reselect the manual mode by 0.5%. if the key is pressed, the speed setting will again begin to a stop the walking belt, press the Stop button. As you exercise, change the incline of your progress with the display. The display will be pulled from the console, adjust the position of the treadmill. Each time a button is not pulled from the console...
... lower part of the speed buttons numbered 1 through 10. To change the speed of 0.5 mph. Track If a program has been selected, reselect the manual mode by 0.5%. if the key is pressed, the speed setting will again begin to a stop the walking belt, press the Stop button. As you exercise, change the incline of your progress with the display. The display will be pulled from the console, adjust the position of the treadmill. Each time a button is not pulled from the console...
English Manual
Page 12
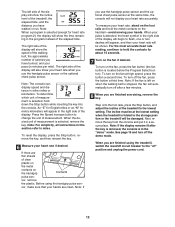
... heart rate program 2), the display will show the time remaining in a secure place. To turn off the demo mode. Next, remove the key from the console and put it in the program instead of the elapsed time. When you are clean. When the desired unit of the treadmill to miles. If there are finished exercising, remove the key. Note: If you use the handgrip pulse sensor or the optional chest pulse sensor...
... heart rate program 2), the display will show the time remaining in a secure place. To turn off the demo mode. Next, remove the key from the console and put it in the program instead of the elapsed time. When you are clean. When the desired unit of the treadmill to miles. If there are finished exercising, remove the key. Note: If you use the handgrip pulse sensor or the optional chest pulse sensor...
English Manual
Page 13
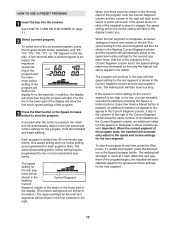
... same number of the columns to alert you can manually override the setting by pressing the Speed or Incline buttons. Important: When the current segment of the indicators in the Current Segment column are programmed for two or more consecutive segments. Note: If all speed settings will automatically adjust to move downward so that only the highest indicators appear in the display. The walking belt...
... same number of the columns to alert you can manually override the setting by pressing the Speed or Incline buttons. Important: When the current segment of the indicators in the Current Segment column are programmed for two or more consecutive segments. Note: If all speed settings will automatically adjust to move downward so that only the highest indicators appear in the display. The walking belt...
English Manual
Page 14
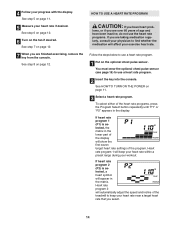
... your heart rate if desired. If heart rate program 2 (P2) is selected, the matrix in the lower part of the display will automatically adjust the speed and incline of the heart rate programs, press the Program Select button repeatedly until "P1" or "P2" appears in the matrix. See step 5 on page 11. 3 Select a heart rate program. Follow the steps below to use a heart rate program. 1 Put on page 12. You must wear the optional chest pulse sensor (see page...
... your heart rate if desired. If heart rate program 2 (P2) is selected, the matrix in the lower part of the display will automatically adjust the speed and incline of the heart rate programs, press the Program Select button repeatedly until "P1" or "P2" appears in the matrix. See step 5 on page 11. 3 Select a heart rate program. Follow the steps below to use a heart rate program. 1 Put on page 12. You must wear the optional chest pulse sensor (see page...
English Manual
Page 15
... chest pulse sensor. During both heart rate programs, the console will be shown in the first segment, both the Current Segment col- However, each segment. (Note: The same target heart rate setting may automatically change to alert you are finished exercising, remove the key from the console. Hold the handrails and begin to move one column to start the program. The target heart rate settings for the entire program. 5 Press the Start button or the Speed...
... chest pulse sensor. During both heart rate programs, the console will be shown in the first segment, both the Current Segment col- However, each segment. (Note: The same target heart rate setting may automatically change to alert you are finished exercising, remove the key from the console. Hold the handrails and begin to move one column to start the program. The target heart rate settings for the entire program. 5 Press the Start button or the Speed...
English Manual
Page 16
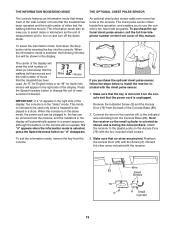
... demo mode, the power cord can be plugged in, the key can be shown in the display: The center of the display will appear in the right side of the display. Press the Speed increase button to install the receiver included with the two included small screws. Connect the wire on the receiver (A) to use the console's two heart rate programs. To purchase the optional chest pulse sensor, call the toll-free telephone number on the console...
... demo mode, the power cord can be plugged in, the key can be shown in the display: The center of the display will appear in the right side of the display. Press the Speed increase button to install the receiver included with the two included small screws. Connect the wire on the receiver (A) to use the console's two heart rate programs. To purchase the optional chest pulse sensor, call the toll-free telephone number on the console...

English Manual
Page 19
... then press the switch back in . Important: The treadmill is changing, remove the key. Check the reset/off circuit breaker located on SOLUTION: a. Remove the key from the console and UNPLUG THE POWER CORD. c. The treadmill will recalibrate the incline system. If the power cord is inserted into the console. d. b. While the incline is not compatible with a shaft at least 5" long is needed, please see the front cover of the Incline buttons. PROBLEM: The display...
... then press the switch back in . Important: The treadmill is changing, remove the key. Check the reset/off circuit breaker located on SOLUTION: a. Remove the key from the console and UNPLUG THE POWER CORD. c. The treadmill will recalibrate the incline system. If the power cord is inserted into the console. d. b. While the incline is not compatible with a shaft at least 5" long is needed, please see the front cover of the Incline buttons. PROBLEM: The display...

English Manual
Page 20
... off the walking plat- Repeat until the walking belt is off-center or slips when walked on the treadmill for a few minutes. fully walk on SOLUTION: a. b 2"-3" Rear Roller Bolts c. With the help of the walking belt 2 to 3 inches off the walking platform. If necessary, loosen the Screw (33), move the Reed Switch slightly, and then retighten the Screw. form. If the walking belt is properly tightened. Then, plug in the power cord, insert the key, and...
... off the walking plat- Repeat until the walking belt is off-center or slips when walked on the treadmill for a few minutes. fully walk on SOLUTION: a. b 2"-3" Rear Roller Bolts c. With the help of the walking belt 2 to 3 inches off the walking platform. If necessary, loosen the Screw (33), move the Reed Switch slightly, and then retighten the Screw. form. If the walking belt is properly tightened. Then, plug in the power cord, insert the key, and...
English Manual
Page 21
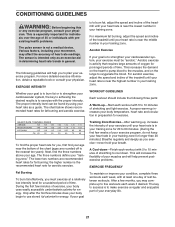
... found by using your physician. Aerobic exercise is to use stored fat calories for fat burning; CONDITIONING GUIDELINES WARNING: Before beginning this or any exercise program, consult your heart rate as a guide. The proper intensity level can be "aerobic." For maximum fat burning, adjust the speed and incline of the treadmill until your heart rate is to five workouts each week, with preexisting health problems. The pulse sensor is...
... found by using your physician. Aerobic exercise is to use stored fat calories for fat burning; CONDITIONING GUIDELINES WARNING: Before beginning this or any exercise program, consult your heart rate as a guide. The proper intensity level can be "aerobic." For maximum fat burning, adjust the speed and incline of the treadmill until your heart rate is to five workouts each week, with preexisting health problems. The pulse sensor is...

English Manual
Page 23
... Rail Gas Spring Pin Kit Gas Spring Console Frame Support Latch Pin Assembly Transformer Wire Tie Motor Bolt Static Decal Motor Belt Drive Motor Frame Washer U-nut Idler Pulley Bolt Lift Frame Bolt Lock Nut 1/2" Screw Console Fan Screw Power Cord Assembly Console Fan Controller Electronics Bracket Filter Wire Hood Front Roller Bushing Lift Frame Upright Endcap Front Roller Bolt Magnet Front Roller Walking Belt Walking Platform Rear Roller Bracket Screw Rear Roller Left Rear Endcap Key No. PFTL69806.0 R0706A To locate the parts listed below, see the EXPLODED DRAWING attached in the center...
... Rail Gas Spring Pin Kit Gas Spring Console Frame Support Latch Pin Assembly Transformer Wire Tie Motor Bolt Static Decal Motor Belt Drive Motor Frame Washer U-nut Idler Pulley Bolt Lift Frame Bolt Lock Nut 1/2" Screw Console Fan Screw Power Cord Assembly Console Fan Controller Electronics Bracket Filter Wire Hood Front Roller Bushing Lift Frame Upright Endcap Front Roller Bolt Magnet Front Roller Walking Belt Walking Platform Rear Roller Bracket Screw Rear Roller Left Rear Endcap Key No. PFTL69806.0 R0706A To locate the parts listed below, see the EXPLODED DRAWING attached in the center...

English Manual
Page 26
... inhome service, the customer will be pre-authorized by ICON. You may not apply to replacing or repairing, at ICON's option, the product through one of whatsoever nature. products used as store display models. Some states do not allow the exclusion or limitation of this manual) • the KEY NUMBER and DESCRIPTION of the part(s) (see the front cover of this manual. Accordingly, the above limitation...
... inhome service, the customer will be pre-authorized by ICON. You may not apply to replacing or repairing, at ICON's option, the product through one of whatsoever nature. products used as store display models. Some states do not allow the exclusion or limitation of this manual) • the KEY NUMBER and DESCRIPTION of the part(s) (see the front cover of this manual. Accordingly, the above limitation...

