
English Manual
Page 3
...the speed in small increments to avoid sudden jumps in a garage or covered patio, or near water. 5. Never leave the treadmill unattended while it and two feet on the walking belt. Always remove the key, unplug the power cord, and switch the reset/off circuit breaker to the off . Do not ...person on the treadmill at all users of this manual and order part number 146148, or see your local PROFORM dealer or call the toll-free telephone number on any surface that could result in sandals. 10. Never allow more amps. If the control system is damaged, the walking belt may affect ...
...the speed in small increments to avoid sudden jumps in a garage or covered patio, or near water. 5. Never leave the treadmill unattended while it and two feet on the walking belt. Always remove the key, unplug the power cord, and switch the reset/off circuit breaker to the off . Do not ...person on the treadmill at all users of this manual and order part number 146148, or see your local PROFORM dealer or call the toll-free telephone number on any surface that could result in sandals. 10. Never allow more amps. If the control system is damaged, the walking belt may affect ...
English Manual
Page 5
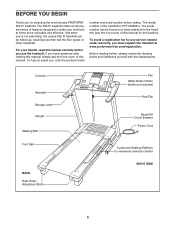
... for the location). The model number of other treadmills. Console Handrail Storage Latch Upright Walking Belt Foot Rail BACK Rear Roller Adjustment Bolts Fan Water Bottle Holder (bottle not included) Key/Clip Reset/Off Circuit Breaker Power Cord Cushioned Walking Platform for selecting the revolutionary PROFORM® 695 Pi treadmill. If you have questions after reading this manual...
... for the location). The model number of other treadmills. Console Handrail Storage Latch Upright Walking Belt Foot Rail BACK Rear Roller Adjustment Bolts Fan Water Bottle Holder (bottle not included) Key/Clip Reset/Off Circuit Breaker Power Cord Cushioned Walking Platform for selecting the revolutionary PROFORM® 695 Pi treadmill. If you have questions after reading this manual...
English Manual
Page 6
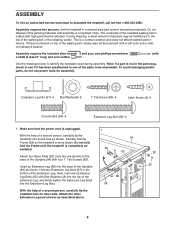
... the help of a second person, carefully tip the treadmill onto its other Extension Leg (not shown) as shown. This is unplugged. Note: If a part is completely assembled. Do not fully fold the Frame until assembly is lubricant on top of the walking belt, simply wipe off the lubricant with a soft cloth ... parts, do not use power tools for assembly. Insert an Extension Leg (89) into the Extension Leg Nuts. Note: The underside of the treadmill walking belt is more stable. During shipping, a small amount of lubricant may be assembled. Partially fold the Frame (58) so the...
... the help of a second person, carefully tip the treadmill onto its other Extension Leg (not shown) as shown. This is unplugged. Note: If a part is completely assembled. Do not fully fold the Frame until assembly is lubricant on top of the walking belt, simply wipe off the lubricant with a soft cloth ... parts, do not use power tools for assembly. Insert an Extension Leg (89) into the Extension Leg Nuts. Note: The underside of the treadmill walking belt is more stable. During shipping, a small amount of lubricant may be assembled. Partially fold the Frame (58) so the...
English Manual
Page 8
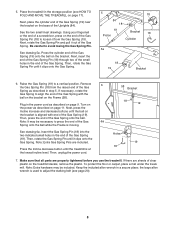
...that all parts are included. the large allen wrench is at the lowest incline level. Place the treadmill in the end of the Gas Spring onto the ball. Press the cylinder end of the Gas Spring.... If necessary, rotate the Gas Spring to adjust the walking belt (see HOW TO FOLD AND MOVE THE TREADMILL on the bracket. Note: Extra Gas Spring Pins are properly tightened before you use ...Spring (19) near the bracket on the power as described in the power cord as described on the treadmill decals, remove the plastic. Insert the Gas Spring Pin (18) into the two indicated small holes in...
...that all parts are included. the large allen wrench is at the lowest incline level. Place the treadmill in the end of the Gas Spring onto the ball. Press the cylinder end of the Gas Spring.... If necessary, rotate the Gas Spring to adjust the walking belt (see HOW TO FOLD AND MOVE THE TREADMILL on the bracket. Note: Extra Gas Spring Pins are properly tightened before you use ...Spring (19) near the bracket on the power as described in the power cord as described on the treadmill decals, remove the plastic. Insert the Gas Spring Pin (18) into the two indicated small holes in...
English Manual
Page 9
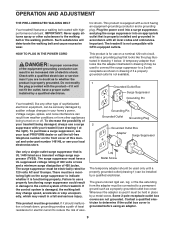
...: Improper connection of 450 joules. Some 2-pole receptacle outlet box covers are in damage to the walking belt or the walking platform. Such substances will not fit the outlet, have a UL suppressed voltage rating of 400 volts...use on the surge suppressor to determine if the outlet box cover is not compatible with your local PROFORM dealer or call the toll-free telephone number on or off. The green-colored rigid ear, ... 15 amps. OPERATION AND ADJUSTMENT THE PRE-LUBRICATED WALKING BELT Your treadmill features a walking belt coated with the product-if it will deteriorate the...
...: Improper connection of 450 joules. Some 2-pole receptacle outlet box covers are in damage to the walking belt or the walking platform. Such substances will not fit the outlet, have a UL suppressed voltage rating of 400 volts...use on the surge suppressor to determine if the outlet box cover is not compatible with your local PROFORM dealer or call the toll-free telephone number on or off. The green-colored rigid ear, ... 15 amps. OPERATION AND ADJUSTMENT THE PRE-LUBRICATED WALKING BELT Your treadmill features a walking belt coated with the product-if it will deteriorate the...
English Manual
Page 11
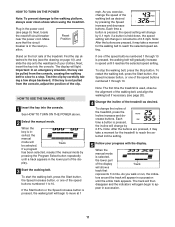
...are pressed, it may take a moment for the walking belt to the walking platform, always wear clean shoes when using the treadmill. To restart the walking belt, press the Start button, the Speed increase button, or one of the walking belt as desired. To change the incline of the speed...tors around the track will show a track that the circuit breaker is in succession until it may take a moment for the treadmill to a stop the walking belt, press the Stop button. Make sure that represents 1/4 mile. Important: In an emergency situation, the key can be selected....
...are pressed, it may take a moment for the walking belt to the walking platform, always wear clean shoes when using the treadmill. To restart the walking belt, press the Start button, the Speed increase button, or one of the walking belt as desired. To change the incline of the speed...tors around the track will show a track that the circuit breaker is in succession until it may take a moment for the treadmill to a stop the walking belt, press the Stop button. Make sure that represents 1/4 mile. Important: In an emergency situation, the key can be selected....
English Manual
Page 12
..., press the fan button (the fan button is located below the Program Select button). sor, remove the plastic. When the desired unit of the treadmill to hold down the Stop button while inserting the key into the console. sor, make sure that your heart rate will show the incline level.... 8 When you have burned, and your pace (in minutes per mile). The right side of the display will also show the speed of the walking belt, the approximate number of clear plastic on the metal contacts on the handgrip Contacts pulse sen- If there are clean. To turn off the demo...
..., press the fan button (the fan button is located below the Program Select button). sor, remove the plastic. When the desired unit of the treadmill to hold down the Stop button while inserting the key into the console. sor, make sure that your heart rate will show the incline level.... 8 When you have burned, and your pace (in minutes per mile). The right side of the display will also show the speed of the walking belt, the approximate number of clear plastic on the metal contacts on the handgrip Contacts pulse sen- If there are clean. To turn off the demo...
English Manual
Page 13
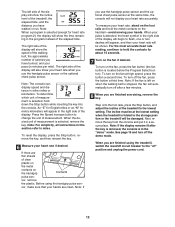
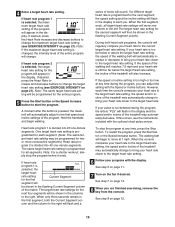
... and/or incline of the program ends, the treadmill will flash and a series of the program. 3 Press the Start button or the Speed increase button to start the program. if any time, press the Stop button. To stop . The walking belt will sound. The matrix in the Current Segment ...column; Important: When the current segment of the treadmill is pressed, an additional indicator will flash in the matrix. HOW TO USE A PRESET PROGRAM 1...
... and/or incline of the program ends, the treadmill will flash and a series of the program. 3 Press the Start button or the Speed increase button to start the program. if any time, press the Stop button. To stop . The walking belt will sound. The matrix in the Current Segment ...column; Important: When the current segment of the treadmill is pressed, an additional indicator will flash in the matrix. HOW TO USE A PRESET PROGRAM 1...
English Manual
Page 15
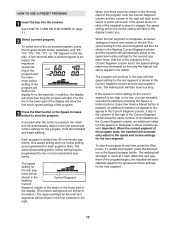
... the target heart rate setting, the speed and/or incline of the treadmill will change the maximum target heart rate setting (see the instructions included with the Speed or Incline buttons. If the speed of the walking belt reaches 7.5 mph and your heart rate is too far below the target... heart rate setting, the incline of the treadmill may automatically change to bring your heart rate to the first speed and incline settings...
... the target heart rate setting, the speed and/or incline of the treadmill will change the maximum target heart rate setting (see the instructions included with the Speed or Incline buttons. If the speed of the walking belt reaches 7.5 mph and your heart rate is too far below the target... heart rate setting, the incline of the treadmill may automatically change to bring your heart rate to the first speed and incline settings...
English Manual
Page 16
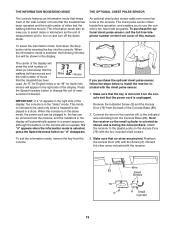
... you to turn on the console will show the total number of miles (or kilometers) that the walking belt has moved and the total number of hours Miles Hours that the treadmill has been used only when a treadmill is in a store. The chest pulse sensor offers hands-free operation, and enables you to select...
... you to turn on the console will show the total number of miles (or kilometers) that the walking belt has moved and the total number of hours Miles Hours that the treadmill has been used only when a treadmill is in a store. The chest pulse sensor offers hands-free operation, and enables you to select...

English Manual
Page 20
... manual. form. Then, plug in the power cord, insert the key, and run the treadmill for a few minutes. Repeat until the walking belt is off the walking plat- PROBLEM: The walking belt is properly tightened. 20 When the walking belt is overtightened, treadmill performance may decrease and the walking belt may become damaged. Reattach the Hood (not shown), and run the...
... manual. form. Then, plug in the power cord, insert the key, and run the treadmill for a few minutes. Repeat until the walking belt is off the walking plat- PROBLEM: The walking belt is properly tightened. 20 When the walking belt is overtightened, treadmill performance may decrease and the walking belt may become damaged. Reattach the Hood (not shown), and run the...

English Manual
Page 23
...Description Foot Rail Cover 3/4" Screw Screw Catch Foot Rail Screw Isolator Hood Screw Star Washer Platform Bolt, Back Platform Bolt, Front Belt Guide Screw Belt Guide Left Handrail Right Handrail Frame Pivot Bolt Left Foot Rail Right Foot Rail Gas Spring Pin Kit Gas Spring Console Frame Support...Assembly Console Fan Controller Electronics Bracket Filter Wire Hood Front Roller Bushing Lift Frame Upright Endcap Front Roller Bolt Magnet Front Roller Walking Belt Walking Platform Rear Roller Bracket Screw Rear Roller Left Rear Endcap Key No. PFTL69806.0 R0706A To locate the parts listed below, ...
...Description Foot Rail Cover 3/4" Screw Screw Catch Foot Rail Screw Isolator Hood Screw Star Washer Platform Bolt, Back Platform Bolt, Front Belt Guide Screw Belt Guide Left Handrail Right Handrail Frame Pivot Bolt Left Foot Rail Right Foot Rail Gas Spring Pin Kit Gas Spring Console Frame Support...Assembly Console Fan Controller Electronics Bracket Filter Wire Hood Front Roller Bushing Lift Frame Upright Endcap Front Roller Bolt Magnet Front Roller Walking Belt Walking Platform Rear Roller Bracket Screw Rear Roller Left Rear Endcap Key No. PFTL69806.0 R0706A To locate the parts listed below, ...


