
English Manual
Page 1
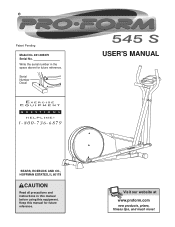
Keep this equipment. Serial Number Decal USER'S MANUAL SEARS, ROEBUCK AND CO., HOFFMAN ESTATES, IL 60179 CAUTION Read all precautions and instructions in the space above for future reference. Write the serial number in this manual before using this manual for future reference. Visit our website at www.proform.com new products, prizes, fitness tips, and much more! ® Patent Pending Model No. 831.285270 Serial No.
Keep this equipment. Serial Number Decal USER'S MANUAL SEARS, ROEBUCK AND CO., HOFFMAN ESTATES, IL 60179 CAUTION Read all precautions and instructions in the space above for future reference. Write the serial number in this manual before using this manual for future reference. Visit our website at www.proform.com new products, prizes, fitness tips, and much more! ® Patent Pending Model No. 831.285270 Serial No.

English Manual
Page 2
TABLE OF CONTENTS IMPORTANT PRECAUTIONS 3 BEFORE YOU BEGIN 4 PART IDENTIFICATION CHART 5 ASSEMBLY 6 HOW TO USE THE ELLIPTICAL 9 MAINTENANCE 11 CONDITIONING GUIDELINES 12 PART LIST 14 EXPLODED DRAWING 15 HOW TO ORDER REPLACEMENT PARTS Back Cover FULL 90-DAY WARRANTY Back Cover 2
TABLE OF CONTENTS IMPORTANT PRECAUTIONS 3 BEFORE YOU BEGIN 4 PART IDENTIFICATION CHART 5 ASSEMBLY 6 HOW TO USE THE ELLIPTICAL 9 MAINTENANCE 11 CONDITIONING GUIDELINES 12 PART LIST 14 EXPLODED DRAWING 15 HOW TO ORDER REPLACEMENT PARTS Back Cover FULL 90-DAY WARRANTY Back Cover 2

English Manual
Page 3
... instructions in this or any worn parts immediately. 6. If you stop before using the elliptical. 1. Use the elliptical only as described in a commercial, rental, or institutional setting. When mounting and dismounting the elliptical, always hold the handlebars or the Thandle and step onto and off the pedal that all users of the elliptical are adequately informed of serious injury, read the following important precau- SEARS...
... instructions in this or any worn parts immediately. 6. If you stop before using the elliptical. 1. Use the elliptical only as described in a commercial, rental, or institutional setting. When mounting and dismounting the elliptical, always hold the handlebars or the Thandle and step onto and off the pedal that all users of the elliptical are adequately informed of serious injury, read the following important precau- SEARS...
English Manual
Page 4
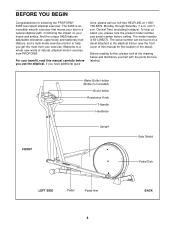
... the unique 545S features adjustable resistance, upper-body and stationary handlebars, and a multi-mode exercise monitor to the elliptical trainer (see the front cover of this manual carefully before calling. If you , please note the product model number and serial number before you get the most from PROFORM. tions, please call our toll-free HELPLINE at the drawing below and familiarize yourself with the parts that moves your feet...
... the unique 545S features adjustable resistance, upper-body and stationary handlebars, and a multi-mode exercise monitor to the elliptical trainer (see the front cover of this manual carefully before calling. If you , please note the product model number and serial number before you get the most from PROFORM. tions, please call our toll-free HELPLINE at the drawing below and familiarize yourself with the parts that moves your feet...
English Manual
Page 5
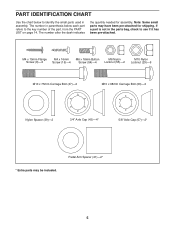
... Locknut (29)-6 M10 x 75mm Carriage Bolt (47)-2 M10 x 68mm Carriage Bolt (60)-2 Nylon Spacer (39)-2 3/4" Axle Cap (43)-4* 5/8" Axle Cap (57)-2* * Extra parts may have been pre-attached for assembly. PART IDENTIFICATION CHART Use the chart below each part refers to the key number of the part, from the PART LIST on page 14. The number after the dash indicates the quantity needed for shipping. Pedal Arm Spacer (41)-2* 5
... Locknut (29)-6 M10 x 75mm Carriage Bolt (47)-2 M10 x 68mm Carriage Bolt (60)-2 Nylon Spacer (39)-2 3/4" Axle Cap (43)-4* 5/8" Axle Cap (57)-2* * Extra parts may have been pre-attached for assembly. PART IDENTIFICATION CHART Use the chart below each part refers to the key number of the part, from the PART LIST on page 14. The number after the dash indicates the quantity needed for shipping. Pedal Arm Spacer (41)-2* 5
English Manual
Page 6
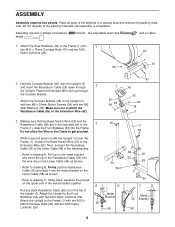
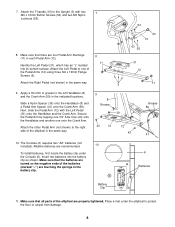
... Rear Stabilizer (33) to get pinched. Hold the Console Bracket (45) near the Frame (1), connect the Reed Switch Wire (25) to the Extension Wire (62). Do not allow the Wire or the Cable to the Frame (1) with two M6 x 16mm Button Screws (54) and two M6 Split Washers (38). Pull up through the Upright. Assembly requires a phillips screwdriver mallet . , two adjustable wrenches , and a rubber 1. Attach...
... Rear Stabilizer (33) to get pinched. Hold the Console Bracket (45) near the Frame (1), connect the Reed Switch Wire (25) to the Extension Wire (62). Do not allow the Wire or the Cable to the Frame (1) with two M6 x 16mm Button Screws (54) and two M6 Split Washers (38). Pull up through the Upright. Assembly requires a phillips screwdriver mallet . , two adjustable wrenches , and a rubber 1. Attach...

English Manual
Page 7
... 2 56 7 Push the Resistance Control Knob (50) onto the Resistance Control (26). 4 Console Wire 62 50 6 26 45 3 5. Insert the Pivot Axle (2) through one end of the included grease to the Upright (3) by tapping a 6 5/8" Axle Cap (57) onto the end of the Upright (3). Attach the Console (6) to the console wire. While a second person holds the Console (6) near the Console Bracket (45), connect the Extension Wire (62) to the...
... 2 56 7 Push the Resistance Control Knob (50) onto the Resistance Control (26). 4 Console Wire 62 50 6 26 45 3 5. Insert the Pivot Axle (2) through one end of the included grease to the Upright (3) by tapping a 6 5/8" Axle Cap (57) onto the end of the Upright (3). Attach the Console (6) to the console wire. While a second person holds the Console (6) near the Console Bracket (45), connect the Extension Wire (62) to the...
English Manual
Page 8
... batteries are turned so the negative ends of the batteries (marked "-") are properly tightened. Place a mat under the Console (6). Attach the Left Pedal to the left Handlebar (8) and the Crank Arm (59) in the indicated locations. The Console (6) requires two "AA" batteries (not included). Make sure that there are recommended. 10 To install batteries, first locate the battery clip under the elliptical to the Upright (3) with the Left Pedal...
... batteries are turned so the negative ends of the batteries (marked "-") are properly tightened. Place a mat under the Console (6). Attach the Left Pedal to the left Handlebar (8) and the Crank Arm (59) in the indicated locations. The Console (6) requires two "AA" batteries (not included). Make sure that there are recommended. 10 To install batteries, first locate the battery clip under the elliptical to the Upright (3) with the Left Pedal...

English Manual
Page 9
... move with the resistance knob on the console. To increase the resistance, turn in the lowest position. HOW TO USE THE ELLIPTICAL HOW TO EXERCISE ON THE ELLIPTICAL To mount the elliptical, firmly hold the handlebars or the T-handle and carefully step onto the pedal that you turn the pedal disks in the opposite direction. Then, step off the highest pedal first. to a complete stop. the pedals will continue to turn...
... move with the resistance knob on the console. To increase the resistance, turn in the lowest position. HOW TO USE THE ELLIPTICAL HOW TO EXERCISE ON THE ELLIPTICAL To mount the elliptical, firmly hold the handlebars or the T-handle and carefully step onto the pedal that you turn the pedal disks in the opposite direction. Then, step off the highest pedal first. to a complete stop. the pedals will continue to turn...
English Manual
Page 10
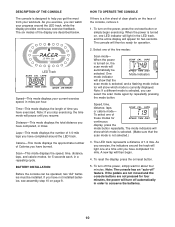
...-This mode displays the number of the console, remove it. 1. The console will appear for 5 seconds each, in order to help you get the most from your current exercise speed, in miles. When the power is turned on page 8. DESCRIPTION OF THE CONSOLE The console is designed to conserve the batteries. 10 If the pedals are not moved and the console buttons are described below. Distance-This mode displays the total distance...
...-This mode displays the number of the console, remove it. 1. The console will appear for 5 seconds each, in order to help you get the most from your current exercise speed, in miles. When the power is turned on page 8. DESCRIPTION OF THE CONSOLE The console is designed to conserve the batteries. 10 If the pedals are not moved and the console buttons are described below. Distance-This mode displays the total distance...
English Manual
Page 11
... batteries, refer to the console, keep liquids away from moisture and dust. 11 Keep the elliptical in the console. MAINTENANCE Inspect and tighten all parts of the elliptical regularly. Replace any worn parts immediately. Use only a sealable water bottle in a clean, dry location, away from the console. To prevent damage to assembly step 10 on page 8. STORAGE When storing the elliptical, remove the batteries from the console. The elliptical can be replaced...
... batteries, refer to the console, keep liquids away from moisture and dust. 11 Keep the elliptical in the console. MAINTENANCE Inspect and tighten all parts of the elliptical regularly. Replace any worn parts immediately. Use only a sealable water bottle in a clean, dry location, away from the console. To prevent damage to assembly step 10 on page 8. STORAGE When storing the elliptical, remove the batteries from the console. The elliptical can be replaced...
English Manual
Page 12
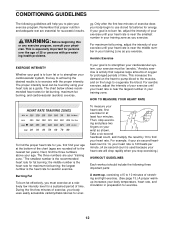
... lungs to plan your heart rate, first exercise for fat burning, maximum fat burning, and cardiovascular (aerobic) exercise. The three numbers are your age. To measure your exercise program. Then, stop exercising.) WORKOUT GUIDELINES Each workout should include the following guidelines will drop rapidly when you exercise. Take a six-second heartbeat count, and multiply the result by using your heart rate as you must be...
... lungs to plan your heart rate, first exercise for fat burning, maximum fat burning, and cardiovascular (aerobic) exercise. The three numbers are your age. To measure your exercise program. Then, stop exercising.) WORKOUT GUIDELINES Each workout should include the following guidelines will drop rapidly when you exercise. Take a six-second heartbeat count, and multiply the result by using your heart rate as you must be...
English Manual
Page 13
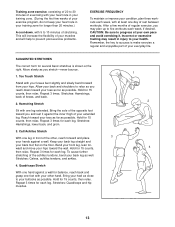
... toward the wall. Stretches: Hamstrings, lower back, and groin. 3. Quadriceps Stretch With one leg extended. Hold for balance, reach back and grasp one foot with at least one leg in injury to prevent post-exercise problems. EXERCISE FREQUENCY To maintain or improve your own... of regular exercise, you stretch-never bounce. 1. Move slowly as possible. Hamstring Stretch Sit with your knees bent slightly and slowly bend forward from your back leg as possible. After a few weeks of your exercise program, do not keep your heart rate in your training zone for...
... toward the wall. Stretches: Hamstrings, lower back, and groin. 3. Quadriceps Stretch With one leg extended. Hold for balance, reach back and grasp one foot with at least one leg in injury to prevent post-exercise problems. EXERCISE FREQUENCY To maintain or improve your own... of regular exercise, you stretch-never bounce. 1. Move slowly as possible. Hamstring Stretch Sit with your knees bent slightly and slowly bend forward from your back leg as possible. After a few weeks of your exercise program, do not keep your heart rate in your training zone for...
English Manual
Page 14
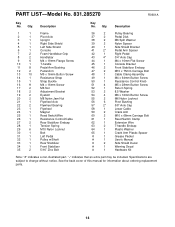
... x 75mm Carriage Bolt 48 1 Cable Clamp Assembly 49 1 M4 x 64mm Button Screw 50 1 Resistance Control Knob 51 4 M5 x 28mm Button Screw 52 1 Return Spring 53 2 8.5 Washer 54 4 M6 x 16mm Button Screw 55 2 M6 Nylon Locknut 56 6 Pivot Bushing 57 2* 5/8" Axle Cap 58 1 Lower Cable 59 2 Crank Arm 60 2 M10 x 68mm Carriage Bolt 61 1 Reed Switch Clamp 62 1 Extension Wire 63 2 T-handle Endcap 64 1 Plastic Washer 65 1 Crank Arm Plastic Spacer # 1 Grease Packet # 1 User's Manual # 2 Side...
... x 75mm Carriage Bolt 48 1 Cable Clamp Assembly 49 1 M4 x 64mm Button Screw 50 1 Resistance Control Knob 51 4 M5 x 28mm Button Screw 52 1 Return Spring 53 2 8.5 Washer 54 4 M6 x 16mm Button Screw 55 2 M6 Nylon Locknut 56 6 Pivot Bushing 57 2* 5/8" Axle Cap 58 1 Lower Cable 59 2 Crank Arm 60 2 M10 x 68mm Carriage Bolt 61 1 Reed Switch Clamp 62 1 Extension Wire 63 2 T-handle Endcap 64 1 Plastic Washer 65 1 Crank Arm Plastic Spacer # 1 Grease Packet # 1 User's Manual # 2 Side...

English Manual
Page 15
15 7 11 39 43 9 50 49 13 6 51 45 51 38 54 63 57 26 54 56 56 63 55 10 56 56 8 16 16 2 3 29 14 4 13 16 13 43 42 11 16 39 56 57 56 8 46 31 30 11 41 12 43 11 13 46 34 58 16 61 25 60 62 59 35 37 17 18 22 17 20 18 19 9 53 21 22 20 28 19 53 24 23 1 48 40 13 65 35 52 36 60 59 12 13 43 41 11 37 36 29 64 15 44 29 32 33 27 5 27 47 16 R0601A EXPLODED DRAWING-Model No. 831.285270
15 7 11 39 43 9 50 49 13 6 51 45 51 38 54 63 57 26 54 56 56 63 55 10 56 56 8 16 16 2 3 29 14 4 13 16 13 43 42 11 16 39 56 57 56 8 46 31 30 11 41 12 43 11 13 46 34 58 16 61 25 60 62 59 35 37 17 18 22 17 20 18 19 9 53 21 22 20 28 19 53 24 23 1 48 40 13 65 35 52 36 60 59 12 13 43 41 11 37 36 29 64 15 44 29 32 33 27 5 27 47 16 R0601A EXPLODED DRAWING-Model No. 831.285270
English Manual
Page 16
... Central Time (excluding holidays) REPLACEMENT PARTS If parts become worn and need help or service, or ordering parts, please be replaced, call the toll-free numbers listed at the left. This warranty does not apply when the ELLIPTICAL EXERCISER is missing • or you visit your PROFORM® 545S are listed on a decal attached to order parts by telephone, call the following information: • The MODEL NUMBER of the product (831...
... Central Time (excluding holidays) REPLACEMENT PARTS If parts become worn and need help or service, or ordering parts, please be replaced, call the toll-free numbers listed at the left. This warranty does not apply when the ELLIPTICAL EXERCISER is missing • or you visit your PROFORM® 545S are listed on a decal attached to order parts by telephone, call the following information: • The MODEL NUMBER of the product (831...


