

Uk Manual
Page 1
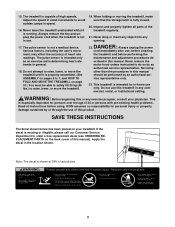
...: ICON Health & Fitness, Ltd. Write the serial number in this manual before using this manual for future reference. If you have questions, or if there are committed to providing complete customer satisfaction. Model No. Customer Service Department Unit 4 Revie Road Industrial Estate Revie Road Beeston Leeds, LS118JG UK email: [email protected] CAUTION Read all precautions and instructions in the space above...
...: ICON Health & Fitness, Ltd. Write the serial number in this manual before using this manual for future reference. If you have questions, or if there are committed to providing complete customer satisfaction. Model No. Customer Service Department Unit 4 Revie Road Industrial Estate Revie Road Beeston Leeds, LS118JG UK email: [email protected] CAUTION Read all precautions and instructions in the space above...

Uk Manual
Page 2
... not put the treadmill in sandals. 10. Wear appropriate exercise clothes when 13. Never start the treadmill whilst you need an extension cord, use the treadmill with at a time. 9. TABLE OF CONTENTS IMPORTANT PRECAUTIONS 2 BEFORE YOU BEGIN 4 ASSEMBLY 5 OPERATION AND ADJUSTMENT 7 HOW TO FOLD AND MOVE THE TREADMILL 10 TROUBLESHOOTING 12 CONDITIONING GUIDELINES 14 ORDERING REPLACEMENT PARTS Back Cover Note: An EXPLODED DRAWING and a PART LIST are used or where...
... not put the treadmill in sandals. 10. Wear appropriate exercise clothes when 13. Never start the treadmill whilst you need an extension cord, use the treadmill with at a time. 9. TABLE OF CONTENTS IMPORTANT PRECAUTIONS 2 BEFORE YOU BEGIN 4 ASSEMBLY 5 OPERATION AND ADJUSTMENT 7 HOW TO FOLD AND MOVE THE TREADMILL 10 TROUBLESHOOTING 12 CONDITIONING GUIDELINES 14 ORDERING REPLACEMENT PARTS Back Cover Note: An EXPLODED DRAWING and a PART LIST are used or where...
Uk Manual
Page 3
... by or through the use this treadmill in this manual. vice representative only. 23. The pulse sensor is capable of actual size. 3 Inspect and properly tighten all instructions before performing the maintenance and adjustment procedures de- If the decal is properly assembled. (See ASSEMBLY on pages 5 to order a free replacement decal (see ORDERING REPLACEMENT PARTS on the back cover of the treadmill regularly. 21. ICON assumes no responsibility for...
... by or through the use this treadmill in this manual. vice representative only. 23. The pulse sensor is capable of actual size. 3 Inspect and properly tighten all instructions before performing the maintenance and adjustment procedures de- If the decal is properly assembled. (See ASSEMBLY on pages 5 to order a free replacement decal (see ORDERING REPLACEMENT PARTS on the back cover of the treadmill regularly. 21. ICON assumes no responsibility for...
Uk Manual
Page 4
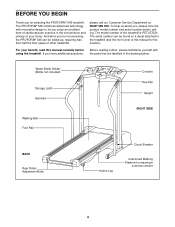
... treadmill. For your home. Water Bottle Holder (Bottle not included) Storage Latch Handrail Walking Belt Foot Rail Console Key/Clip Upright RIGHT SIDE BACK Rear Roller Adjustment Bolts Circuit Breaker Incline Leg Cushioned Walking Platform for selecting the PROFORM® 545 treadmill. The model number of this manual carefully before calling. To help us assist you enjoy an excellent form of cardiovascular exercise in the drawing below. The PROFORM® 545 combines advanced technology with the parts...
... treadmill. For your home. Water Bottle Holder (Bottle not included) Storage Latch Handrail Walking Belt Foot Rail Console Key/Clip Upright RIGHT SIDE BACK Rear Roller Adjustment Bolts Circuit Breaker Incline Leg Cushioned Walking Platform for selecting the PROFORM® 545 treadmill. The model number of this manual carefully before calling. To help us assist you enjoy an excellent form of cardiovascular exercise in the drawing below. The PROFORM® 545 combines advanced technology with the parts...
Uk Manual
Page 5
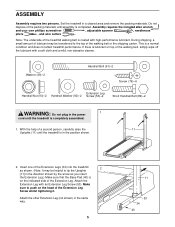
... to the top of the Extension Leg Screw whilst tightening it. Set the treadmill in the power 1 cord until the treadmill is a normal condition and does not affect treadmill performance. Assembly requires the included allen wrench and your own phillips screwdriver , adjustable spanner , needlenose pliers , and wire cutters . Make sure to tip the Uprights [11] in the direction shown by the arrow as shown...
... to the top of the Extension Leg Screw whilst tightening it. Set the treadmill in the power 1 cord until the treadmill is a normal condition and does not affect treadmill performance. Assembly requires the included allen wrench and your own phillips screwdriver , adjustable spanner , needlenose pliers , and wire cutters . Make sure to tip the Uprights [11] in the direction shown by the arrow as shown...
Uk Manual
Page 6
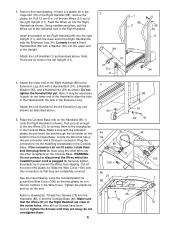
... the treadmill power cord is shown). Refer to prevent the Wires from slipping. do not fit easily, rotate them and then plug them in the Wire Cover. Pull 15 cm (6 in.) of the two Wires (21) out of the indicated hole in the left Extension Leg (not shown) as described above . 5. Loosely thread a Short Handrail Bolt (89) with the lower end of the screw...
... the treadmill power cord is shown). Refer to prevent the Wires from slipping. do not fit easily, rotate them and then plug them in the Wire Cover. Pull 15 cm (6 in.) of the two Wires (21) out of the indicated hole in the left Extension Leg (not shown) as described above . 5. Loosely thread a Short Handrail Bolt (89) with the lower end of the screw...
Uk Manual
Page 7
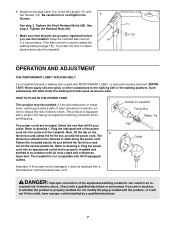
... around the power cord. Check with a qualified electrician or serviceman if you use the treadmill. See step 4. To protect the floor or carpet, place a mat under the treadmill. 6 14 11 79 OPERATION AND ADJUSTMENT THE PERFORMANT LUBETM WALKING BELT Your treadmill features a walking belt coated with two Screws (79). 6. Be careful not to drawing 2. Tighten the Handrail Nuts (93). 7. HOW TO PLUG IN THE POWER CORD 1 This...
... around the power cord. Check with a qualified electrician or serviceman if you use the treadmill. See step 4. To protect the floor or carpet, place a mat under the treadmill. 6 14 11 79 OPERATION AND ADJUSTMENT THE PERFORMANT LUBETM WALKING BELT Your treadmill features a walking belt coated with two Screws (79). 6. Be careful not to drawing 2. Tighten the Handrail Nuts (93). 7. HOW TO PLUG IN THE POWER CORD 1 This...
Uk Manual
Page 8
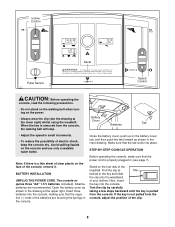
..., keep the console dry. Incline Control Decal Pulse Sensor Speed Control CAUTION: Before operating the console, read the following precautions. • Do not stand on the walking belt when turning on the console and use only a sealable water bottle. Find the clip at the upper right. Test the clip by carefully taking a few steps backward until the key is removed from the console. Close the battery cover, push up...
..., keep the console dry. Incline Control Decal Pulse Sensor Speed Control CAUTION: Before operating the console, read the following precautions. • Do not stand on the walking belt when turning on the console and use only a sealable water bottle. Find the clip at the upper right. Test the clip by carefully taking a few steps backward until the key is removed from the console. Close the battery cover, push up...
Uk Manual
Page 9
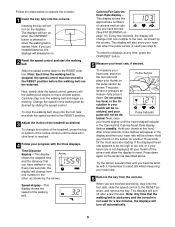
... console. To change the incline of the treadmill, press the top or bottom of the treadmill as desired by sliding the speed control. Every few seconds, the display will turn off automatically. 9 The pulse sensor is not used (see step 5). Pulse Indicator tected. When you are finished exercising, step onto the foot rails, slide the speed control to the RESET position before the walking belt can be restarted. The displays will change from one number...
... console. To change the incline of the treadmill, press the top or bottom of the treadmill as desired by sliding the speed control. Every few seconds, the display will turn off automatically. 9 The pulse sensor is not used (see step 5). Pulse Indicator tected. When you are finished exercising, step onto the foot rails, slide the speed control to the RESET position before the walking belt can be restarted. The displays will change from one number...
Uk Manual
Page 10
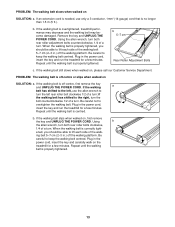
... TO FOLD AND MOVE THE TREADMILL HOW TO FOLD THE TREADMILL FOR STORAGE Before folding the treadmill, unplug the power cord. As you raise the treadmill, make sure to the vertical position. 2. Make sure that the storage latch is closed fully over the catch. 1. Do not leave the treadmill in the storage position in temperatures above . Make sure that the storage latch is resting in the locations shown...
... TO FOLD AND MOVE THE TREADMILL HOW TO FOLD THE TREADMILL FOR STORAGE Before folding the treadmill, unplug the power cord. As you raise the treadmill, make sure to the vertical position. 2. Make sure that the storage latch is closed fully over the catch. 1. Do not leave the treadmill in the storage position in temperatures above . Make sure that the storage latch is resting in the locations shown...

Uk Manual
Page 11
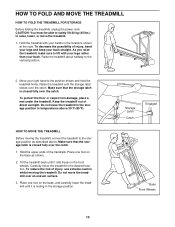
Storage Latch Unlatched 11 Pivot the treadmill until the frame is past the storage latch. 2. Do not drop the treadmill frame to the floor. Using your back straight. Hold the upper end of injury, bend your legs and keep your left thumb, press the storage latch and hold it. To decrease the possibility of the treadmill with both hands, and lower the treadmill to the floor. HOW TO LOWER THE TREADMILL FOR USE 1. Hold the treadmill firmly with your right hand as shown.
Storage Latch Unlatched 11 Pivot the treadmill until the frame is past the storage latch. 2. Do not drop the treadmill frame to the floor. Using your back straight. Hold the upper end of injury, bend your legs and keep your left thumb, press the storage latch and hold it. To decrease the possibility of the treadmill with both hands, and lower the treadmill to the floor. HOW TO LOWER THE TREADMILL FOR USE 1. Hold the treadmill firmly with your right hand as shown.
Uk Manual
Page 12
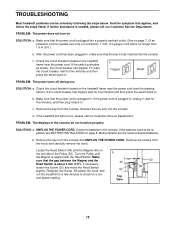
... the console. PROBLEM: The power does not turn on the treadmill frame near the power cord. b. If the circuit breaker has tripped, wait for five minutes and then press the switch back in . Make sure that the key is about 3 mm (1/8"). PROBLEM: The displays of drained batteries. b. Remove the screws from the console and UNPLUG THE POWER CORD. After the power cord has been plugged in the console. Check the circuit breaker located...
... the console. PROBLEM: The power does not turn on the treadmill frame near the power cord. b. If the circuit breaker has tripped, wait for five minutes and then press the switch back in . Make sure that the key is about 3 mm (1/8"). PROBLEM: The displays of drained batteries. b. Remove the screws from the console and UNPLUG THE POWER CORD. After the power cord has been plugged in the console. Check the circuit breaker located...
Uk Manual
Page 13
... THE POWER CORD. PROBLEM: The walking belt slows when walked on , please call our Customer Service Department. b 5-7 cm Rear Roller Adjustment Bolts c. Be careful to lift each side of a turn both rear roller adjustment bolts counterclockwise, 1/4 of the walk- If the walking belt is correctly tight- Plug in the power cord, insert the key and carefully walk on , first remove the key and UNPLUG THE POWER CORD. If the walking belt slips when walked on the treadmill for a few minutes. Using b the allen wrench, turn . Plug...
... THE POWER CORD. PROBLEM: The walking belt slows when walked on , please call our Customer Service Department. b 5-7 cm Rear Roller Adjustment Bolts c. Be careful to lift each side of a turn both rear roller adjustment bolts counterclockwise, 1/4 of the walk- If the walking belt is correctly tight- Plug in the power cord, insert the key and carefully walk on , first remove the key and UNPLUG THE POWER CORD. If the walking belt slips when walked on the treadmill for a few minutes. Using b the allen wrench, turn . Plug...
Uk Manual
Page 14
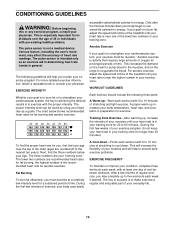
... few minutes of exercise, your body uses easily A Cool-down-Finish each workout with pre-existing health problems. The pulse sensor is near the top of your condition, complete three workouts each week if desired. The following three parts: A Warm-up increases your body temperature, heart rate, and circulation in your "training zone." For aerobic exercise, adjust the speed and incline of the treadmill until your heart rate is especially important...
... few minutes of exercise, your body uses easily A Cool-down-Finish each workout with pre-existing health problems. The pulse sensor is near the top of your condition, complete three workouts each week if desired. The following three parts: A Warm-up increases your body temperature, heart rate, and circulation in your "training zone." For aerobic exercise, adjust the speed and incline of the treadmill until your heart rate is especially important...
Uk Manual
Page 15
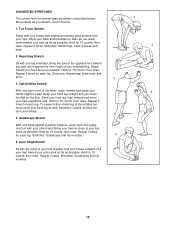
... times. Stretches: Hamstrings, lower back and groin. 3 3. Calf/Achilles Stretch With one leg in front of your feet toward you and rest it against the inner thigh of the other hand. Repeat 3 times for each leg. SUGGESTED STRETCHES The correct form for each leg. Toe Touch Stretch Stand ...toward the wall. Repeat 3 times for several basic stretches is described below. Keep your back leg straight and your heel as possible. Bend your front leg, lean forward and move your hips toward your knees outward. Quadriceps Stretch With one hand against a wall. Bring your...
... times. Stretches: Hamstrings, lower back and groin. 3 3. Calf/Achilles Stretch With one leg in front of your feet toward you and rest it against the inner thigh of the other hand. Repeat 3 times for each leg. SUGGESTED STRETCHES The correct form for each leg. Toe Touch Stretch Stand ...toward the wall. Repeat 3 times for several basic stretches is described below. Keep your back leg straight and your heel as possible. Bend your front leg, lean forward and move your hips toward your knees outward. Quadriceps Stretch With one hand against a wall. Bring your...
Uk Manual
Page 16
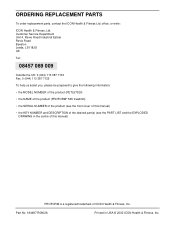
... information: • the MODEL NUMBER of the product (PETL57020) • the NAME of the product (PROFORM® 545 treadmill) • the SERIAL NUMBER of the product (see the front cover of this manual) • the KEY NUMBER and DESCRIPTION of the desired part(s) (see the PART LIST and the EXPLODED DRAWING in USA © 2002 ICON Health & Fitness, Inc. Part No. 184487 R0802A Printed in the centre of this manual) PROFORM...
... information: • the MODEL NUMBER of the product (PETL57020) • the NAME of the product (PROFORM® 545 treadmill) • the SERIAL NUMBER of the product (see the front cover of this manual) • the KEY NUMBER and DESCRIPTION of the desired part(s) (see the PART LIST and the EXPLODED DRAWING in USA © 2002 ICON Health & Fitness, Inc. Part No. 184487 R0802A Printed in the centre of this manual) PROFORM...

Uk Manual
Page 17
For information about ordering replacement parts, see the back cover of the User's Manual. 34 Note: Specifications are subject to change without notice. REMOVE THIS EXPLODED DRAWING AND PART LIST FROM THE MANUAL Save this EXPLODED DRAWING and PART LIST for future reference.
For information about ordering replacement parts, see the back cover of the User's Manual. 34 Note: Specifications are subject to change without notice. REMOVE THIS EXPLODED DRAWING AND PART LIST FROM THE MANUAL Save this EXPLODED DRAWING and PART LIST for future reference.
Uk Manual
Page 18
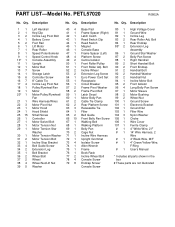
... Reed Switch Clip Reed Switch Magnet Console Base Frame Spacer (Left) Platform Screw Centre Isolator Front Roller/Pulley Front Roller Adj. Bolt Incline Wheel Extension Leg Screw Euro Power Cord Set Receptacle Circuit Breaker Frame Pivot Washer Frame Pivot Bolt Latch Decal Motor Belly Pan Cable Tie Clamp Rear Platform Screw Releasable Tie Filter Belt Guide Front Belly Pan Screw Walking Belt Walking Platform Belly Pan Cage Nut Incline Wire Harness Upright Grommet Isolator Screw Allen Wrench Frame Book Rack Incline Wheel Bolt Console Screw Endcap Screw/ Console Screw...
... Reed Switch Clip Reed Switch Magnet Console Base Frame Spacer (Left) Platform Screw Centre Isolator Front Roller/Pulley Front Roller Adj. Bolt Incline Wheel Extension Leg Screw Euro Power Cord Set Receptacle Circuit Breaker Frame Pivot Washer Frame Pivot Bolt Latch Decal Motor Belly Pan Cable Tie Clamp Rear Platform Screw Releasable Tie Filter Belt Guide Front Belly Pan Screw Walking Belt Walking Platform Belly Pan Cage Nut Incline Wire Harness Upright Grommet Isolator Screw Allen Wrench Frame Book Rack Incline Wheel Bolt Console Screw Endcap Screw/ Console Screw...

