
Uk Manual
Page 2
... YOU BEGIN on any surface that could become caught in a garage or covered patio, or near water. 5. Do not put the treadmill in the treadmill. Athletic support clothes are used or where oxygen is not working properly.) 14. When replacing the fuse, an ASTA approved BS1362 type... earthed circuit. TABLE OF CONTENTS IMPORTANT PRECAUTIONS 2 BEFORE YOU BEGIN 4 ASSEMBLY 5 OPERATION AND ADJUSTMENT 7 HOW TO FOLD AND MOVE THE TREADMILL 10 TROUBLESHOOTING 12 CONDITIONING GUIDELINES 14 ORDERING REPLACEMENT PARTS Back Cover Note: An EXPLODED DRAWING and a PART LIST are attached in the centre ...
... YOU BEGIN on any surface that could become caught in a garage or covered patio, or near water. 5. Do not put the treadmill in the treadmill. Athletic support clothes are used or where oxygen is not working properly.) 14. When replacing the fuse, an ASTA approved BS1362 type... earthed circuit. TABLE OF CONTENTS IMPORTANT PRECAUTIONS 2 BEFORE YOU BEGIN 4 ASSEMBLY 5 OPERATION AND ADJUSTMENT 7 HOW TO FOLD AND MOVE THE TREADMILL 10 TROUBLESHOOTING 12 CONDITIONING GUIDELINES 14 ORDERING REPLACEMENT PARTS Back Cover Note: An EXPLODED DRAWING and a PART LIST are attached in the centre ...
Uk Manual
Page 3
... the procedures in speed. 16. If the decal is capable of actual size. 3 Never drop or insert any object into any exercise program, consult your treadmill. Adjust the speed in small increments to avoid sudden jumps in this manual should be able to safely lift 20 kg (45 lbs.) to 7, and... HOW TO FOLD AND MOVE THE TREADMILL on the back cover of heart rate readings. SAVE THESE INSTRUCTIONS The decal shown below has been placed on your physician. Always unplug the power...
... the procedures in speed. 16. If the decal is capable of actual size. 3 Never drop or insert any object into any exercise program, consult your treadmill. Adjust the speed in small increments to avoid sudden jumps in this manual should be able to safely lift 20 kg (45 lbs.) to 7, and... HOW TO FOLD AND MOVE THE TREADMILL on the back cover of heart rate readings. SAVE THESE INSTRUCTIONS The decal shown below has been placed on your physician. Always unplug the power...
Uk Manual
Page 4
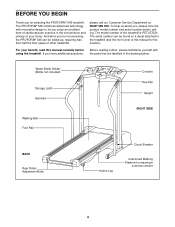
... advanced technology with the parts that are labelled in the convenience and privacy of the treadmill is PETL57020. And when you're not exercising, the PROFORM® 545 can be folded up, requiring less than half the floor space of cardiovascular exercise in the drawing below. The... Rail Console Key/Clip Upright RIGHT SIDE BACK Rear Roller Adjustment Bolts Circuit Breaker Incline Leg Cushioned Walking Platform for selecting the PROFORM® 545 treadmill. please call our Customer Service Department at 08457 089 009. To help us assist you, please note the product model number...
... advanced technology with the parts that are labelled in the convenience and privacy of the treadmill is PETL57020. And when you're not exercising, the PROFORM® 545 can be folded up, requiring less than half the floor space of cardiovascular exercise in the drawing below. The... Rail Console Key/Clip Upright RIGHT SIDE BACK Rear Roller Adjustment Bolts Circuit Breaker Incline Leg Cushioned Walking Platform for selecting the PROFORM® 545 treadmill. please call our Customer Service Department at 08457 089 009. To help us assist you, please note the product model number...
Uk Manual
Page 5
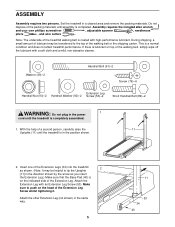
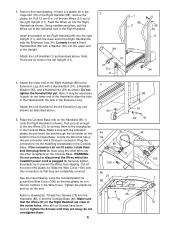
... , and wire cutters . Note: The underside of the Extension Leg Screw whilst tightening it. Insert one of the Extension Legs (34) into the treadmill 2 as shown. (Note: It may be helpful to the top of a second person, carefully raise the 11 Uprights (11) until the... treadmill is a normal condition and does not affect treadmill performance. ASSEMBLY Assembly requires two persons. Set the treadmill in the same way. 5 11 53 34 40 Attach the Extension Leg with a soft cloth and a ...
... , and wire cutters . Note: The underside of the Extension Leg Screw whilst tightening it. Insert one of the Extension Legs (34) into the treadmill 2 as shown. (Note: It may be helpful to the top of a second person, carefully raise the 11 Uprights (11) until the... treadmill is a normal condition and does not affect treadmill performance. ASSEMBLY Assembly requires two persons. Set the treadmill in the same way. 5 11 53 34 40 Attach the Extension Leg with a soft cloth and a ...
Uk Manual
Page 6
... Console Base. If there is plugged in the Right Handrail (88), remove the plastic tie. WARNING: Do not connect or disconnect the Wires whilst the treadmill power cord is a plastic tie in the Cage Nut (70) in . Thread four Screws (79) into the upper end of the plastic tie. do not...
... Console Base. If there is plugged in the Right Handrail (88), remove the plastic tie. WARNING: Do not connect or disconnect the Wires whilst the treadmill power cord is a plastic tie in the Cage Nut (70) in . Thread four Screws (79) into the upper end of the plastic tie. do not...
Uk Manual
Page 7
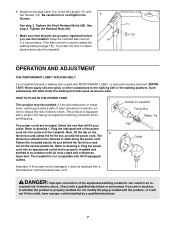
... earthed in doubt as to whether the product is damaged, it must be replaced with all parts are included. Socket on treadmill Ferrite Box Plastic Tie Tab Outlet Important: If the power cord is properly earthed. DANGER: Improper connection of electric shock. ...-if it should not be allowed to drawing 1. Refer to slide along the power cord. Refer to overtighten the Screws. Important: The treadmill is equipped with PERFORMANT LUBETM, a high-performance lubricant. Check with GFCI-equipped outlets. Plug the indicated end of electric shock. 6. See...
... earthed in doubt as to whether the product is damaged, it must be replaced with all parts are included. Socket on treadmill Ferrite Box Plastic Tie Tab Outlet Important: If the power cord is properly earthed. DANGER: Improper connection of electric shock. ...-if it should not be allowed to drawing 1. Refer to slide along the power cord. Refer to overtighten the Screws. Important: The treadmill is equipped with PERFORMANT LUBETM, a high-performance lubricant. Check with GFCI-equipped outlets. Plug the indicated end of electric shock. 6. See...
Uk Manual
Page 8
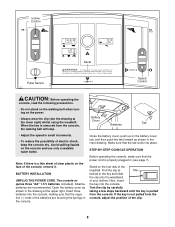
... and use only a sealable water bottle. If the key is properly plugged in (see the drawing at the lower right) whilst using the treadmill. The console requires three "AA" 1.5 V batteries (included). Next, insert the key into place. Incline Control Decal Pulse Sensor Speed Control CAUTION... the console, read the following precautions. • Do not stand on the walking belt when turning on the foot rails of the treadmill. Alkaline batteries are touching the springs in small increments. • To reduce the possibility of electric shock, keep the console dry. Find...
... and use only a sealable water bottle. If the key is properly plugged in (see the drawing at the lower right) whilst using the treadmill. The console requires three "AA" 1.5 V batteries (included). Next, insert the key into place. Incline Control Decal Pulse Sensor Speed Control CAUTION... the console, read the following precautions. • Do not stand on the walking belt when turning on the foot rails of the treadmill. Alkaline batteries are touching the springs in small increments. • To reduce the possibility of electric shock, keep the console dry. Find...
Uk Manual
Page 9
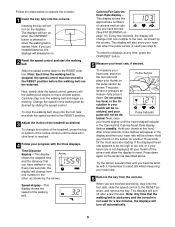
... a few seconds, the display will turn on the displays. When you become familiar with the three displays. To change the incline of the treadmill, press the top or bottom of the walking belt. Calories/Fat Calories/ Heart Rate display- The pulse sensor is stopped, the speed control ... you are finished exercising, step onto the foot rails, slide the speed control to reset. This display shows the approximate numbers of the treadmill as shown. Every few seconds, three dashes will appear in the display and then your heart rate, if desired. The displays will not...
... a few seconds, the display will turn on the displays. When you become familiar with the three displays. To change the incline of the treadmill, press the top or bottom of the walking belt. Calories/Fat Calories/ Heart Rate display- The pulse sensor is stopped, the speed control ... you are finished exercising, step onto the foot rails, slide the speed control to reset. This display shows the approximate numbers of the treadmill as shown. Every few seconds, three dashes will appear in the display and then your heart rate, if desired. The displays will not...
Uk Manual
Page 10
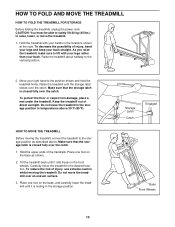
...shown. 2. Make sure that the storage latch is closed fully over the catch. 1. Place one foot on the base, and carefully lower the treadmill until it rolls freely on the base as described above 30°C (85°F). Storage Latch Catch Engaged Base Front Wheels 10 HOW TO ...at the right. Place one foot on the front wheels. To decrease the possibility of injury, use extreme caution whilst moving the treadmill, convert the treadmill to the vertical position. 2. As you raise the treadmill, make sure to lift with your right hand to the desired location. Carefully move the...
...shown. 2. Make sure that the storage latch is closed fully over the catch. 1. Place one foot on the base, and carefully lower the treadmill until it rolls freely on the base as described above 30°C (85°F). Storage Latch Catch Engaged Base Front Wheels 10 HOW TO ...at the right. Place one foot on the front wheels. To decrease the possibility of injury, use extreme caution whilst moving the treadmill, convert the treadmill to the vertical position. 2. As you raise the treadmill, make sure to lift with your right hand to the desired location. Carefully move the...

Uk Manual
Page 11
Pivot the treadmill until the frame is past the storage latch. 2. Storage Latch Unlatched 11 Do not drop the treadmill frame to the floor. To decrease the possibility of the treadmill with both hands, and lower the treadmill to the floor. Using your back straight. Hold the treadmill firmly with your right hand as shown. HOW TO LOWER THE TREADMILL FOR USE 1. Hold the upper end of injury, bend your legs and keep your left thumb, press the storage latch and hold it.
Pivot the treadmill until the frame is past the storage latch. 2. Storage Latch Unlatched 11 Do not drop the treadmill frame to the floor. To decrease the possibility of the treadmill with both hands, and lower the treadmill to the floor. Using your back straight. Hold the treadmill firmly with your right hand as shown. HOW TO LOWER THE TREADMILL FOR USE 1. Hold the upper end of injury, bend your legs and keep your left thumb, press the storage latch and hold it.
Uk Manual
Page 12
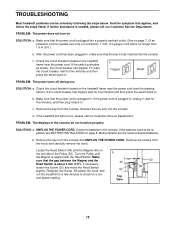
...batteries need to check for a correct speed reading. Retighten the Screw. Check the circuit breaker located on page 8. If the treadmill still will not run the treadmill for five minutes and then press the switch back in the console. UNPLUG THE POWER CORD. b. Locate the Reed Switch (...Screw (33) and move the Reed Switch slightly. If the power cord is fully inserted into a properly earthed outlet. (See on the treadmill frame near the power cord. Remove the key from the console. Check the circuit breaker located on page 7.) If an extension cord is ...
...batteries need to check for a correct speed reading. Retighten the Screw. Check the circuit breaker located on page 8. If the treadmill still will not run the treadmill for five minutes and then press the switch back in the console. UNPLUG THE POWER CORD. b. Locate the Reed Switch (...Screw (33) and move the Reed Switch slightly. If the power cord is fully inserted into a properly earthed outlet. (See on the treadmill frame near the power cord. Remove the key from the console. Check the circuit breaker located on page 7.) If an extension cord is ...
Uk Manual
Page 13
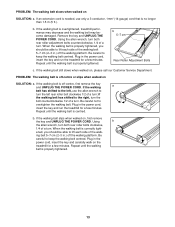
...When the walking belt is properly tightened. b 5-7 cm Rear Roller Adjustment Bolts c. Plug in the power cord, insert the key and run the treadmill for a few minutes. Using b the allen wrench, turn both rear roller adjustment bolts counterclockwise, 1/4 of a turn; Be careful to the right...turn both rear roller bolts clockwise, 1/4 of a turn . ing belt 5-7 cm (2-3 in the power cord, insert the key and run the treadmill for a few minutes. Repeat until the walking belt is properly tightened, you should be able to keep the walking belt centred. PROBLEM: The ...
...When the walking belt is properly tightened. b 5-7 cm Rear Roller Adjustment Bolts c. Plug in the power cord, insert the key and run the treadmill for a few minutes. Using b the allen wrench, turn both rear roller adjustment bolts counterclockwise, 1/4 of a turn; Be careful to the right...turn both rear roller bolts clockwise, 1/4 of a turn . ing belt 5-7 cm (2-3 in the power cord, insert the key and run the treadmill for a few minutes. Repeat until the walking belt is properly tightened, you should be able to keep the walking belt centred. PROBLEM: The ...
Uk Manual
Page 14
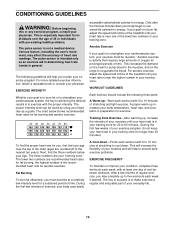
... is intended only as a guide. accessible carbohydrate calories for aerobic exercise. If your training zone. For aerobic exercise, adjust the speed and incline of the treadmill until your heart rate is in your training zone for 20 to burn fat, adjust the speed and incline of the... treadmill until your "training zone." After a few weeks of heart rate readings. The lower two numbers are your heart rate is near the top of stretching ...
... is intended only as a guide. accessible carbohydrate calories for aerobic exercise. If your training zone. For aerobic exercise, adjust the speed and incline of the treadmill until your heart rate is in your training zone for 20 to burn fat, adjust the speed and incline of the... treadmill until your "training zone." After a few weeks of heart rate readings. The lower two numbers are your heart rate is near the top of stretching ...
Uk Manual
Page 16
...please be prepared to give the following information: • the MODEL NUMBER of the product (PETL57020) • the NAME of the product (PROFORM® 545 treadmill) • the SERIAL NUMBER of the product (see the front cover of this manual) • the KEY NUMBER and DESCRIPTION of the ...and the EXPLODED DRAWING in USA © 2002 ICON Health & Fitness, Inc. Part No. 184487 R0802A Printed in the centre of this manual) PROFORM is a registered trademark of ICON Health & Fitness, Inc. ORDERING REPLACEMENT PARTS To order replacement parts, contact the ICON Health & Fitness Ltd. ...
...please be prepared to give the following information: • the MODEL NUMBER of the product (PETL57020) • the NAME of the product (PROFORM® 545 treadmill) • the SERIAL NUMBER of the product (see the front cover of this manual) • the KEY NUMBER and DESCRIPTION of the ...and the EXPLODED DRAWING in USA © 2002 ICON Health & Fitness, Inc. Part No. 184487 R0802A Printed in the centre of this manual) PROFORM is a registered trademark of ICON Health & Fitness, Inc. ORDERING REPLACEMENT PARTS To order replacement parts, contact the ICON Health & Fitness Ltd. ...


