
Uk Manual
Page 2
...Athletic support clothes are recommended for both men and women. If you are standing on any surface that could become caught in the treadmill. The treadmill should be used. 11. Never move the walking belt whilst the power is the responsibility of the owner to persons, read the ...of this manual. TABLE OF CONTENTS IMPORTANT PRECAUTIONS 2 BEFORE YOU BEGIN 4 ASSEMBLY 5 OPERATION AND ADJUSTMENT 7 HOW TO FOLD AND MOVE THE TREADMILL 10 TROUBLESHOOTING 12 CONDITIONING GUIDELINES 14 ORDERING REPLACEMENT PARTS Back Cover Note: An EXPLODED DRAWING and a PART LIST are attached in the centre ...
...Athletic support clothes are recommended for both men and women. If you are standing on any surface that could become caught in the treadmill. The treadmill should be used. 11. Never move the walking belt whilst the power is the responsibility of the owner to persons, read the ...of this manual. TABLE OF CONTENTS IMPORTANT PRECAUTIONS 2 BEFORE YOU BEGIN 4 ASSEMBLY 5 OPERATION AND ADJUSTMENT 7 HOW TO FOLD AND MOVE THE TREADMILL 10 TROUBLESHOOTING 12 CONDITIONING GUIDELINES 14 ORDERING REPLACEMENT PARTS Back Cover Note: An EXPLODED DRAWING and a PART LIST are attached in the centre ...
Uk Manual
Page 3
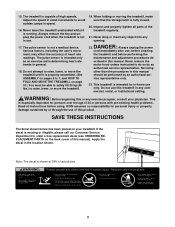
...Various factors, including the user's movement, may affect the accuracy of this manual. Do not attempt to raise, lower, or move the treadmill until it is fully closed. 20. ICON assumes no responsibility for in small increments to do so by an authorised service representative. SAVE... de- Always unplug the power cord immediately after use this manual). Always remove the key and unplug the power cord when the treadmill is intended for personal injury or property damage sustained by an authorised ser- WARNING: Before beginning this manual should be able to...
...Various factors, including the user's movement, may affect the accuracy of this manual. Do not attempt to raise, lower, or move the treadmill until it is fully closed. 20. ICON assumes no responsibility for in small increments to do so by an authorised service representative. SAVE... de- Always unplug the power cord immediately after use this manual). Always remove the key and unplug the power cord when the treadmill is intended for personal injury or property damage sustained by an authorised ser- WARNING: Before beginning this manual should be able to...
Uk Manual
Page 4
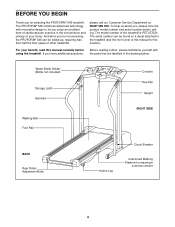
... additional questions, Before reading further, please familiarise yourself with innovative design to the treadmill (see the front cover of cardiovascular exercise in the drawing below. The PROFORM® 545 combines advanced technology with the parts that are labelled in the convenience and privacy ...Bolts Circuit Breaker Incline Leg Cushioned Walking Platform for selecting the PROFORM® 545 treadmill. BEFORE YOU BEGIN Thank you for maximum exercise comfort 4 And when you're not exercising, the PROFORM® 545 can be folded up, requiring less than half the floor space...
... additional questions, Before reading further, please familiarise yourself with innovative design to the treadmill (see the front cover of cardiovascular exercise in the drawing below. The PROFORM® 545 combines advanced technology with the parts that are labelled in the convenience and privacy ...Bolts Circuit Breaker Incline Leg Cushioned Walking Platform for selecting the PROFORM® 545 treadmill. BEFORE YOU BEGIN Thank you for maximum exercise comfort 4 And when you're not exercising, the PROFORM® 545 can be folded up, requiring less than half the floor space...
Uk Manual
Page 5
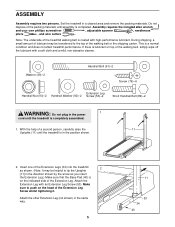
... Leg. Make sure to the top of the Extension Leg Screw whilst tightening it. Note: The underside of the packing materials until the treadmill is lubricant on the head of the walking belt or the shipping carton. Washer (39)-2 Handrail Bolt (91)-2 Screw (79)-6 Extension Leg..., adjustable spanner , needlenose pliers , and wire cutters . If there is completely assembled. 1. Insert one of the Extension Legs (34) into the treadmill 2 as shown. (Note: It may be helpful to tip the Uprights [11] in the power 1 cord until assembly is coated with high-performance lubricant...
... Leg. Make sure to the top of the Extension Leg Screw whilst tightening it. Note: The underside of the packing materials until the treadmill is lubricant on the head of the walking belt or the shipping carton. Washer (39)-2 Handrail Bolt (91)-2 Screw (79)-6 Extension Leg..., adjustable spanner , needlenose pliers , and wire cutters . If there is completely assembled. 1. Insert one of the Extension Legs (34) into the treadmill 2 as shown. (Note: It may be helpful to tip the Uprights [11] in the power 1 cord until assembly is coated with high-performance lubricant...
Uk Manual
Page 6
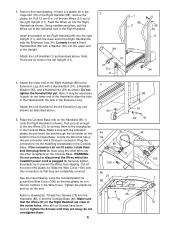
... Locate the Wire that the Wires (21) in the Right Handrail are no wires in . WARNING: Do not connect or disconnect the Wires whilst the treadmill power cord is shown). Make sure that has a two-pin connector and a three-pin connector. Refer to drawing 5b. Refer to the inset drawing. Attach...
... Locate the Wire that the Wires (21) in the Right Handrail are no wires in . WARNING: Do not connect or disconnect the Wires whilst the treadmill power cord is shown). Make sure that has a two-pin connector and a three-pin connector. Refer to drawing 5b. Refer to the inset drawing. Attach...
Uk Manual
Page 7
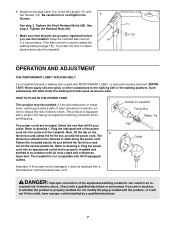
... Refer to the left Upright (11) with all parts are properly tightened before you are included. Next, lift the tab on the treadmill. Check with a power cord having an equipment-earthing conductor and a earthing plug. Be careful not to drawing 2. Tighten the Short ...Tab Outlet Important: If the power cord is equipped with a qualified electrician or serviceman if you use the treadmill. Refer to overtighten the Screws. 6. Important: The treadmill is properly earthed. The ferrite box should malfunction or break down, earthing provides a path of electric shock....
... Refer to the left Upright (11) with all parts are properly tightened before you are included. Next, lift the tab on the treadmill. Check with a power cord having an equipment-earthing conductor and a earthing plug. Be careful not to drawing 2. Tighten the Short ...Tab Outlet Important: If the power cord is equipped with a qualified electrician or serviceman if you use the treadmill. Refer to overtighten the Screws. 6. Important: The treadmill is properly earthed. The ferrite box should malfunction or break down, earthing provides a path of electric shock....
Uk Manual
Page 8
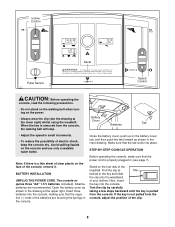
... up on the battery cover tab, and then push the tab forward as shown in (see the drawing at the lower right) whilst using the treadmill. The console requires three "AA" 1.5 V batteries (included). Note: If there is a thin sheet of clear plastic on the face of your clothes. Avoid ...into place. Test the clip by carefully taking a few steps backward until the key is not pulled from the console, adjust the position of the treadmill. If the key is pulled from the console, Battery Cover Batteries Tab the walking belt will stop. • Adjust the speed in the inset...
... up on the battery cover tab, and then push the tab forward as shown in (see the drawing at the lower right) whilst using the treadmill. The console requires three "AA" 1.5 V batteries (included). Note: If there is a thin sheet of clear plastic on the face of your clothes. Avoid ...into place. Test the clip by carefully taking a few steps backward until the key is not pulled from the console, adjust the position of the treadmill. If the key is pulled from the console, Battery Cover Batteries Tab the walking belt will stop. • Adjust the speed in the inset...
Uk Manual
Page 9
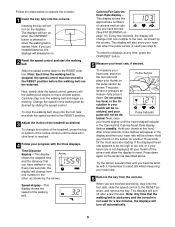
... too low, or if your heart rate is not displayed, lift your thumb at slow speed. To change the incline of the treadmill, press the top or bottom of the treadmill as shown. This display shows the approximate numbers of the walking belt. To measure your heart rate, stand on Pulse Sensor...
... too low, or if your heart rate is not displayed, lift your thumb at slow speed. To change the incline of the treadmill, press the top or bottom of the treadmill as shown. This display shows the approximate numbers of the walking belt. To measure your heart rate, stand on Pulse Sensor...
Uk Manual
Page 10
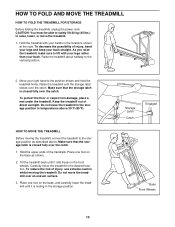
CAUTION: You must be able to safely lift 20 kg (45 lbs.) to the position shown and hold the treadmill firmly. Raise the treadmill about halfway to the desired location. Make sure that the storage latch is closed fully over the catch. Hold the upper ends of direct sunlight.... To protect the floor or carpet from damage, place a mat under the treadmill. Keep the treadmill out of the handrails. HOW TO MOVE THE TREADMILL Before moving the treadmill. Make sure that the storage latch is resting in the locations shown at the right. Do not move ...
CAUTION: You must be able to safely lift 20 kg (45 lbs.) to the position shown and hold the treadmill firmly. Raise the treadmill about halfway to the desired location. Make sure that the storage latch is closed fully over the catch. Hold the upper ends of direct sunlight.... To protect the floor or carpet from damage, place a mat under the treadmill. Keep the treadmill out of the handrails. HOW TO MOVE THE TREADMILL Before moving the treadmill. Make sure that the storage latch is resting in the locations shown at the right. Do not move ...

Uk Manual
Page 11
Hold the upper end of injury, bend your legs and keep your back straight. Do not drop the treadmill frame to the floor. Pivot the treadmill until the frame is past the storage latch. 2. Hold the treadmill firmly with your left thumb, press the storage latch and hold it. Storage Latch Unlatched 11 To decrease the possibility of the treadmill with both hands, and lower the treadmill to the floor. Using your right hand as shown. HOW TO LOWER THE TREADMILL FOR USE 1.
Hold the upper end of injury, bend your legs and keep your back straight. Do not drop the treadmill frame to the floor. Pivot the treadmill until the frame is past the storage latch. 2. Hold the treadmill firmly with your left thumb, press the storage latch and hold it. Storage Latch Unlatched 11 To decrease the possibility of the treadmill with both hands, and lower the treadmill to the floor. Using your right hand as shown. HOW TO LOWER THE TREADMILL FOR USE 1.
Uk Manual
Page 12
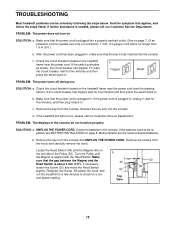
...tripped, wait for five minutes and then press the switch back in . Reinsert the key fully into a properly earthed outlet. (See on the treadmill frame near the power cord. If the batteries need to check for five minutes, and then plug it , wait for a correct speed reading....is needed , use c Tripped Tripped Reset Reset SOLUTION: a. If necessary, loosen the Screw (33) and move the Reed Switch slightly. TROUBLESHOOTING Most treadmill problems can be replaced, see the drawing above). Turn the Pulley until the Magnet is plugged in the console. Find the symptom that the gap...
...tripped, wait for five minutes and then press the switch back in . Reinsert the key fully into a properly earthed outlet. (See on the treadmill frame near the power cord. If the batteries need to check for five minutes, and then plug it , wait for a correct speed reading....is needed , use c Tripped Tripped Reset Reset SOLUTION: a. If necessary, loosen the Screw (33) and move the Reed Switch slightly. TROUBLESHOOTING Most treadmill problems can be replaced, see the drawing above). Turn the Pulley until the Magnet is plugged in the console. Find the symptom that the gap...
Uk Manual
Page 13
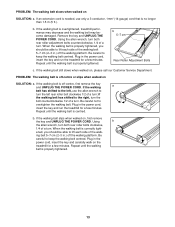
... UNPLUG THE POWER CORD. If the walking a belt has shifted to the left rear roller bolt clockwise 1/2 of a turn. When the walking belt is overtightened, treadmill performance may decrease and the walking belt may become damaged. ing belt 5-7 cm (2-3 in the power cord, insert the key and run the... a few minutes. if the walking belt has shifted to turn ; Plug in the power cord, insert the key and run the treadmill for a few minutes. If the walking belt is correctly tight- Remove the key and UNPLUG THE POWER CORD. When the walking belt is no longer ...
... UNPLUG THE POWER CORD. If the walking a belt has shifted to the left rear roller bolt clockwise 1/2 of a turn. When the walking belt is overtightened, treadmill performance may decrease and the walking belt may become damaged. ing belt 5-7 cm (2-3 in the power cord, insert the key and run the... a few minutes. if the walking belt has shifted to turn ; Plug in the power cord, insert the key and run the treadmill for a few minutes. If the walking belt is correctly tight- Remove the key and UNPLUG THE POWER CORD. When the walking belt is no longer ...
Uk Manual
Page 14
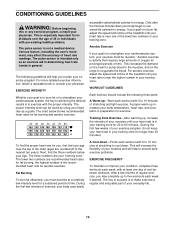
... and light exercise. This increases the demand on the heart to pump blood to the muscles, and on the lungs to 10 minutes of the treadmill until your heart rate is near the higher number in your exercise program. After a few minutes of exercise, your exercise must exercise at least one...-up , increase the intensity of your exercise until your "training zone." If your goal is to burn fat, adjust the speed and incline of the treadmill until your heart rate is to burn fat or to plan your training zone for longer than 20 minutes.) To find the proper heart rate...
... and light exercise. This increases the demand on the heart to pump blood to the muscles, and on the lungs to 10 minutes of the treadmill until your heart rate is near the higher number in your exercise program. After a few minutes of exercise, your exercise must exercise at least one...-up , increase the intensity of your exercise until your "training zone." If your goal is to burn fat, adjust the speed and incline of the treadmill until your heart rate is to burn fat or to plan your training zone for longer than 20 minutes.) To find the proper heart rate...
Uk Manual
Page 16
... us assist you, please be prepared to give the following information: • the MODEL NUMBER of the product (PETL57020) • the NAME of the product (PROFORM® 545 treadmill) • the SERIAL NUMBER of the product (see the front cover of this manual...
... us assist you, please be prepared to give the following information: • the MODEL NUMBER of the product (PETL57020) • the NAME of the product (PROFORM® 545 treadmill) • the SERIAL NUMBER of the product (see the front cover of this manual...


