

English Manual
Page 2
...CONTENTS WARNING DECAL PLACEMENT 2 IMPORTANT PRECAUTIONS 3 BEFORE YOU BEGIN 5 PART IDENTIFICATION CHART 6 ASSEMBLY 7 HOW TO USE THE ELLIPTICAL 16 FCC INFORMATION 23 MAINTENANCE AND TROUBLESHOOTING 24 EXERCISE GUIDELINES 26 PART LIST 27 EXPLODED DRAWING 29 ORDERING REPLACEMENT PARTS Back ...Cover LIMITED WARRANTY Back Cover WARNING DECAL PLACEMENT This drawing shows the location(s) of ICON IP, Inc. 2 PROFORM is missing or illegible, see the front cover of this manual and request a free replacement decal. Apply the decal in the location shown...
...CONTENTS WARNING DECAL PLACEMENT 2 IMPORTANT PRECAUTIONS 3 BEFORE YOU BEGIN 5 PART IDENTIFICATION CHART 6 ASSEMBLY 7 HOW TO USE THE ELLIPTICAL 16 FCC INFORMATION 23 MAINTENANCE AND TROUBLESHOOTING 24 EXERCISE GUIDELINES 26 PART LIST 27 EXPLODED DRAWING 29 ORDERING REPLACEMENT PARTS Back ...Cover LIMITED WARRANTY Back Cover WARNING DECAL PLACEMENT This drawing shows the location(s) of ICON IP, Inc. 2 PROFORM is missing or illegible, see the front cover of this manual and request a free replacement decal. Apply the decal in the location shown...

English Manual
Page 3
...persons over age 35 or persons with at all times. 15. Keep your physician. Inspect and properly tighten all parts regularly. Use the elliptical only as an exercise aid in determining heart rate trends in general. 13. The heart rate monitor is not a medical device. IMPORTANT ...PRECAUTIONS WARNING: To reduce the risk of serious injury, read all important precautions and instructions in this manual and all warnings on the elliptical. Reduce your back. 7. It is intended for personal injury or property damage sustained by persons weighing more than 275 lbs. (125 kg)....
...persons over age 35 or persons with at all times. 15. Keep your physician. Inspect and properly tighten all parts regularly. Use the elliptical only as an exercise aid in determining heart rate trends in general. 13. The heart rate monitor is not a medical device. IMPORTANT ...PRECAUTIONS WARNING: To reduce the risk of serious injury, read all important precautions and instructions in this manual and all warnings on the elliptical. Reduce your back. 7. It is intended for personal injury or property damage sustained by persons weighing more than 275 lbs. (125 kg)....
English Manual
Page 5
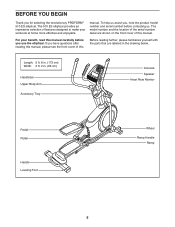
The 510 ES elliptical provides an impressive selection of features designed to make your benefit, read this manual carefully before contacting us assist you, note the product model number and serial number before you use the elliptical. Length: 5 ft. 8 in. (173 cm) Width: 2 ft. 2 in the drawing below. BEFORE YOU BEGIN Thank ... Console Speaker Heart Rate Monitor Pedal Roller Handle Leveling Foot Wheel Ramp Handle Ramp 5 To help us . If you for selecting the revolutionary PROFORM® 510 ES elliptical. For your workouts at home more effective and enjoyable. manual.
The 510 ES elliptical provides an impressive selection of features designed to make your benefit, read this manual carefully before contacting us assist you, note the product model number and serial number before you use the elliptical. Length: 5 ft. 8 in. (173 cm) Width: 2 ft. 2 in the drawing below. BEFORE YOU BEGIN Thank ... Console Speaker Heart Rate Monitor Pedal Roller Handle Leveling Foot Wheel Ramp Handle Ramp 5 To help us . If you for selecting the revolutionary PROFORM® 510 ES elliptical. For your workouts at home more effective and enjoyable. manual.
English Manual
Page 13
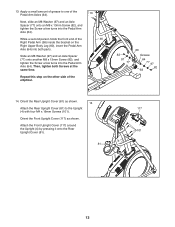
... (4) with four M4 x 16mm Screws (101). Orient the Front Upright Cover (117) as shown. 14 Attach the Rear Upright Cover (81) to one of the elliptical. 82 97 77 60 Grease 64 77 97 82 58 14. Slide an M8 Washer (97) and an Axle Spacer (77) onto another M8 x 13mm...
... (4) with four M4 x 16mm Screws (101). Orient the Front Upright Cover (117) as shown. 14 Attach the Rear Upright Cover (81) to one of the elliptical. 82 97 77 60 Grease 64 77 97 82 58 14. Slide an M8 Washer (97) and an Axle Spacer (77) onto another M8 x 13mm...
English Manual
Page 14
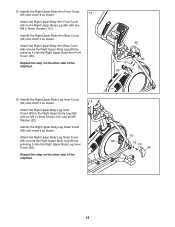
... Leg Inner Cover (83) and orient it as shown. Repeat this step on the other side of the elliptical. 60 83 32 101 69 14 Repeat this step on the other side of the elliptical. 65 60 101 66 16. Attach the Right Upper Body Arm Rear Cover (66) around the Right...
... Leg Inner Cover (83) and orient it as shown. Repeat this step on the other side of the elliptical. 60 83 32 101 69 14 Repeat this step on the other side of the elliptical. 65 60 101 66 16. Attach the Right Upper Body Arm Rear Cover (66) around the Right...
English Manual
Page 15
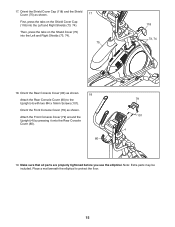
..., 74). Orient the Front Console Cover (79) as shown. 18 Attach the Rear Console Cover (80) to protect the floor. 15 Place a mat beneath the elliptical to the Upright (4) with two M4 x 16mm Screws (101). Make sure that all parts are properly tightened before you use the... elliptical. Orient the Rear Console Cover (80) as shown. 17. Orient the Shield Cover Cap (118) and the Shield Cover (75) as shown. Then, press the ...
..., 74). Orient the Front Console Cover (79) as shown. 18 Attach the Rear Console Cover (80) to protect the floor. 15 Place a mat beneath the elliptical to the Upright (4) with two M4 x 16mm Screws (101). Make sure that all parts are properly tightened before you use the... elliptical. Orient the Rear Console Cover (80) as shown. 17. Orient the Shield Cover Cap (118) and the Shield Cover (75) as shown. Then, press the ...
English Manual
Page 16
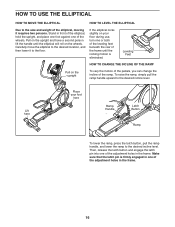
... the latch button and engage the latch pin into one of the adjustment holes in front of the elliptical, hold the upright, and place one foot against one of the wheels. If the elliptical rocks slightly on the wheels. To raise the ramp, simply pull the ramp handle upward to the floor... of the ramp. Make sure that the latch pin is eliminated. Lift here Place your floor during use, turn one of the frame until the elliptical will roll on your foot here Ramp Handle Latch Button Ramp To lower the ramp, press the latch button, pull the ramp handle, and lower...
... the latch button and engage the latch pin into one of the adjustment holes in front of the elliptical, hold the upright, and place one foot against one of the wheels. If the elliptical rocks slightly on the wheels. To raise the ramp, simply pull the ramp handle upward to the floor... of the ramp. Make sure that the latch pin is eliminated. Lift here Place your floor during use, turn one of the frame until the elliptical will roll on your foot here Ramp Handle Latch Button Ramp To lower the ramp, press the latch button, pull the ramp handle, and lower...
English Manual
Page 17
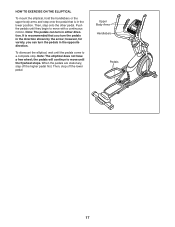
It is in the lower position. Then, step off the higher pedal first. To dismount the elliptical, wait until the flywheel stops. Note: The elliptical does not have a free wheel; Upper Body Arms Handlebars Pedals 17 however, for variety, you turn the pedals in the opposite direction.... the pedals will continue to a complete stop. HOW TO EXERCISE ON THE ELLIPTICAL To mount the elliptical, hold the handlebars or the upper body arms and step onto the pedal that is recommended that you can turn in either direction....
It is in the lower position. Then, step off the higher pedal first. To dismount the elliptical, wait until the flywheel stops. Note: The elliptical does not have a free wheel; Upper Body Arms Handlebars Pedals 17 however, for variety, you turn the pedals in the opposite direction.... the pedals will continue to a complete stop. HOW TO EXERCISE ON THE ELLIPTICAL To mount the elliptical, hold the handlebars or the upper body arms and step onto the pedal that is recommended that you can turn in either direction....

English Manual
Page 23
... USE THE SOUND SYSTEM THE USER MODE To play button on your personal audio player. The center display will show the total distance that the elliptical has been pedaled. The right display will not occur in . However, there is no guarantee that to radio communications. If this equipment. 23 Note: To...
... USE THE SOUND SYSTEM THE USER MODE To play button on your personal audio player. The center display will show the total distance that the elliptical has been pedaled. The right display will not occur in . However, there is no guarantee that to radio communications. If this equipment. 23 Note: To...
English Manual
Page 24
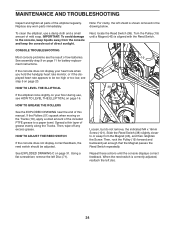
IMPORTANT: To avoid damage to or away from the console and keep the console out of this manual. Spread a thin layer of the elliptical regularly. To clean the elliptical, use , see step 5 on page 31. Loosen, but do not remove, the indicated M4 x 16mm Screw (101). Slide the Reed Switch (...11 for battery replace- When the reed switch is shown removed in the drawing below. Replace any excess grease. HOW TO LEVEL THE ELLIPTICAL If the elliptical rocks slightly on your heart rate when you hold the handgrip heart rate monitor, or if the displayed heart rate appears to a ...
IMPORTANT: To avoid damage to or away from the console and keep the console out of this manual. Spread a thin layer of the elliptical regularly. To clean the elliptical, use , see step 5 on page 31. Loosen, but do not remove, the indicated M4 x 16mm Screw (101). Slide the Reed Switch (...11 for battery replace- When the reed switch is shown removed in the drawing below. Replace any excess grease. HOW TO LEVEL THE ELLIPTICAL If the elliptical rocks slightly on your heart rate when you hold the handgrip heart rate monitor, or if the displayed heart rate appears to a ...
English Manual
Page 25
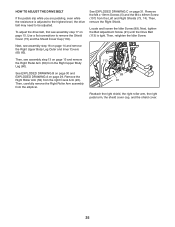
Remove the M4 x 19mm Screws (5) and the M4 x 48mm Screw (107) from the elliptical. 89 91 Reattach the right shield, the right roller arm, the right pedal arm, the shield cover cap, and the shield cover. 25 See EXPLODED ...
Remove the M4 x 19mm Screws (5) and the M4 x 48mm Screw (107) from the elliptical. 89 91 Reattach the right shield, the right roller arm, the right pedal arm, the shield cover cap, and the shield cover. 25 See EXPLODED ...


