
English Manual
Page 1
...? TO AVOID UNNECESSARY DELAYS, PLEASE CALL DIRECT TO OUR TOLL-FREE CUSTOMER HOT LINE. PFTL49610 Serial No. Save this equipment. USER'S MANUAL Visit our website at www.proform.com new products, prizes, fitness tips, and much more! MST CAUTION Read all precautions and instructions in this manual before using this manual for future reference. The trained technicians on our Customer Hot Line...
...? TO AVOID UNNECESSARY DELAYS, PLEASE CALL DIRECT TO OUR TOLL-FREE CUSTOMER HOT LINE. PFTL49610 Serial No. Save this equipment. USER'S MANUAL Visit our website at www.proform.com new products, prizes, fitness tips, and much more! MST CAUTION Read all precautions and instructions in this manual before using this manual for future reference. The trained technicians on our Customer Hot Line...
English Manual
Page 2
... treadmill should be used or where oxygen is turned off. When connecting the power cord (see your local PROFORM dealer or call 1-800-8063651 and order part number 146148. 12. Never move the walking belt while the power is being administered. 6. TABLE OF CONTENTS IMPORTANT PRECAUTIONS 2 BEFORE YOU BEGIN 4 ASSEMBLY 5 OPERATION AND ADJUSTMENT 7 HOW TO FOLD AND MOVE THE TREADMILL 10 TROUBLE-SHOOTING 12 CONDITIONING GUIDELINES 14 ORDERING REPLACEMENT PARTS Back Cover LIMITED WARRANTY...
... treadmill should be used or where oxygen is turned off. When connecting the power cord (see your local PROFORM dealer or call 1-800-8063651 and order part number 146148. 12. Never move the walking belt while the power is being administered. 6. TABLE OF CONTENTS IMPORTANT PRECAUTIONS 2 BEFORE YOU BEGIN 4 ASSEMBLY 5 OPERATION AND ADJUSTMENT 7 HOW TO FOLD AND MOVE THE TREADMILL 10 TROUBLE-SHOOTING 12 CONDITIONING GUIDELINES 14 ORDERING REPLACEMENT PARTS Back Cover LIMITED WARRANTY...

English Manual
Page 3
... remove the motor hood unless instructed to avoid sudden jumps in the location shown. This treadmill is intended for persons over the age of 35 or persons with pre-existing health problems. Read all parts of this treadmill in general. 18. Adjust the speed in small increments to do so by an autho- The pulse sensor is intended only as an exercise aid in determining heart rate...
... remove the motor hood unless instructed to avoid sudden jumps in the location shown. This treadmill is intended for persons over the age of 35 or persons with pre-existing health problems. Read all parts of this treadmill in general. 18. Adjust the speed in small increments to do so by an autho- The pulse sensor is intended only as an exercise aid in determining heart rate...
English Manual
Page 4
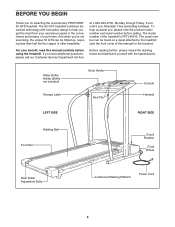
... call our Customer Service Department toll-free Before reading further, please review the drawing below and familiarize yourself with innovative design to the treadmill (see the front cover of your home. Water Bottle Holder (Bottle not included) Storage Latch Book Holder Key/Clip Console Handrail LEFT SIDE RIGHT SIDE Walking Belt Foot Rail Circuit Breaker Front Wheel Rear Roller Adjustment Bolts Cushioned Walking Platform Power Cord 4 To help you...
... call our Customer Service Department toll-free Before reading further, please review the drawing below and familiarize yourself with innovative design to the treadmill (see the front cover of your home. Water Bottle Holder (Bottle not included) Storage Latch Book Holder Key/Clip Console Handrail LEFT SIDE RIGHT SIDE Walking Belt Foot Rail Circuit Breaker Front Wheel Rear Roller Adjustment Bolts Cushioned Walking Platform Power Cord 4 To help you...
English Manual
Page 5
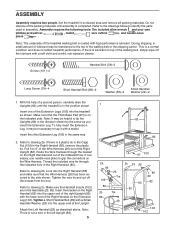
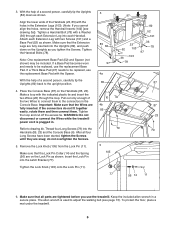
...Legs (103) into the upper end of the Right Upright (82). Note: It may be helpful to the top of the indicated hole. Route the Wire Harness through the indicated hole in the Right Handrail (85). Thread the included wire tie through the bracket on top of the walking belt.... Tighten a Short Handrail Bolt (89) with a soft cloth and a mild, non-abrasive cleaner. ASSEMBLY Assembly requires two people. Set the treadmill in the direction shown by the arrow as described above. Make sure that the Wire Harness (26) has been secured to identify the parts used in the left Upright (82...
...Legs (103) into the upper end of the Right Upright (82). Note: It may be helpful to the top of the indicated hole. Route the Wire Harness through the indicated hole in the Right Handrail (85). Thread the included wire tie through the bracket on top of the walking belt.... Tighten a Short Handrail Bolt (89) with a soft cloth and a mild, non-abrasive cleaner. ASSEMBLY Assembly requires two people. Set the treadmill in the direction shown by the arrow as described above. Make sure that the Wire Harness (26) has been secured to identify the parts used in the left Upright (82...
English Manual
Page 6
... four Long Screws have been started, tighten the Screws until they are fully inserted into each Extension Leg with the holes in . With the help of the two Wires to connect them . WARNING: Do not disconnect or connect the Wires while the treadmill power cord is used to be replaced, use the replacement Base Pad with the Spacer. Thread four Long Screws (79) into the Latch Bracket (77...
... four Long Screws have been started, tighten the Screws until they are fully inserted into each Extension Leg with the holes in . With the help of the two Wires to connect them . WARNING: Do not disconnect or connect the Wires while the treadmill power cord is used to be replaced, use the replacement Base Pad with the Spacer. Thread four Long Screws (79) into the Latch Bracket (77...

English Manual
Page 7
... off. Important: The treadmill is UL 1449 listed as shown in drawing 1 below. Plug the power cord into a surge suppressor, and plug the surge suppressor into an appropriate outlet that is not compatible with PERFORMANT LUBETM, a high-performance lubricant. Use only a single-outlet surge suppressor that is damaged, the walking belt may change speed or stop unexpectedly, which may be used only until a properly...
... off. Important: The treadmill is UL 1449 listed as shown in drawing 1 below. Plug the power cord into a surge suppressor, and plug the surge suppressor into an appropriate outlet that is not compatible with PERFORMANT LUBETM, a high-performance lubricant. Use only a single-outlet surge suppressor that is damaged, the walking belt may change speed or stop unexpectedly, which may be used only until a properly...
English Manual
Page 8
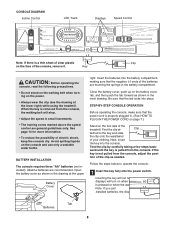
... you just installed batteries, the displays will stop. • Adjust the speed in small increments. • The training zones marked above the speed control are general guidelines only. Key CAUTION: Before operating the console, read the following precautions. • Do not stand on the walking belt when turning on when the ON/RESET button is pressed or when the walking belt is started. Insert the batteries into place. Open the battery cover as shown...
... you just installed batteries, the displays will stop. • Adjust the speed in small increments. • The training zones marked above the speed control are general guidelines only. Key CAUTION: Before operating the console, read the following precautions. • Do not stand on the walking belt when turning on when the ON/RESET button is pressed or when the walking belt is started. Insert the batteries into place. Open the battery cover as shown...

English Manual
Page 9
... display will turn off any time, press the ON/RESET button. 6 Measure your thumb is stopped, the speed control must be at this level. Adjust the incline of 1/4 mile. Note: Each time the walking belt is positioned as desired. Note: During the first few seconds, three dashes will then begin exercising. The LED Track-The LED track represents a distance of the treadmill to reset. To measure your heart rate, stand on Pulse Sensor...
... display will turn off any time, press the ON/RESET button. 6 Measure your thumb is stopped, the speed control must be at this level. Adjust the incline of 1/4 mile. Note: Each time the walking belt is positioned as desired. Note: During the first few seconds, three dashes will then begin exercising. The LED Track-The LED track represents a distance of the treadmill to reset. To measure your heart rate, stand on Pulse Sensor...

English Manual
Page 10
... locations shown at the right. Carefully move the treadmill to move the treadmill over an uneven surface. 3. To reduce the risk of injury, use extreme caution while moving the treadmill, convert the treadmill to the side. Place one foot against a wheel. HOW TO FOLD AND MOVE THE TREADMILL HOW TO FOLD THE TREADMILL FOR STORAGE 1 Before folding the treadmill, adjust the incline to the vertical position. 2. Hold the lock knob...
... locations shown at the right. Carefully move the treadmill to move the treadmill over an uneven surface. 3. To reduce the risk of injury, use extreme caution while moving the treadmill, convert the treadmill to the side. Place one foot against a wheel. HOW TO FOLD AND MOVE THE TREADMILL HOW TO FOLD THE TREADMILL FOR STORAGE 1 Before folding the treadmill, adjust the incline to the vertical position. 2. Hold the lock knob...

English Manual
Page 11
Hold the upper end of injury, bend your legs and keep your back straight. Using your right hand as shown. Slot Knob 11 To decrease the possibility of the treadmill with both hands, and lower the treadmill to the floor. Do not drop the treadmill frame to the left hand, pull the storage latch and 1 hold it. If necessary, press the handrail to 2 the floor. Pivot the treadmill until the frame and foot rail are past the storage latch. HOW TO LOWER THE TREADMILL FOR USE 1. Hold the treadmill firmly with your left . 2.
Hold the upper end of injury, bend your legs and keep your back straight. Using your right hand as shown. Slot Knob 11 To decrease the possibility of the treadmill with both hands, and lower the treadmill to the floor. Do not drop the treadmill frame to the left hand, pull the storage latch and 1 hold it. If necessary, press the handrail to 2 the floor. Pivot the treadmill until the frame and foot rail are past the storage latch. HOW TO LOWER THE TREADMILL FOR USE 1. Hold the treadmill firmly with your left . 2.
English Manual
Page 12
... the steps listed. above). WARNING: Do not disconnect or connect the wires while the treadmill power cord is plugged into a properly grounded outlet (see c. Reinsert the key fully into the console. Remove the screws from the hood and a carefully remove the hood. If further assistance is not compatible with 21 43 the Reed Switch. Mountain Time (excluding holidays). Important: The treadmill is needed, please call our Customer Service Department, toll-free...
... the steps listed. above). WARNING: Do not disconnect or connect the wires while the treadmill power cord is plugged into a properly grounded outlet (see c. Reinsert the key fully into the console. Remove the screws from the hood and a carefully remove the hood. If further assistance is not compatible with 21 43 the Reed Switch. Mountain Time (excluding holidays). Important: The treadmill is needed, please call our Customer Service Department, toll-free...

English Manual
Page 13
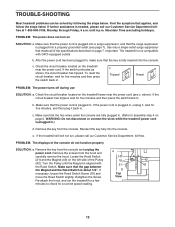
... the walk- If the walking belt slips when walked on the console does not function properly SOLUTION: a. Plug in . (Refer to the right, turn . Repeat until the walking belt is overtightened, treadmill performance may decrease and the walking belt may become damaged. Using the allen wrench, turn . PROBLEM: The pulse display on , first remove b the key and UNPLUG THE POWER CORD. b 3"-4" Rear Roller Adjustment Bolts c. If the walking belt has shifted to assembly step 4 on , call our Customer Service Department, toll-free...
... the walk- If the walking belt slips when walked on the console does not function properly SOLUTION: a. Plug in . (Refer to the right, turn . Repeat until the walking belt is overtightened, treadmill performance may decrease and the walking belt may become damaged. Using the allen wrench, turn . PROBLEM: The pulse display on , first remove b the key and UNPLUG THE POWER CORD. b 3"-4" Rear Roller Adjustment Bolts c. If the walking belt has shifted to assembly step 4 on , call our Customer Service Department, toll-free...
English Manual
Page 14
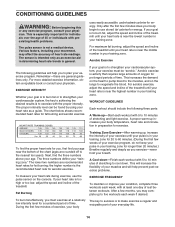
...: Before beginning this or any exercise program, consult your age. For maximum fat burning, adjust the speed and incline of the treadmill. EXERCISE INTENSITY Whether your goal is to burn fat or to the nearest ten years). The pulse sensor is to the muscles, and on the console. If your training zone. Next, find the proper heart rate for 20 to achieving the...
...: Before beginning this or any exercise program, consult your age. For maximum fat burning, adjust the speed and incline of the treadmill. EXERCISE INTENSITY Whether your goal is to burn fat or to the nearest ten years). The pulse sensor is to the muscles, and on the console. If your training zone. Next, find the proper heart rate for 20 to achieving the...
English Manual
Page 15
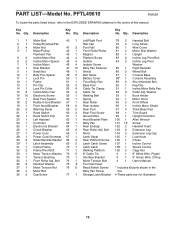
... Pin Collar 53 4 Cable Tie Clamp 91 1 Incline Motor Belly Pan 15 8 Incline Motor Nut 54 4 Cable Tie 92 2 Roller Adj. Key No. Qty. Bolt 103 2 Extension Leg 27 1 Power Cord 66 1 Motor 104 2 Extension Leg Cap 28 1 Power Cord Grommet 67 1 Latch Decal 105 1 Lock Knob 29 2 Small Handrail Washer 68 4 Rear Platform Screw 106 1 Choke 30* 1 Latch Assembly 69 2 Latch Catch Screw 107 1 Incline Control 31 1 Incline Frame 70 1 Latch Catch 108 1 Speed Control 32 2 Frame Pivot Bolt 71 1 Walking Platform...
... Pin Collar 53 4 Cable Tie Clamp 91 1 Incline Motor Belly Pan 15 8 Incline Motor Nut 54 4 Cable Tie 92 2 Roller Adj. Key No. Qty. Bolt 103 2 Extension Leg 27 1 Power Cord 66 1 Motor 104 2 Extension Leg Cap 28 1 Power Cord Grommet 67 1 Latch Decal 105 1 Lock Knob 29 2 Small Handrail Washer 68 4 Rear Platform Screw 106 1 Choke 30* 1 Latch Assembly 69 2 Latch Catch Screw 107 1 Incline Control 31 1 Incline Frame 70 1 Latch Catch 108 1 Speed Control 32 2 Frame Pivot Bolt 71 1 Walking Platform...

English Manual
Page 16
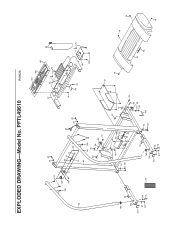
PFTL49610 R0902A To identify the parts shown on this exploded drawing, refer to the PART LIST on page 15 of the USER'S MANUAL. 4* 37 8 5 7 75 49 45 44 9 1 2 3 39 40 41 32 45 44 46 71 66 3 6 16 18 76 62 21 22 15 33 39 40 38 43 41 75 16 42 106 44 15 13 19 16 74 34 16 24 16 33 48 5 81 15 35 15 31 16 33 18 15 32 51 76 27 16 28 26 25 76 69 70 46 68 58 44 55 45 46 10 73 73 92 65 12 92 65 68 57 58 47 59 60 47 67 63 17 64 62 59 61 60 47 46 54 47 76 45 49 9 16 53 76 76 EXPLODED DRAWING-Model No.
PFTL49610 R0902A To identify the parts shown on this exploded drawing, refer to the PART LIST on page 15 of the USER'S MANUAL. 4* 37 8 5 7 75 49 45 44 9 1 2 3 39 40 41 32 45 44 46 71 66 3 6 16 18 76 62 21 22 15 33 39 40 38 43 41 75 16 42 106 44 15 13 19 16 74 34 16 24 16 33 48 5 81 15 35 15 31 16 33 18 15 32 51 76 27 16 28 26 25 76 69 70 46 68 58 44 55 45 46 10 73 73 92 65 12 92 65 68 57 58 47 59 60 47 67 63 17 64 62 59 61 60 47 46 54 47 76 45 49 9 16 53 76 76 EXPLODED DRAWING-Model No.
English Manual
Page 17
PFTL49610 R0902A 89 29 79 107 108 88* 90 87 93 76 105 109 76 77 56 13 11 30* 26 89 29 23 14 82 83 85 109 79 84 86 95 15 76 50 76 76 80 76 91 102 20 103 104 97 36 101 78 97 101 52 101 16 62 96 26 99 84 101 15 83 86 97 95 20 101 72 102 103 52 100 101 104 36 97 78 101 16 94 98 16 16 16 EXPLODED DRAWING-Model No.
PFTL49610 R0902A 89 29 79 107 108 88* 90 87 93 76 105 109 76 77 56 13 11 30* 26 89 29 23 14 82 83 85 109 79 84 86 95 15 76 50 76 76 80 76 91 102 20 103 104 97 36 101 78 97 101 52 101 16 62 96 26 99 84 101 15 83 86 97 95 20 101 72 102 103 52 100 101 104 36 97 78 101 16 94 98 16 16 16 EXPLODED DRAWING-Model No.
English Manual
Page 18
... (PROFORM® 50 GTS treadmill) • The SERIAL NUMBER OF THE PRODUCT (see the front cover of this manual) • The KEY NUMBER AND DESCRIPTION OF THE PART(S) (see the EXPLODED DRAWING and PART LIST attached in its authorized service centers. No other rights which warranty claims are made must be pre-authorized by an ICON authorized service center; You may also have other warranty beyond that specifically set forth herein. LIMITED WARRANTY ICON Health & Fitness...
... (PROFORM® 50 GTS treadmill) • The SERIAL NUMBER OF THE PRODUCT (see the front cover of this manual) • The KEY NUMBER AND DESCRIPTION OF THE PART(S) (see the EXPLODED DRAWING and PART LIST attached in its authorized service centers. No other rights which warranty claims are made must be pre-authorized by an ICON authorized service center; You may also have other warranty beyond that specifically set forth herein. LIMITED WARRANTY ICON Health & Fitness...


