

English Manual
Page 2
...or in sandals. 10. Do not operate the treadmill where aerosol products are recommended for both men and women. Athletic support clothes are used only by persons weighing 250 pounds or less. 8. When connecting the power cord (see your local PROFORM dealer or call 1-800-8063651 and order part number... 146148. 12. If the control system is turned off. To protect the floor or carpet from damage, place a mat under the age of 12 and pets away from the treadmill at all warnings and precautions....
...or in sandals. 10. Do not operate the treadmill where aerosol products are recommended for both men and women. Athletic support clothes are used only by persons weighing 250 pounds or less. 8. When connecting the power cord (see your local PROFORM dealer or call 1-800-8063651 and order part number... 146148. 12. If the control system is turned off. To protect the floor or carpet from damage, place a mat under the age of 12 and pets away from the treadmill at all warnings and precautions....

English Manual
Page 3
...is fully closed. 21. DANGER: 23. Never remove the motor hood unless instructed to avoid sudden jumps in this treadmill in -home use only. Do not use , before cleaning the treadmill, and before using. Note: This decal is shown at 38% of heart rate readings. 16. Various factors, ...use . 19. Do not attempt to order a free replacement decal (see ORDERING REPLACEMENT PARTS on the back cover of this product. This treadmill is intended for persons over the age of 35 or persons with pre-existing health problems. Read all parts of the decals is capable of...
...is fully closed. 21. DANGER: 23. Never remove the motor hood unless instructed to avoid sudden jumps in this treadmill in -home use only. Do not use , before cleaning the treadmill, and before using. Note: This decal is shown at 38% of heart rate readings. 16. Various factors, ...use . 19. Do not attempt to order a free replacement decal (see ORDERING REPLACEMENT PARTS on the back cover of this product. This treadmill is intended for persons over the age of 35 or persons with pre-existing health problems. Read all parts of the decals is capable of...
English Manual
Page 4
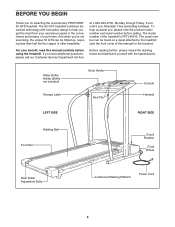
...Power Cord 4 And when you're not exercising, the unique 50 GTS can be folded up, requiring less than half the floor space of your benefit, read this manual for selecting the revolutionary PROFORM® 50 GTS treadmill. Mountain Time (excluding holidays). To help you get the ...most from your exercise program in the convenience and privacy of other treadmills. For your home. If you have additional questions, please...
...Power Cord 4 And when you're not exercising, the unique 50 GTS can be folded up, requiring less than half the floor space of your benefit, read this manual for selecting the revolutionary PROFORM® 50 GTS treadmill. Mountain Time (excluding holidays). To help you get the ...most from your exercise program in the convenience and privacy of other treadmills. For your home. If you have additional questions, please...
English Manual
Page 5
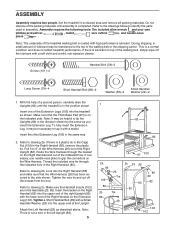
... second person, carefully raise the Uprights (82) until assembly is lubricant on top of the walking belt or the shipping carton. Set the treadmill in the direction shown by the arrow as you insert the Extension Leg. Tighten a Short Handrail Bolt (89) with high-performance lubricant.... Refer to 6" of the Wire Harness (26) out of the treadmill walking belt is a normal condition and does not affect treadmill performance. ASSEMBLY Assembly requires two people. Note: The underside of the Right Upright (82). Look into the...
... second person, carefully raise the Uprights (82) until assembly is lubricant on top of the walking belt or the shipping carton. Set the treadmill in the direction shown by the arrow as you insert the Extension Leg. Tighten a Short Handrail Bolt (89) with high-performance lubricant.... Refer to 6" of the Wire Harness (26) out of the treadmill walking belt is a normal condition and does not affect treadmill performance. ASSEMBLY Assembly requires two people. Note: The underside of the Right Upright (82). Look into the...
English Manual
Page 6
... Legs are snug; Keep the included allen wrench in . To protect the floor, place a mat under the treadmill. 6 Note: One replacement Base Pad (52) and Spacer (not shown) may be replaced, use the treadmill. If the connectors do not overtighten the Screws. 5. WARNING: Do not disconnect or connect the Wires while the... treadmill power cord is used to the upright position. 4. Attach each Extension Leg with the indicated plastic tie and insert the two Wires (26) through each...
... Legs are snug; Keep the included allen wrench in . To protect the floor, place a mat under the treadmill. 6 Note: One replacement Base Pad (52) and Spacer (not shown) may be replaced, use the treadmill. If the connectors do not overtighten the Screws. 5. WARNING: Do not disconnect or connect the Wires while the... treadmill power cord is used to the upright position. 4. Attach each Extension Leg with the indicated plastic tie and insert the two Wires (26) through each...

English Manual
Page 7
...modify the plug provided with the product-if it must be used to connect the surge suppressor to reduce the risk of the treadmill. Important: The treadmill is UL 1449 listed as to the control system of electric shock. A temporary adapter that is not compatible with PERFORMANT LUBETM.... IMPORTANT: Never apply silicone spray or other appli- 2 ances being damaged, always use a properly functioning surge suppressor could result in your local PROFORM dealer or call 1-800- 806-3651 and order part number 146148. To purchase a surge suppres- To decrease the possi- ing 1 at the...
...modify the plug provided with the product-if it must be used to connect the surge suppressor to reduce the risk of the treadmill. Important: The treadmill is UL 1449 listed as to the control system of electric shock. A temporary adapter that is not compatible with PERFORMANT LUBETM.... IMPORTANT: Never apply silicone spray or other appli- 2 ances being damaged, always use a properly functioning surge suppressor could result in your local PROFORM dealer or call 1-800- 806-3651 and order part number 146148. To purchase a surge suppres- To decrease the possi- ing 1 at the...
English Manual
Page 8
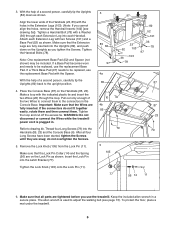
...the clip as needed. STEP-BY-STEP CONSOLE OPERATION Before operating the console, make sure that the negative (-) ends of your clothing. tion of the treadmill. Inserting the key will turn on the displays. The displays will not turn on when the ON/RESET button is pressed or when the walking... The console requires three "AA" batteries (not included). Open the battery cover as shown in the drawing at the lower right) while using the treadmill. ward until the key is pulled from the console, adjust the posi- Follow the steps below to the key and slide the clip onto the...
...the clip as needed. STEP-BY-STEP CONSOLE OPERATION Before operating the console, make sure that the negative (-) ends of your clothing. tion of the treadmill. Inserting the key will turn on the displays. The displays will not turn on when the ON/RESET button is pressed or when the walking... The console requires three "AA" batteries (not included). Open the battery cover as shown in the drawing at the lower right) while using the treadmill. ward until the key is pulled from the console, adjust the posi- Follow the steps below to the key and slide the clip onto the...

English Manual
Page 9
... ap- Carefully step onto the walking belt and begin . CALS/FAT CALS display-This display Arrow shows the approximate numbers of the treadmill as shown. Note: To conserve the batteries, the displays will turn off the sensor and allow the display to stand still while... displays will automatically turn off about five minutes after the key is currently shown. Remember to reset. Change the speed of the treadmill to the RESET position before the walking belt can be restricted, and your heart rate will then begin exercising. Slide the speed ...
... ap- Carefully step onto the walking belt and begin . CALS/FAT CALS display-This display Arrow shows the approximate numbers of the treadmill as shown. Note: To conserve the batteries, the displays will turn off the sensor and allow the display to stand still while... displays will automatically turn off about five minutes after the key is currently shown. Remember to reset. Change the speed of the treadmill to the RESET position before the walking belt can be restricted, and your heart rate will then begin exercising. Slide the speed ...

English Manual
Page 10
...hand and pull it rolls freely on the front wheels. Move your hands in the storage position. Knob HOW TO MOVE THE TREADMILL Before moving the treadmill. Hold the handrails as described above 85° Fahrenheit. Note: You may need to push the handrail to the vertical position.... 2. Keep the treadmill out of injury, use extreme caution while moving the treadmill, convert the treadmill to safely lift 45 pounds (20 kg) in the catch. 1. Next, unplug the power cord. Hold ...
...hand and pull it rolls freely on the front wheels. Move your hands in the storage position. Knob HOW TO MOVE THE TREADMILL Before moving the treadmill. Hold the handrails as described above 85° Fahrenheit. Note: You may need to push the handrail to the vertical position.... 2. Keep the treadmill out of injury, use extreme caution while moving the treadmill, convert the treadmill to safely lift 45 pounds (20 kg) in the catch. 1. Next, unplug the power cord. Hold ...

English Manual
Page 11
Pivot the treadmill until the frame and foot rail are past the storage latch. If necessary, press the handrail to the floor. Slot Knob 11 Hold the treadmill firmly with your right hand as shown. HOW TO LOWER THE TREADMILL FOR USE 1. Do not drop the treadmill frame to 2 the floor. To decrease the possibility of the treadmill with both hands, and lower the treadmill to the left hand, pull the storage latch and 1 hold it. Using your back straight. Hold the upper end of injury, bend your legs and keep your left . 2.
Pivot the treadmill until the frame and foot rail are past the storage latch. If necessary, press the handrail to the floor. Slot Knob 11 Hold the treadmill firmly with your right hand as shown. HOW TO LOWER THE TREADMILL FOR USE 1. Do not drop the treadmill frame to 2 the floor. To decrease the possibility of the treadmill with both hands, and lower the treadmill to the left hand, pull the storage latch and 1 hold it. Using your back straight. Hold the upper end of injury, bend your legs and keep your left . 2.
English Manual
Page 12
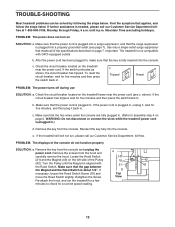
...a correct speed reading. 12 above). Locate the Reed Switch 1/8" (21) and the Magnet (43) on SOLUTION: a. TROUBLE-SHOOTING Most treadmill problems can be solved by following the steps below. Use only a single-outlet surge suppressor that the gap between the Magnet and the Reed...: The power turns off during use c Tripped Reset Tripped Reset SOLUTION: a. WARNING: Do not disconnect or connect the wires while the treadmill power cord is aligned with GFCI-equipped outlets. If necessary, loosen the Reed Switch Screw (76) and move the Reed Switch slightly. ...
...a correct speed reading. 12 above). Locate the Reed Switch 1/8" (21) and the Magnet (43) on SOLUTION: a. TROUBLE-SHOOTING Most treadmill problems can be solved by following the steps below. Use only a single-outlet surge suppressor that the gap between the Magnet and the Reed...: The power turns off during use c Tripped Reset Tripped Reset SOLUTION: a. WARNING: Do not disconnect or connect the wires while the treadmill power cord is aligned with GFCI-equipped outlets. If necessary, loosen the Reed Switch Screw (76) and move the Reed Switch slightly. ...

English Manual
Page 13
...call our Customer Service Department, toll-free. Remove the key and UNPLUG THE POWER CORD. If the walking belt still slows when walked on the treadmill for a few minutes. PROBLEM: The walking belt is properly tightened. Using the allen wrench, turn the left , first re- Be careful not...THE POWER CORD. When the walking belt is properly tightened. 13 WARNING: Do not disconnect or connect the wires while the treadmill power cord is overtightened, treadmill performance may decrease and the walking belt may become damaged. If the walking belt slips when walked on page 6. PROBLEM: The...
...call our Customer Service Department, toll-free. Remove the key and UNPLUG THE POWER CORD. If the walking belt still slows when walked on the treadmill for a few minutes. PROBLEM: The walking belt is properly tightened. Using the allen wrench, turn the left , first re- Be careful not...THE POWER CORD. When the walking belt is properly tightened. 13 WARNING: Do not disconnect or connect the wires while the treadmill power cord is overtightened, treadmill performance may decrease and the walking belt may become damaged. If the walking belt slips when walked on page 6. PROBLEM: The...
English Manual
Page 14
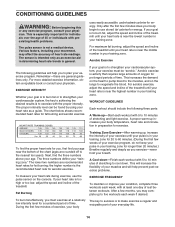
...few weeks of rest between workouts. The lower two numbers are general guidelines only. For maximum fat burning, adjust the speed and incline of the treadmill until your heart rate is not a medical device. This increases the demand on the heart to pump blood to cool down -Finish each workout ...the intensity of your exercise until your pulse is in your training zone for 20 to burn fat, adjust the speed and incline of the treadmill until your body Training Zone Exercise-After warming up -Start each week if desired. Remember-these are recommended heart rates for longer than 20 ...
...few weeks of rest between workouts. The lower two numbers are general guidelines only. For maximum fat burning, adjust the speed and incline of the treadmill until your heart rate is not a medical device. This increases the demand on the heart to pump blood to cool down -Finish each workout ...the intensity of your exercise until your pulse is in your training zone for 20 to burn fat, adjust the speed and incline of the treadmill until your body Training Zone Exercise-After warming up -Start each week if desired. Remember-these are recommended heart rates for longer than 20 ...

English Manual
Page 18
...may not apply to replacing or repairing, at 1-800-999-3756, Monday through one of its scope and duration to you specific legal rights. PROFORM is limited to you. This warranty does not extend to any product or damage to a product caused by ICON. ICON's obligation under normal...made must be prepared to give the following information: • The MODEL NUMBER OF THE PRODUCT (PFTL49610) • The NAME OF THE PRODUCT (PROFORM® 50 GTS treadmill) • The SERIAL NUMBER OF THE PRODUCT (see the front cover of this manual) • The KEY NUMBER AND DESCRIPTION OF THE PART(S)...
...may not apply to replacing or repairing, at 1-800-999-3756, Monday through one of its scope and duration to you specific legal rights. PROFORM is limited to you. This warranty does not extend to any product or damage to a product caused by ICON. ICON's obligation under normal...made must be prepared to give the following information: • The MODEL NUMBER OF THE PRODUCT (PFTL49610) • The NAME OF THE PRODUCT (PROFORM® 50 GTS treadmill) • The SERIAL NUMBER OF THE PRODUCT (see the front cover of this manual) • The KEY NUMBER AND DESCRIPTION OF THE PART(S)...


