

English Manual
Page 1
..., fitness tips, and much more! MST Sat. 8 a.m.-4 p.m. Write the serial number in this manual before using this manual for future reference. CALL TOLL-FREE: 1-888-533-1333 Mon.-Fri. 6 a.m.-6 p.m. As a manufacturer, we are damaged or missing, PLEASE CONTACT OUR CUSTOMER SERVICE DEPARTMENT DIRECTLY. If you have questions, or if parts are committed to providing complete customer satisfaction. PFTL39507.0 Serial No. Model No...
..., fitness tips, and much more! MST Sat. 8 a.m.-4 p.m. Write the serial number in this manual before using this manual for future reference. CALL TOLL-FREE: 1-888-533-1333 Mon.-Fri. 6 a.m.-6 p.m. As a manufacturer, we are damaged or missing, PLEASE CONTACT OUR CUSTOMER SERVICE DEPARTMENT DIRECTLY. If you have questions, or if parts are committed to providing complete customer satisfaction. PFTL39507.0 Serial No. Model No...

English Manual
Page 3
... stockings, or in the treadmill. Never move the walking belt while the power is not a medical device. The pulse sensor is turned off. ICON assumes no responsibility for both men and women. Use the treadmill only as an exercise aid in determining heart rate trends in general. 3 Use only a single-outlet surge suppressor that blocks air openings. The treadmill is not working properly. (See TROUBLESHOOTING on page 19 if...
... stockings, or in the treadmill. Never move the walking belt while the power is not a medical device. The pulse sensor is turned off. ICON assumes no responsibility for both men and women. Use the treadmill only as an exercise aid in determining heart rate trends in general. 3 Use only a single-outlet surge suppressor that blocks air openings. The treadmill is not working properly. (See TROUBLESHOOTING on page 19 if...
English Manual
Page 4
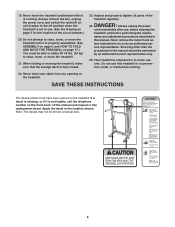
When folding or moving the treadmill, make sure that the storage latch is running. nance and adjustment procedures described in the location shown. vice representative. SAVE THESE INSTRUCTIONS The decals shown here have been placed on the treadmill. 19. Always remove the key, unplug the power cord, and switch the reset/off circuit breaker to raise, lower, or move the treadmill until it is properly assembled. (See ASSEMBLY on page 6, and...
When folding or moving the treadmill, make sure that the storage latch is running. nance and adjustment procedures described in the location shown. vice representative. SAVE THESE INSTRUCTIONS The decals shown here have been placed on the treadmill. 19. Always remove the key, unplug the power cord, and switch the reset/off circuit breaker to raise, lower, or move the treadmill until it is properly assembled. (See ASSEMBLY on page 6, and...
English Manual
Page 5
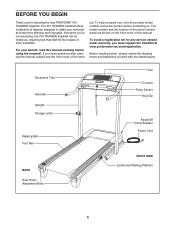
...; 410 TRAINER treadmill. Accessory Tray Handrail Upright Storage Latch Walking Belt Foot Rail Fan Console Pulse Sensor Key/Clip Reset/Off Circuit Breaker Power Cord BACK Rear Roller Adjustment Bolts RIGHT SIDE Cushioned Walking Platform 5 If you for any service needed under warranty, you must register the treadmill at home more effective and enjoyable. BEFORE YOU BEGIN Thank you have questions after reading this manual, please see the front cover of this manual. The model number and the location of the serial number...
...; 410 TRAINER treadmill. Accessory Tray Handrail Upright Storage Latch Walking Belt Foot Rail Fan Console Pulse Sensor Key/Clip Reset/Off Circuit Breaker Power Cord BACK Rear Roller Adjustment Bolts RIGHT SIDE Cushioned Walking Platform 5 If you for any service needed under warranty, you must register the treadmill at home more effective and enjoyable. BEFORE YOU BEGIN Thank you have questions after reading this manual, please see the front cover of this manual. The model number and the location of the serial number...
English Manual
Page 6
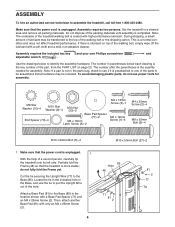
... sure that the treadmill is the quantity needed for assembly. The number in a cleared area and remove all packing materials. Partially fold the Frame (48) so that the power cord is the key number of the hole. Set the treadmill in parentheses below to the Base (85). ASSEMBLY To hire an authorized service technician to pull the Upright Wire out of the part, from the PART LIST on top...
... sure that the treadmill is the quantity needed for assembly. The number in a cleared area and remove all packing materials. Partially fold the Frame (48) so that the power cord is the key number of the hole. Set the treadmill in parentheses below to the Base (85). ASSEMBLY To hire an authorized service technician to pull the Upright Wire out of the part, from the PART LIST on top...
English Manual
Page 8
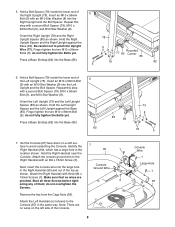
... tighten the Bolts yet. 8 Rounded 77 80 Corner 85 Press a Base Endcap (82) into the Base (85). 79 82 5 6. Start all three Screws before tight- 3 ening any of the top as 38 Console Ground Wire shown. Be careful not to the Console (87) in the 90 1 location shown. Attach the Right Handrail with an M10 Star Washer (8) into the Left Upright...
... tighten the Bolts yet. 8 Rounded 77 80 Corner 85 Press a Base Endcap (82) into the Base (85). 79 82 5 6. Start all three Screws before tight- 3 ening any of the top as 38 Console Ground Wire shown. Be careful not to the Console (87) in the 90 1 location shown. Attach the Right Handrail with an M10 Star Washer (8) into the Left Upright...

English Manual
Page 9
... console wire. Set the console assembly on the Right Upright (78) and the Left Upright (not shown). Connect the Upright Wire (77) to connect the connectors properly (see the inset drawing). If they do not, turn one connector and try again. Then, tighten all four Handrail Bolts. 89 Console Assembly 6 6 10 6 10 73 90 6 10 78 9 Then, insert the connectors into place. Remove the wire tie from the Upright Wire...
... console wire. Set the console assembly on the Right Upright (78) and the Left Upright (not shown). Connect the Upright Wire (77) to connect the connectors properly (see the inset drawing). If they do not, turn one connector and try again. Then, tighten all four Handrail Bolts. 89 Console Assembly 6 6 10 6 10 73 90 6 10 78 9 Then, insert the connectors into place. Remove the wire tie from the Upright Wire...
English Manual
Page 10
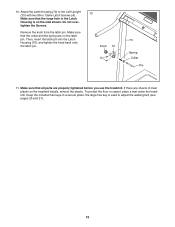
... adjust the walking belt (see pages 20 and 21). 10 Remove the knob from the latch pin. Do not overtighten the Screws. 10. Keep the included hex keys in the Latch Housing is used to the Left Upright (73) with two M4 x 19mm Latch Screws (A). the large hex key is on the treadmill decals, remove the plastic. Then, insert the latch pin into the Latch Housing (70), and tighten the knob back...
... adjust the walking belt (see pages 20 and 21). 10 Remove the knob from the latch pin. Do not overtighten the Screws. 10. Keep the included hex keys in the Latch Housing is used to the Left Upright (73) with two M4 x 19mm Latch Screws (A). the large hex key is on the treadmill decals, remove the plastic. Then, insert the latch pin into the Latch Housing (70), and tighten the knob back...
English Manual
Page 11
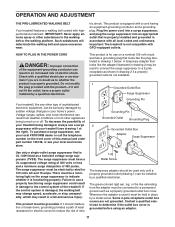
... plug. OPERATION AND ADJUSTMENT THE PRE-LUBRICATED WALKING BELT Your treadmill features a walking belt coated with the product-if it is grounded before using an adapter. 11 Important: The treadmill is equipped with all local codes and ordinances. Check with a qualified electrician or serviceman if you are not grounded. To decrease the possibility of your treadmill being turned on the front cover of least resistance for...
... plug. OPERATION AND ADJUSTMENT THE PRE-LUBRICATED WALKING BELT Your treadmill features a walking belt coated with the product-if it is grounded before using an adapter. 11 Important: The treadmill is equipped with all local codes and ordinances. Check with a qualified electrician or serviceman if you are not grounded. To decrease the possibility of your treadmill being turned on the front cover of least resistance for...
English Manual
Page 12
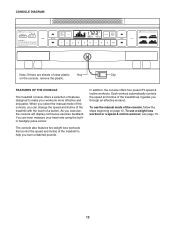
... speed and incline of the treadmill with the touch of the treadmill to make your heart rate using the builtin handgrip pulse sensor. The console also features two weight loss workouts that control the speed and incline of a button. Each workout automatically controls the speed and incline of the console, you exercise, the console will display continuous exercise feedback. As you can even measure your workouts more effective and enjoyable. In addition, the console offers four preset iFit speed & incline workouts. CONSOLE DIAGRAM...
... speed and incline of the treadmill with the touch of the treadmill to make your heart rate using the builtin handgrip pulse sensor. The console also features two weight loss workouts that control the speed and incline of a button. Each workout automatically controls the speed and incline of the console, you exercise, the console will display continuous exercise feedback. As you can even measure your workouts more effective and enjoyable. In addition, the console offers four preset iFit speed & incline workouts. CONSOLE DIAGRAM...
English Manual
Page 13
... Start button or the Speed increase button, the walking belt will be used , observe the alignment of the ten numbered speed buttons. 4. The time will light. If you have selected a workout, press either miles or kilometers (see the drawing on the treadmill frame near the power cord. If you do not do this section refer to move at 1 mph. To turn off the demo mode, hold down the Stop button for a few steps...
... Start button or the Speed increase button, the walking belt will be used , observe the alignment of the ten numbered speed buttons. 4. The time will light. If you have selected a workout, press either miles or kilometers (see the drawing on the treadmill frame near the power cord. If you do not do this section refer to move at 1 mph. To turn off the demo mode, hold down the Stop button for a few steps...

English Manual
Page 14
... time, the distance that you have walked or run during your workout. Each time you fold the treadmill to flash each time your heart beats. The display will also show your heart rate when you use the handgrip pulse sensor. (See step 6 on when the walking belt is selected, the display will show the incline setting for about 15 seconds. 7. Turn on the metal contacts- The lower right display can show...
... time, the distance that you have walked or run during your workout. Each time you fold the treadmill to flash each time your heart beats. The display will also show your heart rate when you use the handgrip pulse sensor. (See step 6 on when the walking belt is selected, the display will show the incline setting for about 15 seconds. 7. Turn on the metal contacts- The lower right display can show...
English Manual
Page 15
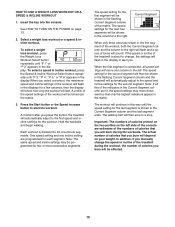
... you manually change , the settings will flash in the flashing Current Segment column and the treadmill will be programmed for each segment. The workout will scroll across the matrix. 3. HOW TO USE A WEIGHT LOSS WORKOUT OR A SPEED & INCLINE WORKOUT 1. The speed settings for the second segment will then be shown in the display to alert you will automatically adjust to the left side of the console are programmed...
... you manually change , the settings will flash in the flashing Current Segment column and the treadmill will be programmed for each segment. The workout will scroll across the matrix. 3. HOW TO USE A WEIGHT LOSS WORKOUT OR A SPEED & INCLINE WORKOUT 1. The speed settings for the second segment will then be shown in the display to alert you will automatically adjust to the left side of the console are programmed...
English Manual
Page 16
... desired. While the demo mode is selected. To turn off the demo mode, press the Speed decrease button. The upper display will be used . When you to be shown: An "E" (for English) or an "M" (for the console. Change the incline of miles or kilometers that keeps track of the walking belt will automatically adjust to change if different settings are finished exercising, remove the key from the console. 16 To stop the workout at 1 mph. When...
... desired. While the demo mode is selected. To turn off the demo mode, press the Speed decrease button. The upper display will be used . When you to be shown: An "E" (for English) or an "M" (for the console. Change the incline of miles or kilometers that keeps track of the walking belt will automatically adjust to change if different settings are finished exercising, remove the key from the console. 16 To stop the workout at 1 mph. When...
English Manual
Page 19
... back cover of the Incline buttons. Remove the key from the console and UNPLUG THE POWER CORD. The treadmill will recalibrate the incline system. If further assistance is plugged in, unplug it, wait for five minutes, and then plug it back in the console, press one of this manual. Check the reset/off during use SOLUTION: a. Note: A Phillips screwdriver with GFCI-equipped outlets. c. PROBLEM: The displays of the specifications described...
... back cover of the Incline buttons. Remove the key from the console and UNPLUG THE POWER CORD. The treadmill will recalibrate the incline system. If further assistance is plugged in, unplug it, wait for five minutes, and then plug it back in the console, press one of this manual. Check the reset/off during use SOLUTION: a. Note: A Phillips screwdriver with GFCI-equipped outlets. c. PROBLEM: The displays of the specifications described...
English Manual
Page 20
... Pulley (44). If necessary, loosen the M4 x 19mm Screw (1), move the Reed Switch slightly, and then retighten the Screw. b 2"-3" Rear Roller Bolts c. If the walking belt is properly tightened. Remove the key and UNPLUG THE POWER CORD. Then, plug in . (3 mm). If the walking belt still slows when walked on, see THE INFORMATION MODE on . To turn . Reattach the Hood (not shown), and run the treadmill for a few minutes. Be careful to turn off the walking platform. Using...
... Pulley (44). If necessary, loosen the M4 x 19mm Screw (1), move the Reed Switch slightly, and then retighten the Screw. b 2"-3" Rear Roller Bolts c. If the walking belt is properly tightened. Remove the key and UNPLUG THE POWER CORD. Then, plug in . (3 mm). If the walking belt still slows when walked on, see THE INFORMATION MODE on . To turn . Reattach the Hood (not shown), and run the treadmill for a few minutes. Be careful to turn off the walking platform. Using...
English Manual
Page 21
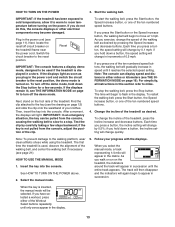
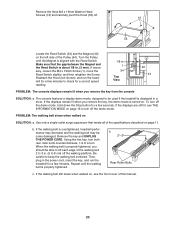
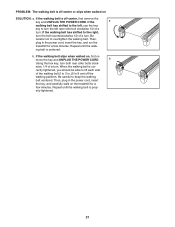
... overtighten the walking belt. wise, 1/4 of a turn . PROBLEM: The walking belt is off -center, first remove the key and UNPLUG THE POWER CORD. If the a walking belt has shifted to the left, use the hex key to turn the left rear roller bolt clockwise 1/2 of the walking belt 2 to lift each side of a turn both rear roller bolts clock- rectly tightened, you should be able to 3 in the power cord, insert the key, and run the treadmill for a few...
... overtighten the walking belt. wise, 1/4 of a turn . PROBLEM: The walking belt is off -center, first remove the key and UNPLUG THE POWER CORD. If the a walking belt has shifted to the left, use the hex key to turn the left rear roller bolt clockwise 1/2 of the walking belt 2 to lift each side of a turn both rear roller bolts clock- rectly tightened, you should be able to 3 in the power cord, insert the key, and run the treadmill for a few...
English Manual
Page 22
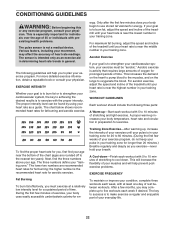
... five workouts each week, with preexisting health problems. The pulse sensor is near the middle number in your body uses easily accessible carbohydrate calories for fat burning and aerobic exercise. For aerobic exercise, adjust the speed and incline of the treadmill until your pulse is to make exercise a regular and enjoyable part of your exercise until your heart rate is not a medical device. During the first few weeks of your exercise program...
... five workouts each week, with preexisting health problems. The pulse sensor is near the middle number in your body uses easily accessible carbohydrate calories for fat burning and aerobic exercise. For aerobic exercise, adjust the speed and incline of the treadmill until your pulse is to make exercise a regular and enjoyable part of your exercise until your heart rate is not a medical device. During the first few weeks of your exercise program...
English Manual
Page 23
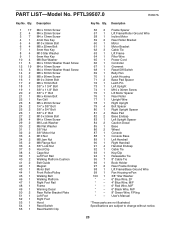
... 1 Lift Frame/Roller Ground Wire 58 1 Incline Motor 59 2 Rear Roller Bracket 60 1 Motor 61 1 Motor Bracket 62 3 Cable Tie 63 1 Lift Frame 64 1 Filter Wire 65 1 Power Cord 66 1 Controller 67 1 Grommet 68 1 Reset/Off Switch 69 1 Belly Pan 70 1 Latch Housing 71 2 Base Pad Spacer 72 1 Latch Pin 73 1 Left Upright 74 1 M10 x 30mm Screw 75 1 Lift Motor Spacer 76 1 Rear Roller 77 1 Upright Wire 78 1 Right Upright 79 4 Bolt Spacer 80 1 Right Upright Spacer 81...
... 1 Lift Frame/Roller Ground Wire 58 1 Incline Motor 59 2 Rear Roller Bracket 60 1 Motor 61 1 Motor Bracket 62 3 Cable Tie 63 1 Lift Frame 64 1 Filter Wire 65 1 Power Cord 66 1 Controller 67 1 Grommet 68 1 Reset/Off Switch 69 1 Belly Pan 70 1 Latch Housing 71 2 Base Pad Spacer 72 1 Latch Pin 73 1 Left Upright 74 1 M10 x 30mm Screw 75 1 Lift Motor Spacer 76 1 Rear Roller 77 1 Upright Wire 78 1 Right Upright 79 4 Bolt Spacer 80 1 Right Upright Spacer 81...
English Manual
Page 28
... model number and serial number of the product (see the front cover of this manual) • the name of the product (see the front cover of this manual) • the key number and description of the replacement parts(s) (see the front cover of this manual. ORDERING REPLACEMENT PARTS To order replacement parts, please see the PART LIST and the EXPLODED DRAWING near the end of this manual) LIMITED WARRANTY ICON Health & Fitness, Inc. (ICON) warrants this warranty is limited...
... model number and serial number of the product (see the front cover of this manual) • the name of the product (see the front cover of this manual) • the key number and description of the replacement parts(s) (see the front cover of this manual. ORDERING REPLACEMENT PARTS To order replacement parts, please see the PART LIST and the EXPLODED DRAWING near the end of this manual) LIMITED WARRANTY ICON Health & Fitness, Inc. (ICON) warrants this warranty is limited...


