Owner's Manual
Page 4
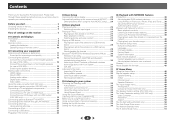
...Analog audio cables 15 Digital audio cables 15 Video cables 15 About the video converter (VSX-1022 only 16 About video outputs connection (VSX-822 only 16 Connecting a TV and playback components 17 Connecting using Phase Control 35 Using ...the receiver 22 03 Basic Setup Canceling the demo display 23 Automatically setting up for surround sound (MCACC) . . 23 Other problems when using the Auto MCACC setup . . . 24 04 Basic playback Playing a source 25 Selecting the audio input signal ... iPad, and iTunes . . 38 About the DHCP server function 38 Authorizing this Pioneer product.
...Analog audio cables 15 Digital audio cables 15 Video cables 15 About the video converter (VSX-1022 only 16 About video outputs connection (VSX-822 only 16 Connecting a TV and playback components 17 Connecting using Phase Control 35 Using ...the receiver 22 03 Basic Setup Canceling the demo display 23 Automatically setting up for surround sound (MCACC) . . 23 Other problems when using the Auto MCACC setup . . . 24 04 Basic playback Playing a source 25 Selecting the audio input signal ... iPad, and iTunes . . 38 About the DHCP server function 38 Authorizing this Pioneer product.
Owner's Manual
Page 6
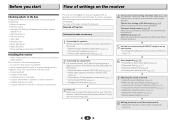
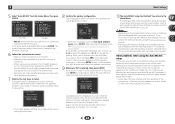
...VSX-822 only) (page 50) (When connecting the front height speakers.) The Input Assign menu (page 49) (When using connections other than the recommended connections.) HDMI Setup (page 52) (When the connected TV supports the HDMI Audio Return Channel function.) 5 Use the on-screen automatic MCACC... using a digital connection from the Blu-ray Disc/DVD player to the receiver. • About the video converter (VSX-1022 only) (page 16) • About video outputs connection (VSX-822 only) (page 16) • Connecting a TV and playback components (page 17) • Connecting antennas (page ...
...VSX-822 only) (page 50) (When connecting the front height speakers.) The Input Assign menu (page 49) (When using connections other than the recommended connections.) HDMI Setup (page 52) (When the connected TV supports the HDMI Audio Return Channel function.) 5 Use the on-screen automatic MCACC... using a digital connection from the Blu-ray Disc/DVD player to the receiver. • About the video converter (VSX-1022 only) (page 16) • About video outputs connection (VSX-822 only) (page 16) • Connecting a TV and playback components (page 17) • Connecting antennas (page ...
Owner's Manual
Page 7
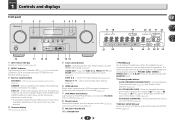
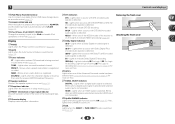
...14. The listening mode, sound volume, Speaker System (VSX-1022)/Pre Out (VSX-822) setting or input name can be displayed, depending on the input source you have selected. 4 Character display See Display on after the Auto MCACC setup (page 23)). 3 Receiver control buttons SPEAKERS -... 32). PRESET / - Chapter 1 Controls and displays Front panel 1 INPUT SELECTOR STANDBY / ON 23 4 5 6 78 9 MCACC HDMI iPod iPhone iPad SPEAKERS DIMMER DISPLAY BAND TUNER EDIT TUNE PRESET AUTO SURROUND/ ALC/ STREAM DIRECT STANDARD SURR ADVANCED SURROUND SOUND iPod iPhone iPad...
...14. The listening mode, sound volume, Speaker System (VSX-1022)/Pre Out (VSX-822) setting or input name can be displayed, depending on the input source you have selected. 4 Character display See Display on after the Auto MCACC setup (page 23)). 3 Receiver control buttons SPEAKERS -... 32). PRESET / - Chapter 1 Controls and displays Front panel 1 INPUT SELECTOR STANDBY / ON 23 4 5 6 78 9 MCACC HDMI iPod iPhone iPad SPEAKERS DIMMER DISPLAY BAND TUNER EDIT TUNE PRESET AUTO SURROUND/ ALC/ STREAM DIRECT STANDARD SURR ADVANCED SURROUND SOUND iPod iPhone iPad...
Owner's Manual
Page 8
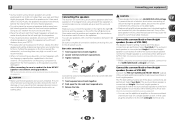
... Digital encoded signal is selected. Blinks when a digital audio signal is selected and selected audio input is registered. Removing the front cover MCACC SETUP MIC VIDEO Attaching the front cover 2 MCACC SETUP MIC VIDEO 5 V 2.1 A iPod iPhone USB iPad 1 5 V 2.1 A iPod iPhone USB iPad 8 Lights when one of the NEO:6 modes of the Advanced...
... Digital encoded signal is selected. Blinks when a digital audio signal is selected and selected audio input is registered. Removing the front cover MCACC SETUP MIC VIDEO Attaching the front cover 2 MCACC SETUP MIC VIDEO 5 V 2.1 A iPod iPhone USB iPad 1 5 V 2.1 A iPod iPhone USB iPad 8 Lights when one of the NEO:6 modes of the Advanced...
Owner's Manual
Page 9
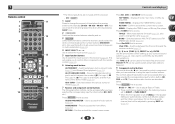
... - Press RECEIVER first to set above these buttons can check the remaining sleep time at SMALL in the Speaker Setting (or automatically via the Auto MCACC setup) and the X.Over is set up your surround sound system (page 46). You can be adjusted by pressing SLEEP once. 2 RECEIVER Switches the...
... - Press RECEIVER first to set above these buttons can check the remaining sleep time at SMALL in the Speaker Setting (or automatically via the Auto MCACC setup) and the X.Over is set up your surround sound system (page 46). You can be adjusted by pressing SLEEP once. 2 RECEIVER Switches the...
Owner's Manual
Page 12
... them very high on the surround back channel pre-outs for surround sound. Connecting the speakers The receiver will suffice) (see The Pre Out Setting (VSX-822 only) on page 50). • You can weaken the surround sound effect. • Place the left and right front height speakers at least one surround... from the front speakers, so the speakers could be damaged.) • After connecting, be positioned 60 cm to 90 cm higher than for surround sound (MCACC) on the floor. 2 Connecting your equipment • Surround and surround back speakers should be sure to conduct the Auto...
... them very high on the surround back channel pre-outs for surround sound. Connecting the speakers The receiver will suffice) (see The Pre Out Setting (VSX-822 only) on page 50). • You can weaken the surround sound effect. • Place the left and right front height speakers at least one surround... from the front speakers, so the speakers could be damaged.) • After connecting, be positioned 60 cm to 90 cm higher than for surround sound (MCACC) on the floor. 2 Connecting your equipment • Surround and surround back speakers should be sure to conduct the Auto...
Owner's Manual
Page 21
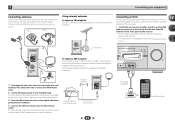
... CONTROL TUNER EDIT ON / OFF TUNE PRESET TO SURROUND/ ALC/ REAM DIRECT STANDARD SURR ADVANCED SURROUND SOUND iPod iPhone iPad RETRIEVER AIR DIRECT CONTROL ENTER MCACC SETUP MIC VIDEO 5 V 2.1 A iPod iPhone USB iPad MASTER VOLUME iPod cable (supplied) iPod/iPhone/iPad to a wall or door frame. b). 3 Place the AM antenna on...
... CONTROL TUNER EDIT ON / OFF TUNE PRESET TO SURROUND/ ALC/ REAM DIRECT STANDARD SURR ADVANCED SURROUND SOUND iPod iPhone iPad RETRIEVER AIR DIRECT CONTROL ENTER MCACC SETUP MIC VIDEO 5 V 2.1 A iPod iPhone USB iPad MASTER VOLUME iPod cable (supplied) iPod/iPhone/iPad to a wall or door frame. b). 3 Place the AM antenna on...
Owner's Manual
Page 22
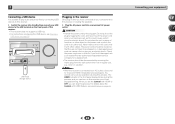
...have connected all your components to this receiver, including the speakers. Plug the AC power cord into standby then connect your nearest Pioneer authorized independent service company for a replacement. • The receiver should be routed so that they are wet, as this process. Note...EDIT CONTROL TUNE ON/OFF PRESET TO SURROUND/ ALC/ REAM DIRECT STANDARD SURR ADVANCED SURROUND SOUND iPod iPhone iPad RETRIEVER AIR DIRECT CONTROL ENTER MCACC SETUP MIC VIDEO 5 V 2.1 A iPod iPhone USB iPad MASTER VOLUME USB mass storage device Plugging in the receiver Only plug in a ...
...have connected all your components to this receiver, including the speakers. Plug the AC power cord into standby then connect your nearest Pioneer authorized independent service company for a replacement. • The receiver should be routed so that they are wet, as this process. Note...EDIT CONTROL TUNE ON/OFF PRESET TO SURROUND/ ALC/ REAM DIRECT STANDARD SURR ADVANCED SURROUND SOUND iPod iPhone iPad RETRIEVER AIR DIRECT CONTROL ENTER MCACC SETUP MIC VIDEO 5 V 2.1 A iPod iPhone USB iPad MASTER VOLUME USB mass storage device Plugging in the receiver Only plug in a ...
Owner's Manual
Page 23
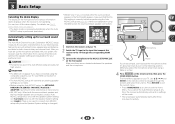
...existing speaker settings you have set before performing the Auto MCACC setup (see below). Make sure there are output at high volume. Chapter 3 Basic Setup Canceling the demo display • VSX-822 only: If you cancel the Auto MCACC setup at any time, the receiver automatically exits and ...no settings will be selected as an input source. • VSX-1022 only: When both channel delay and channel level. For details...
...existing speaker settings you have set before performing the Auto MCACC setup (see below). Make sure there are output at high volume. Chapter 3 Basic Setup Canceling the demo display • VSX-822 only: If you cancel the Auto MCACC setup at any time, the receiver automatically exits and ...no settings will be selected as an input source. • VSX-1022 only: When both channel delay and channel level. For details...
Owner's Manual
Page 24
... you have. 1 . Video Parameter 6 . Auto Power Down 8 . Manual SP Setup 3 . FL Demo Mode VSX-1022 VSX-822 • Mic In! Back [ --- ] Subwoofer [ YES ] 10:Next OK Return • With error messages (such as possible after checking for the Auto MCACC setup (too much ambient noise) select RETRY after pressing ENTER. 3 Basic Setup 5 Select 'Auto...
... you have. 1 . Video Parameter 6 . Auto Power Down 8 . Manual SP Setup 3 . FL Demo Mode VSX-1022 VSX-822 • Mic In! Back [ --- ] Subwoofer [ YES ] 10:Next OK Return • With error messages (such as possible after checking for the Auto MCACC setup (too much ambient noise) select RETRY after pressing ENTER. 3 Basic Setup 5 Select 'Auto...
Owner's Manual
Page 34
...You can also adjust the C.IMG effect (see The Pre Out Setting (VSX-822 only) on page 36). When listening through headphones, you to hear the truest possible reproduction of VSX-822: Cannot be selected when the Speaker System is removed during the compression process...functions. Using the Advanced surround BD MENU ADV SURR ADVANCED SURROUND The Advanced surround feature creates a variety of dialog. DRAMA Designed for surround sound (MCACC) on page 36). PURE DIRECT Analog and PCM sources are available. RECEIVER SLEEP SOURCE 1 2 3 DISP 4 5 6 CH INPUT 7 8...
...You can also adjust the C.IMG effect (see The Pre Out Setting (VSX-822 only) on page 36). When listening through headphones, you to hear the truest possible reproduction of VSX-822: Cannot be selected when the Speaker System is removed during the compression process...functions. Using the Advanced surround BD MENU ADV SURR ADVANCED SURROUND The Advanced surround feature creates a variety of dialog. DRAMA Designed for surround sound (MCACC) on page 36). PURE DIRECT Analog and PCM sources are available. RECEIVER SLEEP SOURCE 1 2 3 DISP 4 5 6 CH INPUT 7 8...
Owner's Manual
Page 46
... Standby - Use and ENTER on the receiver and your TV. Video Parameter 6 . FL Demo Mode Home Menu 1 . Pre Out Setting 5 . FL Demo Mode VSX-1022 VSX-822 • Auto MCACC - Specify the size and number of speakers you want to adjust. Specify what you are designed to exit the Home Menu. 4 Select the setting...
... Standby - Use and ENTER on the receiver and your TV. Video Parameter 6 . FL Demo Mode Home Menu 1 . Pre Out Setting 5 . FL Demo Mode VSX-1022 VSX-822 • Auto MCACC - Specify the size and number of speakers you want to adjust. Specify what you are designed to exit the Home Menu. 4 Select the setting...
Owner's Manual
Page 49
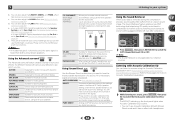
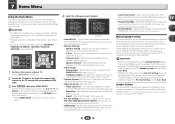
... and press SIGNAL SEL several times to choose A (Analog). (see Selecting the audio input signal on page 25. Auto MCACC 2 . Network Standby 9 . The Video Parameter setting (VSX-1022 only) This receiver can be output from the Home Menu. 7 Home Menu The Input Assign menu Assigns input function ...for analog audio input terminal and component video input terminal (component video input terminal for VSX-1022 only). • For the assignment of the digital signal inputs, see Selecting the audio input signal on page 25) Component Input...
... and press SIGNAL SEL several times to choose A (Analog). (see Selecting the audio input signal on page 25. Auto MCACC 2 . Network Standby 9 . The Video Parameter setting (VSX-1022 only) This receiver can be output from the Home Menu. 7 Home Menu The Input Assign menu Assigns input function ...for analog audio input terminal and component video input terminal (component video input terminal for VSX-1022 only). • For the assignment of the digital signal inputs, see Selecting the audio input signal on page 25) Component Input...
Owner's Manual
Page 50
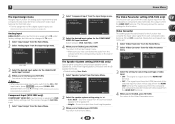
... Select desired output aspect ratio. • THROUGH - Black bands will be output due to the Video Parameter menu. The Pre Out Setting (VSX-822 only) Specify either at the HDMI OUT terminal, select this case, change the setting. Back Return 2 Select which the TV (monitor) is...on the monitor. Aspect Specifies the aspect ratio when analog video input signals are output at the HDMI OUT terminal. Video Parameter a . Home Menu 1 . Auto MCACC 2 . Video Converter b . Back 1 Select 'Pre Out Setting' from the Video Parameter menu. 5 . Input Assign 4 . Auto Power Down 7 . ...
... Select desired output aspect ratio. • THROUGH - Black bands will be output due to the Video Parameter menu. The Pre Out Setting (VSX-822 only) Specify either at the HDMI OUT terminal, select this case, change the setting. Back Return 2 Select which the TV (monitor) is...on the monitor. Aspect Specifies the aspect ratio when analog video input signals are output at the HDMI OUT terminal. Video Parameter a . Home Menu 1 . Auto MCACC 2 . Video Converter b . Back 1 Select 'Pre Out Setting' from the Video Parameter menu. 5 . Input Assign 4 . Auto Power Down 7 . ...
Owner's Manual
Page 51
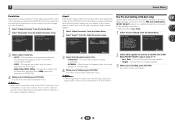
...7 . Input Assign 4 . Video Parameter 6 . Auto Power Down 8 . Speaker System 5 . HDMI Setup 7 . You return to OFF and cannot be changed. Auto MCACC 2 . The AirPlay function can select 2, 4 or 6 hours, or OFF (if no automatic shutoff is in the standby mode). - FL Demo Mode 9 . Manual SP... Setup 3 . HDMI Setup 7 . Home Menu 1 . Auto MCACC 2 . If the Network Standby setting is set to the Home Menu. Network Standby Network Standby OFF VSX-1022 Return 2 Choose ON or OFF for the demo display. 3 When you reduce power...
...7 . Input Assign 4 . Video Parameter 6 . Auto Power Down 8 . Speaker System 5 . HDMI Setup 7 . You return to OFF and cannot be changed. Auto MCACC 2 . The AirPlay function can select 2, 4 or 6 hours, or OFF (if no automatic shutoff is in the standby mode). - FL Demo Mode 9 . Manual SP... Setup 3 . HDMI Setup 7 . Home Menu 1 . Auto MCACC 2 . If the Network Standby setting is set to the Home Menu. Network Standby Network Standby OFF VSX-1022 Return 2 Choose ON or OFF for the demo display. 3 When you reduce power...
Owner's Manual
Page 52
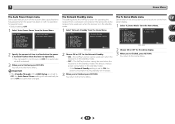
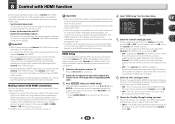
...compatible components in standby, the HDMI input signal selected here will work with Pioneer made Control with HDMI connections You can be sure to 10 second HDMI initialization process begins. Home Menu 6 . Auto MCACC 2 . Input Assign 4 . Speaker System 5 . Network Standby 9 .... FL Demo Mode Control ON ARC [ OFF ] Standby Through [ --- ] VSX-1022 Return 5 Select the 'Control' setting you connect your TV. You...
...compatible components in standby, the HDMI input signal selected here will work with Pioneer made Control with HDMI connections You can be sure to 10 second HDMI initialization process begins. Home Menu 6 . Auto MCACC 2 . Input Assign 4 . Speaker System 5 . Network Standby 9 .... FL Demo Mode Control ON ARC [ OFF ] Standby Through [ --- ] VSX-1022 Return 5 Select the 'Control' setting you connect your TV. You...
Owner's Manual
Page 59
...The temperature within the unit has exceeded the allowable value. If the message persists, call a Pioneer authorized independent service company. The power suddenly turns on your system again using the same... subwoofer is off . Press SPEAKERS to select the proper speaker set to this receiver using MCACC (this component, check the points below , ask your TV to OFF and a TV and another... the component is connected correctly (refer to Connecting your equipment on page 11). VSX-822 only: Use the same type of video cables for the source component and TV to connect...
...The temperature within the unit has exceeded the allowable value. If the message persists, call a Pioneer authorized independent service company. The power suddenly turns on your system again using the same... subwoofer is off . Press SPEAKERS to select the proper speaker set to this receiver using MCACC (this component, check the points below , ask your TV to OFF and a TV and another... the component is connected correctly (refer to Connecting your equipment on page 11). VSX-822 only: Use the same type of video cables for the source component and TV to connect...

Owner's Manual
Page 60
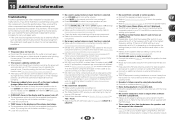
... the audio component on the network before switching on the network which has been switched off all appliances in the room and rerun the Auto MCACC setup. Can't operate the remote control. Replace the batteries (page 10). Operate within 7 m (23 ft.), ...Try rebooting the component if necessary. The component connected to the network. 60 10 Additional information After using the Auto MCACC setup, the speaker size setting (LARGE or SMALL) is not firmly connected. Try using another position. Avoid exposing the remote sensor...
... the audio component on the network before switching on the network which has been switched off all appliances in the room and rerun the Auto MCACC setup. Can't operate the remote control. Replace the batteries (page 10). Operate within 7 m (23 ft.), ...Try rebooting the component if necessary. The component connected to the network. 60 10 Additional information After using the Auto MCACC setup, the speaker size setting (LARGE or SMALL) is not firmly connected. Try using another position. Avoid exposing the remote sensor...

Owner's Manual
Page 64
... speaker impedance 6 Ω to 16 Ω * Measured pursuant to the Federal Trade Commission's Trade Regulation rule on Power Output Claims for Auto MCACC setup 1 Remote control 1 Dry cell batteries (AAA size IEC R03 2 AM loop antenna 1 FM wire antenna 1 iPod cable 1 Warranty card ...) ADAPTER PORT terminal 5 V, 100 mA Network Section LAN terminal 10 BASE-T/100 BASE-TX Miscellaneous Power Requirements AC 120 V, 60 Hz Power Consumption 520 W (VSX-1022) 450 W (VSX-822) In standby 0.4 W (Control OFF) Dimensions . . . . . 435 mm (W) x 168 mm (H) x 342.5 mm (D) 173/16 in. (W) x 65/8 in....
... speaker impedance 6 Ω to 16 Ω * Measured pursuant to the Federal Trade Commission's Trade Regulation rule on Power Output Claims for Auto MCACC setup 1 Remote control 1 Dry cell batteries (AAA size IEC R03 2 AM loop antenna 1 FM wire antenna 1 iPod cable 1 Warranty card ...) ADAPTER PORT terminal 5 V, 100 mA Network Section LAN terminal 10 BASE-T/100 BASE-TX Miscellaneous Power Requirements AC 120 V, 60 Hz Power Consumption 520 W (VSX-1022) 450 W (VSX-822) In standby 0.4 W (Control OFF) Dimensions . . . . . 435 mm (W) x 168 mm (H) x 342.5 mm (D) 173/16 in. (W) x 65/8 in....


