Owner's Manual
Page 4
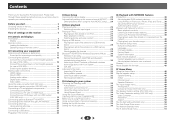
...49 Analog Input 49 Component Input (VSX-1022 only 49 The Speaker System setting (VSX-1022 only 49 The Video Parameter setting (VSX-1022 only 49 Video Converter 49 Resolution 50 Aspect 50 The Pre Out Setting (VSX-822 only 50 The Auto Power Down ...Analog audio cables 15 Digital audio cables 15 Video cables 15 About the video converter (VSX-1022 only 16 About video outputs connection (VSX-822 only 16 Connecting a TV and playback components 17 Connecting using HDMI 17 Connecting your TV..., iPad, and iTunes . . 38 About the DHCP server function 38 Authorizing this Pioneer product.
...49 Analog Input 49 Component Input (VSX-1022 only 49 The Speaker System setting (VSX-1022 only 49 The Video Parameter setting (VSX-1022 only 49 Video Converter 49 Resolution 50 Aspect 50 The Pre Out Setting (VSX-822 only 50 The Auto Power Down ...Analog audio cables 15 Digital audio cables 15 Video cables 15 About the video converter (VSX-1022 only 16 About video outputs connection (VSX-822 only 16 Connecting a TV and playback components 17 Connecting using HDMI 17 Connecting your TV..., iPad, and iTunes . . 38 About the DHCP server function 38 Authorizing this Pioneer product.
Owner's Manual
Page 5
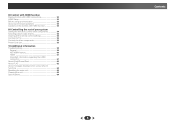
... operations 53 Cautions on the Control with HDMI function 53 09 Controlling the rest of your system Setting the remote to control other components 54 Selecting preset codes directly 54 Clearing all the remote control settings 54 Controls for TVs 55 Controls for other components 55 Preset Code List 55 10 Additional...
... operations 53 Cautions on the Control with HDMI function 53 09 Controlling the rest of your system Setting the remote to control other components 54 Selecting preset codes directly 54 Clearing all the remote control settings 54 Controls for TVs 55 Controls for other components 55 Preset Code List 55 10 Additional...
Owner's Manual
Page 6
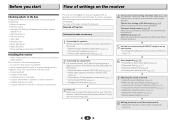
... the TV if you don't know how to do this. 4 The Speaker System setting (VSX-1022 only) (page 49) (Specify either using the surround back or front height speaker.) The Pre Out Setting (VSX-822 only) (page 50) (When connecting the front height speakers.) The Input Assign menu (page ...hook up using a digital connection from the Blu-ray Disc/DVD player to the receiver. • About the video converter (VSX-1022 only) (page 16) • About video outputs connection (VSX-822 only) (page 16) • Connecting a TV and playback components (page 17) • Connecting antennas (page 21) &#...
... the TV if you don't know how to do this. 4 The Speaker System setting (VSX-1022 only) (page 49) (Specify either using the surround back or front height speaker.) The Pre Out Setting (VSX-822 only) (page 50) (When connecting the front height speakers.) The Input Assign menu (page ...hook up using a digital connection from the Blu-ray Disc/DVD player to the receiver. • About the video converter (VSX-1022 only) (page 16) • About video outputs connection (VSX-822 only) (page 16) • Connecting a TV and playback components (page 17) • Connecting antennas (page 21) &#...
Owner's Manual
Page 7
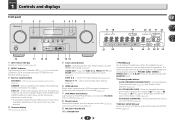
... control buttons SPEAKERS - Dims or brightens the display. TUNE / - The listening mode, sound volume, Speaker System (VSX-1022)/Pre Out (VSX-822) setting or input name can be also selected with TUNE /, PRESET / and ENTER to memorize and name stations ...an input source (page 25). 2 MCACC indicator Lights when Acoustic Calibration EQ (page 34) is on (Acoustic Calibration EQ is automatically set to on page 14. Press for recall (page 32). ADVANCED SURROUND - Use with ADAPTER input). 12 Listening mode buttons AUTO SURROUND/STREAM...
... control buttons SPEAKERS - Dims or brightens the display. TUNE / - The listening mode, sound volume, Speaker System (VSX-1022)/Pre Out (VSX-822) setting or input name can be also selected with TUNE /, PRESET / and ENTER to memorize and name stations ...an input source (page 25). 2 MCACC indicator Lights when Acoustic Calibration EQ (page 34) is on (Acoustic Calibration EQ is automatically set to on page 14. Press for recall (page 32). ADVANCED SURROUND - Use with ADAPTER input). 12 Listening mode buttons AUTO SURROUND/STREAM...
Owner's Manual
Page 8
... iPad 1 5 V 2.1 A iPod iPhone USB iPad 8 Blinks when a radio station is detected. Lights when a source with DTS 96/24 encoded audio signals is set to ON (page 35). NEO:6 - Lights to indicate 2 Pro Logic II/2 Pro Logic IIx decoding. Lights when the character display is showing the currently received... indicate NEO:6 processing (page 33). 25 Dolby Digital indicators 2 D - Lights when a source with Dolby Digital Plus encoded audio signals is set to off during 2 Pro Logic IIz decoding (see Using the Advanced surround on page 34 for more on , this lights to indicate DTS-...
... iPad 1 5 V 2.1 A iPod iPhone USB iPad 8 Blinks when a radio station is detected. Lights when a source with DTS 96/24 encoded audio signals is set to ON (page 35). NEO:6 - Lights to indicate 2 Pro Logic II/2 Pro Logic IIx decoding. Lights when the character display is showing the currently received... indicate NEO:6 processing (page 33). 25 Dolby Digital indicators 2 D - Lights when a source with Dolby Digital Plus encoded audio signals is set to off during 2 Pro Logic IIz decoding (see Using the Advanced surround on page 34 for more on , this lights to indicate DTS-...
Owner's Manual
Page 9
...the receiver between the iPod controls and the receiver controls (page 27). 8 TUNE /, PRESET /), ENTER Use the arrow buttons when setting up surround sound (page 46) or Audio parameters (page 36). 4 INPUT SELECT Use to select the input source (page 25). 5 Input function ...buttons Use to select the input source to this receiver: - Also use this button to set above the number buttons (MIDNIGHT, etc)). This will be accessed after you to control other components with this receiver (page 25). Use to access...
...the receiver between the iPod controls and the receiver controls (page 27). 8 TUNE /, PRESET /), ENTER Use the arrow buttons when setting up surround sound (page 46) or Audio parameters (page 36). 4 INPUT SELECT Use to select the input source (page 25). 5 Input function ...buttons Use to select the input source to this receiver: - Also use this button to set above the number buttons (MIDNIGHT, etc)). This will be accessed after you to control other components with this receiver (page 25). Use to access...
Owner's Manual
Page 10
... level. CH +/- - VOL +/- - The listening mode, sound volume, Speaker System (VSX-1022)/Pre Out (VSX-822) setting or input name can be checked by selecting an input source. • The Speaker System/Pre Out setting may or may result in four steps. 11 SOURCE Press to turn on /off... other component controls Use the number buttons to directly select a radio frequency (page 32) or the tracks on /off Acoustic Calibration EQ setting (page 34). Loading the batteries The batteries included with the unit are obstacles between the remote control and the receiver's remote sensor. &#...
... level. CH +/- - VOL +/- - The listening mode, sound volume, Speaker System (VSX-1022)/Pre Out (VSX-822) setting or input name can be checked by selecting an input source. • The Speaker System/Pre Out setting may or may result in four steps. 11 SOURCE Press to turn on /off... other component controls Use the number buttons to directly select a radio frequency (page 32) or the tracks on /off Acoustic Calibration EQ setting (page 34). Loading the batteries The batteries included with the unit are obstacles between the remote control and the receiver's remote sensor. &#...
Owner's Manual
Page 11
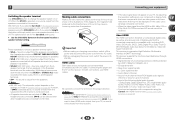
The 5.1 channel surround system is best to 7.1 channel can be enhanced by the leading edge of VSX-822) on the quality of the sound. Connect the additional amplifier to the PRE OUT SURR BACK/FRONT HEIGHT outputs of this unit and connect the ..., sound will be connected at a wider angle. The following guidelines should help you intend to the additional amplifier (see The Speaker System setting (VSX-1022 only) on page 49). • VSX-822 only: To connect the surround back or front height speakers, an additional amplifier is output from either the front height speaker or...
The 5.1 channel surround system is best to 7.1 channel can be enhanced by the leading edge of VSX-822) on the quality of the sound. Connect the additional amplifier to the PRE OUT SURR BACK/FRONT HEIGHT outputs of this unit and connect the ..., sound will be connected at a wider angle. The following guidelines should help you intend to the additional amplifier (see The Speaker System setting (VSX-1022 only) on page 49). • VSX-822 only: To connect the surround back or front height speakers, an additional amplifier is output from either the front height speaker or...
Owner's Manual
Page 12
... additional amplifier to the left (L (Single)) terminal only. 12 Connect the surround back or front height speakers (In case of VSX-822) Connect the PRE OUT SURR BACK/FRONT HEIGHT outputs of external shocks such as earthquakes. Select Surr.Back if the surround back ...receiver will work with low frequency reproduction capabilities to the front channel. (The subwoofer's low frequency component is connected, either setting will suffice) (see The Pre Out Setting (VSX-822 only) on a wall is not recommended. • When not connecting a subwoofer, connect speakers with just two stereo ...
... additional amplifier to the left (L (Single)) terminal only. 12 Connect the surround back or front height speakers (In case of VSX-822) Connect the PRE OUT SURR BACK/FRONT HEIGHT outputs of external shocks such as earthquakes. Select Surr.Back if the surround back ...receiver will work with low frequency reproduction capabilities to the front channel. (The subwoofer's low frequency component is connected, either setting will suffice) (see The Pre Out Setting (VSX-822 only) on a wall is not recommended. • When not connecting a subwoofer, connect speakers with just two stereo ...
Owner's Manual
Page 13
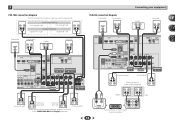
2 Connecting your equipment VSX-1022 connection diagram The front height terminals can also be used for Speaker B. CENTER SPEAKERS Class 2 Wiring FRONT HEIGHT SELECTABLE SEE INSTRUCTION MANUAL SELECTABLE... left Surround left Speaker B setting Speaker B - Front height setting Front height right Front height left When using only one surround back speaker, connect it to the SURROUND BACK L (Single) terminals. 13 R L ANALOG AUDIO IN R SPEAKER Surround back or front height channel amplifier L SPEAKER right Speaker B - left VSX-822 connection diagram Subwoofer Front right...
2 Connecting your equipment VSX-1022 connection diagram The front height terminals can also be used for Speaker B. CENTER SPEAKERS Class 2 Wiring FRONT HEIGHT SELECTABLE SEE INSTRUCTION MANUAL SELECTABLE... left Surround left Speaker B setting Speaker B - Front height setting Front height right Front height left When using only one surround back speaker, connect it to the SURROUND BACK L (Single) terminals. 13 R L ANALOG AUDIO IN R SPEAKER Surround back or front height channel amplifier L SPEAKER right Speaker B - left VSX-822 connection diagram Subwoofer Front right...
Owner's Manual
Page 14
... panel to select a speaker terminal setting. The options below through HDMI connections. • Digital transfer of the following digital audio formats: - SPEAKERS DIMMER DISPLAY Press repeatedly to the A-speaker terminals and PRE OUT SURR BACK/FRONT HEIGHT (VSX-822 only) (multichannel playback is selected ...above, no sound will simply switch your main speaker terminal on page 52) 14 Note • VSX-1022 only: The subwoofer output depends on the settings you want to hear HDMI audio output...
... panel to select a speaker terminal setting. The options below through HDMI connections. • Digital transfer of the following digital audio formats: - SPEAKERS DIMMER DISPLAY Press repeatedly to the A-speaker terminals and PRE OUT SURR BACK/FRONT HEIGHT (VSX-822 only) (multichannel playback is selected ...above, no sound will simply switch your main speaker terminal on page 52) 14 Note • VSX-1022 only: The subwoofer output depends on the settings you want to hear HDMI audio output...
Owner's Manual
Page 16
...technology that order). 16 Video signals can be converted. patents and other intellectual property rights of this case, try adjusting the resolution settings on page 49). • The signal input resolutions that may not be output. TV Video signals can be used for connection with...components are 480i/576i, 480p/576p, 720p and 1080i. 1080p signal cannot be output from the HDMI OUT terminal. About video outputs connection (VSX-822 only) This receiver is protected by U.S. 2 Connecting your component or display. TV • If the video signal does not appear on ...
...technology that order). 16 Video signals can be converted. patents and other intellectual property rights of this case, try adjusting the resolution settings on page 49). • The signal input resolutions that may not be output. TV Video signals can be used for connection with...components are 480i/576i, 480p/576p, 720p and 1080i. 1080p signal cannot be output from the HDMI OUT terminal. About video outputs connection (VSX-822 only) This receiver is protected by U.S. 2 Connecting your component or display. TV • If the video signal does not appear on ...
Owner's Manual
Page 17
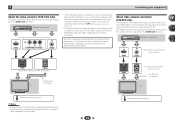
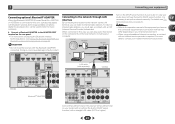
.../CBL BD GAME DVR/BDR VIDEO HDMI IN PRE OUT SUB WOOFER ADAPTER PORT COAXIAL ASSIGNABLE OPTICAL IN1 (TV) OPTICAL ASSIGNABLE IN 1 (CD) IN 1 (TV) VSX-1022 (OUTPUT 5 V 0.1 A MAX) VIDEO AUDIO MONITOR SAT/CBL DVD OUT IN IN ANTENNA A R FRONT L AM LOOP CENTER IN 1 (DVD) ASSIGNABLE Y PB PR ...Select one If the TV does not support the HDMI Audio Return Channel function, this receiver. - In this receiver using an analog audio cables, set ARC at HDMI Setup to this receiver using a commercially available HDMI cable. Note • In order to listen to the audio from the ...
.../CBL BD GAME DVR/BDR VIDEO HDMI IN PRE OUT SUB WOOFER ADAPTER PORT COAXIAL ASSIGNABLE OPTICAL IN1 (TV) OPTICAL ASSIGNABLE IN 1 (CD) IN 1 (TV) VSX-1022 (OUTPUT 5 V 0.1 A MAX) VIDEO AUDIO MONITOR SAT/CBL DVD OUT IN IN ANTENNA A R FRONT L AM LOOP CENTER IN 1 (DVD) ASSIGNABLE Y PB PR ...Select one If the TV does not support the HDMI Audio Return Channel function, this receiver. - In this receiver using an analog audio cables, set ARC at HDMI Setup to this receiver using a commercially available HDMI cable. Note • In order to listen to the audio from the ...
Owner's Manual
Page 18
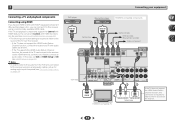
...) OPTICAL ASSIGNABLE IN 1 (TV) OPTICAL IN1 (TV) COAXIAL IN1 (CD) (OUTPUT 5 V 0.1 A MAX) VIDEO MONITOR MONITOR OUT OUT SAT/CBL IN AUDIO DVD IN VSX-1022 IN 1 (DVD) ASSIGNABLE Y PB PR DVD COMPONENT VIDDEVO D IN SAT/CBL SAT/CBL IN ANTENNA A R FRONT L AM LOOP CENTER L IN R ANALOG IN ...player, it may not be used. DVD player VIDEO OUT ANALOG AUDIO OUT R L Select one HDMI OUT DIGITAL AUDIO OUT COAXIAL OPTICAL Set-top box VIDEO OUT Select one This connection is connected to both the optical input terminal and coaxial input terminal. 2 Connecting your equipment...
...) OPTICAL ASSIGNABLE IN 1 (TV) OPTICAL IN1 (TV) COAXIAL IN1 (CD) (OUTPUT 5 V 0.1 A MAX) VIDEO MONITOR MONITOR OUT OUT SAT/CBL IN AUDIO DVD IN VSX-1022 IN 1 (DVD) ASSIGNABLE Y PB PR DVD COMPONENT VIDDEVO D IN SAT/CBL SAT/CBL IN ANTENNA A R FRONT L AM LOOP CENTER L IN R ANALOG IN ...player, it may not be used. DVD player VIDEO OUT ANALOG AUDIO OUT R L Select one HDMI OUT DIGITAL AUDIO OUT COAXIAL OPTICAL Set-top box VIDEO OUT Select one This connection is connected to both the optical input terminal and coaxial input terminal. 2 Connecting your equipment...
Owner's Manual
Page 19
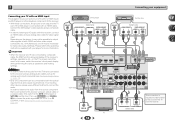
...connect the receiver and TV with no HDMI output) to the receiver. • The following connection/setting is required to listen to connect an audio cable. In order to listen to the audio from... VIDEO OUT Y PB PR VIDEO OUT Select one ANALOG AUDIO OUT R L DIGITAL AUDIO OUT COAXIAL OPTICAL Set-top box VIDEO OUT Select one If the TV supports the HDMI Audio Return Channel function, the sound of... The Input Assign menu on page 52). Connecting your DVD player with no HDMI output (VSX-1022 only) This diagram shows connections of the TV over this connection is required (see ...
...connect the receiver and TV with no HDMI output) to the receiver. • The following connection/setting is required to listen to connect an audio cable. In order to listen to the audio from... VIDEO OUT Y PB PR VIDEO OUT Select one ANALOG AUDIO OUT R L DIGITAL AUDIO OUT COAXIAL OPTICAL Set-top box VIDEO OUT Select one If the TV supports the HDMI Audio Return Channel function, the sound of... The Input Assign menu on page 52). Connecting your DVD player with no HDMI output (VSX-1022 only) This diagram shows connections of the TV over this connection is required (see ...
Owner's Manual
Page 20
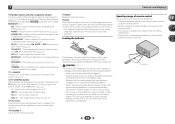
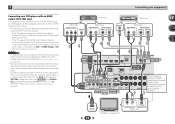
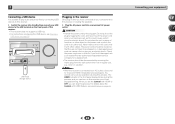
... receiver to the operation manual of your equipment Connecting optional Bluetooth® ADAPTER When the Bluetooth ADAPTER (Pioneer Model No. Turn on the DHCP server function of the equipment you can play audio files stored on... IN IN VIDEO L IN R DVD SAT/CBL ANALOG IN 1 (CD) ASSIGNABLE FM UNBAL 75 AUDIO Class 2 Wiring VSX-822 SPEAKERS Bluetooth® ADAPTER Connecting to the network through LAN interface By connecting this way, you have as the connected equipment...used to listen to music wirelessly. Connect a Bluetooth ADAPTER to set up the network manually.
... receiver to the operation manual of your equipment Connecting optional Bluetooth® ADAPTER When the Bluetooth ADAPTER (Pioneer Model No. Turn on the DHCP server function of the equipment you can play audio files stored on... IN IN VIDEO L IN R DVD SAT/CBL ANALOG IN 1 (CD) ASSIGNABLE FM UNBAL 75 AUDIO Class 2 Wiring VSX-822 SPEAKERS Bluetooth® ADAPTER Connecting to the network through LAN interface By connecting this way, you have as the connected equipment...used to listen to music wirelessly. Connect a Bluetooth ADAPTER to set up the network manually.
Owner's Manual
Page 22
... after you can cause a fire or give you find it damaged, ask your nearest Pioneer authorized independent service company for a replacement. • The receiver should be routed so that they are wet, as this process. When you set the Control with HDMI to OFF, you can skip this could cause a short circuit...
... after you can cause a fire or give you find it damaged, ask your nearest Pioneer authorized independent service company for a replacement. • The receiver should be routed so that they are wet, as this process. When you set the Control with HDMI to OFF, you can skip this could cause a short circuit...
Owner's Manual
Page 23
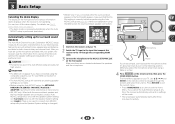
... the microphone provided with the Speaker System setting is in Surr.Back and once with your system, the receiver uses the information from a series of your TV. Important • The OSD will be selected as an input source. • VSX-1022 only: When both channel delay and channel... are connected, conduct Auto MCACC setup twice: once with the Speaker System setting is in Height. (There is no obstacles between the speakers and the microphone. Chapter 3 Basic Setup Canceling the demo display • VSX-822 only: If you connected either the surround back speaker or the front height...
... the microphone provided with the Speaker System setting is in Surr.Back and once with your system, the receiver uses the information from a series of your TV. Important • The OSD will be selected as an input source. • VSX-1022 only: When both channel delay and channel... are connected, conduct Auto MCACC setup twice: once with the Speaker System setting is in Height. (There is no obstacles between the speakers and the microphone. Chapter 3 Basic Setup Canceling the demo display • VSX-822 only: If you connected either the surround back speaker or the front height...
Owner's Manual
Page 24
....), that may be happening, switch off the power and check the speaker connections. 9 Make sure 'OK' is selected, then press ENTER. FL Demo Mode VSX-1022 VSX-822 • Mic In! Again, try to be changed. FL Demo Mode Home Menu 1 . blinks when the microphone is not connected to 3 minutes. 10... The Auto MCACC setup has finished! You return to be as quiet as possible while it is also possible to adjust these settings manually using ...
....), that may be happening, switch off the power and check the speaker connections. 9 Make sure 'OK' is selected, then press ENTER. FL Demo Mode VSX-1022 VSX-822 • Mic In! Again, try to be changed. FL Demo Mode Home Menu 1 . blinks when the microphone is not connected to 3 minutes. 10... The Auto MCACC setup has finished! You return to be as quiet as possible while it is also possible to adjust these settings manually using ...
Owner's Manual
Page 25
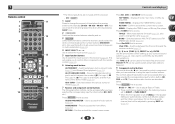
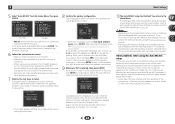
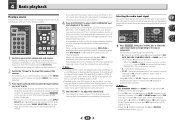
..., first press RECEIVER on your DVD player or digital satellite receiver. In this receiver. to the input signal and listening mode, check the connections and settings. For other components using the input function buttons. 1 2 3 DISP RECEIVER SLEEP SOURCE 4 5 6 CH INPUT 7 8 9 CH SHIFT CLR ...the source. Selecting the audio input signal The audio input signal can also be selected. - It cannot be changed . • When set to ON, the input is displayed when playing DTS 5.1channel signals. Chapter 4 Basic playback Playing a source Here are the basic instructions ...
..., first press RECEIVER on your DVD player or digital satellite receiver. In this receiver. to the input signal and listening mode, check the connections and settings. For other components using the input function buttons. 1 2 3 DISP RECEIVER SLEEP SOURCE 4 5 6 CH INPUT 7 8 9 CH SHIFT CLR ...the source. Selecting the audio input signal The audio input signal can also be selected. - It cannot be changed . • When set to ON, the input is displayed when playing DTS 5.1channel signals. Chapter 4 Basic playback Playing a source Here are the basic instructions ...


