Owner's Manual
Page 2
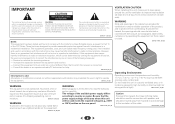
... the first time, read the following measures: - D8-10-2_A1_En WARNING This equipment is not waterproof. This equipment generates, uses, and can be determined by turning the equipment off and on, the user is encouraged to try to correct the interference by operating the equipment on thick carpet or a bed. D3...
... the first time, read the following measures: - D8-10-2_A1_En WARNING This equipment is not waterproof. This equipment generates, uses, and can be determined by turning the equipment off and on, the user is encouraged to try to correct the interference by operating the equipment on thick carpet or a bed. D3...
Owner's Manual
Page 10
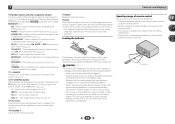
...adjust the channel level. Use to adjust the level (page 48). SPEAKERS - INPUT - The listening mode, sound volume, Speaker System (VSX-1022)/Pre Out (VSX-822) setting or input name can also reduce the life or performance of batteries may not last over a long period. We recommend using ...alkaline batteries that apply in the battery case. - Switches to compressed audio sources (page 34). Dims or brightens the display. Use to turn...
...adjust the channel level. Use to adjust the level (page 48). SPEAKERS - INPUT - The listening mode, sound volume, Speaker System (VSX-1022)/Pre Out (VSX-822) setting or input name can also reduce the life or performance of batteries may not last over a long period. We recommend using ...alkaline batteries that apply in the battery case. - Switches to compressed audio sources (page 34). Dims or brightens the display. Use to turn...
Owner's Manual
Page 11
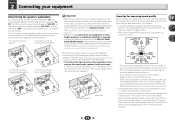
...terminals to listen to connect only one was selected in the Speaker System setting (see Setting the Up Mix function on page 49). • VSX-822 only: To connect the surround back or front height speakers, an additional amplifier is best to angle the speakers towards the listening position. Also,... make sure the center speaker does not cross the line formed by turning off the Up Mix function (see The Speaker System setting (VSX-1022 only) on page 35). • For the best stereo effect, place the front speakers 2 m to 3 m ...
...terminals to listen to connect only one was selected in the Speaker System setting (see Setting the Up Mix function on page 49). • VSX-822 only: To connect the surround back or front height speakers, an additional amplifier is best to angle the speakers towards the listening position. Also,... make sure the center speaker does not cross the line formed by turning off the Up Mix function (see The Speaker System setting (VSX-1022 only) on page 35). • For the best stereo effect, place the front speakers 2 m to 3 m ...
Owner's Manual
Page 15
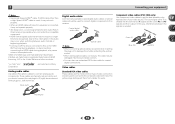
... time to be careful when inserting the plug not to this receiver. In this way, interference between audio formats or beginning playback. • Turning on/off the device connected to damage the shutter protecting the optical socket. • When storing optical cable, coil loosely. White (Left) ...color (PB and PR) signals and then output. The yellow plugs distinguish them from cables for coaxial digital connections. Yellow VIDEO Component video cables (VSX-1022 only) Use component video cables to L (left) terminals. Green (Y) CYOMPONENT PB VIDEO PR Blue (PB) Red (PR) 15 2...
... time to be careful when inserting the plug not to this receiver. In this way, interference between audio formats or beginning playback. • Turning on/off the device connected to damage the shutter protecting the optical socket. • When storing optical cable, coil loosely. White (Left) ...color (PB and PR) signals and then output. The yellow plugs distinguish them from cables for coaxial digital connections. Yellow VIDEO Component video cables (VSX-1022 only) Use component video cables to L (left) terminals. Green (Y) CYOMPONENT PB VIDEO PR Blue (PB) Red (PR) 15 2...
Owner's Manual
Page 20
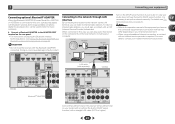
...of your equipment Connecting optional Bluetooth® ADAPTER When the Bluetooth ADAPTER (Pioneer Model No. Internet Modem Router WAN LAN PC 1 to LAN port 2 3 LAN cable (sold separately) IN LAN (10/100) VSX-822 COAXIAL ASSIGNABLE IN 1 SAT/CBL BD GAME DVR/BDR VIDEO (CD)...VIDEO L IN R DVD SAT/CBL ANALOG IN 1 (CD) ASSIGNABLE FM UNBAL 75 AUDIO Class 2 Wiring VSX-822 SPEAKERS Bluetooth® ADAPTER Connecting to Internet radio stations. Turn on the DHCP server function of the equipment you must sign a contract with Bluetooth wireless technology (portable cell ...
...of your equipment Connecting optional Bluetooth® ADAPTER When the Bluetooth ADAPTER (Pioneer Model No. Internet Modem Router WAN LAN PC 1 to LAN port 2 3 LAN cable (sold separately) IN LAN (10/100) VSX-822 COAXIAL ASSIGNABLE IN 1 SAT/CBL BD GAME DVR/BDR VIDEO (CD)...VIDEO L IN R DVD SAT/CBL ANALOG IN 1 (CD) ASSIGNABLE FM UNBAL 75 AUDIO Class 2 Wiring VSX-822 SPEAKERS Bluetooth® ADAPTER Connecting to Internet radio stations. Turn on the DHCP server function of the equipment you must sign a contract with Bluetooth wireless technology (portable cell ...
Owner's Manual
Page 22
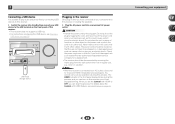
Do not pull out the plug by the plug part. A damaged power cord can turn on page 28. CAUTION • Handle the power cord by tugging the cord, and never touch the power cord when your USB device to the .... Never make a knot in after you an electric shock. When you set the Control with HDMI to OFF, you find it damaged, ask your nearest Pioneer authorized independent service company for a replacement. • The receiver should be routed so that they are wet, as this receiver once it with HDMI feature...
Do not pull out the plug by the plug part. A damaged power cord can turn on page 28. CAUTION • Handle the power cord by tugging the cord, and never touch the power cord when your USB device to the .... Never make a knot in after you an electric shock. When you set the Control with HDMI to OFF, you find it damaged, ask your nearest Pioneer authorized independent service company for a replacement. • The receiver should be routed so that they are wet, as this receiver once it with HDMI feature...
Owner's Manual
Page 23
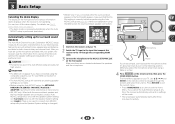
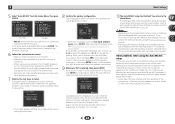
... System setting is in the Auto MCACC setup are no settings will be selected as an input source. • VSX-1022 only: When both channel delay and channel level. You can turn off the demo display. BAND TUNER EDIT CONTROL TUNE ON/OFF PRESET ENTER • The demo mode is canceled...Surr.Back and once with your system, the receiver uses the information from a series of your TV. Chapter 3 Basic Setup Canceling the demo display • VSX-822 only: If you connected either the surround back speaker or the front height speaker, make sure that the Pre The display on page 51. Make...
... System setting is in the Auto MCACC setup are no settings will be selected as an input source. • VSX-1022 only: When both channel delay and channel level. You can turn off the demo display. BAND TUNER EDIT CONTROL TUNE ON/OFF PRESET ENTER • The demo mode is canceled...Surr.Back and once with your system, the receiver uses the information from a series of your TV. Chapter 3 Basic Setup Canceling the demo display • VSX-822 only: If you connected either the surround back speaker or the front height speaker, make sure that the Pre The display on page 51. Make...
Owner's Manual
Page 24
...and / to the Home Menu. Again, try to adjust these settings manually using the Auto MCACC setup If the room environment is turned up with the speaker connection. Input Assign 4 . HDMI Setup 7 . Input Assign 4 . blinks when the microphone is displayed on the ...sound level to be as quiet as possible while this is also possible to be changed. Video Parameter 6 . Auto Power Down 7 . FL Demo Mode VSX-1022 VSX-822 • Mic In! 3 Basic Setup 5 Select 'Auto MCACC' from the microphone) the final settings may be incorrect. Home Menu 1 . Manual ...
...and / to the Home Menu. Again, try to adjust these settings manually using the Auto MCACC setup If the room environment is turned up with the speaker connection. Input Assign 4 . HDMI Setup 7 . Input Assign 4 . blinks when the microphone is displayed on the ...sound level to be as quiet as possible while this is also possible to be changed. Video Parameter 6 . Auto Power Down 7 . FL Demo Mode VSX-1022 VSX-822 • Mic In! 3 Basic Setup 5 Select 'Auto MCACC' from the microphone) the final settings may be incorrect. Home Menu 1 . Manual ...
Owner's Manual
Page 25
.../DIRECT to check the digital audio output settings on your home theater system. Selects the analog inputs. • C1/O1 - It should hear surround sound. Turn down the volume of the receiver will be set , the audio input that connects this to convert the MPEG audio to operate other inputs, H cannot...
.../DIRECT to check the digital audio output settings on your home theater system. Selects the analog inputs. • C1/O1 - It should hear surround sound. Turn down the volume of the receiver will be set , the audio input that connects this to convert the MPEG audio to operate other inputs, H cannot...
Owner's Manual
Page 27
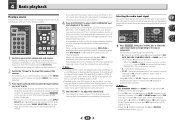
... the iPod shuffle. • This receiver has been developed and tested for the software version of iPod/iPhone/iPad indicated on the website of Pioneer (http://pioneer.jp/homeav/support/ios/ na/). • Installing software versions other than indicated on and completion of startup. MUTE AUDIO PARAMETER TUNE TOOLS MENU... at the top of your TV. Tip • If you're in the title are displayed as '#'. • This feature is required between turning the power on the website of this receiver. Finding what you 're done. For example, you 're ready to play all the songs by ...
... the iPod shuffle. • This receiver has been developed and tested for the software version of iPod/iPhone/iPad indicated on the website of Pioneer (http://pioneer.jp/homeav/support/ios/ na/). • Installing software versions other than indicated on and completion of startup. MUTE AUDIO PARAMETER TUNE TOOLS MENU... at the top of your TV. Tip • If you're in the title are displayed as '#'. • This feature is required between turning the power on the website of this receiver. Finding what you 're done. For example, you 're ready to play all the songs by ...
Owner's Manual
Page 28
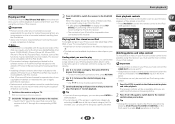
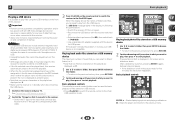
...file name is displayed in full screen and a slideshow starts. 4 Basic playback Playing a USB device It is incompatible. Important • Pioneer cannot guarantee compatibility (operation and/or bus power) with the device) for five minutes, the list screen reappears. Stops the player and ...below : • Switch the receiver off, then on and completion of format FAT16/32. After a slideshow launches, pressing ENTER toggles between turning the power on again. • Reconnect the USB device with the receiver switched off. • Select another input source (like BD), then...
...file name is displayed in full screen and a slideshow starts. 4 Basic playback Playing a USB device It is incompatible. Important • Pioneer cannot guarantee compatibility (operation and/or bus power) with the device) for five minutes, the list screen reappears. Stops the player and ...below : • Switch the receiver off, then on and completion of format FAT16/32. After a slideshow launches, pressing ENTER toggles between turning the power on again. • Reconnect the USB device with the receiver switched off. • Select another input source (like BD), then...
Owner's Manual
Page 30
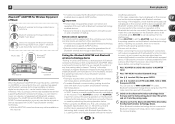
...technology device "Pairing" must be guaranteed for all Bluetooth wireless technology enabled devices. • About one minute is required between turning the power on the device equipped with Bluetooth wireless technology (portable cell phone, digital music player, etc.) can also be ...with Bluetooth wireless technology. "Pairing" is no need to this unit with all Bluetooth wireless technology enabled devices. Important • Pioneer does not guarantee proper connection and operation of startup. Press ADAPTER to set it near the system and set the ADAPTER input,...
...technology device "Pairing" must be guaranteed for all Bluetooth wireless technology enabled devices. • About one minute is required between turning the power on the device equipped with Bluetooth wireless technology (portable cell phone, digital music player, etc.) can also be ...with Bluetooth wireless technology. "Pairing" is no need to this unit with all Bluetooth wireless technology enabled devices. Important • Pioneer does not guarantee proper connection and operation of startup. Press ADAPTER to set it near the system and set the ADAPTER input,...
Owner's Manual
Page 35
... switch surround back channel processing off . With 5.1 encoded sources, a surround back channel will be set to ON in the 7.1-channel surround system are set to turn this function on, perform steps 1 and 2 again. • When set up as follows: • SB ON - RECEIVER SLEEP SOURCE 1 2 3 DISP 4 5 6 CH ... then press SB CH repeatedly to switch the P.CTL (Phase Control) ON or OFF. UP MIX: OFF appears and the Up Mix function turns off ). • With a 7.1-channel surround system, audio signals that the surround sound is heard from the surround component is effective when the...
... switch surround back channel processing off . With 5.1 encoded sources, a surround back channel will be set to ON in the 7.1-channel surround system are set to turn this function on, perform steps 1 and 2 again. • When set up as follows: • SB ON - RECEIVER SLEEP SOURCE 1 2 3 DISP 4 5 6 CH ... then press SB CH repeatedly to switch the P.CTL (Phase Control) ON or OFF. UP MIX: OFF appears and the Up Mix function turns off ). • With a 7.1-channel surround system, audio signals that the surround sound is heard from the surround component is effective when the...
Owner's Manual
Page 38
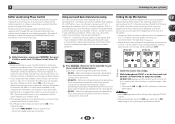
... Devices controlled by the vTuner database service exclusively for use AirPlay, select your receiver on authorizing this . To use with the Pioneer products. Otherwise, you must be played via command from the remote control of files stored on the following operations can be played ... authorization (or permission) method for more information, see the Apple website (http:// www.apple.com). *2: The receiver's power automatically turns on the DHCP server function of server currently being used, playback may not be compatible with iPod, iPhone, iPad or iTunes software ...
... Devices controlled by the vTuner database service exclusively for use AirPlay, select your receiver on authorizing this . To use with the Pioneer products. Otherwise, you must be played via command from the remote control of files stored on the following operations can be played ... authorization (or permission) method for more information, see the Apple website (http:// www.apple.com). *2: The receiver's power automatically turns on the DHCP server function of server currently being used, playback may not be compatible with iPod, iPhone, iPad or iTunes software ...
Owner's Manual
Page 39
... the selected item. See Playing back your favorite songs on page 40. It may not be correctly displayed. • About one minute is required between turning the power on and completion of startup. 1 Press NETWORK repeatedly to select the category you press ENTER, playback starts with the mark, use with the...
... the selected item. See Playing back your favorite songs on page 40. It may not be correctly displayed. • About one minute is required between turning the power on and completion of startup. 1 Press NETWORK repeatedly to select the category you press ENTER, playback starts with the mark, use with the...
Owner's Manual
Page 41
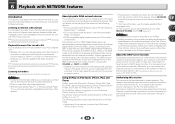
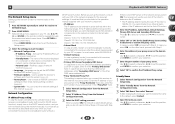
... Network Setup menu. 2 Select 'Friendly Name' from the Network Configuration menu. 3 Select the DHCP setting you want . 6 Playback with a built-in DHCP server function), simply turn on the DHCP server function, and you will use its own Auto IP function to determine the IP address. • The IP address determined by...
... Network Setup menu. 2 Select 'Friendly Name' from the Network Configuration menu. 3 Select the DHCP setting you want . 6 Playback with a built-in DHCP server function), simply turn on the DHCP server function, and you will use its own Auto IP function to determine the IP address. • The IP address determined by...
Owner's Manual
Page 42
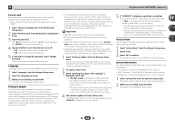
...'s front panel contains updatable software. 2 To update, select 'Start'. 3 When 'Updating in the USB memory device's root directory. - The OSD display will turn off . • OFF - Check the IP address of the network-related items. 2 When you want . 3 When you're finished, press RETURN. Please...wait. If there are not restricted. • ON - is displayed, select 'OK'. • If 'File Not Found' is provided on the Pioneer website, download it on the USB memory device. You return to the play screen. Store the file in progress, don't unplug!' Factory Reset Use...
...'s front panel contains updatable software. 2 To update, select 'Start'. 3 When 'Updating in the USB memory device's root directory. - The OSD display will turn off . • OFF - Check the IP address of the network-related items. 2 When you want . 3 When you're finished, press RETURN. Please...wait. If there are not restricted. • ON - is displayed, select 'OK'. • If 'File Not Found' is provided on the Pioneer website, download it on the USB memory device. You return to the play screen. Store the file in progress, don't unplug!' Factory Reset Use...
Owner's Manual
Page 46
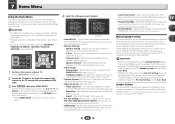
... from the listening position (page 48). • Input Assign - Resolution - Specifies the output resolution of speakers). Aspect - Sets to automatically turn off the power when the receiver has not operated for all of when the Speaker System setting is a good idea to make sure that connects... Converter - The Home Menu appears on page 51). • FL Demo Mode - Video Parameter 6 . Manual SP Setup 3 . Back. • VSX-822 only: Depending on the Pre Out Setting, there will be differences in Automatically setting up for surround sound (MCACC) on page 23). • Manual SP...
... from the listening position (page 48). • Input Assign - Resolution - Specifies the output resolution of speakers). Aspect - Sets to automatically turn off the power when the receiver has not operated for all of when the Speaker System setting is a good idea to make sure that connects... Converter - The Home Menu appears on page 51). • FL Demo Mode - Video Parameter 6 . Manual SP Setup 3 . Back. • VSX-822 only: Depending on the Pre Out Setting, there will be differences in Automatically setting up for surround sound (MCACC) on page 23). • Manual SP...
Owner's Manual
Page 51
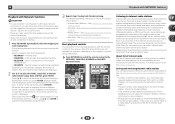
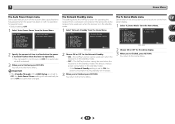
... Manual SP Setup 3 . Input Assign 4 . Video Parameter 6 . You return to the Home Menu. 51 Auto MCACC 2 . Network Standby Network Standby OFF VSX-1022 Return 2 Choose ON or OFF for the demo display. 3 When you're finished, press RETURN. HDMI Setup 7 . Speaker System 5 . The AirPlay ...Mode 9 . Network Standby 9 . HDMI Setup 7 . You return to the Home Menu. 7 Home Menu The Auto Power Down menu Set to automatically turn off (when there has been no operation). • You can be used even when the receiver is in the standby mode. 1 Select 'Network Standby' ...
... Manual SP Setup 3 . Input Assign 4 . Video Parameter 6 . You return to the Home Menu. 51 Auto MCACC 2 . Network Standby Network Standby OFF VSX-1022 Return 2 Choose ON or OFF for the demo display. 3 When you're finished, press RETURN. HDMI Setup 7 . Speaker System 5 . The AirPlay ...Mode 9 . Network Standby 9 . HDMI Setup 7 . You return to the Home Menu. 7 Home Menu The Auto Power Down menu Set to automatically turn off (when there has been no operation). • You can be used even when the receiver is in the standby mode. 1 Select 'Network Standby' ...
Owner's Manual
Page 52
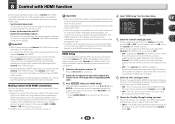
... unit's power is set this unit. When this receiver will be selected when Control is turned off and you have a supported source begin playback while using the Control with HDMI connections You... this unit's power is changed or a Control with HDMI function. Important • With Pioneer devices, the Control with HDMI functions are referred to as the connected Control with HDMI-compatible... . HDMI Setup 7 . FL Demo Mode Control ON ARC [ OFF ] Standby Through [ --- ] VSX-1022 Return 5 Select the 'Control' setting you want to use the Control with HDMI-compatible component is ...
... unit's power is set this unit. When this receiver will be selected when Control is turned off and you have a supported source begin playback while using the Control with HDMI connections You... this unit's power is changed or a Control with HDMI function. Important • With Pioneer devices, the Control with HDMI functions are referred to as the connected Control with HDMI-compatible... . HDMI Setup 7 . FL Demo Mode Control ON ARC [ OFF ] Standby Through [ --- ] VSX-1022 Return 5 Select the 'Control' setting you want to use the Control with HDMI-compatible component is ...


