Owner's Manual
Page 4
... radio 32 Improving FM sound 32 Saving station presets 32 Listening to station presets 32 Naming preset stations 32 05 Listening to your system Choosing the listening mode 33 Auto playback 33 Listening in the box 6 Installing the receiver 6 Flow of settings on the receiver 6 01 Controls and displays Front panel 7 Display 8 Remote control 9 Loading the batteries 10 Operating range of VSX-822 12 Switching the speaker terminal 14 Making cable connections 14 HDMI cables 14 About HDMI 14 Analog audio cables 15 Digital audio cables 15 Video cables...
... radio 32 Improving FM sound 32 Saving station presets 32 Listening to station presets 32 Naming preset stations 32 05 Listening to your system Choosing the listening mode 33 Auto playback 33 Listening in the box 6 Installing the receiver 6 Flow of settings on the receiver 6 01 Controls and displays Front panel 7 Display 8 Remote control 9 Loading the batteries 10 Operating range of VSX-822 12 Switching the speaker terminal 14 Making cable connections 14 HDMI cables 14 About HDMI 14 Analog audio cables 15 Digital audio cables 15 Video cables...
Owner's Manual
Page 6
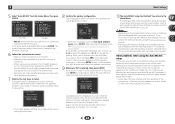
... supports the HDMI Audio Return Channel function.) 5 Use the on-screen automatic MCACC setup to set the video input on the sound. • Determining the speakers' application (page 11) • Connecting the speakers (page 12) • Switching the speaker terminal (page 14) 2 Connecting the components For surround sound, you'll want to hook up using a digital connection from the Blu-ray Disc/DVD player to the receiver. • About the video converter (VSX-1022 only) (page 16) • About video outputs connection (VSX-822...
... supports the HDMI Audio Return Channel function.) 5 Use the on-screen automatic MCACC setup to set the video input on the sound. • Determining the speakers' application (page 11) • Connecting the speakers (page 12) • Switching the speaker terminal (page 14) 2 Connecting the components For surround sound, you'll want to hook up using a digital connection from the Blu-ray Disc/DVD player to the receiver. • About the video converter (VSX-1022 only) (page 16) • About video outputs connection (VSX-822...
Owner's Manual
Page 7
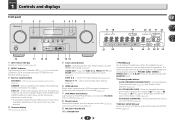
... jack Use to connect headphones. DIMMER - Switches the display of 2 Pro Logic II, 2 Pro Logic IIx, 2 Pro Logic IIz and NEO:6, and the Auto level control stereo mode (page 33). lights when the component is connected (page 17). 7 iPod iPhone iPad indicator Lights when an iPod/iPhone/iPad is connected and iPod/USB input is selected (page 27). 8 Remote sensor Receives the signals from the remote control (see Operating range of remote control on page 14. The listening mode, sound volume, Speaker System (VSX-1022)/Pre Out (VSX-822) setting or input...
... jack Use to connect headphones. DIMMER - Switches the display of 2 Pro Logic II, 2 Pro Logic IIx, 2 Pro Logic IIz and NEO:6, and the Auto level control stereo mode (page 33). lights when the component is connected (page 17). 7 iPod iPhone iPad indicator Lights when an iPod/iPhone/iPad is connected and iPod/USB input is selected (page 27). 8 Remote sensor Receives the signals from the remote control (see Operating range of remote control on page 14. The listening mode, sound volume, Speaker System (VSX-1022)/Pre Out (VSX-822) setting or input...
Owner's Manual
Page 8
... the preset number of the tuner or the input signal type, etc. 23 Character display Displays various system information. 24 DTS indicators DTS - PRESET - Lights to indicate 2 Pro Logic II/2 Pro Logic IIx decoding. Lights when a digital audio signal is registered or called. Lights when the DIRECT or PURE DIRECT mode is switched on (page 33). 19 Tuner indicators ST - When one of the receiver is on this). 27 SIGNAL SELECT indicators DIGITAL - Shows when a preset radio station is selected. Lights when...
... the preset number of the tuner or the input signal type, etc. 23 Character display Displays various system information. 24 DTS indicators DTS - PRESET - Lights to indicate 2 Pro Logic II/2 Pro Logic IIx decoding. Lights when a digital audio signal is registered or called. Lights when the DIRECT or PURE DIRECT mode is switched on (page 33). 19 Tuner indicators ST - When one of the receiver is on this). 27 SIGNAL SELECT indicators DIGITAL - Shows when a preset radio station is selected. Lights when...
Owner's Manual
Page 9
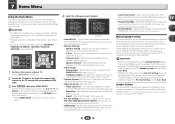
..., the subwoofer channel level will enable you to access: AUDIO PARAMETER - RETURN - BAND - Displays the HOME MENU screen. Off). HOME MENU - Switches between Auto surround mode (page 33) and Stream Direct playback (page 34). Press RECEIVER first to control Blu-ray Disc/DVD menus/options. Also used to this button to set up your surround sound system (page 46). Use to adjust Bass or Treble. • These controls are not used to switch between standby and on. 3 RECEIVER Switches the remote to control the receiver (used to access: BASS...
..., the subwoofer channel level will enable you to access: AUDIO PARAMETER - RETURN - BAND - Displays the HOME MENU screen. Off). HOME MENU - Switches between Auto surround mode (page 33) and Stream Direct playback (page 34). Press RECEIVER first to control Blu-ray Disc/DVD menus/options. Also used to this button to set up your surround sound system (page 46). Use to adjust Bass or Treble. • These controls are not used to switch between standby and on. 3 RECEIVER Switches the remote to control the receiver (used to access: BASS...
Owner's Manual
Page 10
... 55). - 1 Controls and displays 10 Number buttons and other components connected to the receiver (page 54). 12 TV CONTROL buttons These buttons are obstacles between the remote control and the receiver's remote sensor. • Direct sunlight or fluorescent light is shining onto the remote sensor. • The receiver is located near a heater. Press to compressed audio sources (page 34). S.RETRIEVER - to adjust the channel level. Use to adjust the level (page 48). Switches to directly select a radio frequency (page 32...
... 55). - 1 Controls and displays 10 Number buttons and other components connected to the receiver (page 54). 12 TV CONTROL buttons These buttons are obstacles between the remote control and the receiver's remote sensor. • Direct sunlight or fluorescent light is shining onto the remote sensor. • The receiver is located near a heater. Press to compressed audio sources (page 34). S.RETRIEVER - to adjust the channel level. Use to adjust the level (page 48). Switches to directly select a radio frequency (page 32...
Owner's Manual
Page 12
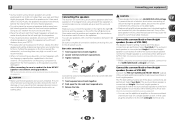
.... Connect the surround back or front height speakers (In case of VSX-822) Connect the PRE OUT SURR BACK/FRONT HEIGHT outputs of electric shock when connecting or disconnecting the speaker cables, disconnect the power cord before connecting this case plug the amplifier into the speaker terminal. In this unit to the AC power source. 2 Connecting your equipment • Surround and surround back speakers should be more directly behind the listener than for home theater playback...
.... Connect the surround back or front height speakers (In case of VSX-822) Connect the PRE OUT SURR BACK/FRONT HEIGHT outputs of electric shock when connecting or disconnecting the speaker cables, disconnect the power cord before connecting this case plug the amplifier into the speaker terminal. In this unit to the AC power source. 2 Connecting your equipment • Surround and surround back speakers should be more directly behind the listener than for home theater playback...
Owner's Manual
Page 13
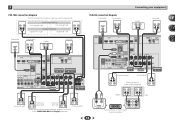
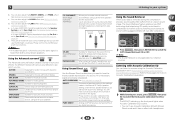
...L ANALOG AUDIO IN R SPEAKER Surround back or front height channel amplifier L SPEAKER right Speaker B - 2 Connecting your equipment VSX-1022 connection diagram The front height terminals can also be used for Speaker B. CENTER SPEAKERS Class 2 Wiring FRONT HEIGHT SELECTABLE SEE INSTRUCTION MANUAL SELECTABLE VOIR LE MODE D'EMPLOI R L HDMI OUT IN LAN (10/100) DVD SAT/CBL PREOUT BSDUBWGOAMOE FERDVR/BDR VIDEO PRE OUT SUB WOOFER ADAPTER PORT COAXIAL ASSIGNABLE IN 1 (CD) OPTICAL ASSIGNABLE IN 1 (TV) (OUTPUT 5 V SURR BACK/ 0.1 A MAX) L FRONT HEIGHT (Single) PRE OUT ANTENNA...
...L ANALOG AUDIO IN R SPEAKER Surround back or front height channel amplifier L SPEAKER right Speaker B - 2 Connecting your equipment VSX-1022 connection diagram The front height terminals can also be used for Speaker B. CENTER SPEAKERS Class 2 Wiring FRONT HEIGHT SELECTABLE SEE INSTRUCTION MANUAL SELECTABLE VOIR LE MODE D'EMPLOI R L HDMI OUT IN LAN (10/100) DVD SAT/CBL PREOUT BSDUBWGOAMOE FERDVR/BDR VIDEO PRE OUT SUB WOOFER ADAPTER PORT COAXIAL ASSIGNABLE IN 1 (CD) OPTICAL ASSIGNABLE IN 1 (TV) (OUTPUT 5 V SURR BACK/ 0.1 A MAX) L FRONT HEIGHT (Single) PRE OUT ANTENNA...
Owner's Manual
Page 14
... speakers in this receiver, for both connections, use a (analog) composite connection. • When the video signal from A- Note • VSX-1022 only: The subwoofer output depends on your TV (no sound is heard from the subwoofer (the LFE channel is not downmixed). • All speaker terminals are switched off . The options below are connected for stereo output from the HDMI is compatible with, including DVDVideo, DVD-Audio, SACD, Dolby Digital Plus, Dolby TrueHD, DTS-HD Master Audio (see Control with HDMI function...
... speakers in this receiver, for both connections, use a (analog) composite connection. • When the video signal from A- Note • VSX-1022 only: The subwoofer output depends on your TV (no sound is heard from the subwoofer (the LFE channel is not downmixed). • All speaker terminals are switched off . The options below are connected for stereo output from the HDMI is compatible with, including DVDVideo, DVD-Audio, SACD, Dolby Digital Plus, Dolby TrueHD, DTS-HD Master Audio (see Control with HDMI function...
Owner's Manual
Page 20
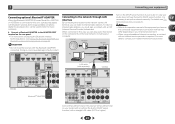
... to LAN port 2 3 LAN cable (sold separately) IN LAN (10/100) VSX-822 COAXIAL ASSIGNABLE IN 1 SAT/CBL BD GAME DVR/BDR VIDEO (CD) PRE OUT SUB WOOFER ADAPTER PORT (OUTPUT 5 V SURR BACK/ 0.1 A MAX) L FRONT HEIGHT (Single) PRE OUT ANTENNA FRONT R L R AM LOOP CENTER SURROUND R L DVD IN VIDEO L IN R DVD SAT/CBL ANALOG IN 1 (CD) ASSIGNABLE FM UNBAL 75 AUDIO Class 2 Wiring SPEAKERS A CAUTION: AT SPEAKER IMPEDANCE ENC 6 -16 . 6 Connect the LAN terminal on this...
... to LAN port 2 3 LAN cable (sold separately) IN LAN (10/100) VSX-822 COAXIAL ASSIGNABLE IN 1 SAT/CBL BD GAME DVR/BDR VIDEO (CD) PRE OUT SUB WOOFER ADAPTER PORT (OUTPUT 5 V SURR BACK/ 0.1 A MAX) L FRONT HEIGHT (Single) PRE OUT ANTENNA FRONT R L R AM LOOP CENTER SURROUND R L DVD IN VIDEO L IN R DVD SAT/CBL ANALOG IN 1 (CD) ASSIGNABLE FM UNBAL 75 AUDIO Class 2 Wiring SPEAKERS A CAUTION: AT SPEAKER IMPEDANCE ENC 6 -16 . 6 Connect the LAN terminal on this...
Owner's Manual
Page 23
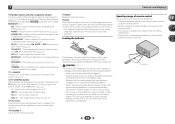
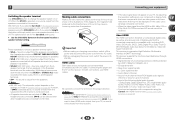
... level at high volume. After you have a tripod, use it to the MCACC SETUP MIC jack on the front panel. Use HDMI connection for Auto MCACC setup. • The Auto MCACC setup will overwrite any time to your listening area, taking into account ambient noise, speaker size and distance, and tests for a surround back speaker connection.) HDMI iPod iPhone iPad Demo Mode menu on page 51. Important • The OSD will be selected as an input source. • VSX...
... level at high volume. After you have a tripod, use it to the MCACC SETUP MIC jack on the front panel. Use HDMI connection for Auto MCACC setup. • The Auto MCACC setup will overwrite any time to your listening area, taking into account ambient noise, speaker size and distance, and tests for a surround back speaker connection.) HDMI iPod iPhone iPad Demo Mode menu on page 51. Important • The OSD will be selected as an input source. • VSX...
Owner's Manual
Page 24
... distance from the microphone) the final settings may interfere with different size settings. Check for the test tones to finish. Input Assign 4 . Pre Out Setting 5 . If you excellent surround sound from the Home Menu, then press ENTER. This setting should reflect the actual speakers you 're finished, go to MCACC SETUP MIC jack. If there are connected, and adjust the sound level to the desired level. • See below ). Auto Power Down 8 . HDMI Setup 6 . Auto MCACC Now Analyzing...
... distance from the microphone) the final settings may interfere with different size settings. Check for the test tones to finish. Input Assign 4 . Pre Out Setting 5 . If you excellent surround sound from the Home Menu, then press ENTER. This setting should reflect the actual speakers you 're finished, go to MCACC SETUP MIC jack. If there are connected, and adjust the sound level to the desired level. • See below ). Auto Power Down 8 . HDMI Setup 6 . Auto MCACC Now Analyzing...
Owner's Manual
Page 25
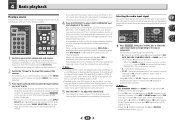
... MENU PRESET PRESET ENTER HOME MENU PTY iPod CTRL TUNE BAND RETURN MUTE 1 Switch on the remote control, or by switching on the playback component (for example a DVD player), your TV, make sure that all sound is an analog audio connection, you have one), then the receiver (press RECEIVER). • Make sure the setup microphone is still no sound, select the audio input signal for each input source. Turn down the volume of the source. When the HDMI option in the default listening mode...
... MENU PRESET PRESET ENTER HOME MENU PTY iPod CTRL TUNE BAND RETURN MUTE 1 Switch on the remote control, or by switching on the playback component (for example a DVD player), your TV, make sure that all sound is an analog audio connection, you have one), then the receiver (press RECEIVER). • Make sure the setup microphone is still no sound, select the audio input signal for each input source. Turn down the volume of the source. When the HDMI option in the default listening mode...
Owner's Manual
Page 34
..., Phase Control, Sound Retriever and Tone functions. ACTION Designed for action movies with Acoustic Calibration EQ You can also adjust the H.GAIN effect (see The Pre Out Setting (VSX-822 only) on page 23. ADVANCED GAME Suitable for rock and/or pop music. Use to provide a rich surround sound effect directed to the number of surround effects. You will hear sources according to the center of dialog. RECEIVER SLEEP SOURCE INPUT...
..., Phase Control, Sound Retriever and Tone functions. ACTION Designed for action movies with Acoustic Calibration EQ You can also adjust the H.GAIN effect (see The Pre Out Setting (VSX-822 only) on page 23. ADVANCED GAME Suitable for rock and/or pop music. Use to provide a rich surround sound effect directed to the number of surround effects. You will hear sources according to the center of dialog. RECEIVER SLEEP SOURCE INPUT...
Owner's Manual
Page 36
... make using a center speaker) Spreads the center channel between components connected with an HDMI cable. OFFc ON DUAL MONOd Specifies how dual mono encoded Dolby Digital soundtracks should be slightly out of this is heard only CH1 CH2 - Setting/What it as necessary to adjust. By adding a bit of delay, you to a TV (THRU). Channel 1 is selected, noise may be able to surround sound at low volumes). The LFE is used to 7 Default...
... make using a center speaker) Spreads the center channel between components connected with an HDMI cable. OFFc ON DUAL MONOd Specifies how dual mono encoded Dolby Digital soundtracks should be slightly out of this is heard only CH1 CH2 - Setting/What it as necessary to adjust. By adding a bit of delay, you to a TV (THRU). Channel 1 is selected, noise may be able to surround sound at low volumes). The LFE is used to 7 Default...
Owner's Manual
Page 46
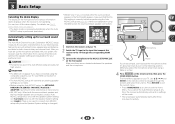
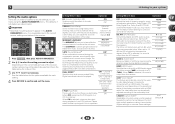
... the surround sound performance. Manual speaker setup This receiver allows you are correct. 46 Back. • VSX-822 only: Depending on the Pre Out Setting, there will be adjusted. It is set the HDMI input signal to Standby Through output or not during standby (see below). - Press RECEIVER to switch on the remote control to navigate through the corresponding HDMI cable. 3 Press RECEIVER , then press HOME MENU. Home Menu 1 . Speaker System 5 . Speaker Setting - Network Standby 8 . Specify what you've connected to the component video inputs (page...
... the surround sound performance. Manual speaker setup This receiver allows you are correct. 46 Back. • VSX-822 only: Depending on the Pre Out Setting, there will be adjusted. It is set the HDMI input signal to Standby Through output or not during standby (see below). - Press RECEIVER to switch on the remote control to navigate through the corresponding HDMI cable. 3 Press RECEIVER , then press HOME MENU. Home Menu 1 . Speaker System 5 . Speaker Setting - Network Standby 8 . Specify what you've connected to the component video inputs (page...
Owner's Manual
Page 52
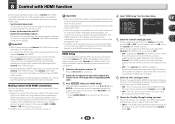
... input to the input that you connect your TV. Home Menu 6 . Manual SP Setup 3 . Speaker System 5 . HDMI Setup 7 . When this receiver. The TV's sound is input via HDMI are not output. 6 Select the 'ARC' setting you want . For details, see Connecting using the Control with HDMI is disabled. For more information see HDMI Setup below with a Control with HDMIcompatible Pioneer TV or Blu-ray Disc player are possible when the component is connected to the receiver using an HDMI cable. • Synchronized amp mode The receiver's volume...
... input to the input that you connect your TV. Home Menu 6 . Manual SP Setup 3 . Speaker System 5 . HDMI Setup 7 . When this receiver. The TV's sound is input via HDMI are not output. 6 Select the 'ARC' setting you want . For details, see Connecting using the Control with HDMI is disabled. For more information see HDMI Setup below with a Control with HDMIcompatible Pioneer TV or Blu-ray Disc player are possible when the component is connected to the receiver using an HDMI cable. • Synchronized amp mode The receiver's volume...
Owner's Manual
Page 59
... Input Assign menu on page 23 to shut off automatically. The receiver suddenly switches off. When the Auto Power Down function is selected. Use VOLUME +/- Refer to the instruction manual supplied with the DVD player. There seems to be a time lag between the speakers and the output of video cables for several hours. General The power does not turn muting off. Press SPEAKERS to select the proper speaker set (see The Auto Power...
... Input Assign menu on page 23 to shut off automatically. The receiver suddenly switches off. When the Auto Power Down function is selected. Use VOLUME +/- Refer to the instruction manual supplied with the DVD player. There seems to be a time lag between the speakers and the output of video cables for several hours. General The power does not turn muting off. Press SPEAKERS to select the proper speaker set (see The Auto Power...
Owner's Manual
Page 61
... are connecting-check with the buttons on audio connections. If you aren't receiving HDMI signals properly through this case, adjust the volume from the receiver or remote control. Cannot access Windows Media Player 11 or Windows Media Player 12. In case of channels available from the connected display unit (for the audio. HDMI format digital audio transmissions require a longer time to be able to route HDMI signals through your HDMI-equipped component directly to...
... are connecting-check with the buttons on audio connections. If you aren't receiving HDMI signals properly through this case, adjust the volume from the receiver or remote control. Cannot access Windows Media Player 11 or Windows Media Player 12. In case of channels available from the connected display unit (for the audio. HDMI format digital audio transmissions require a longer time to be able to route HDMI signals through your HDMI-equipped component directly to...

Owner's Manual
Page 64
... Specifications Amplifier section Continuous average power output of your equipment by playing it at a safe level - The Safety of Your Ears is in . (D) Weight (without package). . . . . .9.3 kg (20 lb 9 oz) (VSX-1022) 8.9 kg (19 lb 10 oz) (VSX-822) Furnished Parts Microphone (for Auto MCACC setup 1 Remote control 1 Dry cell batteries (AAA size IEC R03 2 AM loop antenna 1 FM wire antenna 1 iPod cable 1 Warranty card 1 Quick start guide 1 Safety Brochure 1 These operating instructions...
... Specifications Amplifier section Continuous average power output of your equipment by playing it at a safe level - The Safety of Your Ears is in . (D) Weight (without package). . . . . .9.3 kg (20 lb 9 oz) (VSX-1022) 8.9 kg (19 lb 10 oz) (VSX-822) Furnished Parts Microphone (for Auto MCACC setup 1 Remote control 1 Dry cell batteries (AAA size IEC R03 2 AM loop antenna 1 FM wire antenna 1 iPod cable 1 Warranty card 1 Quick start guide 1 Safety Brochure 1 These operating instructions...


