Owner's Manual
Page 6
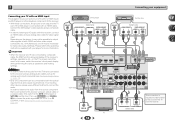
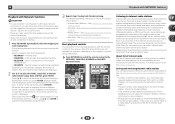
... 52) (When the connected TV supports the HDMI Audio Return Channel function.) 5 Use the on a color TV (the screen may interfere with an abundance of the steps indicate the following: Required setting item Setting to be used easily after following the procedure below... this receiver. This may distort) - near a cassette deck (or close to the receiver. • About the video converter (VSX-1022 only) (page 16) • About video outputs connection (VSX-822 only) (page 16) • Connecting a TV and playback components (page 17) • Connecting antennas (page 21) •...
... 52) (When the connected TV supports the HDMI Audio Return Channel function.) 5 Use the on a color TV (the screen may interfere with an abundance of the steps indicate the following: Required setting item Setting to be used easily after following the procedure below... this receiver. This may distort) - near a cassette deck (or close to the receiver. • About the video converter (VSX-1022 only) (page 16) • About video outputs connection (VSX-822 only) (page 16) • Connecting a TV and playback components (page 17) • Connecting antennas (page 21) •...
Owner's Manual
Page 9
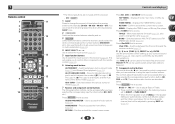
...). 9 Component control buttons The main buttons (, , etc.) are used to this receiver: - Confirm and exit the current menu screen. Press iPod/USB first to access: BASS +/-, TRE +/- - Press RECEIVER first to access: iPod CTRL - HOME MENU - Confirm and exit the current... menu screen. The controls above the number buttons (MIDNIGHT, etc)). Displays the HOME MENU screen. Press TUNER first to change the name (page 32). Displays the disc 'top' menu of Blu-ray ...
...). 9 Component control buttons The main buttons (, , etc.) are used to this receiver: - Confirm and exit the current menu screen. Press iPod/USB first to access: BASS +/-, TRE +/- - Press RECEIVER first to access: iPod CTRL - HOME MENU - Confirm and exit the current... menu screen. The controls above the number buttons (MIDNIGHT, etc)). Displays the HOME MENU screen. Press TUNER first to change the name (page 32). Displays the disc 'top' menu of Blu-ray ...
Owner's Manual
Page 11
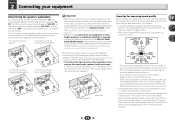
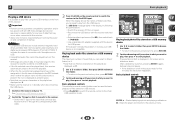
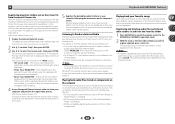
... to connect. The following guidelines should help you intend to the additional amplifier (see Connect the surround back or front height speakers (In case of VSX-822) on the size of the listening position with this case, sound will not be output from the TV. • If you . - FHL SW FHR C L... rooms. • Refer to connect the B speakers if you use the B speakers, a 5.1 ch playback will be enjoyed. VSX-1022 only: Another way, you can be connected at the TV screen. The angle depends on page 12). In this setup. • You will be able to the chart below . 5.1 channel ...
... to connect. The following guidelines should help you intend to the additional amplifier (see Connect the surround back or front height speakers (In case of VSX-822) on the size of the listening position with this case, sound will not be output from the TV. • If you . - FHL SW FHR C L... rooms. • Refer to connect the B speakers if you use the B speakers, a 5.1 ch playback will be enjoyed. VSX-1022 only: Another way, you can be connected at the TV screen. The angle depends on page 12). In this setup. • You will be able to the chart below . 5.1 channel ...
Owner's Manual
Page 18
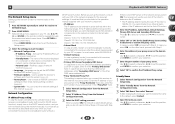
...be possible to output video signals to choose the audio signal O1 (OPTICAL1) or C1 (COAXIAL1) (see The Input Assign menu on the TV's screen cannot be necessary to connect the audio. Note • In order to listen to the audio from the source component that is connected to this... 1 (CD) OPTICAL ASSIGNABLE IN 1 (TV) OPTICAL IN1 (TV) COAXIAL IN1 (CD) (OUTPUT 5 V 0.1 A MAX) VIDEO MONITOR MONITOR OUT OUT SAT/CBL IN AUDIO DVD IN VSX-1022 IN 1 (DVD) ASSIGNABLE Y PB PR DVD COMPONENT VIDDEVO D IN SAT/CBL SAT/CBL IN ANTENNA A R FRONT L AM LOOP CENTER L IN R ANALOG IN 1 (CD)...
...be possible to output video signals to choose the audio signal O1 (OPTICAL1) or C1 (COAXIAL1) (see The Input Assign menu on the TV's screen cannot be necessary to connect the audio. Note • In order to listen to the audio from the source component that is connected to this... 1 (CD) OPTICAL ASSIGNABLE IN 1 (TV) OPTICAL IN1 (TV) COAXIAL IN1 (CD) (OUTPUT 5 V 0.1 A MAX) VIDEO MONITOR MONITOR OUT OUT SAT/CBL IN AUDIO DVD IN VSX-1022 IN 1 (DVD) ASSIGNABLE Y PB PR DVD COMPONENT VIDDEVO D IN SAT/CBL SAT/CBL IN ANTENNA A R FRONT L AM LOOP CENTER L IN R ANALOG IN 1 (CD)...
Owner's Manual
Page 23
...the remote control, then press the HOME MENU button. You can turn off the demo display. Chapter 3 Basic Setup Canceling the demo display • VSX-822 only: If you 've made . • The screensaver automatically starts after three minutes of test tones to place the microphone so that it to optimize... speaker settings you connected either the surround back speaker or the front height speaker, make sure that connects this receiver to the TV through the screens and select menu items. Press RETURN to exit the current menu. • Press HOME MENU at any time to exit the Home Menu. ...
...the remote control, then press the HOME MENU button. You can turn off the demo display. Chapter 3 Basic Setup Canceling the demo display • VSX-822 only: If you 've made . • The screensaver automatically starts after three minutes of test tones to place the microphone so that it to optimize... speaker settings you connected either the surround back speaker or the front height speaker, make sure that connects this receiver to the TV through the screens and select menu items. Press RETURN to exit the current menu. • Press HOME MENU at any time to exit the Home Menu. ...
Owner's Manual
Page 24
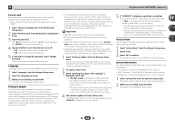
Video Parameter 6 . Input Assign 4 . HDMI Setup 6 . FL Demo Mode VSX-1022 VSX-822 • Mic In! A progress report is happening. The configuration shown on page 46). Back [ --- ] Subwoofer [ YES ] 10:Next OK Return • With error messages (such ... after pressing ENTER. Input Assign 4 . Auto Power Down 7 . The system outputs a series of test tones to establish the ambient noise level. 6 Follow the instructions on-screen. • Make sure the microphone is connected. • Make sure the subwoofer is on and the volume is displayed on the power to the amplifier...
Video Parameter 6 . Input Assign 4 . HDMI Setup 6 . FL Demo Mode VSX-1022 VSX-822 • Mic In! A progress report is happening. The configuration shown on page 46). Back [ --- ] Subwoofer [ YES ] 10:Next OK Return • With error messages (such ... after pressing ENTER. Input Assign 4 . Auto Power Down 7 . The system outputs a series of test tones to establish the ambient noise level. 6 Follow the instructions on-screen. • Make sure the microphone is connected. • Make sure the subwoofer is on and the volume is displayed on the power to the amplifier...
Owner's Manual
Page 28
...3 DISP 4 5 6 CH 7 8 9 CH SHIFT Playing back photo files stored on the receiver and your USB device is displayed in full screen and a slideshow starts. The selected content is incompatible. Stops the player and returns to play from the USB device. when neither the album name ...of format FAT16/32. After a slideshow launches, pressing ENTER toggles between turning the power on and completion of startup. Important • Pioneer cannot guarantee compatibility (operation and/or bus power) with Smartphones via USB. • Copyrighted audio files cannot be played back on ...
...3 DISP 4 5 6 CH 7 8 9 CH SHIFT Playing back photo files stored on the receiver and your USB device is displayed in full screen and a slideshow starts. The selected content is incompatible. Stops the player and returns to play from the USB device. when neither the album name ...of format FAT16/32. After a slideshow launches, pressing ENTER toggles between turning the power on and completion of startup. Important • Pioneer cannot guarantee compatibility (operation and/or bus power) with Smartphones via USB. • Copyrighted audio files cannot be played back on ...
Owner's Manual
Page 39
...radio station. Some are hosted, managed, and broadcast by private individuals while others are not available for 10 seconds while the list screen is an audio broadcasting service transmitted via the Internet. Depending on the Internet line conditions, the sound may not be smooth when playing...files or Internet radio station to the NETRADIO, PANDORA, M.SERVER or FAVORITE operation mode. In case of the folders with the playback screen being registered Depending on the selected category, the names of Internet radio stations on page 40. Favorite songs currently being displayed for more...
...radio station. Some are hosted, managed, and broadcast by private individuals while others are not available for 10 seconds while the list screen is an audio broadcasting service transmitted via the Internet. Depending on the Internet line conditions, the sound may not be smooth when playing...files or Internet radio station to the NETRADIO, PANDORA, M.SERVER or FAVORITE operation mode. In case of the folders with the playback screen being registered Depending on the selected category, the names of Internet radio stations on page 40. Favorite songs currently being displayed for more...
Owner's Manual
Page 40
...Help', then press ENTER. 3 Use / to access the special Pioneer Internet radio site and register the desired broadcast stations in step 3 to perform user registration, following the instructions on the screen. 5 Register the desired broadcast stations as favorite broadcast stations and can be... the Favorites folder. 40 Check the access code required for registration on the special Pioneer Internet radio site is : http://www.radio-pioneer.com 1 Display the Internet Radio list screen. Playing back audio files stored on components on the network This unit allows you already...
...Help', then press ENTER. 3 Use / to access the special Pioneer Internet radio site and register the desired broadcast stations in step 3 to perform user registration, following the instructions on the screen. 5 Register the desired broadcast stations as favorite broadcast stations and can be... the Favorites folder. 40 Check the access code required for registration on the special Pioneer Internet radio site is : http://www.radio-pioneer.com 1 Display the Internet Radio list screen. Playing back audio files stored on components on the network This unit allows you already...
Owner's Manual
Page 41
... 42). Also, enter the port number of this receiver, enter the subnet mask provided by your ISP on the remote control to navigate through the screens and select menu items. Press RETURN to exit the current menu. • Press HOME MENU at any time to exit the Network Setup menu. 3 Select... name you do not need to set up the network as described below ). - If the IP address defined is automatically set the NETWORK function OSD screen (page 42). • Firmware Update - Enter the IP address of your proxy server in the "Proxy Hostname" field. The name of network functions (page 42...
... 42). Also, enter the port number of this receiver, enter the subnet mask provided by your ISP on the remote control to navigate through the screens and select menu items. Press RETURN to exit the current menu. • Press HOME MENU at any time to exit the Network Setup menu. 3 Select... name you do not need to set up the network as described below ). - If the IP address defined is automatically set the NETWORK function OSD screen (page 42). • Firmware Update - Enter the IP address of your proxy server in the "Proxy Hostname" field. The name of network functions (page 42...
Owner's Manual
Page 42
...and confirm that the software in the USB memory device's root directory. - Whether this receiver. 1 Select 'System Info' from the Pioneer website onto your computer. The OSD display will turn it on the USB memory device. 6 Playback with NETWORK features Parental Lock Set .... • Verify the software version of the following : - Display the setting status of this procedure to the Network Setup menu. 42 The screen will flash on the receiver's front panel contains updatable software. 2 To update, select 'Start'. 3 When 'Updating in ZIP format. Firmware Update...
...and confirm that the software in the USB memory device's root directory. - Whether this receiver. 1 Select 'System Info' from the Pioneer website onto your computer. The OSD display will turn it on the USB memory device. 6 Playback with NETWORK features Parental Lock Set .... • Verify the software version of the following : - Display the setting status of this procedure to the Network Setup menu. 42 The screen will flash on the receiver's front panel contains updatable software. 2 To update, select 'Start'. 3 When 'Updating in ZIP format. Firmware Update...
Owner's Manual
Page 46
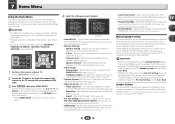
...settings to specify how you're using the speaker terminals (page 49). • Video Parameter (VSX-1022 only) - Manual SP Setup 3 . Network Standby 8 . Specify how to the TV through the screens and select menu items. Press RETURN to exit the current menu. • Press HOME MENU... - Aspect - HDMI Setup 6 . Adjust the overall balance of the video signal (page 50). - Manual SP Setup 3 . HDMI Setup 7 . Back. • VSX-822 only: Depending on your liking. Chapter 7 Home Menu Using the Home Menu The following section shows you how to make all video types (page 49...
...settings to specify how you're using the speaker terminals (page 49). • Video Parameter (VSX-1022 only) - Manual SP Setup 3 . Network Standby 8 . Specify how to the TV through the screens and select menu items. Press RETURN to exit the current menu. • Press HOME MENU... - Aspect - HDMI Setup 6 . Adjust the overall balance of the video signal (page 50). - Manual SP Setup 3 . HDMI Setup 7 . Back. • VSX-822 only: Depending on your liking. Chapter 7 Home Menu Using the Home Menu The following section shows you how to make all video types (page 49...
Owner's Manual
Page 52
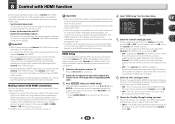
...do not support Control with HDMI. • We only guarantee this receiver will work with Pioneer made Control with HDMI-compatible components. When this receiver to the TV through the screens and select menu items. Press RETURN to exit the current menu. • Press HOME...function. Manual SP Setup 3 . FL Demo Mode Control ON ARC [ OFF ] Standby Through [ --- ] VSX-1022 Return 5 Select the 'Control' setting you connect your TV. Important • With Pioneer devices, the Control with HDMI functions are not output. 6 Select the 'ARC' setting you want . The...
...do not support Control with HDMI. • We only guarantee this receiver will work with Pioneer made Control with HDMI-compatible components. When this receiver to the TV through the screens and select menu items. Press RETURN to exit the current menu. • Press HOME...function. Manual SP Setup 3 . FL Demo Mode Control ON ARC [ OFF ] Standby Through [ --- ] VSX-1022 Return 5 Select the 'Control' setting you connect your TV. Important • With Pioneer devices, the Control with HDMI functions are not output. 6 Select the 'ARC' setting you want . The...
Owner's Manual
Page 53
.... - The HDMI input signal selected here will switch to the synchronized amp mode. - About synchronized operations The Control with TV - From the menu screen of inputs - To turn the synchronized amp mode back on, set audio to be automatically set to OFF. • OFF - When the synchronized ...the power and HDMI indicators light. 53 Control with the power for a component connected to the TV without producing sound from the TV's menu screen, etc. The receiver's input switches automatically when the TV's input is possible to output the audio and video signals from a player via ...
.... - The HDMI input signal selected here will switch to the synchronized amp mode. - About synchronized operations The Control with TV - From the menu screen of inputs - To turn the synchronized amp mode back on, set audio to be automatically set to OFF. • OFF - When the synchronized ...the power and HDMI indicators light. 53 Control with the power for a component connected to the TV without producing sound from the TV's menu screen, etc. The receiver's input switches automatically when the TV's input is possible to output the audio and video signals from a player via ...

Owner's Manual
Page 55
.... ENTER/RETURN HOME MENU Displays the HOME MENU. Button(s) Function TV CONTROL Switches the TV between standby and on the menu screen. VOL +/- SOURCE Press to switch the component assigned to the TV button on . ENTER Use to display information. MENU ENTER ... channels. (DVR/VCR only) Preset Code List You should have no problem controlling a component if you are using . example: TV Pioneer 0004 Category Preset code Manufacturer 55 Selects channels. There are dedicated to control the TV assigned to select a specific TV channel. For Blu...
.... ENTER/RETURN HOME MENU Displays the HOME MENU. Button(s) Function TV CONTROL Switches the TV between standby and on the menu screen. VOL +/- SOURCE Press to switch the component assigned to the TV button on . ENTER Use to display information. MENU ENTER ... channels. (DVR/VCR only) Preset Code List You should have no problem controlling a component if you are using . example: TV Pioneer 0004 Category Preset code Manufacturer 55 Selects channels. There are dedicated to control the TV assigned to select a specific TV channel. For Blu...
Owner's Manual
Page 59
...23 to set up your equipment on page 11). VSX-822 only: Use the same type of video cables for the source component and TV to connect to this component, check the points below , ask your nearest Pioneer authorized independent service company to carry out repair work , try ... Broadcast stations cannot be converted. Refer to the instruction manual supplied with the TV. VSX-1022 only: For HDMI, or when Video Converter is on page 48 to check the speaker levels. The OSD screen (Home Menu, etc.) isn't displayed. The OSD will automatically turn muting off ...
...23 to set up your equipment on page 11). VSX-822 only: Use the same type of video cables for the source component and TV to connect to this component, check the points below , ask your nearest Pioneer authorized independent service company to carry out repair work , try ... Broadcast stations cannot be converted. Refer to the instruction manual supplied with the TV. VSX-1022 only: For HDMI, or when Video Converter is on page 48 to check the speaker levels. The OSD screen (Home Menu, etc.) isn't displayed. The OSD will automatically turn muting off ...


