Owner's Manual
Page 4
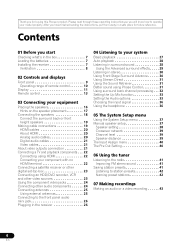
... 7 Loading the batteries 7 Installing the receiver 7 Ventilation 8 02 Controls and displays Front panel 9 Operating range of remote control 10 Display 11 Remote control 13 03 Connecting your equipment Placing the speakers 16 Hints on the speaker placement 17 Connecting the speakers 18 Connect the... Listening in surround sound 28 Using the Advanced surround effects . . . . . 29 Listening in a safe place for buying this Pioneer product. Please read through these operating instructions so you will know how to station presets 42 Naming preset stations 42 07 Making recordings Making...
... 7 Loading the batteries 7 Installing the receiver 7 Ventilation 8 02 Controls and displays Front panel 9 Operating range of remote control 10 Display 11 Remote control 13 03 Connecting your equipment Placing the speakers 16 Hints on the speaker placement 17 Connecting the speakers 18 Connect the... Listening in surround sound 28 Using the Advanced surround effects . . . . . 29 Listening in a safe place for buying this Pioneer product. Please read through these operating instructions so you will know how to station presets 42 Naming preset stations 42 07 Making recordings Making...
Owner's Manual
Page 7
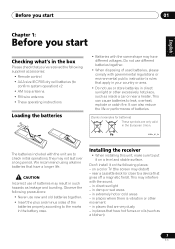
...;ol English Deutsch Français Italiano Nederlands Español Before you start 01 Chapter 1: Before you 've received the following supplied accessories: • Remote control • AAA size IEC R03 dry cell batteries (to leak, overheat, explode or catch fire. CAUTION Incorrect use of used batteries, please comply with...
...;ol English Deutsch Français Italiano Nederlands Español Before you start 01 Chapter 1: Before you 've received the following supplied accessories: • Remote control • AAA size IEC R03 dry cell batteries (to leak, overheat, explode or catch fire. CAUTION Incorrect use of used batteries, please comply with...
Owner's Manual
Page 9
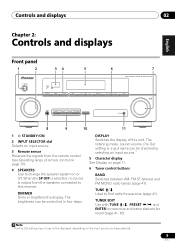
...5 6 7 AUDIO/ VIDEO MULTI- When the SP OFF is selected, no sound is output from the remote control (see Operating range of this receiver. DISPLAY Switches the display of remote control on page 10). 4 SPEAKERS Use to this unit. The listening mode, sound volume, Pre Out ...41). DIMMER Dims or brightens the display. Note 1 The Pre Out setting may or may not be controlled in four steps. CHANNEL RECEIVER VSX-520 TUNE TUNER EDIT PRESET ENTER MASTER VOLUME PHONES AUTO/DIRECT LISTENING MODE STEREO/ALC STANDARD ADV SURROUND SOUND RETRIEVER PORTABLE 8 9 10 11 1 ...
...5 6 7 AUDIO/ VIDEO MULTI- When the SP OFF is selected, no sound is output from the remote control (see Operating range of this receiver. DISPLAY Switches the display of remote control on page 10). 4 SPEAKERS Use to this unit. The listening mode, sound volume, Pre Out ...41). DIMMER Dims or brightens the display. Note 1 The Pre Out setting may or may not be controlled in four steps. CHANNEL RECEIVER VSX-520 TUNE TUNER EDIT PRESET ENTER MASTER VOLUME PHONES AUTO/DIRECT LISTENING MODE STEREO/ALC STANDARD ADV SURROUND SOUND RETRIEVER PORTABLE 8 9 10 11 1 ...
Owner's Manual
Page 10
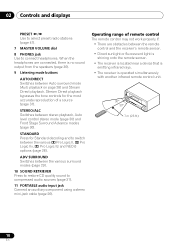
... may not work properly if: • There are connected, there is operated simultaneously with another infrared remote control unit. 30° 30° 7 m (23 ft.) 10 En ADV SURROUND Switches between the various 2 Pro Logic II, 2 Pro Logic IIx, 2 Pro ...surround mode (Auto playback on page 28) and Stream Direct playback. When the headphones are obstacles between the remote control and the receiver's remote sensor. • Direct sunlight or fluorescent light is shining onto the remote sensor. • The receiver is located near a device that is emitting infrared rays. • The receiver...
... may not work properly if: • There are connected, there is operated simultaneously with another infrared remote control unit. 30° 30° 7 m (23 ft.) 10 En ADV SURROUND Switches between the various 2 Pro Logic II, 2 Pro Logic IIx, 2 Pro ...surround mode (Auto playback on page 28) and Stream Direct playback. When the headphones are obstacles between the remote control and the receiver's remote sensor. • Direct sunlight or fluorescent light is shining onto the remote sensor. • The receiver is located near a device that is emitting infrared rays. • The receiver...
Owner's Manual
Page 13
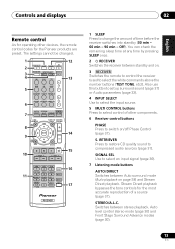
... 7 8 DIMMER CLR 0 +10 LEV 9 LEV ENTER CH SHIFT 16 17 RECEIVER 1 SLEEP Press to change the amount of other devices, the remote control codes for the most accurate reproduction of a source (page 31). Off). STEREO/A.L.C. SIGNAL SEL Use to select control of time before the receiver ... AUTO/DIRECT Switches between standby and on page 28) and Stream Direct playback. S. Stream Direct playback bypasses the tone controls for the Pioneer products are preset. You can check the remaining sleep time at any time by pressing SLEEP once. 2 RECEIVER Switches the receiver...
... 7 8 DIMMER CLR 0 +10 LEV 9 LEV ENTER CH SHIFT 16 17 RECEIVER 1 SLEEP Press to change the amount of other devices, the remote control codes for the most accurate reproduction of a source (page 31). Off). STEREO/A.L.C. SIGNAL SEL Use to select control of time before the receiver ... AUTO/DIRECT Switches between standby and on page 28) and Stream Direct playback. S. Stream Direct playback bypasses the tone controls for the Pioneer products are preset. You can check the remaining sleep time at any time by pressing SLEEP once. 2 RECEIVER Switches the receiver...
Owner's Manual
Page 15
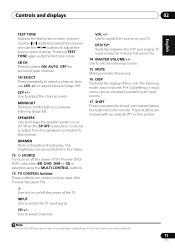
... to select a channel, then use the / buttons to select the channel and use LEV +/- VOL +/- These buttons are marked with Pioneer flat panel TVs. Use to this unit. Controls and displays 02 English Deutsch Français Italiano Nederlands Español TEST TONE Outputs...Note 1 The Pre Out setting may or may not be used with an asterisk (* ) in four steps. 12 SOURCE Turns on the remote. to select channels. DIMMER Dims or brightens the display. Use to adjust the level (page 39). The brightness can be controlled in this section. Use...
... to select a channel, then use the / buttons to select the channel and use LEV +/- VOL +/- These buttons are marked with Pioneer flat panel TVs. Use to this unit. Controls and displays 02 English Deutsch Français Italiano Nederlands Español TEST TONE Outputs...Note 1 The Pre Out setting may or may not be used with an asterisk (* ) in four steps. 12 SOURCE Turns on the remote. to select channels. DIMMER Dims or brightens the display. Use to adjust the level (page 39). The brightness can be controlled in this section. Use...
Owner's Manual
Page 26
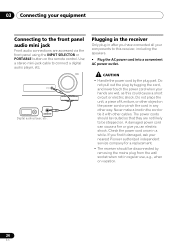
...this could cause a short circuit or electric shock. Plugging in the receiver Only plug in the cord or tie it damaged, ask your nearest Pioneer authorized independent service company for a replacement. • The receiver should be routed so that they are accessed via the front panel using the... INPUT SELECTOR or PORTABLE button on the remote control. The power cords should be disconnected by removing the mains plug from the wall socket when not in a while. CAUTION • Handle...
...this could cause a short circuit or electric shock. Plugging in the receiver Only plug in the cord or tie it damaged, ask your nearest Pioneer authorized independent service company for a replacement. • The receiver should be routed so that they are accessed via the front panel using the... INPUT SELECTOR or PORTABLE button on the remote control. The power cords should be disconnected by removing the mains plug from the wall socket when not in a while. CAUTION • Handle...

Owner's Manual
Page 27
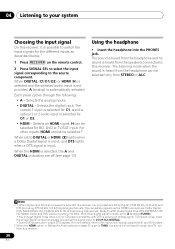
... to manually switch the input signal type press SIGNAL SEL (page 36). 3 • You may need to check the digital audio output settings on the remote control, INPUT SELECT, or the front panel INPUT SELECTOR dial.2 3 Press AUTO/DIRECT to select 'AUTO SURROUND' and start playback of the receiver. If you...
... to manually switch the input signal type press SIGNAL SEL (page 36). 3 • You may need to check the digital audio output settings on the remote control, INPUT SELECT, or the front panel INPUT SELECTOR dial.2 3 Press AUTO/DIRECT to select 'AUTO SURROUND' and start playback of the receiver. If you...
Owner's Manual
Page 33
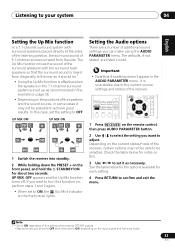
... not be possible to achieve good results. Check the table below for the options available for each setting. 4 Press RETURN to OFF. Depending on the remote control, then press AUDIO PARAMETER button. 2 Use / to select the setting you want to adjust. Note 1 • Set to ON regardless of this...
... not be possible to achieve good results. Check the table below for the options available for each setting. 4 Press RETURN to OFF. Depending on the remote control, then press AUDIO PARAMETER button. 2 Use / to select the setting you want to adjust. Note 1 • Set to ON regardless of this...
Owner's Manual
Page 36
... be selected only from STEREO or ALC. Each press cycles through your DVD player. 2 When the HDMI option in Setting the Audio options on the remote control. 2 Press SIGNAL SEL to select the input signal corresponding to the source component. The coaxial 1 input is selected for C1, and the optical 1 or...
... be selected only from STEREO or ALC. Each press cycles through your DVD player. 2 When the HDMI option in Setting the Audio options on the remote control. 2 Press SIGNAL SEL to select the input signal corresponding to the source component. The coaxial 1 input is selected for C1, and the optical 1 or...
Owner's Manual
Page 37
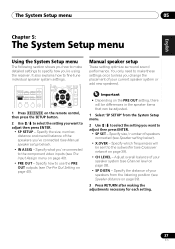
... to the component video inputs (see Channel level on page 40). • PRE OUT - Specify size / number of speakers connected (see Crossover network on the remote control, then press the SETUP button. 2 Use / to select the setting you want to adjust then press ENTER. • SP SET - You only...
... to the component video inputs (see Channel level on page 40). • PRE OUT - Specify size / number of speakers connected (see Crossover network on the remote control, then press the SETUP button. 2 Use / to select the setting you want to adjust then press ENTER. • SP SET - You only...
Owner's Manual
Page 39
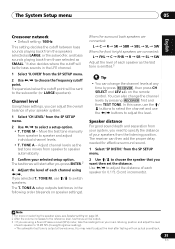
... level of each speaker (in the following order (depends on speaker settings). Note 1 For more on selecting the speaker sizes, see Speaker setting on the remote control. If you can then add the proper delay needed for bass sounds in the LFE channel. 1 Select 'X.OVER' from the SP SETUP menu. 2 Use...
... level of each speaker (in the following order (depends on speaker settings). Note 1 For more on selecting the speaker sizes, see Speaker setting on the remote control. If you can then add the proper delay needed for bass sounds in the LFE channel. 1 Select 'X.OVER' from the SP SETUP menu. 2 Use...
Owner's Manual
Page 42
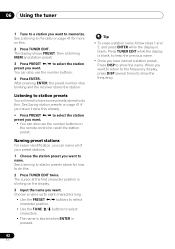
... to do this . Listening to station presets You will need to have named a station preset, Press DISP to memorize. See Saving station presets on the remote control to do this . 2 Press TUNER EDIT twice. See Listening to station presets above for more on the display. 3 Input the name you want. 06...
... to do this . Listening to station presets You will need to have named a station preset, Press DISP to memorize. See Saving station presets on the remote control to do this . 2 Press TUNER EDIT twice. See Listening to station presets above for more on the display. 3 Input the name you want. 06...
Owner's Manual
Page 44
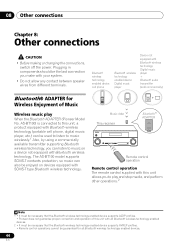
...other operations.2 Note 1 • It must be necessary that the Bluetooth wireless technology enabled device supports A2DP profiles. • Pioneer does not guarantee proper connection and operation of this unit, a product equipped with Bluetooth wireless technology (portable cell phone, digital music...174; ADAPTER for all Bluetooth wireless technology enabled devices. 44 En Music data This receiver Bluetooth® ADAPTER Remote control operation Remote control operation The remote control supplied with this unit allows you can be used to listen to music wirelessly.1 Also, by using...
...other operations.2 Note 1 • It must be necessary that the Bluetooth wireless technology enabled device supports A2DP profiles. • Pioneer does not guarantee proper connection and operation of this unit, a product equipped with Bluetooth wireless technology (portable cell phone, digital music...174; ADAPTER for all Bluetooth wireless technology enabled devices. 44 En Music data This receiver Bluetooth® ADAPTER Remote control operation Remote control operation The remote control supplied with this unit allows you can be used to listen to music wirelessly.1 Also, by using...

Owner's Manual
Page 45
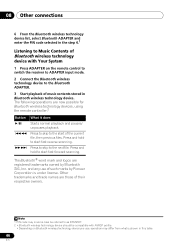
..., NO ADAPTER will be done with this case, perform the connection operation from 0000/ 1234/8888 using Bluetooth ADAPTER. In this system. 4 Switch on the remote control to switch the receiver to ADAPTER input mode.1 Pairing Bluetooth ADAPTER and Bluetooth wireless technology device "Pairing" must be done before you want to...
..., NO ADAPTER will be done with this case, perform the connection operation from 0000/ 1234/8888 using Bluetooth ADAPTER. In this system. 4 Switch on the remote control to switch the receiver to ADAPTER input mode.1 Pairing Bluetooth ADAPTER and Bluetooth wireless technology device "Pairing" must be done before you want to...
Owner's Manual
Page 46
... technology device to the next file. The Bluetooth® word mark and logos are now possible for Bluetooth wireless technology devices, using the remote controller.2 Button What it does / Starts normal playback and pauses/ unpauses playback. Press to skip to as ... 46 En and any use , operation may differ from what is under license. The following operations are registered trademarks owned by Pioneer Corporation is shown in some case be compatible with Your System 1 Press ADAPTER on Bluetooth wireless technology device you use of their ...
... technology device to the next file. The Bluetooth® word mark and logos are now possible for Bluetooth wireless technology devices, using the remote controller.2 Button What it does / Starts normal playback and pauses/ unpauses playback. Press to skip to as ... 46 En and any use , operation may differ from what is under license. The following operations are registered trademarks owned by Pioneer Corporation is shown in some case be compatible with Your System 1 Press ADAPTER on Bluetooth wireless technology device you use of their ...
Owner's Manual
Page 47
... on the TV monitor is connected correctly (refer to the instruction manual supplied with this component, check the points below , ask your nearest Pioneer authorized service center or your dealer to carry out repair work. • If the unit does not operate normally due to your nearest... Pioneer authorized service center or your equipment on page 16). • Press MUTE on the remote control to select the proper input signal (see Choosing the input signal on . • Disconnect the ...
... on the TV monitor is connected correctly (refer to the instruction manual supplied with this component, check the points below , ask your nearest Pioneer authorized service center or your dealer to carry out repair work. • If the unit does not operate normally due to your nearest... Pioneer authorized service center or your equipment on page 16). • Press MUTE on the remote control to select the proper input signal (see Choosing the input signal on . • Disconnect the ...
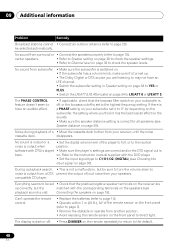
Owner's Manual
Page 48
... disappears. software with the DVD player. • Set the input signal type to noise is output from a DTS prevent the output of the remote sensor on the front panel (refer to page 7). • Remove the obstacle or operate from your subwoofer, set • Check that the ...lowpass filter switch on the remote repeatedly to return to the highest frequency setting. During a playback search, • This is not a malfunction, but the matched with the corresponding ...
... disappears. software with the DVD player. • Set the input signal type to noise is output from a DTS prevent the output of the remote sensor on the front panel (refer to page 7). • Remove the obstacle or operate from your subwoofer, set • Check that the ...lowpass filter switch on the remote repeatedly to return to the highest frequency setting. During a playback search, • This is not a malfunction, but the matched with the corresponding ...
Owner's Manual
Page 52
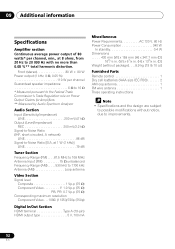
... standby 0.4 W Dimensions . . . . . 420 mm (W) x 158 mm (H) x 347.7 mm (D) 169/16 in. (W) x 61/4 in. (H) x 133/4 in. (D) Weight (without package) . . . .8.9 kg (19 lb 10 oz) Furnished Parts Remote control 1 Dry cell batteries (AAA size IEC R03 2 AM loop antenna 1 FM wire antenna 1 These operating instructions Note • Specifications and the design are subject...
... standby 0.4 W Dimensions . . . . . 420 mm (W) x 158 mm (H) x 347.7 mm (D) 169/16 in. (W) x 61/4 in. (H) x 133/4 in. (D) Weight (without package) . . . .8.9 kg (19 lb 10 oz) Furnished Parts Remote control 1 Dry cell batteries (AAA size IEC R03 2 AM loop antenna 1 FM wire antenna 1 These operating instructions Note • Specifications and the design are subject...


