
Owner's Manual
Page 1
AUDIO/VIDEO MULTI-CHANNEL RECEIVER RECEPTEUR AUDIOVISUEL A VOIES MULTIPLES RECEPTOR MULTICANAL DE AUDIO/VÍDEO VSX-520 Register your product on http://www.pioneerelectronics.com (US) http://www.pioneerelectronics.ca (Canada) • Protect your new investment The... new product • Improve product development Your input helps us continue to design products that meet your needs. • Receive a free Pioneer newsletter Registered customers can opt in to receive a monthly newsletter. http://www.pioneerelectronics.com (US) http://www.pioneerelectronics.ca (Canada) Operating Instructions ...
AUDIO/VIDEO MULTI-CHANNEL RECEIVER RECEPTEUR AUDIOVISUEL A VOIES MULTIPLES RECEPTOR MULTICANAL DE AUDIO/VÍDEO VSX-520 Register your product on http://www.pioneerelectronics.com (US) http://www.pioneerelectronics.ca (Canada) • Protect your new investment The... new product • Improve product development Your input helps us continue to design products that meet your needs. • Receive a free Pioneer newsletter Registered customers can opt in to receive a monthly newsletter. http://www.pioneerelectronics.com (US) http://www.pioneerelectronics.ca (Canada) Operating Instructions ...
Owner's Manual
Page 4
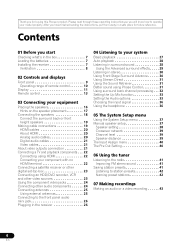
...the Audio options 33 Choosing the input signal 36 Using the headphone 36 05 The System Setup menu Using the System Setup menu 37 Manual speaker setup 37 Speaker setting 38 Crossover network 39 Channel level 39 Speaker distance 39 The Input Assign menu 40 The Pre Out ...playback 27 Auto playback 28 Listening in surround sound 28 Using the Advanced surround effects . . . . . 29 Listening in a safe place for buying this Pioneer product. After you have finished reading the instructions, put them away in stereo 30 Using Front Stage Surround Advance 30 Using Stream Direct 31 Using...
...the Audio options 33 Choosing the input signal 36 Using the headphone 36 05 The System Setup menu Using the System Setup menu 37 Manual speaker setup 37 Speaker setting 38 Crossover network 39 Channel level 39 Speaker distance 39 The Input Assign menu 40 The Pre Out ...playback 27 Auto playback 28 Listening in surround sound 28 Using the Advanced surround effects . . . . . 29 Listening in a safe place for buying this Pioneer product. After you have finished reading the instructions, put them away in stereo 30 Using Front Stage Surround Advance 30 Using Stream Direct 31 Using...
Owner's Manual
Page 6
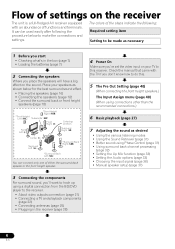
Check the manual that came with an abundance of functions and terminals. The colors of the steps indicate the following: Required setting item Setting to be used easily ... (page 32) • Setting the Up Mix function (page 33) • Setting the Audio options (page 33) • Choosing the input signal (page 36) • Manual speaker setup (page 37) 6 En
Check the manual that came with an abundance of functions and terminals. The colors of the steps indicate the following: Required setting item Setting to be used easily ... (page 32) • Setting the Up Mix function (page 33) • Setting the Audio options (page 33) • Choosing the input signal (page 36) • Manual speaker setup (page 37) 6 En
Owner's Manual
Page 24
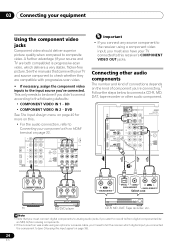
.... A further advantage (if your TV connected to this . • For the audio connection, refer to (see Choosing the input signal on page 22. See the manuals that you connected the component to Connecting your component with progressive-scan video. • If necessary, assign the component video inputs to the following defaults...
.... A further advantage (if your TV connected to this . • For the audio connection, refer to (see Choosing the input signal on page 22. See the manuals that you connected the component to Connecting your component with progressive-scan video. • If necessary, assign the component video inputs to the following defaults...

Owner's Manual
Page 27
... is set to a multichannel listening mode if you are the basic instructions for example a DVD player), your DVD player or source discs, you need to manually switch the input signal type press SIGNAL SEL (page 36). 3 • You may only get digital 2 channel stereo and analog sound. You can use the...
... is set to a multichannel listening mode if you are the basic instructions for example a DVD player), your DVD player or source discs, you need to manually switch the input signal type press SIGNAL SEL (page 36). 3 • You may only get digital 2 channel stereo and analog sound. You can use the...

Owner's Manual
Page 35
... to 2-channel sources in DOLBY PLIIz HEIGHT mode. b. e. If you find the automatically set delay time unsuitable, set to OFF and adjust the delay time manually. ON C.IMGh Adjust the center image to create a wider stereo effect with dual mono encoded Dolby Digital and DTS soundtracks. If set A.DLY to H, the...
... to 2-channel sources in DOLBY PLIIz HEIGHT mode. b. e. If you find the automatically set delay time unsuitable, set to OFF and adjust the delay time manually. ON C.IMGh Adjust the center image to create a wider stereo effect with dual mono encoded Dolby Digital and DTS soundtracks. If set A.DLY to H, the...
Owner's Manual
Page 36
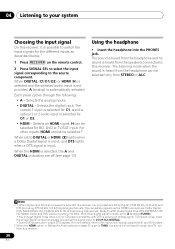
... into the PHONES jack. With other inputs, HDMI cannot be selected for BD, DVD or TV/SAT input. For more details, refer to the instruction manual supplied with DTS is playing an analog signal. Selects the analog inputs. • DIGITAL - Selects the digital input. When the HDMI is selected, the A and...
... into the PHONES jack. With other inputs, HDMI cannot be selected for BD, DVD or TV/SAT input. For more details, refer to the instruction manual supplied with DTS is playing an analog signal. Selects the analog inputs. • DIGITAL - Selects the digital input. When the HDMI is selected, the A and...
Owner's Manual
Page 37
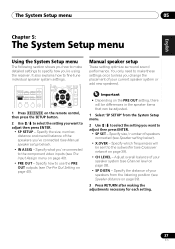
... Pre Out Setting on page 39). 3 Press RETURN after making the adjustments necessary for each setting. 37 En Specify size / number of speakers connected (see Manual speaker setup below ). • X.OVER - Specify what you 've connected (see Speaker setting below ). • IN ASSIG - Specify the size, number, distance and overall balance... which frequencies will be differences in the speaker items that can be sent to the subwoofer (see Channel level on page 39). • CH LEVEL - Manual speaker setup These setting optimize surround sound performance.
... Pre Out Setting on page 39). 3 Press RETURN after making the adjustments necessary for each setting. 37 En Specify size / number of speakers connected (see Manual speaker setup below ). • X.OVER - Specify what you 've connected (see Speaker setting below ). • IN ASSIG - Specify the size, number, distance and overall balance... which frequencies will be differences in the speaker items that can be sent to the subwoofer (see Channel level on page 39). • CH LEVEL - Manual speaker setup These setting optimize surround sound performance.
Owner's Manual
Page 39
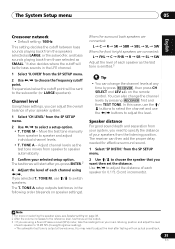
... emitted.3 Tip • You can change the channel levels by press RECEIVER , then press CH SELECT and LEV +/- on speaker settings). Move the test tone manually from the SP SETUP menu. 2 Use / to choose the frequency cutoff point. Speaker distance For good sound depth and separation from your speaker...
... emitted.3 Tip • You can change the channel levels by press RECEIVER , then press CH SELECT and LEV +/- on speaker settings). Move the test tone manually from the SP SETUP menu. 2 Use / to choose the frequency cutoff point. Speaker distance For good sound depth and separation from your speaker...
Owner's Manual
Page 41
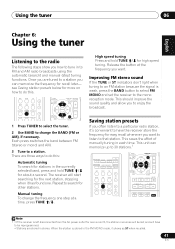
...;/ for high speed tuning. Repeat to do this . Release the button at a time, press TUNE /. This saves the effort of manually tuning in to that station. When the station is stored in the currently selected band, press and hold TUNE / for about a second. Once... you are tuned to a station you want to listen to FM and AM radio broadcasts using the automatic (search) and manual (step) tuning functions. Manual tuning To change the BAND (FM or AM), if necessary. Improving FM stereo sound If the TUNE or ST indicators don't light when...
...;/ for high speed tuning. Repeat to do this . Release the button at a time, press TUNE /. This saves the effort of manually tuning in to that station. When the station is stored in the currently selected band, press and hold TUNE / for about a second. Once... you are tuned to a station you want to listen to FM and AM radio broadcasts using the automatic (search) and manual (step) tuning functions. Manual tuning To change the BAND (FM or AM), if necessary. Improving FM stereo sound If the TUNE or ST indicators don't light when...

Owner's Manual
Page 43
... to do this ). 3 Prepare the source you want to record. into the recording device and set the audio recording level automatically-check the component's instruction manual if you are unsure how to use the same type of the source component. Note 1 If you 're unsure. 5 Start recording, then start playback of...
... to do this ). 3 Prepare the source you want to record. into the recording device and set the audio recording level automatically-check the component's instruction manual if you are unsure how to use the same type of the source component. Note 1 If you 're unsure. 5 Start recording, then start playback of...
Owner's Manual
Page 47
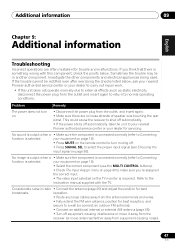
...This could cause the receiver to shut off automatically. • If the power shuts off automatically, take the unit to your nearest Pioneer authorized service center or your equipment on page 16). • Press MUTE on the remote control to turn on the TV monitor is... TV. No sound is output when a • Make sure the component is connected correctly (refer to the instruction manual supplied with this component, check the points below , ask your nearest Pioneer authorized service center or your equipment on page 16). • Select the correct component (use the MULTI CONTROL buttons...
...This could cause the receiver to shut off automatically. • If the power shuts off automatically, take the unit to your nearest Pioneer authorized service center or your equipment on page 16). • Press MUTE on the remote control to turn on the TV monitor is... TV. No sound is output when a • Make sure the component is connected correctly (refer to the instruction manual supplied with this component, check the points below , ask your nearest Pioneer authorized service center or your equipment on page 16). • Select the correct component (use the MULTI CONTROL buttons...
Owner's Manual
Page 48
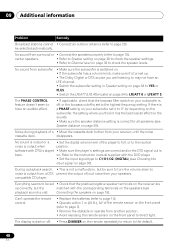
... sound from another position. • Avoid exposing the remote sensor on your receiver, until the noise cassette deck. compatible CD player. Refer to the instruction manual supplied with DTS is played • Make sure the player's settings are listening to the default. 48 En Noise during playback of loud noise from...
... sound from another position. • Avoid exposing the remote sensor on your receiver, until the noise cassette deck. compatible CD player. Refer to the instruction manual supplied with DTS is played • Make sure the player's settings are listening to the default. 48 En Noise during playback of loud noise from...
Owner's Manual
Page 50
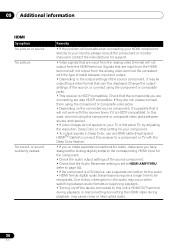
... on your TV or flat panel TV, try adjusting the resolution, Deep Color or other setting for your monitor, please consult the component or monitor manual or contact the manufacturer for audio, make sure you are connecting are input from the analog video terminal will not output from the HDMI terminal...
... on your TV or flat panel TV, try adjusting the resolution, Deep Color or other setting for your monitor, please consult the component or monitor manual or contact the manufacturer for audio, make sure you are connecting are input from the analog video terminal will not output from the HDMI terminal...

Owner's Manual
Page 158
...MAY VARY FROM STATE TO STATE. IN THE U.S.A. P.O. Following our response to an Authorized Service Company. Please refer to the owner's manual enclosed with the unit will be reached during the rental period or (b) retail sale, whichever occurs first. THIS WARRANTY DOES NOT APPLY ...POC in what time period, to obtain a prompt resolution. call Customer Support at 1-800-421-1404, or, in writing informing you and Pioneer, Pioneer makes available its Complaint Resolution Program to the representative, a resolution number will be new or rebuilt at 1-877-283-5901. After the ...
...MAY VARY FROM STATE TO STATE. IN THE U.S.A. P.O. Following our response to an Authorized Service Company. Please refer to the owner's manual enclosed with the unit will be reached during the rental period or (b) retail sale, whichever occurs first. THIS WARRANTY DOES NOT APPLY ...POC in what time period, to obtain a prompt resolution. call Customer Support at 1-800-421-1404, or, in writing informing you and Pioneer, Pioneer makes available its Complaint Resolution Program to the representative, a resolution number will be new or rebuilt at 1-877-283-5901. After the ...


