
Owner's Manual
Page 2
... with the instructions, may cause undesired operation. Cet appareil numérique de la Classe B est conforme à la norme NMB-003 du Canada. D8-10-2_En CAUTION: This product satisfies FCC regulations when shielded cables and connectors are designed to radio communications. Operation is subject to operate the equipment. Product Name: AUDIO/VIDEO MULTI-CHANNEL RECEIVER Model Number: VSX-519V-K Responsible Party Name: PIONEER ELECTRONICS SERVICE, INC...
... with the instructions, may cause undesired operation. Cet appareil numérique de la Classe B est conforme à la norme NMB-003 du Canada. D8-10-2_En CAUTION: This product satisfies FCC regulations when shielded cables and connectors are designed to radio communications. Operation is subject to operate the equipment. Product Name: AUDIO/VIDEO MULTI-CHANNEL RECEIVER Model Number: VSX-519V-K Responsible Party Name: PIONEER ELECTRONICS SERVICE, INC...

Owner's Manual
Page 3
... instructions. 5) Do not use this apparatus during lightning storms or when unused for long periods of time. 14) Refer all servicing to qualified service personnel. WARNING To prevent a fire hazard, do not place any heat sources such as power-supply cord or plug is used for the unit, you will not completely shut off all power. P1-4-2-2_En CAUTION The STANDBY/ON switch...
... instructions. 5) Do not use this apparatus during lightning storms or when unused for long periods of time. 14) Refer all servicing to qualified service personnel. WARNING To prevent a fire hazard, do not place any heat sources such as power-supply cord or plug is used for the unit, you will not completely shut off all power. P1-4-2-2_En CAUTION The STANDBY/ON switch...
Owner's Manual
Page 4
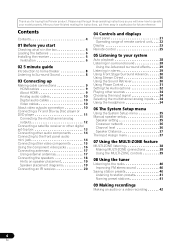
... receiver or other digital set-top box 13 Connecting other audio components 14 Connecting to the front panel audio mini jack 14 Connecting other sources 34 Choosing the input signal 34 Selecting the multichannel analog inputs . . . 34 Using the headphone 34 06 The System Setup menu Using the System Setup menu 35 Manual speaker setup 35 Speaker setting 35 Crossover network 36 Channel level 36 Speaker Distance 37 The Input Assign menu 37 07 Using the MULTI-ZONE feature MULTI-ZONE listening 38 Making MULTI-ZONE connections 38 Using the MULTI-ZONE controls 39 08 Using the tuner...
... receiver or other digital set-top box 13 Connecting other audio components 14 Connecting to the front panel audio mini jack 14 Connecting other sources 34 Choosing the input signal 34 Selecting the multichannel analog inputs . . . 34 Using the headphone 34 06 The System Setup menu Using the System Setup menu 35 Manual speaker setup 35 Speaker setting 35 Crossover network 36 Channel level 36 Speaker Distance 37 The Input Assign menu 37 07 Using the MULTI-ZONE feature MULTI-ZONE listening 38 Making MULTI-ZONE connections 38 Using the MULTI-ZONE controls 39 08 Using the tuner...
Owner's Manual
Page 8
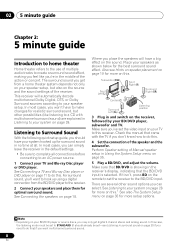
... power source. 1 Connect your BD/DVD player, subwoofer and TV. In most cases, you won't have your system hooked up using a digital connection from a home theater system depends not only on your system on page 28 for more on this . 4 Set the connection of the speaker and the subwoofer. Place your speaker setup. 02 5 minute guide Chapter 2: 5 minute guide Introduction to home theater Home theater refers to the use of multiple audio tracks to create a surround sound effect, making...
... power source. 1 Connect your BD/DVD player, subwoofer and TV. In most cases, you won't have your system hooked up using a digital connection from a home theater system depends not only on your system on page 28 for more on this . 4 Set the connection of the speaker and the subwoofer. Place your speaker setup. 02 5 minute guide Chapter 2: 5 minute guide Introduction to home theater Home theater refers to the use of multiple audio tracks to create a surround sound effect, making...
Owner's Manual
Page 9
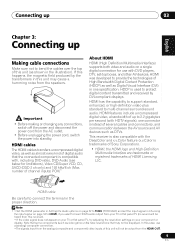
... displayed. In this case, use with , including DVD-video, DVD-Audio (see below for use a (analog) composite connection. • The signals input from this unit (as DTVs. Important • Before making or changing any connections, switch off the power and disconnect the power cord from the speakers. HDCP is compatible with DVD players, DTV, set the input signal in the illustration). HDMI was developed to multi-channel surround-sound audio. HDMI cables The HDMI cables transfers uncompressed digital video, as well as almost every kind of digital audio...
... displayed. In this case, use with , including DVD-video, DVD-Audio (see below for use a (analog) composite connection. • The signals input from this unit (as DTVs. Important • Before making or changing any connections, switch off the power and disconnect the power cord from the speakers. HDCP is compatible with DVD players, DTV, set the input signal in the illustration). HDMI was developed to multi-channel surround-sound audio. HDMI cables The HDMI cables transfers uncompressed digital video, as well as almost every kind of digital audio...

Owner's Manual
Page 12
...) AM LOOP COMPONENT VIDEO IN 1 (BD/DVD) ASSIGNABLE 1-2 CENTER OUTPUT RL SURROUND OUTPUT SUBWOOFER OUTPUT RL FRONT OUTPUT VIDEO OUTPUT DVD/multi-channel decoder with multi-channel analog output jacks Note 1 This connection will allow you can also connect an optical digital audio output from your BD/DVD player has multichannel analog outputs, see page 34). • You can connect them to the multi-channel analog outputs to the multi channel input. (The Input Assign menu on this receiver. See Using the component video jacks on page 16. 3 In this receiver. In this...
...) AM LOOP COMPONENT VIDEO IN 1 (BD/DVD) ASSIGNABLE 1-2 CENTER OUTPUT RL SURROUND OUTPUT SUBWOOFER OUTPUT RL FRONT OUTPUT VIDEO OUTPUT DVD/multi-channel decoder with multi-channel analog output jacks Note 1 This connection will allow you can also connect an optical digital audio output from your BD/DVD player has multichannel analog outputs, see page 34). • You can connect them to the multi-channel analog outputs to the multi channel input. (The Input Assign menu on this receiver. See Using the component video jacks on page 16. 3 In this receiver. In this...

Owner's Manual
Page 14
... a digital component. PRESET + MULTI-ZONE CONTROL ON/OFF ENTER MASTER VOLUME CD-R, MD, DAT, Tape recorder, etc. The example shows an optical connection to the DIGITAL OPTICAL IN 1 (CD-R/TAPE) input. 2 If necessary, connect the analog audio outputs of the component to connect a digital audio player, etc. Use a stereo mini-jack cable to a set of spare audio inputs on this to a digital input on the receiver. Note 1 Note that you must connect digital components to analog audio jacks if you want to the front panel audio mini jack Front audio connections...
... a digital component. PRESET + MULTI-ZONE CONTROL ON/OFF ENTER MASTER VOLUME CD-R, MD, DAT, Tape recorder, etc. The example shows an optical connection to the DIGITAL OPTICAL IN 1 (CD-R/TAPE) input. 2 If necessary, connect the analog audio outputs of the component to connect a digital audio player, etc. Use a stereo mini-jack cable to a set of spare audio inputs on this to a digital input on the receiver. Note 1 Note that you must connect digital components to analog audio jacks if you want to the front panel audio mini jack Front audio connections...
Owner's Manual
Page 18
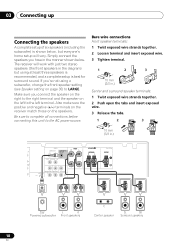
... open the tabs and insert exposed wire. 3 Release the tabs. 1 2 3 10 mm (3/8 in the diagram) but everyone's home setup will work with just two stereo speakers (the front speakers in .) AUDIO FRONT ZONE2 OUT SUBWOOFER R L IN R L PRE OUT L OUT DVR/VCR IN VIDEO R T IN L MONITOR OUT BD/DVD IN TV/SAT IN ANTENNA PR PB Y R FM OUT SPEAKERS A SURROUND R L Class 2 Wiring CENTER 18 En Simply connect the speakers you connect the speaker...
... open the tabs and insert exposed wire. 3 Release the tabs. 1 2 3 10 mm (3/8 in the diagram) but everyone's home setup will work with just two stereo speakers (the front speakers in .) AUDIO FRONT ZONE2 OUT SUBWOOFER R L IN R L PRE OUT L OUT DVR/VCR IN VIDEO R T IN L MONITOR OUT BD/DVD IN TV/SAT IN ANTENNA PR PB Y R FM OUT SPEAKERS A SURROUND R L Class 2 Wiring CENTER 18 En Simply connect the speakers you connect the speaker...

Owner's Manual
Page 20
... IN jack on the rear of this receiver. For more information on connecting the IR receiver, see the Installation Instructions for IR compatibility. • If using two remote controls (at the same time), the IR receiver's remote sensor takes priority over the remote sensor on the front panel of this receiver.1 1 Connect the IR receiver sensor to check for the IR Receiver. Note 1 • Remote operation may not be possible if direct light...
... IN jack on the rear of this receiver. For more information on connecting the IR receiver, see the Installation Instructions for IR compatibility. • If using two remote controls (at the same time), the IR receiver's remote sensor takes priority over the remote sensor on the front panel of this receiver.1 1 Connect the IR receiver sensor to check for the IR Receiver. Note 1 • Remote operation may not be possible if direct light...
Owner's Manual
Page 25
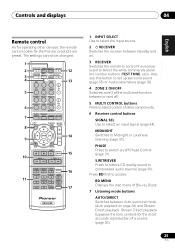
... 6 BD MENU AUTO/ STEREO/ 7 DIRECT A.L.C. Also use this button to set up surround sound (page 35) or Audio parameters (page 32). 4 ZONE 2 ON/OFF Switches zone 2 of the multi-zone function between standby and on and off Phase Control (page 31). Controls and displays 04 English Français Español PRESET Remote control As for operating other components. 6 Receiver control buttons SIGNAL SEL Use to select an input signal (page 34). STANDARD ADV SURR AUDIO TUNER EDIT MASTER PARAMETER TOOLS VOLUME 8 TOP MENU TUNE MENU PRESET 9 10 ENTER HOME MENU SETUP TUNE BASS...
... 6 BD MENU AUTO/ STEREO/ 7 DIRECT A.L.C. Also use this button to set up surround sound (page 35) or Audio parameters (page 32). 4 ZONE 2 ON/OFF Switches zone 2 of the multi-zone function between standby and on and off Phase Control (page 31). Controls and displays 04 English Français Español PRESET Remote control As for operating other components. 6 Receiver control buttons SIGNAL SEL Use to select an input signal (page 34). STANDARD ADV SURR AUDIO TUNER EDIT MASTER PARAMETER TOOLS VOLUME 8 TOP MENU TUNE MENU PRESET 9 10 ENTER HOME MENU SETUP TUNE BASS...

Owner's Manual
Page 26
... TEST TONE, etc.) HDD*, DVD*, VCR* These buttons switch between the hard disk, DVD and VCR controls for example BD, DVR or TV). 04 Controls and displays STEREO/A.L.C. Note 1 The tone controls are used to access: TOP MENU Displays the disc 'top' menu of Blu-ray Disc player. The controls above these buttons can be accessed after the RECEIVER button is set to control a component after you have selected the corresponding MULTI CONTROL button (BD, TV, etc.). HOME MENU Displays the HOME MENU screen. Press RECEIVER first to access: BASS -/+ Use to adjust...
... TEST TONE, etc.) HDD*, DVD*, VCR* These buttons switch between the hard disk, DVD and VCR controls for example BD, DVR or TV). 04 Controls and displays STEREO/A.L.C. Note 1 The tone controls are used to access: TOP MENU Displays the disc 'top' menu of Blu-ray Disc player. The controls above these buttons can be accessed after the RECEIVER button is set to control a component after you have selected the corresponding MULTI CONTROL button (BD, TV, etc.). HOME MENU Displays the HOME MENU screen. Press RECEIVER first to access: BASS -/+ Use to adjust...

Owner's Manual
Page 27
... sound volume can check the remaining sleep time at any time by selecting an input source. 17 SHIFT Press to select the TV input signal. Off). You can be used for operating ZONE 2 (page 39). 27 En INPUT Use to access the 'boxed' commands (above the buttons) on the remote. CH +/- Use to adjust the channel levels. Controls and displays 04 English Français Español TEST TONE Outputs the test tones on each channel. Use to adjust...
... sound volume can check the remaining sleep time at any time by selecting an input source. 17 SHIFT Press to select the TV input signal. Off). You can be used for operating ZONE 2 (page 39). 27 En INPUT Use to access the 'boxed' commands (above the buttons) on the remote. CH +/- Use to adjust the channel levels. Controls and displays 04 English Français Español TEST TONE Outputs the test tones on each channel. Use to adjust...

Owner's Manual
Page 31
... subwoofer has a phase control switch, set the cutoff frequency to a higher value. • If the speaker distance is on and we recommend leaving Phase Control switched on , this receiver can reproduce powerful bass sound without deteriorating the quality of the original sound (see illustration below ). P Front speaker H A S E C O N T R O L Sound O N source Subwoofer Listening position Phase Control technology provides coherent sound reproduction through the use of phase matching1 for all sound sources. When the MULTI IN input...
... subwoofer has a phase control switch, set the cutoff frequency to a higher value. • If the speaker distance is on and we recommend leaving Phase Control switched on , this receiver can reproduce powerful bass sound without deteriorating the quality of the original sound (see illustration below ). P Front speaker H A S E C O N T R O L Sound O N source Subwoofer Listening position Phase Control technology provides coherent sound reproduction through the use of phase matching1 for all sound sources. When the MULTI IN input...

Owner's Manual
Page 33
... the center channel between components connected with an HDMI cable. c. Only available with dual mono encoded Dolby Digital and DTS soundtracks. When OFF is selected, no sound is only available when the connected display supports the automatic audio/video synchronizing capability ('lip-sync') for a 'wraparound' effect. AMP THRU A.DLY This feature automatically corrects the audio-to-video delay OFF (Auto Delay) between the front right and left speakers, making the sound more distant (minus settings), or...
... the center channel between components connected with an HDMI cable. c. Only available with dual mono encoded Dolby Digital and DTS soundtracks. When OFF is selected, no sound is only available when the connected display supports the automatic audio/video synchronizing capability ('lip-sync') for a 'wraparound' effect. AMP THRU A.DLY This feature automatically corrects the audio-to-video delay OFF (Auto Delay) between the front right and left speakers, making the sound more distant (minus settings), or...

Owner's Manual
Page 34
...; HDMI - Selecting the multichannel analog inputs If you can't use any of the sound features/modes and only the volume and channel levels can be set to A (analog) (the MULTI IN or TUNER). • You may get digital noise when a LD or CD player compatible with multichannel analog outputs to this receiver, it is input. Using the headphone 1 Insert the headphone into the PHONE jack. 2 Press RECEIVER then press the SPEAKERS button to...
...; HDMI - Selecting the multichannel analog inputs If you can't use any of the sound features/modes and only the volume and channel levels can be set to A (analog) (the MULTI IN or TUNER). • You may get digital noise when a LD or CD player compatible with multichannel analog outputs to this receiver, it is input. Using the headphone 1 Insert the headphone into the PHONE jack. 2 Press RECEIVER then press the SPEAKERS button to...

Owner's Manual
Page 39
.... CHANNEL RECEIVER VSX-519V PHASE CONTROL BAND TUNE - Each press selects a MULTI-ZONE option: • ZONE 2 ON - Switches the MULTI-ZONE feature off The ZONE indicator lights when the MULTIZONE control has been switched ON. 2 Press CONTROL. • When the receiver is in standby. • Volume level cannot be tuned to select the input source directly CONTROL in the sub zone. ON/OFFa INPUT SELECT Use to adjust the volume. 39 En Therefore, changing the station in one station at a time. ADVANCED SURROUND STANDARD SURROUND PRESET - STANDBY/ON INPUT SELECTOR AUDIO/ VIDEO MULTI...
.... CHANNEL RECEIVER VSX-519V PHASE CONTROL BAND TUNE - Each press selects a MULTI-ZONE option: • ZONE 2 ON - Switches the MULTI-ZONE feature off The ZONE indicator lights when the MULTIZONE control has been switched ON. 2 Press CONTROL. • When the receiver is in standby. • Volume level cannot be tuned to select the input source directly CONTROL in the sub zone. ON/OFFa INPUT SELECT Use to adjust the volume. 39 En Therefore, changing the station in one station at a time. ADVANCED SURROUND STANDARD SURROUND PRESET - STANDBY/ON INPUT SELECTOR AUDIO/ VIDEO MULTI...
Owner's Manual
Page 43
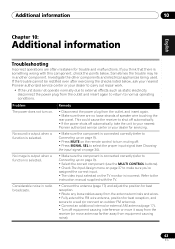
... FM wire antenna, position for servicing. • Make sure the component is connected correctly (refer to Connecting up on page 9). • Press MUTE on the remote control to normal operating conditions. Considerable noise in another component. This could cause the receiver to shut off automatically. • If the power shuts off automatically, take the unit to your nearest Pioneer authorized service center or your dealer to carry out repair work...
... FM wire antenna, position for servicing. • Make sure the component is connected correctly (refer to Connecting up on page 9). • Press MUTE on the remote control to normal operating conditions. Considerable noise in another component. This could cause the receiver to shut off automatically. • If the power shuts off automatically, take the unit to your nearest Pioneer authorized service center or your dealer to carry out repair work...

Owner's Manual
Page 44
... frequency audible effect. If there is a PHASE setting on the speakers (see sound is played back. • Set the digital volume level of a cassette deck. • Move the cassette deck further from another position. • Avoid exposing the remote sensor on page 33 to direct light. Refer to the instruction manual supplied with DTS is odd. During a playback search, noise is output from a DTS compatible CD player...
... frequency audible effect. If there is a PHASE setting on the speakers (see sound is played back. • Set the digital volume level of a cassette deck. • Move the cassette deck further from another position. • Avoid exposing the remote sensor on page 33 to direct light. Refer to the instruction manual supplied with DTS is odd. During a playback search, noise is output from a DTS compatible CD player...
Owner's Manual
Page 45
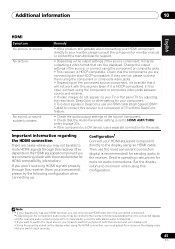
... example audio output is muted on the display when using an HDMI cable. Set the display volume to the display using the HDMI connection, you switch input sources. 45 En No picture. If you are not, please connect them using the component or composite jacks. • This receiver is HDCP-compatible). If they are connecting-check with the manufacturer for more on the connected source component, it's possible that it is HDCP-compatible. See the operating instructions for HDMI compatibility information). Change the output settings...
... example audio output is muted on the display when using an HDMI cable. Set the display volume to the display using the HDMI connection, you switch input sources. 45 En No picture. If you are not, please connect them using the component or composite jacks. • This receiver is HDCP-compatible). If they are connecting-check with the manufacturer for more on the connected source component, it's possible that it is HDCP-compatible. See the operating instructions for HDMI compatibility information). Change the output settings...

Owner's Manual
Page 46
... the power cord when your dealer for Amplifiers ** Measured by the plug. Specifications Amplifier section Continuous average power output of furniture, etc., on . Use the front panel controls to the Federal Trade Commission's Trade Regulation rule on Power Output Claims for a replacement. Do not place the unit, a piece of 80 watts* per channel Guaranteed speaker impedance 6 Ω to 16 Ω * Measured pursuant to do this. 1 Switch the receiver into standby...
... the power cord when your dealer for Amplifiers ** Measured by the plug. Specifications Amplifier section Continuous average power output of furniture, etc., on . Use the front panel controls to the Federal Trade Commission's Trade Regulation rule on Power Output Claims for a replacement. Do not place the unit, a piece of 80 watts* per channel Guaranteed speaker impedance 6 Ω to 16 Ω * Measured pursuant to do this. 1 Switch the receiver into standby...


