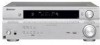
Owner's Manual
Page 2
... by qualified service personnel. Product Name: AUDIO/VIDEO MULTI-CHANNEL RECEIVER Model Number: VSX-517-K, VSX-517-S Responsible Party Name: PIONEER ELECTRONICS SERVICE INC. D1-4-2-1_En CAUTION - ATTENTION - If connected to radio communications. The equipment should be removed and appropriate one or more of after removal. THE SERIAL NUMBER FOR THIS EQUIPMENT IS LOCATED IN THE REAR. Increase the separation between the equipment and receiver. - D8-10-1-2_En This Class B digital apparatus...
... by qualified service personnel. Product Name: AUDIO/VIDEO MULTI-CHANNEL RECEIVER Model Number: VSX-517-K, VSX-517-S Responsible Party Name: PIONEER ELECTRONICS SERVICE INC. D1-4-2-1_En CAUTION - ATTENTION - If connected to radio communications. The equipment should be removed and appropriate one or more of after removal. THE SERIAL NUMBER FOR THIS EQUIPMENT IS LOCATED IN THE REAR. Increase the separation between the equipment and receiver. - D8-10-1-2_En This Class B digital apparatus...
Owner's Manual
Page 3
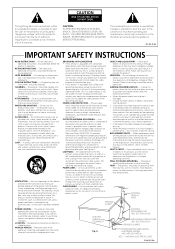
... attempt to service this indicates a need for a long period of power source indicated on a bed, sofa, rug, or other hazards. REPLACEMENT PARTS - FOLLOW INSTRUCTIONS - CLEANING - If you to provide some protection against them might be fatal. Article 810 of the National Electrical Code, ANSI/NFPA 70, provides information with regard to proper grounding of the mast and supporting structure, grounding...
... attempt to service this indicates a need for a long period of power source indicated on a bed, sofa, rug, or other hazards. REPLACEMENT PARTS - FOLLOW INSTRUCTIONS - CLEANING - If you to provide some protection against them might be fatal. Article 810 of the National Electrical Code, ANSI/NFPA 70, provides information with regard to proper grounding of the mast and supporting structure, grounding...
Owner's Manual
Page 4
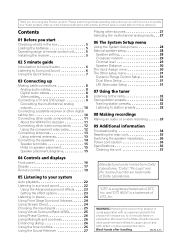
...operating instructions so you will expose you to chemicals listed on speaker placement 15 Speaker placement diagrams 15 Playing other reproductive harm. "DTS" is a trademark of remote control unit. . . . . . 5 Installing the receiver 5 02 5 minute guide Introduction to home theater 6 Listening to Surround Sound 6 Using the Quick Setup 7 03 Connecting up Making cable connections 8 Analog audio cables 8 Digital audio cables 8 Video cables 8 Connecting a TV and DVD player 9 Connecting the multichannel analog outputs 10 Connecting a satellite receiver or other digital set-top box...
...operating instructions so you will expose you to chemicals listed on speaker placement 15 Speaker placement diagrams 15 Playing other reproductive harm. "DTS" is a trademark of remote control unit. . . . . . 5 Installing the receiver 5 02 5 minute guide Introduction to home theater 6 Listening to Surround Sound 6 Using the Quick Setup 7 03 Connecting up Making cable connections 8 Analog audio cables 8 Digital audio cables 8 Video cables 8 Connecting a TV and DVD player 9 Connecting the multichannel analog outputs 10 Connecting a satellite receiver or other digital set-top box...
Owner's Manual
Page 6
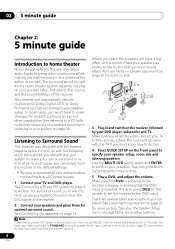
... hooked up using a digital connection from a home theater system depends not only on your speaker setup, but other sound options you don't know how to do this .1See also The System Setup menu on your TV to this receiver. See Connecting the speakers on page 15 for the best surround sound effect. 02 5 minute guide Chapter 2: 5 minute guide Introduction to home theater Home theater refers to the use of multiple audio tracks to create a surround sound effect, making...
... hooked up using a digital connection from a home theater system depends not only on your speaker setup, but other sound options you don't know how to do this .1See also The System Setup menu on your TV to this receiver. See Connecting the speakers on page 15 for the best surround sound effect. 02 5 minute guide Chapter 2: 5 minute guide Introduction to home theater Home theater refers to the use of multiple audio tracks to create a surround sound effect, making...
Owner's Manual
Page 7
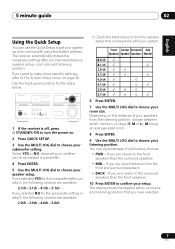
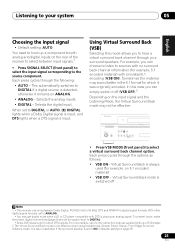
... position. PHASE CONTROL PHASE DIALOGUE AUTO SURR/ CONTROL ENHANCEMENT DIRECT DVD / LD DVD 5.1 TV / SAT DVR / VCR STANDBY/ON PHONES SOUND MIDNIGHT/ VSB RETRIEVER LOUDNESS MODE TONE SIGNAL SELECT DIMMER TUNER EDIT QUICK SETUP SETUP RETURN MULTI JOG ENTER VSX-517 MULTI JOG TUNING STATION STEREO/ ADVANCED F.S.SURR STANDARD SURROUND LISTENING MODE MASTER VOLUME DOWN UP 1 If the receiver is off, press STANDBY/ON to turn the power on. 2 Press QUICK SETUP. 3 Use the MULTI JOG dial to confirm your speaker setup. The display shows the speaker setup, room...
... position. PHASE CONTROL PHASE DIALOGUE AUTO SURR/ CONTROL ENHANCEMENT DIRECT DVD / LD DVD 5.1 TV / SAT DVR / VCR STANDBY/ON PHONES SOUND MIDNIGHT/ VSB RETRIEVER LOUDNESS MODE TONE SIGNAL SELECT DIMMER TUNER EDIT QUICK SETUP SETUP RETURN MULTI JOG ENTER VSX-517 MULTI JOG TUNING STATION STEREO/ ADVANCED F.S.SURR STANDARD SURROUND LISTENING MODE MASTER VOLUME DOWN UP 1 If the receiver is off, press STANDBY/ON to turn the power on. 2 Press QUICK SETUP. 3 Use the MULTI JOG dial to confirm your speaker setup. The display shows the speaker setup, room...
Owner's Manual
Page 9
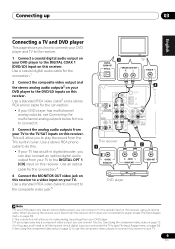
... you to make analog recordings from your DVD player. 3 If your player also has a component video output, you can also connect an optical digital audio output from your TV to connect it to the optical input on this too. Use a stereo RCA phono cable to do this. • If your TV. 9 En See Using the component video jacks on page 12. 4 In this case, you'll need to tell the receiver which digital input you connected the...
... you to make analog recordings from your DVD player. 3 If your player also has a component video output, you can also connect an optical digital audio output from your TV to connect it to the optical input on this too. Use a stereo RCA phono cable to do this. • If your TV. 9 En See Using the component video jacks on page 12. 4 In this case, you'll need to tell the receiver which digital input you connected the...
Owner's Manual
Page 10
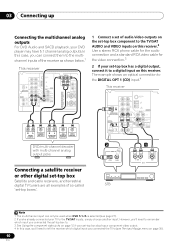
... VIDEO ANTENNA OUT MONITOR OUT SUB WOOFER PREOUT DVD/multi-channel decoder with multi-channel analog output jacks Connecting a satellite receiver or other digital set-top box Satellite and cable receivers, and terrestrial digital TV tuners are all examples of so-called 'set-top boxes'. 2 DIGITAL OUT OPTICAL COAXIAL 1 R AUDIO L AV OUT VIDEO STB Note 1 The multichannel input can connect them to the multichannel inputs of audio/video outputs on the set-top box component to the TV/SAT AUDIO and VIDEO inputs on this receiver.2 Use a stereo RCA phono cable for the audio connection...
... VIDEO ANTENNA OUT MONITOR OUT SUB WOOFER PREOUT DVD/multi-channel decoder with multi-channel analog output jacks Connecting a satellite receiver or other digital set-top box Satellite and cable receivers, and terrestrial digital TV tuners are all examples of so-called 'set-top boxes'. 2 DIGITAL OUT OPTICAL COAXIAL 1 R AUDIO L AV OUT VIDEO STB Note 1 The multichannel input can connect them to the multichannel inputs of audio/video outputs on the set-top box component to the TV/SAT AUDIO and VIDEO inputs on this receiver.2 Use a stereo RCA phono cable for the audio connection...

Owner's Manual
Page 13
... sound quality, connect external antennas (see Using external antennas below . DVR See Assigning the component video inputs on page 30. 3 Connect the COMPONENT VIDEO MONITOR OUT jacks on a flat surface and in a direction giving the best reception. 5 Connect the FM wire antenna in the direction indicated by the arrow (fig. b fig. This only needs to be done if you plan to mount the AM antenna to a set of component video inputs on your source to a wall...
... sound quality, connect external antennas (see Using external antennas below . DVR See Assigning the component video inputs on page 30. 3 Connect the COMPONENT VIDEO MONITOR OUT jacks on a flat surface and in a direction giving the best reception. 5 Connect the FM wire antenna in the direction indicated by the arrow (fig. b fig. This only needs to be done if you plan to mount the AM antenna to a set of component video inputs on your source to a wall...
Owner's Manual
Page 14
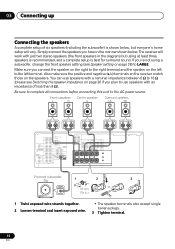
... power source. 1 Twist exposed wire strands together. 2 Loosen terminal and insert exposed wire. • The speaker terminals also accept single banana plugs. 3 Tighten terminal. 14 En 03 Connecting up Connecting the speakers A complete setup of less than 8 Ω). The receiver will work with an impedance of six speakers (including the subwoofer) is best for surround sound. Simply connect the speakers you have in the diagram) but everyone's home setup will vary. Also make...
... power source. 1 Twist exposed wire strands together. 2 Loosen terminal and insert exposed wire. • The speaker terminals also accept single banana plugs. 3 Tighten terminal. 14 En 03 Connecting up Connecting the speakers A complete setup of less than 8 Ω). The receiver will work with an impedance of six speakers (including the subwoofer) is best for surround sound. Simply connect the speakers you have in the diagram) but everyone's home setup will vary. Also make...
Owner's Manual
Page 17
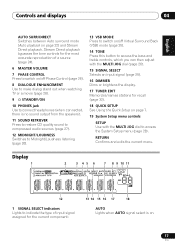
... Virtual Surround Back (VSB) mode (page 25). 14 TONE Press this button to access the bass and treble controls, which you can then adjust with the MULTI JOG dial (page 26). 15 SIGNAL SELECT Selects an input signal (page 25). 16 DIMMER Dims or brightens the display. 17 TUNER EDIT Memorizes/names stations for recall (page 32). 18 QUICK SETUP See Using the Quick Setup on page 7. 19 System Setup menu controls SETUP Use with the MULTI...
... Virtual Surround Back (VSB) mode (page 25). 14 TONE Press this button to access the bass and treble controls, which you can then adjust with the MULTI JOG dial (page 26). 15 SIGNAL SELECT Selects an input signal (page 25). 16 DIMMER Dims or brightens the display. 17 TUNER EDIT Memorizes/names stations for recall (page 32). 18 QUICK SETUP See Using the Quick Setup on page 7. 19 System Setup menu controls SETUP Use with the MULTI...
Owner's Manual
Page 18
... use. SPA means the speakers are connected. 12 Character display 13 ADV.SURR (Advanced Surround) Lights when one of the Advanced Surround modes has been selected. 14 WMA9 Pro Lights to indicate decoding of a source. 7 AUTO SURR. Lights when Dialog Enhancement is detected. 04 Controls and displays DIGITAL Lights when a digital audio signal is switched on (page 26). 17 LOUDNESS Lights during Loudness listening (page 26). 18 Master volume level 18 En Lights when the Auto Surround...
... use. SPA means the speakers are connected. 12 Character display 13 ADV.SURR (Advanced Surround) Lights when one of the Advanced Surround modes has been selected. 14 WMA9 Pro Lights to indicate decoding of a source. 7 AUTO SURR. Lights when Dialog Enhancement is detected. 04 Controls and displays DIGITAL Lights when a digital audio signal is switched on (page 26). 17 LOUDNESS Lights during Loudness listening (page 26). 18 Master volume level 18 En Lights when the Auto Surround...
Owner's Manual
Page 19
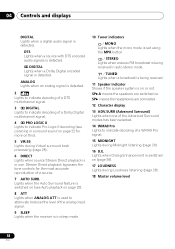
... 'boxed' commands (above the buttons) on page 22) and Stream Direct playback. Also adjusts the level of a DVD. buttons to set the listening volume. Use to select a channel, then use the LEVEL +/- Controls and displays 04 English Deutsch Français Italiano Nederlands Español Remote control RECEIVER SLEEP DIMMER PHASE 1 INPUT SELECTOR DVD 5.1 DVD TV DVR RECEIVER CD CD-R FM AM STEREO/ 2 AUTOSURR F.S.SURR STANDARD ADV.SURR TOP MENU S.RETRIEVER MENU 3 MIDNIGHT DIALOG TUNER EDIT...
... 'boxed' commands (above the buttons) on page 22) and Stream Direct playback. Also adjusts the level of a DVD. buttons to set the listening volume. Use to select a channel, then use the LEVEL +/- Controls and displays 04 English Deutsch Français Italiano Nederlands Español Remote control RECEIVER SLEEP DIMMER PHASE 1 INPUT SELECTOR DVD 5.1 DVD TV DVR RECEIVER CD CD-R FM AM STEREO/ 2 AUTOSURR F.S.SURR STANDARD ADV.SURR TOP MENU S.RETRIEVER MENU 3 MIDNIGHT DIALOG TUNER EDIT...

Owner's Manual
Page 20
... buttons Press to select an input source. Use when setting up your system (press SHIFT to access the commands bordered by pressing SLEEP once. Button What it does DVD/ Turns DVD power on /off . Switches channels. JUKEBOX* Switches to use the remote DVD/DVR controls. DISPLAY Switch the display between the hard disk and DVD DVD* controls for DVD/HDD recorders. Also used for the receiver (page 28). 9 MENU Displays the disc menu of station presets (page 32). 20 En HDD/ Switch between station preset name and frequency...
... buttons Press to select an input source. Use when setting up your system (press SHIFT to access the commands bordered by pressing SLEEP once. Button What it does DVD/ Turns DVD power on /off . Switches channels. JUKEBOX* Switches to use the remote DVD/DVR controls. DISPLAY Switch the display between the hard disk and DVD DVD* controls for DVD/HDD recorders. Also used for the receiver (page 28). 9 MENU Displays the disc menu of station presets (page 32). 20 En HDD/ Switch between station preset name and frequency...
Owner's Manual
Page 25
... the 5.1 format for example, 5.1 encoded material) with your DVD player. 2 The Virtual Surround Back mode is set the signal input to DIGITAL. • Some DVD players don't output DTS signals. PHASE CONTROL PHASE DIALOGUE AUTO SURR/ CONTROL ENHANCEMENT DIRECT DVD / LD DVD 5.1 TV / SAT DVR / VCR CD CD-R / TAPE / MD FM STANDBY/ON PHONES SOUND MIDNIGHT/ VSB RETRIEVER LOUDNESS MODE TONE SIGNAL SELECT DIMMER TUNER EDIT QUICK SETUP SETUP RETURN MULTI JOG • Press VSB MODE (front panel) to the source component. Listening to...
... the 5.1 format for example, 5.1 encoded material) with your DVD player. 2 The Virtual Surround Back mode is set the signal input to DIGITAL. • Some DVD players don't output DTS signals. PHASE CONTROL PHASE DIALOGUE AUTO SURR/ CONTROL ENHANCEMENT DIRECT DVD / LD DVD 5.1 TV / SAT DVR / VCR CD CD-R / TAPE / MD FM STANDBY/ON PHONES SOUND MIDNIGHT/ VSB RETRIEVER LOUDNESS MODE TONE SIGNAL SELECT DIMMER TUNER EDIT QUICK SETUP SETUP RETURN MULTI JOG • Press VSB MODE (front panel) to the source component. Listening to...
Owner's Manual
Page 26
The default setting is a very important factor in achieving proper sound reproduction. Using the tone controls Depending on what you are listening to, you may want to adjust. If two waveforms are selected (except when STEREO is selected using the front panel tone control.2 1 Press TONE to select the frequency you to hear effective surround sound of movies at low volume levels. The Loudness listening feature can be used to get good bass and treble...
The default setting is a very important factor in achieving proper sound reproduction. Using the tone controls Depending on what you are listening to, you may want to adjust. If two waveforms are selected (except when STEREO is selected using the front panel tone control.2 1 Press TONE to select the frequency you to hear effective surround sound of movies at low volume levels. The Loudness listening feature can be used to get good bass and treble...
Owner's Manual
Page 28
... you change the placement of speakers connected (see Channel level below ). • IN ASSIG. - Use / to select the size (and number) of each setting. You only need to make detailed settings to specify how you want to set to adjust then press ENTER. • SP SET - Make customized settings to reflect how you want to SMALL. RECEIVER SLEEP DIMMER PHASE INPUT SELECTOR DVD 5.1 DVD TV DVR RECEIVER TOP MENU S.RETRIEVER MIDNIGHT TUNER...
... you change the placement of speakers connected (see Channel level below ). • IN ASSIG. - Use / to select the size (and number) of each setting. You only need to make detailed settings to specify how you want to set to adjust then press ENTER. • SP SET - Make customized settings to reflect how you want to SMALL. RECEIVER SLEEP DIMMER PHASE INPUT SELECTOR DVD 5.1 DVD TV DVR RECEIVER TOP MENU S.RETRIEVER MIDNIGHT TUNER...
Owner's Manual
Page 29
....3 4 Adjust the level of the surround channels is selected.1 Choose the PLUS setting if you want deeper bass (the bass frequencies that would normally come out the front and center speakers are also routed to LARGE and SMALL alternatively and let your surround speakers reproduce bass frequencies effectively. The T. The test tones will be output. 4 • If you want the subwoofer to output bass sound continuously or you are output from the SP SETUP menu. 2 Use...
....3 4 Adjust the level of the surround channels is selected.1 Choose the PLUS setting if you want deeper bass (the bass frequencies that would normally come out the front and center speakers are also routed to LARGE and SMALL alternatively and let your surround speakers reproduce bass frequencies effectively. The T. The test tones will be output. 4 • If you want the subwoofer to output bass sound continuously or you are output from the SP SETUP menu. 2 Use...
Owner's Manual
Page 30
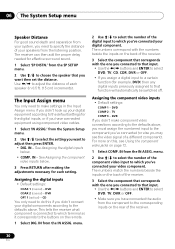
.... DVR If you didn't make settings in 0.5 ft. (15 cm) increments). The Input Assign menu You only need to do this , see the video signal of the digital input to which you may see Using the component video jacks on the rear of the receiver. 3 Select the component that corresponds with the one you connected to that input. • Use the / buttons and ENTER to select DVD, TV, CD, CDR, DVR...
.... DVR If you didn't make settings in 0.5 ft. (15 cm) increments). The Input Assign menu You only need to do this , see the video signal of the digital input to which you may see Using the component video jacks on the rear of the receiver. 3 Select the component that corresponds with the one you connected to that input. • Use the / buttons and ENTER to select DVD, TV, CD, CDR, DVR...
Owner's Manual
Page 34
... Pioneer authorized service center or your dealer to carry out repair work. • If the unit does not operate normally due to external effects such as static electricity disconnect the power plug from the antenna terminals and wires. • Fully extend the FM wire antenna, position for best reception, and secure to Channel level on page 8). • Select the correct component (use the input select buttons). Sometimes the trouble may lie in radio...
... Pioneer authorized service center or your dealer to carry out repair work. • If the unit does not operate normally due to external effects such as static electricity disconnect the power plug from the antenna terminals and wires. • Fully extend the FM wire antenna, position for best reception, and secure to Channel level on page 8). • Select the correct component (use the input select buttons). Sometimes the trouble may lie in radio...
Owner's Manual
Page 35
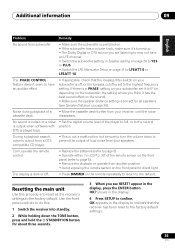
... turn the volume down the TONE button, press and hold the STANDBY/ON button for all the receiver's settings to the factory default. Can't operate the remote control. • Replace the batteries (refer to page 5). • Operate within 7 m (23 ft.), 30° of loud noise from your subwoofer, set to the highest frequency setting. OK? OK appears in the display. 4 Press SETUP to confirm. Resetting the main unit Use this . 1 Switch the receiver into standby...
... turn the volume down the TONE button, press and hold the STANDBY/ON button for all the receiver's settings to the factory default. Can't operate the remote control. • Replace the batteries (refer to page 5). • Operate within 7 m (23 ft.), 30° of loud noise from your subwoofer, set to the highest frequency setting. OK? OK appears in the display. 4 Press SETUP to confirm. Resetting the main unit Use this . 1 Switch the receiver into standby...


