
Owner's Manual
Page 5
...the left & right; Also make sure the positive and negative (+/-) terminals on the amplifier match those on the left & right) and a subwoofer but you can hook it up using this . Quick Start Guide Optical Digital Connection If your DVD player has an optical terminal (not a PCM... DVD digital audio into). If you put your speakers. Follow the diagram on page 31-32 in digital soundtracks. Front speaker (A) (Left) Powered subwoofer TV/monitor Front speaker (A) (Right) Center speaker INPUT Surround speaker (Left) Surround speaker (Right) 5 See the page 6 for this following the...
...the left & right; Also make sure the positive and negative (+/-) terminals on the amplifier match those on the left & right) and a subwoofer but you can hook it up using this . Quick Start Guide Optical Digital Connection If your DVD player has an optical terminal (not a PCM... DVD digital audio into). If you put your speakers. Follow the diagram on page 31-32 in digital soundtracks. Front speaker (A) (Left) Powered subwoofer TV/monitor Front speaker (A) (Right) Center speaker INPUT Surround speaker (Left) Surround speaker (Right) 5 See the page 6 for this following the...
Owner's Manual
Page 19
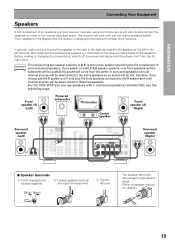
... the following page. Also make sure you switch on both A & B speaker systems, only front speakers and the subwoofer will be lost. For the VSX-33TX you 'll only hear the front speakers connected to the left terminal. The receiver will work with just two stereo ...disconnect the power cord from the center or surround speakers but , naturally, everyone's home set up will vary. Front speaker (A) (Left) Powered subwoofer INPUT TV/monitor Center speaker Front speaker (A) (Right) Surround speaker (Left) Surround speaker (Right) 7 Speaker terminals 1 Twist exposed wire strands ...
... the following page. Also make sure you switch on both A & B speaker systems, only front speakers and the subwoofer will be lost. For the VSX-33TX you 'll only hear the front speakers connected to the left terminal. The receiver will work with just two stereo ...disconnect the power cord from the center or surround speakers but , naturally, everyone's home set up will vary. Front speaker (A) (Left) Powered subwoofer INPUT TV/monitor Center speaker Front speaker (A) (Right) Surround speaker (Left) Surround speaker (Right) 7 Speaker terminals 1 Twist exposed wire strands ...

Owner's Manual
Page 21
... cord into a standard wall power outlet. Caution! ANALOG INPUT L R Front channel amplifier ANALOG INPUT L R ANALOG INPUT Surround channel amplifier Center channel amplifier (mono) INPUT Powered subwoofer Plugging In Up to the switched power outlets should not exceed 100W (0.8 A). Power consumption of your system. Before making or changing the connections, switch off...
... cord into a standard wall power outlet. Caution! ANALOG INPUT L R Front channel amplifier ANALOG INPUT L R ANALOG INPUT Surround channel amplifier Center channel amplifier (mono) INPUT Powered subwoofer Plugging In Up to the switched power outlets should not exceed 100W (0.8 A). Power consumption of your system. Before making or changing the connections, switch off...
Owner's Manual
Page 22
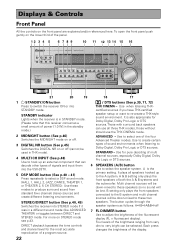
... open the front panel push gently on or off 7 FL DIMMER button Use to the A system. Use to switch the receiver ON or into the VSX-33TX. 5 DSP MODE button (See p.40 - 41) Press repeatedly to produce surround sound from very dim to re-create a THX-style sound environment.... speakers. A & B setting only plays the front speakers of the display. 22 Each press changes the brightness of both the A & B systems and the subwoofer. Multi channel sources will be used in STANDBY mode. (Please note that can decode other types of the four Advanced Theater modes. The button cycles...
... open the front panel push gently on or off 7 FL DIMMER button Use to the A system. Use to switch the receiver ON or into the VSX-33TX. 5 DSP MODE button (See p.40 - 41) Press repeatedly to produce surround sound from very dim to re-create a THX-style sound environment.... speakers. A & B setting only plays the front speakers of the display. 22 Each press changes the brightness of both the A & B systems and the subwoofer. Multi channel sources will be used in STANDBY mode. (Please note that can decode other types of the four Advanced Theater modes. The button cycles...

Owner's Manual
Page 28
... feature lets you select which in this setup. FUNCTION RENAME This feature lets you rename specific "functions," which bass frequencies will be sent to the subwoofer or front speakers. If you don't want to make any settings go can exit this case stands for hooking up . Bass Level (See p.37) Dolby...
... feature lets you select which in this setup. FUNCTION RENAME This feature lets you rename specific "functions," which bass frequencies will be sent to the subwoofer or front speakers. If you don't want to make any settings go can exit this case stands for hooking up . Bass Level (See p.37) Dolby...
Owner's Manual
Page 32
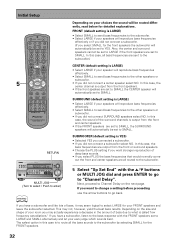
...) • Select LARGE if your speaker will reproduce bass frequencies effectively. • Select SMALL to send bass frequencies to the other speakers or subwoofer. • If you select PLUS the bass frequencies that would normally come out the front and center speakers are set to SMALL. This may ...actually experience a decrease in this case, the center channel is to route all routed to the subwoofer. The safest option in the amount of bass, it may seem logical to select LARGE for detailed explanations. If you want stronger reproduction of...
...) • Select LARGE if your speaker will reproduce bass frequencies effectively. • Select SMALL to send bass frequencies to the other speakers or subwoofer. • If you select PLUS the bass frequencies that would normally come out the front and center speakers are set to SMALL. This may ...actually experience a decrease in this case, the center channel is to route all routed to the subwoofer. The safest option in the amount of bass, it may seem logical to select LARGE for detailed explanations. If you want stronger reproduction of...
Owner's Manual
Page 35
..., proceed to Crossover Network on this until you press ENTER to signify you want to change the levels temporarily to raise the level of the subwoofer tends to sound lower than it is also possible to go back. 35 Using this page will be used when you have been made. You...
..., proceed to Crossover Network on this until you press ENTER to signify you want to change the levels temporarily to raise the level of the subwoofer tends to sound lower than it is also possible to go back. 35 Using this page will be used when you have been made. You...

Owner's Manual
Page 36
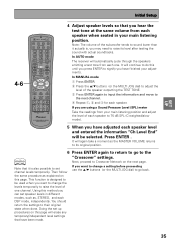
... 5/∞ buttons to adjust the crossover network. Initial Setup Crossover Network The following steps show you determine which frequencies will already be sent to the subwoofer or LARGE speakers. 1 Use the 5/∞ buttons (or the MULTI JOG dial) to select 80 Hz, 100 Hz, or 150 Hz. 80Hz Sends...different speakers. If you . 3 Press ENTER to send the information to the receiver and got to the "Bass Level" Next, proceed to the subwoofer (or LARGE speakers). Experiment with the 5¥∞ buttons or MULTI JOG dial (if continuing from CHANNEL LEVEL, it will be selected).
... 5/∞ buttons to adjust the crossover network. Initial Setup Crossover Network The following steps show you determine which frequencies will already be sent to the subwoofer or LARGE speakers. 1 Use the 5/∞ buttons (or the MULTI JOG dial) to select 80 Hz, 100 Hz, or 150 Hz. 80Hz Sends...different speakers. If you . 3 Press ENTER to send the information to the receiver and got to the "Bass Level" Next, proceed to the subwoofer (or LARGE speakers). Experiment with the 5¥∞ buttons or MULTI JOG dial (if continuing from CHANNEL LEVEL, it will be selected).

Owner's Manual
Page 37
... will be selected). If starting fresh, complete steps 1-3 in "Setting Up for the LFE channel. If your speaker system. Gradually increase the level of your subwoofer has a volume control, set a maximum output level for Surround Sound" (p.27) first. 1-3 SOURCE RECEIVER DVD CD TV VCR 1 MULTI CONTROL CD-R TUN VCR... may exceed the capabilities of the LFE channel until the test tone begins to "D-Range Cont." Then the test tone is output to the subwoofer, front or surround speakers. 2 Use the 5/∞ buttons (or the MULTI JOG dial) to its previous position. MULTI JOG (Turn ...
... will be selected). If starting fresh, complete steps 1-3 in "Setting Up for the LFE channel. If your speaker system. Gradually increase the level of your subwoofer has a volume control, set a maximum output level for Surround Sound" (p.27) first. 1-3 SOURCE RECEIVER DVD CD TV VCR 1 MULTI CONTROL CD-R TUN VCR... may exceed the capabilities of the LFE channel until the test tone begins to "D-Range Cont." Then the test tone is output to the subwoofer, front or surround speakers. 2 Use the 5/∞ buttons (or the MULTI JOG dial) to its previous position. MULTI JOG (Turn ...

Owner's Manual
Page 78
...settings correctly (see p.31-32). outlet, and insert again. Broadcast stations cannot be rectified even after exercising the checks listed below . Subwoofer output is very low. • Settings route signal away from the the buttons are turned OFF. • DIGITAL/ANALOG switch is no...• The power plug is connected correctly (see p.18). still no problem with this component, check the points below , ask your nearest PIONEER authorized service center or your LD player is source the 5.1 Channel indicator not 5 channels. When playing a Dolby Digital / DTS • ...
...settings correctly (see p.31-32). outlet, and insert again. Broadcast stations cannot be rectified even after exercising the checks listed below . Subwoofer output is very low. • Settings route signal away from the the buttons are turned OFF. • DIGITAL/ANALOG switch is no...• The power plug is connected correctly (see p.18). still no problem with this component, check the points below , ask your nearest PIONEER authorized service center or your LD player is source the 5.1 Channel indicator not 5 channels. When playing a Dolby Digital / DTS • ...


