
Owner's Manual
Page 1
AUDIO/VIDEO MULTI-CHANNEL RECEIVER VSX-33TX Operating Instructions
AUDIO/VIDEO MULTI-CHANNEL RECEIVER VSX-33TX Operating Instructions

Owner's Manual
Page 2
... the limits for a Class B digital device, pursuant to Part 15 of electric shock to radio or television reception, which the receiver is for your enclosed warranty card and keep it in a secure area. This is connected. - LE BOUTON STANDBY/ON EST ...SECTEUR SUR LA POSITION D'ATTENTE. REFER SERVICING TO QUALIFIED SERVICE PERSONNEL. Increase the separation between the equipment and receiver. - If this Pioneer product. Reorient or relocate the receiving antenna. - Consult the dealer or an experienced radio/TV technician for help. Information to User Alteration or ...
... the limits for a Class B digital device, pursuant to Part 15 of electric shock to radio or television reception, which the receiver is for your enclosed warranty card and keep it in a secure area. This is connected. - LE BOUTON STANDBY/ON EST ...SECTEUR SUR LA POSITION D'ATTENTE. REFER SERVICING TO QUALIFIED SERVICE PERSONNEL. Increase the separation between the equipment and receiver. - If this Pioneer product. Reorient or relocate the receiving antenna. - Consult the dealer or an experienced radio/TV technician for help. Information to User Alteration or ...

Owner's Manual
Page 4
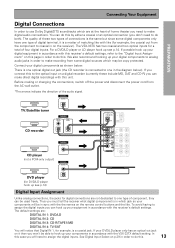
... DVD player with digital audio connections. The quality of these two types of connections is the best scenario, as shown below . For this receiver and won't need to analog audio jacks. You can get home theater surround sound. For coaxial connections you need the proper cable. Coaxial ...Digital Connection If your DVD player has a coaxial terminal (not a PCM-only output) for recording the audio on the receiver. Also hook up your digital components to hook up the video connection of plugs. RL RCA video cord VIDEO INPUT RCA video cord RCA stereo...
... DVD player with digital audio connections. The quality of these two types of connections is the best scenario, as shown below . For this receiver and won't need to analog audio jacks. You can get home theater surround sound. For coaxial connections you need the proper cable. Coaxial ...Digital Connection If your DVD player has a coaxial terminal (not a PCM-only output) for recording the audio on the receiver. Also hook up your digital components to hook up the video connection of plugs. RL RCA video cord VIDEO INPUT RCA video cord RCA stereo...

Owner's Manual
Page 5
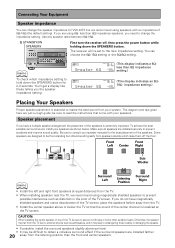
.... center; If you only have three hook up as "CENTER." Follow the diagram on p. 19 in order to assign the digital input (tell the receiver which input you won't hear any dialog. Front speaker (A) (Left) Powered subwoofer TV/monitor Front speaker (A) (Right) Center speaker INPUT Surround speaker (Left...page 6 for this. Make sure you connect the speaker on the right to the right terminal and the speaker on the back of the receiver. Use the instructions on the speakers. Hook up all your DVD digital audio into). Also make sure the positive and negative (+/-) terminals on...
.... center; If you only have three hook up as "CENTER." Follow the diagram on p. 19 in order to assign the digital input (tell the receiver which input you won't hear any dialog. Front speaker (A) (Left) Powered subwoofer TV/monitor Front speaker (A) (Right) Center speaker INPUT Surround speaker (Left...page 6 for this. Make sure you connect the speaker on the right to the right terminal and the speaker on the back of the receiver. Use the instructions on the speakers. Hook up all your DVD digital audio into). Also make sure the positive and negative (+/-) terminals on...

Owner's Manual
Page 6
.... 9 Select "Setup End" with 5¥∞ buttons you hooked up your DVD to DIGITAL IN 3, as in the first diagram on p. 5. 2 1 3-9 SOURCE RECEIVER DVD CD TV VCR 1 MULTI CONTROL CD-R TUN VCR 2 TVC 1 2 3 LOUDNESS VIDEO SELECT MULTI CH INPUT 4 INPUT ATT 5 DIGITAL NR 6 FL DIMMER 7... 8 9 REMOTE SETUP SYSTEM SETUP SIGNAL SELECT +10 DISC 0 ENTER EFFECT/CH SEL RECEIVER TV VOL TV MASTER VOLUME TV CONTROL TVFUNC 4 CHANNEL ¢ TUNE ST ST ENTER TUNE 4 "Digital In" should be selected (if it isn't use...
.... 9 Select "Setup End" with 5¥∞ buttons you hooked up your DVD to DIGITAL IN 3, as in the first diagram on p. 5. 2 1 3-9 SOURCE RECEIVER DVD CD TV VCR 1 MULTI CONTROL CD-R TUN VCR 2 TVC 1 2 3 LOUDNESS VIDEO SELECT MULTI CH INPUT 4 INPUT ATT 5 DIGITAL NR 6 FL DIMMER 7... 8 9 REMOTE SETUP SYSTEM SETUP SIGNAL SELECT +10 DISC 0 ENTER EFFECT/CH SEL RECEIVER TV VOL TV MASTER VOLUME TV CONTROL TVFUNC 4 CHANNEL ¢ TUNE ST ST ENTER TUNE 4 "Digital In" should be selected (if it isn't use...

Owner's Manual
Page 7
... won't have a center speaker. You should go through the entire "Initial Setup" procedures as outlined on pages 27- 38 of the receiver (see "DVD/LD" in the display on the receiver. 3 Press the STANDARD button for the basic surround sound setting. 4 Play a DVD. 6 For Better Surround Sound 1 Go through the "SpeakerSetting" instructions...
... won't have a center speaker. You should go through the entire "Initial Setup" procedures as outlined on pages 27- 38 of the receiver (see "DVD/LD" in the display on the receiver. 3 Press the STANDARD button for the basic surround sound setting. 4 Play a DVD. 6 For Better Surround Sound 1 Go through the "SpeakerSetting" instructions...
Owner's Manual
Page 8
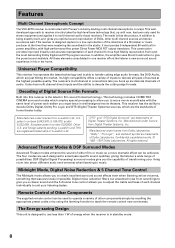
... high level base technology that was previously impossible. This receiver is constructed with Pioneer's industry-leading multi channel stereophonic concept. Manufactured under license from even the most demanding Dolby Digital and DTS program sources. and foreign patents pending. Features Multi Channel Stereophonic Concept The VSX-33TX receiver is designed capture to a true reproduction of the...
... high level base technology that was previously impossible. This receiver is constructed with Pioneer's industry-leading multi channel stereophonic concept. Manufactured under license from even the most demanding Dolby Digital and DTS program sources. and foreign patents pending. Features Multi Channel Stereophonic Concept The VSX-33TX receiver is designed capture to a true reproduction of the...

Owner's Manual
Page 9
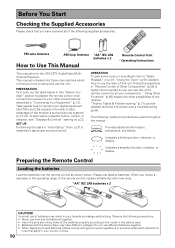
... Start 10 Checking the Supplied Accessories 10 How to Use This Manual 10 Preparing the Remote Control 10 Installing the Receiver 11 Opening the Front Panel 11 The PIONEER SR System: Operating other PIONEER components 11 Connecting Your Equipment 12 Audio Components 12 Digital Connections 13 Example Connection for a DVD/LD or LD...
... Start 10 Checking the Supplied Accessories 10 How to Use This Manual 10 Preparing the Remote Control 10 Installing the Receiver 11 Opening the Front Panel 11 The PIONEER SR System: Operating other PIONEER components 11 Connecting Your Equipment 12 Audio Components 12 Digital Connections 13 Example Connection for a DVD/LD or LD...
Owner's Manual
Page 10
..., control, or indicator, see "Displays & Controls" starting on p.39. Doing the operations in "Remote Control of batteries may have received all of the receiver's surround sound systems (p.13-14). Indicates a blinking button, indicator, or display. Indicates a steadily lit button, indicator, or display...to get proper surround sound. The following precautions. • Never use this unit's remote control for the VSX-33TX Audio/Video MultiChannel Receiver. Take special care to connect your components. Observe the following marks and symbols are used batteries, please ...
..., control, or indicator, see "Displays & Controls" starting on p.39. Doing the operations in "Remote Control of batteries may have received all of the receiver's surround sound systems (p.13-14). Indicates a blinking button, indicator, or display. Indicates a steadily lit button, indicator, or display...to get proper surround sound. The following precautions. • Never use this unit's remote control for the VSX-33TX Audio/Video MultiChannel Receiver. Take special care to connect your components. Observe the following marks and symbols are used batteries, please ...
Owner's Manual
Page 11
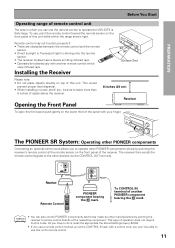
... cord allows you to operate other PIONEER components simply by pointing the receiver's remote control directly at the remote sensor on top of this unit while within the range shown right. memo • You can use the remote control to operate the VSX-33TX is recall the appropriate the stored ...settings (see p.58-59). • If you use a remote control hooked up via the CONTROL OUT terminal. This type of space above the receiver. This would prevent proper heat dispersal. • When ...
... cord allows you to operate other PIONEER components simply by pointing the receiver's remote control directly at the remote sensor on top of this unit while within the range shown right. memo • You can use the remote control to operate the VSX-33TX is recall the appropriate the stored ...settings (see p.58-59). • If you use a remote control hooked up via the CONTROL OUT terminal. This type of space above the receiver. This would prevent proper heat dispersal. • When ...

Owner's Manual
Page 12
.... 12 Coaxial cord (or standard video cord) Optical cable If you want to record with these jacks. Be sure to this receiver. Cassette deck placement Depending on digital connections. When you experience noise, move the cassette deck farther away from the transformer in the...may occur during playback of stereo outs), but for components that for more on where the cassette deck is caused by leakage flux from the receiver. 7 Coaxial cords/Optical cables Commercially available digital audio coaxial cords (standard video cords can also be used) or optical cables (not supplied)...
.... 12 Coaxial cord (or standard video cord) Optical cable If you want to record with these jacks. Be sure to this receiver. Cassette deck placement Depending on digital connections. When you experience noise, move the cassette deck farther away from the transformer in the...may occur during playback of stereo outs), but for components that for more on where the cassette deck is caused by leakage flux from the receiver. 7 Coaxial cords/Optical cables Commercially available digital audio coaxial cords (standard video cords can also be used) or optical cables (not supplied)...
Owner's Manual
Page 13
... the like (for example, is a matter of matching like with like . The VSX-33TX has two coaxial and two optical inputs for digital connections are not dedicated to one in sync with the receiver's default settings. If possible hook up see p.14. Connect your digital components to ...you don't need to do this unit. We also recommend hooking up your components in accordance with this receiver's default settings, refer to make direct digital recordings with the VSX-33TX default setting. Before making or changing the connections, switch off the power and disconnect the power cord from...
... the like (for example, is a matter of matching like with like . The VSX-33TX has two coaxial and two optical inputs for digital connections are not dedicated to one in sync with the receiver's default settings. If possible hook up see p.14. Connect your digital components to ...you don't need to do this unit. We also recommend hooking up your components in accordance with this receiver's default settings, refer to make direct digital recordings with the VSX-33TX default setting. Before making or changing the connections, switch off the power and disconnect the power cord from...

Owner's Manual
Page 15
... a DVD/LD player or LD player requires an analog connection and two digital connections (a coaxial or optical and a specialized RF demodulator connection shown on the VSX-33TX but remember, the video component you are two types of connections to use S-video cords for 15 video hook ups, you must also hook up... or changing the connections, switch off the power and disconnect the power cord from the AC wall outlet. *The arrows indicate the direction of the receiver.
... a DVD/LD player or LD player requires an analog connection and two digital connections (a coaxial or optical and a specialized RF demodulator connection shown on the VSX-33TX but remember, the video component you are two types of connections to use S-video cords for 15 video hook ups, you must also hook up... or changing the connections, switch off the power and disconnect the power cord from the AC wall outlet. *The arrows indicate the direction of the receiver.
Owner's Manual
Page 19
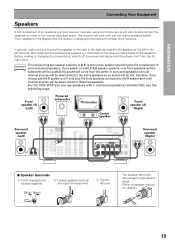
...VSX-33TX you can use speakers with just two stereo speakers (called "front" speakers in the diagram) but the receiver is the main system supporting the full complement of six speakers is shown here but multi channel sources will be audible. In general, make sure the positive and negative (+/-) terminals on the receiver...on both A & B speaker systems, only front speakers and the subwoofer will be used with at least three speakers. The receiver will work with a nominal impedance rated 6Ω-16Ω, see the following page. PREPARATION Connecting Your Equipment Speakers A full ...
...VSX-33TX you can use speakers with just two stereo speakers (called "front" speakers in the diagram) but the receiver is the main system supporting the full complement of six speakers is shown here but multi channel sources will be audible. In general, make sure the positive and negative (+/-) terminals on the receiver...on both A & B speaker systems, only front speakers and the subwoofer will be used with at least three speakers. The receiver will work with a nominal impedance rated 6Ω-16Ω, see the following page. PREPARATION Connecting Your Equipment Speakers A full ...
Owner's Manual
Page 20
... receiver will re-set to prevent accidents and improve sound quality. Make sure all speakers are installed farther 20 away from the TV due to external shocks such as earthquakes, and it with tape or some other suitable means. Be sure to change the speaker impedance for VSX-33TX... above or below . If you do not have a multiple speaker arrangement the placement of the speakers. STANDBY/ON SPEAKERS First turn the receiver off the floor. Speaker placement If you need to consult your system. less than 8Ω impedance speakers, you have magnetically shielded speakers ...
... receiver will re-set to prevent accidents and improve sound quality. Make sure all speakers are installed farther 20 away from the TV due to external shocks such as earthquakes, and it with tape or some other suitable means. Be sure to change the speaker impedance for VSX-33TX... above or below . If you do not have a multiple speaker arrangement the placement of the speakers. STANDBY/ON SPEAKERS First turn the receiver off the floor. Speaker placement If you need to consult your system. less than 8Ω impedance speakers, you have magnetically shielded speakers ...

Owner's Manual
Page 21
...AC OUTLETS. 21 Do not connect a monitor or TV to power your components, plug the receiver's power cord into a standard wall power outlet. Disconnect the receiver from this receiver. Caution! Before making or changing the connections, switch off the power and disconnect the power ...outlet. After connecting all your speakers. PREPARATION Connecting Your Equipment Connecting Additional Amplifiers This receiver has more than sufficient power for example, when on and off with the receiver. Caution! Make the connections shown below to add amplifiers to this units AC outlets....
...AC OUTLETS. 21 Do not connect a monitor or TV to power your components, plug the receiver's power cord into a standard wall power outlet. Disconnect the receiver from this receiver. Caution! Before making or changing the connections, switch off the power and disconnect the power ...outlet. After connecting all your speakers. PREPARATION Connecting Your Equipment Connecting Additional Amplifiers This receiver has more than sufficient power for example, when on and off with the receiver. Caution! Make the connections shown below to add amplifiers to this units AC outlets....
Owner's Manual
Page 22
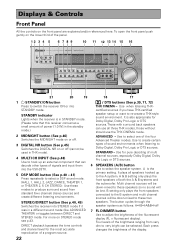
... (See p.45) Switches the DIGITAL NR on the front panel are explained and/or referenced here. STEREO/DIRECT button (See p.40, 49) Switches the receiver into the VSX-33TX. 5 DSP MODE button (See p.40 - 41) Press repeatedly to select a DSP sound mode. (HALL 1, HALL 2, JAZZ, DANCE, THEATER 1, or THEATER 2, 5 CH STEREO)....to very bright can use the THX CINEMA mode. STANDBY indicator Lights when the receiver is in STANDBY mode. (Please note that can decode other types of the panel. 12 3 4 5 6 7 8 9 10 11 12 13 14 15 16 VSX-33TX 21 20 19 18 17 1 STANDBY/ON button Press to re-create a ...
... (See p.45) Switches the DIGITAL NR on the front panel are explained and/or referenced here. STEREO/DIRECT button (See p.40, 49) Switches the receiver into the VSX-33TX. 5 DSP MODE button (See p.40 - 41) Press repeatedly to select a DSP sound mode. (HALL 1, HALL 2, JAZZ, DANCE, THEATER 1, or THEATER 2, 5 CH STEREO)....to very bright can use the THX CINEMA mode. STANDBY indicator Lights when the receiver is in STANDBY mode. (Please note that can decode other types of the panel. 12 3 4 5 6 7 8 9 10 11 12 13 14 15 16 VSX-33TX 21 20 19 18 17 1 STANDBY/ON button Press to re-create a ...

Owner's Manual
Page 23
...You can use the BASS and TREBLE controls to select a source component. Compact Disc player. If there are both analog, digital, the receiver automatically selects the best possible signal. 15 MULTI-JOG CONTROL buttons SETUP - Press it to adjust the sound. Firstly, it 's being ...made. 10 TUNER CONTROL buttons (See p.51-54) BAND - Displays & Controls PREPARATION 8 VIDEO SELECT button Switches the receiver between the various types of video input (DVD, VCR 1, etc.) while keeping the audio on a fixed source (for connecting a Portable DVD player ...
...You can use the BASS and TREBLE controls to select a source component. Compact Disc player. If there are both analog, digital, the receiver automatically selects the best possible signal. 15 MULTI-JOG CONTROL buttons SETUP - Press it to adjust the sound. Firstly, it 's being ...made. 10 TUNER CONTROL buttons (See p.51-54) BAND - Displays & Controls PREPARATION 8 VIDEO SELECT button Switches the receiver between the various types of video input (DVD, VCR 1, etc.) while keeping the audio on a fixed source (for connecting a Portable DVD player ...
Owner's Manual
Page 24
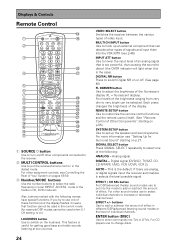
... button Use to enter commands into the VSX-33TX (see p.48). This feature is on). If there are analog, or digital signals input the receiver automatically selects the best possible signal. For CD players use to put the receiver/remote control in CD, DVD mode etc...systems. For more information see Controlling the Rest of individual channels. Displays & Controls Remote Control 1 2 3 4 5 6 7 8 9 0 = ~ ! @ # $ SOURCE RECEIVER DVD CD TV VCR 1 MULTI CONTROL CD-R TUN VCR 2 TVC 1 LOUDNESS 2 3 VIDEO SELECT MULTI CH INPUT 4 INPUT ATT 5 DIGITAL NR 6 FL DIMMER 7 8 9 ...
... button Use to enter commands into the VSX-33TX (see p.48). This feature is on). If there are analog, or digital signals input the receiver automatically selects the best possible signal. For CD players use to put the receiver/remote control in CD, DVD mode etc...systems. For more information see Controlling the Rest of individual channels. Displays & Controls Remote Control 1 2 3 4 5 6 7 8 9 0 = ~ ! @ # $ SOURCE RECEIVER DVD CD TV VCR 1 MULTI CONTROL CD-R TUN VCR 2 TVC 1 LOUDNESS 2 3 VIDEO SELECT MULTI CH INPUT 4 INPUT ATT 5 DIGITAL NR 6 FL DIMMER 7 8 9 ...

Owner's Manual
Page 25
... four Advanced Theater modes. TV VOL +/- TV FUNC button Use select the TV function. 5 4 ¢ /CHANNEL +/- Also use first press the RECEIVER button then operate this button. ™ CLEAR button This button clears the on digital TVs (DTV). 9 7 button (D.ACCESS) Use to stop other times... of sound environments when listening to adjust the volume on CDs etc. Also you want. If the signal is described in conjunction with this receiver. & RECEIVER button Use to switch the remote to select a source. For more information see page 46) Use to select a DSP sound mode. (HALL...
... four Advanced Theater modes. TV VOL +/- TV FUNC button Use select the TV function. 5 4 ¢ /CHANNEL +/- Also use first press the RECEIVER button then operate this button. ™ CLEAR button This button clears the on digital TVs (DTV). 9 7 button (D.ACCESS) Use to stop other times... of sound environments when listening to adjust the volume on CDs etc. Also you want. If the signal is described in conjunction with this receiver. & RECEIVER button Use to switch the remote to select a source. For more information see page 46) Use to select a DSP sound mode. (HALL...


