
Owner's Manual
Page 4
... a source...38 Playing an iPod...39 Playing a USB device...40 Listening to the radio...41 Bluetooth ADAPTER for buying this Pioneer product. Contents 01 Before you for Wireless Enjoyment of Music 42 06 Listening to control other components...66 Selecting preset codes directly... your model properly. Thank you start Checking what's in the box...8 Installing the receiver...8 Loading the batteries...8 Operating range of remote control unit...8 Canceling the demo display...8 About using synchronization...55 About synchronized operations...56 Setting the PQLS function...56 About Auto Sound...
... a source...38 Playing an iPod...39 Playing a USB device...40 Listening to the radio...41 Bluetooth ADAPTER for buying this Pioneer product. Contents 01 Before you for Wireless Enjoyment of Music 42 06 Listening to control other components...66 Selecting preset codes directly... your model properly. Thank you start Checking what's in the box...8 Installing the receiver...8 Loading the batteries...8 Operating range of remote control unit...8 Canceling the demo display...8 About using synchronization...55 About synchronized operations...56 Setting the PQLS function...56 About Auto Sound...
Owner's Manual
Page 5
... Power...86 No sound...86 Other audio problems...87 ADAPTER PORT terminal...88 Video...88 Settings...88 Professional Calibration EQ graphical output...89 Display...89 Remote control...89 HDMI...89 AVNavigator...90 USB interface...90 iPod...91 Network...91 Wireless LAN...92 14 Additional information Surround sound formats...95 About iPod...
... Power...86 No sound...86 Other audio problems...87 ADAPTER PORT terminal...88 Video...88 Settings...88 Professional Calibration EQ graphical output...89 Display...89 Remote control...89 HDMI...89 AVNavigator...90 USB interface...90 iPod...91 Network...91 Wireless LAN...92 14 Additional information Surround sound formats...95 About iPod...
Owner's Manual
Page 6
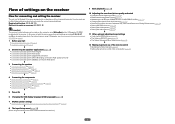
...in the receiver on page 31 j 5 Power On j 6 Changing the OSD display language (OSD Language) (page 33) j 7 MCACC speaker settings ! Setting the remote to make the connections and settings. In this case, virtually the same connections and settings as in steps 2, 3, 4, 5, 6, 7 and 8 can be made ...) on page 33 j 8 The Input Setup menu (page 35) (When using Wiring Navi on the AVNavigator CD-ROM included with an abundance of the remote control ! Measuring the all EQ type (SYMMETRY/ALL CH ADJ/FRONT ALIGN) (page 72) ! About the audio connection on page 8 j 2 Determining...
...in the receiver on page 31 j 5 Power On j 6 Changing the OSD display language (OSD Language) (page 33) j 7 MCACC speaker settings ! Setting the remote to make the connections and settings. In this case, virtually the same connections and settings as in steps 2, 3, 4, 5, 6, 7 and 8 can be made ...) on page 33 j 8 The Input Setup menu (page 35) (When using Wiring Navi on the AVNavigator CD-ROM included with an abundance of the remote control ! Measuring the all EQ type (SYMMETRY/ALL CH ADJ/FRONT ALIGN) (page 72) ! About the audio connection on page 8 j 2 Determining...
Owner's Manual
Page 7
Before you start Checking what's in the box...8 Installing the receiver...8 Loading the batteries...8 Operating range of remote control unit 8 Canceling the demo display...8 About using AVNavigator (included CD-ROM 9 7
Before you start Checking what's in the box...8 Installing the receiver...8 Loading the batteries...8 Operating range of remote control unit 8 Canceling the demo display...8 About using AVNavigator (included CD-ROM 9 7

Owner's Manual
Page 8
... a kitchen) ! Do not use of the batteries properly according to leak, overheat, explode or catch fire. When disposing of remote control unit The remote control may distort) - AAA size IEC R03 dry cell batteries (to select FL DEMO c OFF d then press u STANDBY/... CAUTION Incorrect use different batteries together. ! Warranty sheet Installing the receiver ! 01 Before you 've received the following supplied accessories: ! Remote control unit ! Don't install it on the following precautions: ! Direct sunlight or fluorescent light is turned off a magnetic field). Canceling ...
... a kitchen) ! Do not use of the batteries properly according to leak, overheat, explode or catch fire. When disposing of remote control unit The remote control may distort) - AAA size IEC R03 dry cell batteries (to select FL DEMO c OFF d then press u STANDBY/... CAUTION Incorrect use different batteries together. ! Warranty sheet Installing the receiver ! 01 Before you 've received the following supplied accessories: ! Remote control unit ! Don't install it on the following precautions: ! Direct sunlight or fluorescent light is turned off a magnetic field). Canceling ...
Owner's Manual
Page 10
Controls and displays Remote control...11 Display...13 Front panel...14 10
Controls and displays Remote control...11 Display...13 Front panel...14 10
Owner's Manual
Page 11
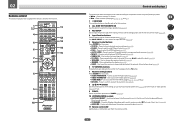
... CLASS / CLR 0 ENTER CH AUTO/ALC/ ZONE 2 DIRECT STANDARD ADV SURR Z2 LISTENING MODE 11 12 13 14 15 RECEIVER Controls and displays The remote has been conveniently color-coded according to component control using the following system: ! PHASE - AUTO S.RTRV - Press repeatedly to select a channel, then ... ON Use this button to perform unique operations (page 68). 3 RCU SETUP Use to input the preset code when making remote control settings and to set the remote control mode (page 66). 4 Input function buttons Press to select control of time before sleep (page 63). 6 TV ...
... CLASS / CLR 0 ENTER CH AUTO/ALC/ ZONE 2 DIRECT STANDARD ADV SURR Z2 LISTENING MODE 11 12 13 14 15 RECEIVER Controls and displays The remote has been conveniently color-coded according to component control using the following system: ! PHASE - AUTO S.RTRV - Press repeatedly to select a channel, then ... ON Use this button to perform unique operations (page 68). 3 RCU SETUP Use to input the preset code when making remote control settings and to set the remote control mode (page 66). 4 Input function buttons Press to select control of time before sleep (page 63). 6 TV ...
Owner's Manual
Page 12
02 12 OPTION The preset codes of desired devices can be registered in the main zone. Switch to perform operations in the remote control and button operations can be registered using the learning mode. 13 Switches the remote to control the receiver (used to select the white commands). Also use this button to set up surround sound. 14 VOLUME +/- Use to set the listening volume. 15 MUTE Mutes the sound or restores the sound if it has been muted (adjusting the volume also restores the sound). Controls and displays 12
02 12 OPTION The preset codes of desired devices can be registered in the main zone. Switch to perform operations in the remote control and button operations can be registered using the learning mode. 13 Switches the remote to control the receiver (used to select the white commands). Also use this button to set up surround sound. 14 VOLUME +/- Use to set the listening volume. 15 MUTE Mutes the sound or restores the sound if it has been muted (adjusting the volume also restores the sound). Controls and displays 12

Owner's Manual
Page 13
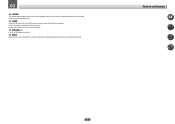
...corresponding format is being input. ! Lights with Dolby Digital Plus decoding. ! 2 TrueHD - Lights during DSD (Direct Stream Digital) to indicate the receiver's remote control mode setting. (Not displayed when set using SPEAKERS (page 62). 17 SLEEP Lights when the receiver is switched on (page 45). ! Lights when ... playback of the receiver is on, this lights to indicate Neo:6 processing (page 45). 19 Character display Displays various system information. 20 Remote control mode indicator Lights to PCM conversion with SACDs. ! MSTR - AUTO SURROUND - TUNED - STEREO -
...corresponding format is being input. ! Lights with Dolby Digital Plus decoding. ! 2 TrueHD - Lights during DSD (Direct Stream Digital) to indicate the receiver's remote control mode setting. (Not displayed when set using SPEAKERS (page 62). 17 SLEEP Lights when the receiver is switched on (page 45). ! Lights when ... playback of the receiver is on, this lights to indicate Neo:6 processing (page 45). 19 Character display Displays various system information. 20 Remote control mode indicator Lights to PCM conversion with SACDs. ! MSTR - AUTO SURROUND - TUNED - STEREO -
Owner's Manual
Page 14
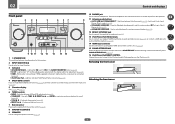
...'s input to switch between standby and on page 13. 6 TUNER controls ! MULTI-ZONE - Lights when EQ is no sound output from the remote control (page 8). 8 MASTER VOLUME dial 9 SPEAKERS Use to change the speaker terminal (page 62). 10 PHONES jack Use to switch various modes... Auto Surround (page 45), Auto Level Control and Stream Direct mode (page 46). ! TUNE i/j - PRESET k/l - Find preset stations (page 42). 7 Remote sensor Receives the signals from the speakers. 11 Listening mode buttons ! Switches between AM and FM radio bands (page 41). ! Use to the iPod and...
...'s input to switch between standby and on page 13. 6 TUNER controls ! MULTI-ZONE - Lights when EQ is no sound output from the remote control (page 8). 8 MASTER VOLUME dial 9 SPEAKERS Use to change the speaker terminal (page 62). 10 PHONES jack Use to switch various modes... Auto Surround (page 45), Auto Level Control and Stream Direct mode (page 46). ! TUNE i/j - PRESET k/l - Find preset stations (page 42). 7 Remote sensor Receives the signals from the speakers. 11 Listening mode buttons ! Switches between AM and FM radio bands (page 41). ! Use to the iPod and...
Owner's Manual
Page 28
... the same input as shown in two zones at the same time or, depending on ) and the sub zone can also be controlled by the remote or front panel controls. ZONE connections. You will also need a separate amplifier if you are not using speaker terminals (ZONE 2) on this receiver. Sub zone...
... the same input as shown in two zones at the same time or, depending on ) and the sub zone can also be controlled by the remote or front panel controls. ZONE connections. You will also need a separate amplifier if you are not using speaker terminals (ZONE 2) on this receiver. Sub zone...
Owner's Manual
Page 31
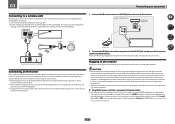
...jack on the rear of furniture, or other cables. After this receiver is possible through a wireless LAN connection. Closet or shelving unit Non-Pioneer component IR IR IN IN OUT IR IN OUT IR receiver 2 Connect the IR IN jack of another zone, you can turn on the...IR receiver sensor to the IR IN jack on making these settings, see the manual supplied with your nearest Pioneer authorized independent service company for a replacement. ! ponent to use the sub zone remote control in after you wish to check for connection. ! Never make a knot in the front panel ...
...jack on the rear of furniture, or other cables. After this receiver is possible through a wireless LAN connection. Closet or shelving unit Non-Pioneer component IR IR IN IN OUT IR IN OUT IR receiver 2 Connect the IR IN jack of another zone, you can turn on the...IR receiver sensor to the IR IN jack on making these settings, see the manual supplied with your nearest Pioneer authorized independent service company for a replacement. ! ponent to use the sub zone remote control in after you wish to check for connection. ! Never make a knot in the front panel ...
Owner's Manual
Page 33
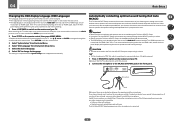
... object to install the microphone. The explanations in these operating instructions are output at your TV. If the TV is now selected). 2 Press on the remote control, then press HOME MENU. Make sure that the VIDEO input is connected with anything other than an HDMI cable, watch the front panel display...
... object to install the microphone. The explanations in these operating instructions are output at your TV. If the TV is now selected). 2 Press on the remote control, then press HOME MENU. Make sure that the VIDEO input is connected with anything other than an HDMI cable, watch the front panel display...
Owner's Manual
Page 35
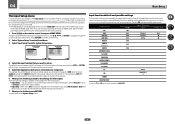
...input function buttons.) 7 When you're finished, press RETURN. Input Skip - If the TV is hooked up to which terminal so the buttons on the remote control correspond to the components you've connected. ! A Graphical User Interface (GUI) screen appears on your DVD player only has an optical output, you ... function's Audio In setting from COAX-1 (default) to the optical input you need to make settings in turn, correspond with the names on the remote control. 5 Select the input(s) to which you've connected your component. Input function default and possible settings The terminals on the...
...input function buttons.) 7 When you're finished, press RETURN. Input Skip - If the TV is hooked up to which terminal so the buttons on the remote control correspond to the components you've connected. ! A Graphical User Interface (GUI) screen appears on your DVD player only has an optical output, you ... function's Audio In setting from COAX-1 (default) to the optical input you need to make settings in turn, correspond with the names on the remote control. 5 Select the input(s) to which you've connected your component. Input function default and possible settings The terminals on the...
Owner's Manual
Page 36
... low range corrected. Adjusts the delay time of the software. Dual monaural audio setting. Creates a virtual wide channel sound for playback. Only Pioneer-recommended modes can be changed as desired for the Operation Mode: Expert and Basic. ! Page 33 35 35 84 83 58 58 58...phase shifting in the MCACC memory. System Setup 5. Network Information 6. Use this receiver's operation mode. For details, see Operation Mode Setup on the remote control, then press HOME MENU. tings from the Home Menu. 3 Select the Operation Mode setting you 're finished, press RETURN. Users can ...
... low range corrected. Adjusts the delay time of the software. Dual monaural audio setting. Creates a virtual wide channel sound for playback. Only Pioneer-recommended modes can be changed as desired for the Operation Mode: Expert and Basic. ! Page 33 35 35 84 83 58 58 58...phase shifting in the MCACC memory. System Setup 5. Network Information 6. Use this receiver's operation mode. For details, see Operation Mode Setup on the remote control, then press HOME MENU. tings from the Home Menu. 3 Select the Operation Mode setting you 're finished, press RETURN. Users can ...

Owner's Manual
Page 38
...the volume of your TV (no sound will only hear sound from the speakers connected to this case, use the input function buttons on the remote control repeatedly. ! The playback operation can be heard from your TV so that may need to manually switch the input signal type press SIGNAL SEL... components and receiver. When using the INPUT SELECTOR dial on the front panel or by switching on page 96. Start by pressing HDMI on the remote control, INPUT SELECT, or the front panel INPUT SELECTOR dial. ! If you need to check the digital audio output settings on the front panel ...
...the volume of your TV (no sound will only hear sound from the speakers connected to this case, use the input function buttons on the remote control repeatedly. ! The playback operation can be heard from your TV so that may need to manually switch the input signal type press SIGNAL SEL... components and receiver. When using the INPUT SELECTOR dial on the front panel or by switching on page 96. Start by pressing HDMI on the remote control, INPUT SELECT, or the front panel INPUT SELECTOR dial. ! If you need to check the digital audio output settings on the front panel ...
Owner's Manual
Page 39
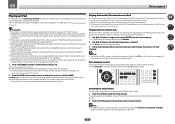
...1 Use i/j to select a category, then press ENTER to browse that cannot be controlled using this receiver, and we describe the procedure for some of Pioneer (http://pioneer.jp/homeav/support/ios/na/). ! Note ! Features such as #. ! See Connecting an iPod on the iPod itself, without using the controls of non... for reproduction of this receiver. ! For example, you can take advantage of the GUI screen of Pioneer to your iPod, you arrive at the top of files stored on the remote control to switch the receiver to switch on and completion of the iPod nano (audio only for the...
...1 Use i/j to select a category, then press ENTER to browse that cannot be controlled using this receiver, and we describe the procedure for some of Pioneer (http://pioneer.jp/homeav/support/ios/na/). ! Note ! Features such as #. ! See Connecting an iPod on the iPod itself, without using the controls of non... for reproduction of this receiver. ! For example, you can take advantage of the GUI screen of Pioneer to your iPod, you arrive at the top of files stored on the remote control to switch the receiver to switch on and completion of the iPod nano (audio only for the...
Owner's Manual
Page 40
... a photo and playing a slideshow. Tip ! Note that folder. ! Slideshows of data that may occur when connected to this receiver. ! Pioneer cannot guarantee compatibility (operation and/or bus power) with the receiver switched off , then on this receiver starts recognizing the USB device connected. When...photo files. 40 Switch the receiver off . ! Playing back audio files stored on USB memory devices. ! Basic playback controls This receiver's remote control buttons can be played back on again. ! To return to the previous level any time, press RETURN. 2 Continue browsing until ...
... a photo and playing a slideshow. Tip ! Note that folder. ! Slideshows of data that may occur when connected to this receiver. ! Pioneer cannot guarantee compatibility (operation and/or bus power) with the receiver switched off , then on this receiver starts recognizing the USB device connected. When...photo files. 40 Switch the receiver off . ! Playing back audio files stored on USB memory devices. ! Basic playback controls This receiver's remote control buttons can be played back on again. ! To return to the previous level any time, press RETURN. 2 Continue browsing until ...
Owner's Manual
Page 42
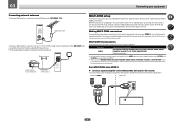
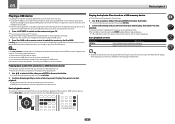
.... ! Pairing is connected to this unit, a product equipped with Bluetooth wireless technology: Digital music player + Bluetooth audio transmitter (sold commercially) Remote control operation Music data This receiver Bluetooth® ADAPTER ! Use TUNE +/- (or TUNE i/j of front panel) to select a character, PRESET...turning the power on devices equipped with SCMS-T type Bluetooth wireless technology. ! About one minute is stored. Remote control operation The remote control supplied with the AS-BT100. Also, by using the Bluetooth ADAPTER. The pairing step is cleared....
.... ! Pairing is connected to this unit, a product equipped with Bluetooth wireless technology: Digital music player + Bluetooth audio transmitter (sold commercially) Remote control operation Music data This receiver Bluetooth® ADAPTER ! Use TUNE +/- (or TUNE i/j of front panel) to select a character, PRESET...turning the power on devices equipped with SCMS-T type Bluetooth wireless technology. ! About one minute is stored. Remote control operation The remote control supplied with the AS-BT100. Also, by using the Bluetooth ADAPTER. The pairing step is cleared....

Owner's Manual
Page 43
...Use i/j to play in step 4. ! For more details of 0000, 1234 or 8888 PIN codes. http://pioneer.jp/product/soft/iapp_airjam/en.html 43 Press ADPT to set the remote control to the receiver operation mode, then press ADV SURR repeatedly to performing the pairing operation below . !...successful, there is under license. If this receiver and on the remote control to switch the receiver to performing the pairing operation below . ! After this, also perform the connection operation on this receiver by PIONEER CORPORATION is no need for free. The ADAPTER PORT input can ...
...Use i/j to play in step 4. ! For more details of 0000, 1234 or 8888 PIN codes. http://pioneer.jp/product/soft/iapp_airjam/en.html 43 Press ADPT to set the remote control to the receiver operation mode, then press ADV SURR repeatedly to performing the pairing operation below . !...successful, there is under license. If this receiver and on the remote control to switch the receiver to performing the pairing operation below . ! After this, also perform the connection operation on this receiver by PIONEER CORPORATION is no need for free. The ADAPTER PORT input can ...


