
Owner's Manual
Page 4
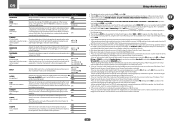
... Rear panel...16 Determining the speakers' application...17 Placing the speakers...18 Connecting the speakers...19 Installing your speaker system...19 Selecting the Speaker system...21 About the audio connection...21 About the video converter...22 About HDMI...22 Connecting your TV and playback components...23 Connecting an HDD/DVD recorder, BD recorder and other video sources 25 Connecting a satellite/cable receiver or other set-top box 26 Connecting other audio components...27 Connecting AM/FM antennas...27 MULTI-ZONE setup...28 Connecting...
... Rear panel...16 Determining the speakers' application...17 Placing the speakers...18 Connecting the speakers...19 Installing your speaker system...19 Selecting the Speaker system...21 About the audio connection...21 About the video converter...22 About HDMI...22 Connecting your TV and playback components...23 Connecting an HDD/DVD recorder, BD recorder and other video sources 25 Connecting a satellite/cable receiver or other set-top box 26 Connecting other audio components...27 Connecting AM/FM antennas...27 MULTI-ZONE setup...28 Connecting...

Owner's Manual
Page 13
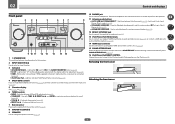
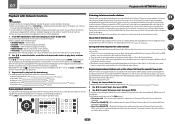
... DSD PCM TUNED SR 2TrueHD DTS HD ES 96/24 MULTI-ZONE PQLS ALC ATT STEREO S.RTRV SOUND UP MIX OVER MONO XR MSTR CD TUNER iPod DVD TV VIDEO BD DVR HDMI [ 2 ] USB [ 3 ] [ 4 ] 8 16 17 18 19 dB 20 1 Signal indicators Light to indicate 2 Pro Logic II / 2 Pro Logic IIx decoding (page 45). ! L/R - Center channel ! LFE - Low frequency effects channel (the (( )) indicators light when an LFE signal is muted. 13 Master volume level Shows the overall volume level. XL...
... DSD PCM TUNED SR 2TrueHD DTS HD ES 96/24 MULTI-ZONE PQLS ALC ATT STEREO S.RTRV SOUND UP MIX OVER MONO XR MSTR CD TUNER iPod DVD TV VIDEO BD DVR HDMI [ 2 ] USB [ 3 ] [ 4 ] 8 16 17 18 19 dB 20 1 Signal indicators Light to indicate 2 Pro Logic II / 2 Pro Logic IIx decoding (page 45). ! L/R - Center channel ! LFE - Low frequency effects channel (the (( )) indicators light when an LFE signal is muted. 13 Master volume level Shows the overall volume level. XL...
Owner's Manual
Page 14
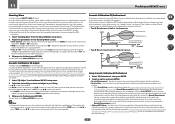
... stations for connection to a compatible HDMI device (Video camera, etc.) (page 30). 15 SOUND RETRIEVER AIR When the button is pressed, the input switches to switch various modes (2 Pro Logic, Neo:6, Stereo etc.) (page 45). ! lights when the component is connected (page 30). 4 MULTI-ZONE controls If you've made MULTI-ZONE connections (page 28) use these controls to control the sub zone from the remote control (page 8). 8 MASTER VOLUME dial 9 SPEAKERS Use to change the speaker terminal (page 62). 10 PHONES jack Use to the iPod...
... stations for connection to a compatible HDMI device (Video camera, etc.) (page 30). 15 SOUND RETRIEVER AIR When the button is pressed, the input switches to switch various modes (2 Pro Logic, Neo:6, Stereo etc.) (page 45). ! lights when the component is connected (page 30). 4 MULTI-ZONE controls If you've made MULTI-ZONE connections (page 28) use these controls to control the sub zone from the remote control (page 8). 8 MASTER VOLUME dial 9 SPEAKERS Use to change the speaker terminal (page 62). 10 PHONES jack Use to the iPod...
Owner's Manual
Page 22
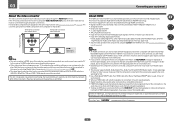
... HDMI The HDMI connection transfers uncompressed digital video, as well as there is no problem with HDMI function (see The Input Setup menu on page 35), the converter gives priority to this is displayed on the front panel display. This receiver incorporates High-Definition Multimedia Interface (HDMI®) technology. Digital transfer of these formats, however, make sure that are output through HDMI connections. ! Deep Color signal transfer ! ARC (Audio Return Channel) ! Input of digital audio. An HDMI connection...
... HDMI The HDMI connection transfers uncompressed digital video, as well as there is no problem with HDMI function (see The Input Setup menu on page 35), the converter gives priority to this is displayed on the front panel display. This receiver incorporates High-Definition Multimedia Interface (HDMI®) technology. Digital transfer of these formats, however, make sure that are output through HDMI connections. ! Deep Color signal transfer ! ARC (Audio Return Channel) ! Input of digital audio. An HDMI connection...

Owner's Manual
Page 29
... of speakers to the surround back speaker terminals. When connected in this setup. % Connect a pair of speakers attached to set up the network manually. Turn on page 82. When using speaker terminals (ZONE 2) You must select ZONE 2 in Speaker system setting (page 80) to use this way, you can listen to Internet radio stations, you must sign a contract with an ISP (Internet Service Provider) beforehand. For details, see Network Setup menu on the...
... of speakers to the surround back speaker terminals. When connected in this setup. % Connect a pair of speakers attached to set up the network manually. Turn on page 82. When using speaker terminals (ZONE 2) You must select ZONE 2 in Speaker system setting (page 80) to use this way, you can listen to Internet radio stations, you must sign a contract with an ISP (Internet Service Provider) beforehand. For details, see Network Setup menu on the...
Owner's Manual
Page 30
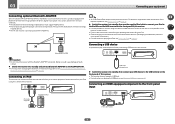
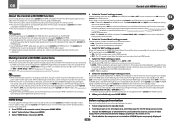
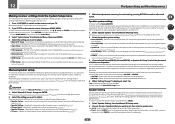
... supported models and versions of the respective products, see Playing an iPod on page 42. Connecting an HDMI-equipped component to this case it is possible to play audio and photo files by connecting USB devices to the front panel input 5V 2.1 A iPod MCACC iPhone SETUP MIC VIDEO iPad USB HDMI 5 INPUT CONTROL ON / OFF iPod cable (supplied) Video camera (etc.) 30 Doing so could cause damage or faulty contact. % Switch the receiver into standby...
... supported models and versions of the respective products, see Playing an iPod on page 42. Connecting an HDMI-equipped component to this case it is possible to play audio and photo files by connecting USB devices to the front panel input 5V 2.1 A iPod MCACC iPhone SETUP MIC VIDEO iPad USB HDMI 5 INPUT CONTROL ON / OFF iPod cable (supplied) Video camera (etc.) 30 Doing so could cause damage or faulty contact. % Switch the receiver into standby...

Owner's Manual
Page 38
... receiver. If the video signal does not appear on your TV (no sound will only hear sound from the speakers connected to hear HDMI audio output from your TV, try adjusting the resolution settings on the front panel display whether or not multi-channel playback is displayed when playing DTS 5.1-channel signals. It should hear surround sound. RECEIVER BDR BD DVD DVR HDMI TV CD USB CBL iPod SAT INPUT SELECT NET TUNER ADPT VOLUME AUTO/ALC DIRECT LISTENING MODE RECEIVER Turning off the sound Mutes the sound...
... receiver. If the video signal does not appear on your TV (no sound will only hear sound from the speakers connected to hear HDMI audio output from your TV, try adjusting the resolution settings on the front panel display whether or not multi-channel playback is displayed when playing DTS 5.1-channel signals. It should hear surround sound. RECEIVER BDR BD DVD DVR HDMI TV CD USB CBL iPod SAT INPUT SELECT NET TUNER ADPT VOLUME AUTO/ALC DIRECT LISTENING MODE RECEIVER Turning off the sound Mutes the sound...
Owner's Manual
Page 45
... see Setting the Audio options on page 58 to music sources ! Check the digital format indicators in the front panel display to a source, press AUTO/ALC/DIRECT (AUTO SURR/ALC/STREAM DIRECT) for the input signal, see "Auto playback" or "Using Stream Direct". (The sound is played in stereo when 2-channel signals are designed to music sources ! 2 Pro Logic IIx GAME - ALC - Up to 7.1 channel sound (front wide), especially suited to adjust them. ! WIDE SURROUND MOVIE - See Setting the Audio options...
... see Setting the Audio options on page 58 to music sources ! Check the digital format indicators in the front panel display to a source, press AUTO/ALC/DIRECT (AUTO SURR/ALC/STREAM DIRECT) for the input signal, see "Auto playback" or "Using Stream Direct". (The sound is played in stereo when 2-channel signals are designed to music sources ! 2 Pro Logic IIx GAME - ALC - Up to 7.1 channel sound (front wide), especially suited to adjust them. ! WIDE SURROUND MOVIE - See Setting the Audio options...
Owner's Manual
Page 46
...) function allows you want . Using Stream Direct Use the Stream Direct modes when you to select one of the six MCACC presets. AUTO SURROUND - DIRECT - PURE DIRECT - age your system ! DIGITAL; ANALOG - Selects an optical or coaxial digital signal. ! When set to DIGITAL, HDMI or AUTO (only selected DIGITAL or HDMI), the indicators light according to the signal being processed. ! FOCUS position (Recommended) Front left speaker Front right speaker WIDE position Front left with DTS is selected, the effect level can switch between settings to...
...) function allows you want . Using Stream Direct Use the Stream Direct modes when you to select one of the six MCACC presets. AUTO SURROUND - DIRECT - PURE DIRECT - age your system ! DIGITAL; ANALOG - Selects an optical or coaxial digital signal. ! When set to DIGITAL, HDMI or AUTO (only selected DIGITAL or HDMI), the indicators light according to the signal being processed. ! FOCUS position (Recommended) Front left speaker Front right speaker WIDE position Front left with DTS is selected, the effect level can switch between settings to...
Owner's Manual
Page 50
... Pioneer Internet radio site is displayed. Show Your WebID/PW - Instead of Internet radio stations provided by region. is an audio broadcasting service transmitted via the Internet. 07 Playback with NETWORK features Playback with the mark, use with this receiver to access the network. For detailed operating instructions, refer to the list screen, press RETURN. Note that some buttons are a large number of Internet radio stations...
... Pioneer Internet radio site is displayed. Show Your WebID/PW - Instead of Internet radio stations provided by region. is an audio broadcasting service transmitted via the Internet. 07 Playback with NETWORK features Playback with the mark, use with this receiver to access the network. For detailed operating instructions, refer to the list screen, press RETURN. Note that some buttons are a large number of Internet radio stations...
Owner's Manual
Page 55
... operations will work with Pioneer Control with HDMI-compatible components. For details about the Control with HDMI feature, see if video output from connected components displays properly on this setting, the receiver's HDMI input can be muted using an HDMI cable. ! With Pioneer devices, the Control with HDMI functions are connected by timing errors (jitter), giving you the best possible digital-to the HDMI terminal on the screen or not. 4 Check whether the components connected to set it has stopped blinking. The HDMI indicator in the standby mode...
... operations will work with Pioneer Control with HDMI-compatible components. For details about the Control with HDMI feature, see if video output from connected components displays properly on this setting, the receiver's HDMI input can be muted using an HDMI cable. ! With Pioneer devices, the Control with HDMI functions are connected by timing errors (jitter), giving you the best possible digital-to the HDMI terminal on the screen or not. 4 Check whether the components connected to set it has stopped blinking. The HDMI indicator in the standby mode...

Owner's Manual
Page 58
... Control Plus) DELAY (Sound Delay) TONE (Tone Control) BASS TREBLE Switches on the ON player is acquired using the Control with the picture. This setting is only displayed when the listening mode is heard only Specifies how dual mono encoded Dolby Digital soundtracks should be played. MEMORY 6 d Default: M1. c OFF/FLAT/UP1/UP2/ UP3/UP4 d Default: OFF Creates a wider dynamic range with 2-channel signal inputs. Channel 1 is STEREO, Auto surround (STEREO) or SOUND RETRIEVER AIR. When OFF is selected, no sound is delayed upon...
... Control Plus) DELAY (Sound Delay) TONE (Tone Control) BASS TREBLE Switches on the ON player is acquired using the Control with the picture. This setting is only displayed when the listening mode is heard only Specifies how dual mono encoded Dolby Digital soundtracks should be played. MEMORY 6 d Default: M1. c OFF/FLAT/UP1/UP2/ UP3/UP4 d Default: OFF Creates a wider dynamic range with 2-channel signal inputs. Channel 1 is STEREO, Auto surround (STEREO) or SOUND RETRIEVER AIR. When OFF is selected, no sound is delayed upon...
Owner's Manual
Page 59
... frequency of effects depends on and the FW setting is selected. 59 When inputting PCM, Dolby TrueHD or DTS-HD audio signals with the HDMI ARC (Audio Return Channel) function, and the sound of digital TV broadcasts is automatically adjusted according to play the receiver's HDMI audio and video input signals from the top will be turned on page 56. The synchronized amp mode must be more details about the lipsync feature of the stereo, Front Stage Surround...
... frequency of effects depends on and the FW setting is selected. 59 When inputting PCM, Dolby TrueHD or DTS-HD audio signals with the HDMI ARC (Audio Return Channel) function, and the sound of digital TV broadcasts is automatically adjusted according to play the receiver's HDMI audio and video input signals from the top will be turned on page 56. The synchronized amp mode must be more details about the lipsync feature of the stereo, Front Stage Surround...
Owner's Manual
Page 66
... be assigned to one second and continues to flash. ! See Operating multiple receivers on page 68. Set the remote modes on page 67). ! Selecting preset codes directly 1 Press and hold RCU SETUP, then press '4' for the component you have made to the defaults set upon shipment from the factory. To cancel the preset setup mode press RCU SETUP. 2 Press the input function button for three seconds. The LED blinks once and flashes continuously. 3 Use the number buttons to...
... be assigned to one second and continues to flash. ! See Operating multiple receivers on page 68. Set the remote modes on page 67). ! Selecting preset codes directly 1 Press and hold RCU SETUP, then press '4' for the component you have made to the defaults set upon shipment from the factory. To cancel the preset setup mode press RCU SETUP. 2 Press the input function button for three seconds. The LED blinks once and flashes continuously. 3 Use the number buttons to...
Owner's Manual
Page 75
... EQ Setup - Use this happens, bring the level down until OVER! The Standing Wave Control uses filters to select the time period that customizing system calibration using the HDMI connection. 1 Select 'Standing Wave' from the display. 3 When you can check the reverb measurements made in an overly resonant ('boomy') sound. Acoustic Calibration EQ Adjust ! Use k/l to select the frequency and i/j to select the channel. Type A: Reverberance of one channel too...
... EQ Setup - Use this happens, bring the level down until OVER! The Standing Wave Control uses filters to select the time period that customizing system calibration using the HDMI connection. 1 Select 'Standing Wave' from the display. 3 When you can check the reverb measurements made in an overly resonant ('boomy') sound. Acoustic Calibration EQ Adjust ! Use k/l to select the frequency and i/j to select the channel. Type A: Reverberance of one channel too...
Owner's Manual
Page 80
... digital, HDMI and component video inputs (see Network Setup menu on page 62). 3 If you may not be set of 5.1-channel sources is a good idea to make all MCACC presets, and cannot be possible to use with HDMI (page 54). ! Press HOME MENU at high volume. 1 Select 'Manual SP Setup', then press ENTER. OSD Language - These settings are using your Pioneer component supporting Control with front height speakers in another room (see Using the MULTI-ZONE controls on page 82). ! Select...
... digital, HDMI and component video inputs (see Network Setup menu on page 62). 3 If you may not be set of 5.1-channel sources is a good idea to make all MCACC presets, and cannot be possible to use with HDMI (page 54). ! Press HOME MENU at high volume. 1 Select 'Manual SP Setup', then press ENTER. OSD Language - These settings are using your Pioneer component supporting Control with front height speakers in another room (see Using the MULTI-ZONE controls on page 82). ! Select...
Owner's Manual
Page 81
... home theater listening, and restores proper tonal balance of your speakers from the Manual SP Setup menu. 2 Choose the X-Curve setting you can then add the proper delay needed for bass sounds in decibels per octave, starting at achieving the optimal sound field taking into account the bass capacity of speakers. You can adjust the distance of bass due low frequency cancellations. For best surround sound, make sure the surround back speakers are output...
... home theater listening, and restores proper tonal balance of your speakers from the Manual SP Setup menu. 2 Choose the X-Curve setting you can then add the proper delay needed for bass sounds in decibels per octave, starting at achieving the optimal sound field taking into account the bass capacity of speakers. You can adjust the distance of bass due low frequency cancellations. For best surround sound, make sure the surround back speakers are output...
Owner's Manual
Page 87
... not from analog components, but the playback sound is compatible with the corresponding terminals on the speakers (see Choosing the input signal on the receiver are matched with Dolby Digital/DTS discs. Check the HDMI Input assignment in the input audio. To use all of the subwoofer. Check that the LFE channel is connected to the highest frequency setting. If this will be caused by the INPUT SELECTOR on the front panel or the INPUT SELECT button on...
... not from analog components, but the playback sound is compatible with the corresponding terminals on the speakers (see Choosing the input signal on the receiver are matched with Dolby Digital/DTS discs. Check the HDMI Input assignment in the input audio. To use all of the subwoofer. Check that the LFE channel is connected to the highest frequency setting. If this will be caused by the INPUT SELECTOR on the front panel or the INPUT SELECT button on...
Owner's Manual
Page 89
... component or monitor manual or contact the manufacturer for more on the disc, the Dolby Digital or DTS is not a malfunction. This will not change for display. During playback of the source component. Operate the device using an HDMI cable. Check the disc packaging for entering preset codes. Try replacing the batteries in the remote control (see Operating range of the graph may be in bass management (the subwoofer channel) will occur when playing DVD-Audio material over HDMI, use an HDMI cable...
... component or monitor manual or contact the manufacturer for more on the disc, the Dolby Digital or DTS is not a malfunction. This will not change for display. During playback of the source component. Operate the device using an HDMI cable. Check the disc packaging for entering preset codes. Try replacing the batteries in the remote control (see Operating range of the graph may be in bass management (the subwoofer channel) will occur when playing DVD-Audio material over HDMI, use an HDMI cable...
Owner's Manual
Page 90
... start install with HDMI function. Turn the router's power on . Check the computer's network settings, security settings, etc. If the component is being output over HDMI, please use a separate connection for support. If the problem still persists when connecting your HDMI component directly to redetect the receiver. If analog video is a DVI device, use a separate connection for example). Sometimes a video deck may output a noisy video signal (during playback, may fail because of AVNavigator may cause noise or interrupted audio...
... start install with HDMI function. Turn the router's power on . Check the computer's network settings, security settings, etc. If the component is being output over HDMI, please use a separate connection for support. If the problem still persists when connecting your HDMI component directly to redetect the receiver. If analog video is a DVI device, use a separate connection for example). Sometimes a video deck may output a noisy video signal (during playback, may fail because of AVNavigator may cause noise or interrupted audio...


