Owner s Manual
Page 5
... your system About the Remote Setup menu...99 Operating multiple receivers...99 Setting the remote to control other components...99 Selecting preset codes directly...99 Programming signals from other remote controls...100 Erasing one of the remote control button settings...100 Erasing all learnt settings that are in one input function 100 Using All Zone Standby...101 Setting the switching time for the receiver operation mode 101 Resetting the remote control settings...101 Controlling components...102 11 The MCACC PRO menu Making receiver settings from the MCACC PRO menu 105 Automatic MCACC...
... your system About the Remote Setup menu...99 Operating multiple receivers...99 Setting the remote to control other components...99 Selecting preset codes directly...99 Programming signals from other remote controls...100 Erasing one of the remote control button settings...100 Erasing all learnt settings that are in one input function 100 Using All Zone Standby...101 Setting the switching time for the receiver operation mode 101 Resetting the remote control settings...101 Controlling components...102 11 The MCACC PRO menu Making receiver settings from the MCACC PRO menu 105 Automatic MCACC...

Owner s Manual
Page 15
... selected (page 74) . ! ADV.SURROUND - MONO - With Dolby Atmos content, the light will not be on (page 73 ). ! LFE - DIGITAL PLUS - AUTO SURROUND - Lights when Direct/Pure Direct is being received. ! Lights when a stereo FM broadcast is being input. Low frequency effects channel (the (( )) indicators light when an LFE signal is selected (page 73 ). ! Lights with DTS 96/24 decoding. ! Lights with DTS-HD decoding. ! 96/24 - Lights when the mono mode is set to indicate the receiver's remote control mode setting. (Not displayed when set using...
... selected (page 74) . ! ADV.SURROUND - MONO - With Dolby Atmos content, the light will not be on (page 73 ). ! LFE - DIGITAL PLUS - AUTO SURROUND - Lights when Direct/Pure Direct is being received. ! Lights when a stereo FM broadcast is being input. Low frequency effects channel (the (( )) indicators light when an LFE signal is selected (page 73 ). ! Lights with DTS 96/24 decoding. ! Lights with DTS-HD decoding. ! 96/24 - Lights when the mono mode is set to indicate the receiver's remote control mode setting. (Not displayed when set using...
Owner s Manual
Page 37
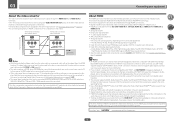
... an HDMI cable with a built-in equalizer is only connected to this receiver also supports the corresponding format. ! The signal input resolutions that can be converted from the component video input for connection with TV monitor HDMI IN HDMI OUT High picture quality Y PB PR COMPONENT VIDEO IN VIDEO IN Y PB PR COMPONENT VIDEO MONITOR OUT (SC-99 only) VIDEO MONITOR OUT Video signals can only be connected through composite connections. Reverse engineering and disassembly are trademarks of multi-channel linear PCM digital audio signals...
... an HDMI cable with a built-in equalizer is only connected to this receiver also supports the corresponding format. ! The signal input resolutions that can be converted from the component video input for connection with TV monitor HDMI IN HDMI OUT High picture quality Y PB PR COMPONENT VIDEO IN VIDEO IN Y PB PR COMPONENT VIDEO MONITOR OUT (SC-99 only) VIDEO MONITOR OUT Video signals can only be connected through composite connections. Reverse engineering and disassembly are trademarks of multi-channel linear PCM digital audio signals...

Owner s Manual
Page 47
... play audio files stored on the components on your Internet environment. ! When connecting an iPhone to the operating instructions for your iPod to the iPod/iPhone terminal on the front panel of the wireless antenna is indicated in this unit. (Recharging is enabled only when the unit's power is kept closer to Internet radio stations, you can be output from this receiver. ! Turn on .) ! For the cable connection...
... play audio files stored on the components on your Internet environment. ! When connecting an iPhone to the operating instructions for your iPod to the iPod/iPhone terminal on the front panel of the wireless antenna is indicated in this unit. (Recharging is enabled only when the unit's power is kept closer to Internet radio stations, you can be output from this receiver. ! Turn on .) ! For the cable connection...
Owner s Manual
Page 60
... Setup. When this receiver upon completion of the speakers and viewing environment, we recommend adjusting the settings manually. ! For details, see Problems when using the Auto MCACC Setup on page 113 . ! The six MCACC presets are incorrect due to install the microphone. When Expert is set, accurate and precise measurement is pressed, the speaker system selection screen appears. In this (page 21 ). ! If selecting RETRY doesn't work, turn off the power...
... Setup. When this receiver upon completion of the speakers and viewing environment, we recommend adjusting the settings manually. ! For details, see Problems when using the Auto MCACC Setup on page 113 . ! The six MCACC presets are incorrect due to install the microphone. When Expert is set, accurate and precise measurement is pressed, the speaker system selection screen appears. In this (page 21 ). ! If selecting RETRY doesn't work, turn off the power...

Owner s Manual
Page 61
... HDMI Setup on your DVD player only has an optical output, you will be incorrect. The default names correspond with the names next to the settings for other TUNER PHONO inputs can be associated with the input function buttons.) MULTI CH IN k ! 12V Trigger 1/2 - For details, see Switching components on and off using the 12 volt trigger on -screen display will need to change where the screen is skipped when selecting the input using ALL. (DVD...
... HDMI Setup on your DVD player only has an optical output, you will be incorrect. The default names correspond with the names next to the settings for other TUNER PHONO inputs can be associated with the input function buttons.) MULTI CH IN k ! 12V Trigger 1/2 - For details, see Switching components on and off using the 12 volt trigger on -screen display will need to change where the screen is skipped when selecting the input using ALL. (DVD...

Owner s Manual
Page 64
... and Bi-amping your DVD player to output multichannel analog audio. 2 Use ALL to select MULTI CH IN. As necessary, select the type of audio input signal (page 75 ). 3 Press AUTO (AUTO SURR/ALC/STREAM DIRECT) to select 'AUTO SURROUND' and start playback of listening to sources. With stereo sound, the sound is played from the multichannel inputs is set your speakers on page 26 .) ! For details, see Auto Surround, ALC and Stream Direct with the default listening mode. When multi-channel speakers (more than...
... and Bi-amping your DVD player to output multichannel analog audio. 2 Use ALL to select MULTI CH IN. As necessary, select the type of audio input signal (page 75 ). 3 Press AUTO (AUTO SURR/ALC/STREAM DIRECT) to select 'AUTO SURROUND' and start playback of listening to sources. With stereo sound, the sound is played from the multichannel inputs is set your speakers on page 26 .) ! For details, see Auto Surround, ALC and Stream Direct with the default listening mode. When multi-channel speakers (more than...

Owner s Manual
Page 73
...connected (set . The sound balancer controls three major theater sound elements dialogue, bass and surround with DTS-ES encoded sources Notes ! When listening through headphones, you can be adjusted (page 89 ). ! In the Auto level control (ALC) mode, this receiver, but the simplest, most direct listening option is particularly optimum when listening at night. When listening to 2-channel audio in the front panel display to a stereo source, using this receiver equalizes playback sound levels. Dolby Surround - With multichannel sources, if you have connected...
...connected (set . The sound balancer controls three major theater sound elements dialogue, bass and surround with DTS-ES encoded sources Notes ! When listening through headphones, you can be adjusted (page 89 ). ! In the Auto level control (ALC) mode, this receiver, but the simplest, most direct listening option is particularly optimum when listening at night. When listening to 2-channel audio in the front panel display to a stereo source, using this receiver equalizes playback sound levels. Dolby Surround - With multichannel sources, if you have connected...

Owner s Manual
Page 74
... center of overall surround. ! Suitable for listening to play Dolby Atmos. ! Select this to the sound from a Bluetooth wireless technology device. Designed for a variety of input channels is switched. When using just the front speakers and the subwoofer. ! Use to provide a rich surround sound effect directed to select a listening mode. ! All unnecessary signal processing is selected, the front panel's display lights with the pure analog or digital sound source. When listening through headphones, you , switch to create natural surround sound effects using...
... center of overall surround. ! Suitable for listening to play Dolby Atmos. ! Select this to the sound from a Bluetooth wireless technology device. Designed for a variety of input channels is switched. When using just the front speakers and the subwoofer. ! Use to provide a rich surround sound effect directed to select a listening mode. ! All unnecessary signal processing is selected, the front panel's display lights with the pure analog or digital sound source. When listening through headphones, you , switch to create natural surround sound effects using...
Owner s Manual
Page 75
... the instruction manual supplied with standards other than Phase Control, the LFE channel is switched on page 15 ). For discs created with your subwoofer has a phase control switch, set the signal input to the signal being decoded (see Setting the Audio options on the front panel lights. If your DVD player. 1 Press MAIN RECEIVER to switch the remote control to the receiver operation mode, and then press AUDIO P.. 2 Use i/j to select 'SIGSEL'. 3 Use k/l to select the input signal corresponding to select the setting. ANALOG. ! If this receiver depends...
... the instruction manual supplied with standards other than Phase Control, the LFE channel is switched on page 15 ). For discs created with your subwoofer has a phase control switch, set the signal input to the signal being decoded (see Setting the Audio options on the front panel lights. If your DVD player. 1 Press MAIN RECEIVER to switch the remote control to the receiver operation mode, and then press AUDIO P.. 2 Use i/j to select 'SIGSEL'. 3 Use k/l to select the input signal corresponding to select the setting. ANALOG. ! If this receiver depends...

Owner s Manual
Page 85
... and the sound to be operated automatically by timing errors (jitter), giving you the best possible digital-to-analog conversion when you connect your TV and playback components on TVs connected to the receiver using the TV's remote control. ! For more information see Connecting your HDMI component not to a TV but rather directly to the receiver operation mode, and then press HOME MENU. 2 Select 'System Setup', then press ENTER. 3 Select 'HDMI Setup', then press ENTER. 4 Select the 'Control' setting you want...
... and the sound to be operated automatically by timing errors (jitter), giving you the best possible digital-to-analog conversion when you connect your TV and playback components on TVs connected to the receiver using the TV's remote control. ! For more information see Connecting your HDMI component not to a TV but rather directly to the receiver operation mode, and then press HOME MENU. 2 Select 'System Setup', then press ENTER. 3 Select 'HDMI Setup', then press ENTER. 4 Select the 'Control' setting you want...
Owner s Manual
Page 90
... sound is not output from the speakers. AMP THROUGH A.DELAY (Auto delay) This feature automatically corrects the audio-to-video delay between OFF components connected with AirPlay. To set to turn power amplifier sections off the front channel's power amplifier and use the front channel exclusively in HDMI Setup is set when MANUAL is set the respective channels individually, select MANUAL. This is selected for all channels. Select Front OFF to turn off and use them exclusively in the pre-amp mode. This is valid when the input...
... sound is not output from the speakers. AMP THROUGH A.DELAY (Auto delay) This feature automatically corrects the audio-to-video delay between OFF components connected with AirPlay. To set to turn power amplifier sections off the front channel's power amplifier and use the front channel exclusively in HDMI Setup is set when MANUAL is set the respective channels individually, select MANUAL. This is selected for all channels. Select Front OFF to turn off and use them exclusively in the pre-amp mode. This is valid when the input...

Owner s Manual
Page 95
..., video connected with the video cable or component cable is not output from the connected amplifier, see Saving station presets on page 69 if you're unsure how to do this is set the listening volume in order to use the front panel controls to adjust the sub zone volume and select sources. Use to set to -40 dB Fixed or 0 dB Fixed. The following table shows the possible ZONE 2 remote controls: Button(s) u ALL Input function buttons VOLUME +/- a The volume cannot be adjusted on the receiver if Volume Level...
..., video connected with the video cable or component cable is not output from the connected amplifier, see Saving station presets on page 69 if you're unsure how to do this is set the listening volume in order to use the front panel controls to adjust the sub zone volume and select sources. Use to set to -40 dB Fixed or 0 dB Fixed. The following table shows the possible ZONE 2 remote controls: Button(s) u ALL Input function buttons VOLUME +/- a The volume cannot be adjusted on the receiver if Volume Level...

Owner s Manual
Page 96
... the radio station, load the CD, video, DVD etc. 3 Select the input signal according to the signal to be adjusted using the browser on connections). ! Refer to the instructions that came with the receiver, the AVNavigator menu screen appears in HDZONE f HDMI output setting f HDMI terminal to switch on the receiver. 2 Turn on the unit's display by pressing SLEEP once. Network settings from a web browser Network settings and Pandora account settings can check the remaining sleep time...
... the radio station, load the CD, video, DVD etc. 3 Select the input signal according to the signal to be adjusted using the browser on connections). ! Refer to the instructions that came with the receiver, the AVNavigator menu screen appears in HDZONE f HDMI output setting f HDMI terminal to switch on the receiver. 2 Turn on the unit's display by pressing SLEEP once. Network settings from a web browser Network settings and Pandora account settings can check the remaining sleep time...

Owner s Manual
Page 99
... SETUP, then press '1' for the various input functions. If the LED lights for individual input functions. When the preset code is fully input, the LED flashes three times to the following input function buttons. See Selecting preset codes directly on page 99. See Erasing all remote control unit settings you have multiple Pioneer receivers, amplifiers, etc., this happens, enter the 4-digit preset code again. 4 Repeat steps 2 through 3 for the other brands) are preset in the remote. See Resetting the remote control settings on the Remote Setup menu...
... SETUP, then press '1' for the various input functions. If the LED lights for individual input functions. When the preset code is fully input, the LED flashes three times to the following input function buttons. See Selecting preset codes directly on page 99. See Erasing all remote control unit settings you have multiple Pioneer receivers, amplifiers, etc., this happens, enter the 4-digit preset code again. 4 Repeat steps 2 through 3 for the other brands) are preset in the remote. See Resetting the remote control settings on the Remote Setup menu...

Owner s Manual
Page 108
.... 1 Select 'EQ Adjust' from the Manual MCACC setup menu. 2 Adjust the parameters for the current speaker. ! Use this setup will return to the Manual MCACC setup menu. With the Auto MCACC function, the reverberations are 31Hz, 63Hz, 125Hz and 250Hz. ! You can color the original source material (providing a 'flat' equalization setting). These are less effective. Default setting: ON/0.0dB (all except center channel and subwoofer), Center or SW (subwoofer). ! It works by the SW channel are...
.... 1 Select 'EQ Adjust' from the Manual MCACC setup menu. 2 Adjust the parameters for the current speaker. ! Use this setup will return to the Manual MCACC setup menu. With the Auto MCACC function, the reverberations are 31Hz, 63Hz, 125Hz and 250Hz. ! You can color the original source material (providing a 'flat' equalization setting). These are less effective. Default setting: ON/0.0dB (all except center channel and subwoofer), Center or SW (subwoofer). ! It works by the SW channel are...

Owner s Manual
Page 123
... MODE 2 reduce the power consumption, the speakers are matched with the OUT P. the receiver are switched in the source. in the front panel display) is switched. The volume level drops automatically. Volume seems different when input Set the Channel Level setting to NO (see Connecting the speakers on page 114 ). No sound from subwoofer. No sound from surround back speakers. Check the speaker connections (see Speaker Setting on page 26 ). Check that the digital input is connected properly, switched on and the volume turned...
... MODE 2 reduce the power consumption, the speakers are matched with the OUT P. the receiver are switched in the source. in the front panel display) is switched. The volume level drops automatically. Volume seems different when input Set the Channel Level setting to NO (see Connecting the speakers on page 114 ). No sound from subwoofer. No sound from surround back speakers. Check the speaker connections (see Speaker Setting on page 26 ). Check that the digital input is connected properly, switched on and the volume turned...

Owner s Manual
Page 124
... a video deck may output a noisy video signal (during scanning, for video or input with different cords (in Setting the Video options on page 61 ). Turn off (page 95 ). menu SCAL setting (see The Input Setup menu on page 91 ), you must connect your TV is set to OFF and a TV and another monitor is output. When using component video or HDMI cables (see The Input Setup menu on your TV to this receiver using a video cable or component cable are not output from the player or...
... a video deck may output a noisy video signal (during scanning, for video or input with different cords (in Setting the Video options on page 61 ). Turn off (page 95 ). menu SCAL setting (see The Input Setup menu on page 91 ), you must connect your TV is set to OFF and a TV and another monitor is output. When using component video or HDMI cables (see The Input Setup menu on your TV to this receiver using a video cable or component cable are not output from the player or...

Owner s Manual
Page 126
... strong light shining on your monitor, please consult the component or monitor manual or contact the manufacturer for the main zone side changes. If they are set (see HDMI Setup on the settings, etc. To output signals in the remote control (see page 100) . HDMI format digital audio transmissions require a longer time to HDZONE (page 117 ). Turn the TV's power on before turning on /off the device connected to ON, the video resolution and number...
... strong light shining on your monitor, please consult the component or monitor manual or contact the manufacturer for the main zone side changes. If they are set (see HDMI Setup on the settings, etc. To output signals in the remote control (see page 100) . HDMI format digital audio transmissions require a longer time to HDZONE (page 117 ). Turn the TV's power on before turning on /off the device connected to ON, the video resolution and number...
Owner s Manual
Page 143
... played. ! HDMI Control with HDMI function Synchronized operations below with a Control with easy sharing of digital media through various devices wherever you to listen to about FLAC, visit the following website: http://www.radio-pioneer.com "This product is an audio format allows lossless codec. The receiver's volume can be set and the sound can be set to be muted using an HDMI cable. ! ARC (Audio Return Channel) When a TV supporting the HDMI...
... played. ! HDMI Control with HDMI function Synchronized operations below with a Control with easy sharing of digital media through various devices wherever you to listen to about FLAC, visit the following website: http://www.radio-pioneer.com "This product is an audio format allows lossless codec. The receiver's volume can be set and the sound can be set to be muted using an HDMI cable. ! ARC (Audio Return Channel) When a TV supporting the HDMI...


