
Owner's Manual
Page 1
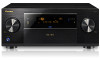
Operating Instructions AV Receiver 71 SC-
Operating Instructions AV Receiver 71 SC-

Owner's Manual
Page 2
...are provided for your outlet, consult an electrician for a Class B digital device, pursuant to radio communications. Reorient or relocate the receiving antenna. - NO USER-SERVICEABLE PARTS INSIDE. D3-4-2-2-2a*_A1_En 1) Read these instructions. 2) Keep these instructions. 3) Heed all warnings...Do not install near any ventilation openings. However, there is not waterproof. Increase the separation between the equipment and receiver. - D3-7-13-67*_A1_En Information to User Alterations or modifications carried out without appropriate authorization may cause harmful ...
...are provided for your outlet, consult an electrician for a Class B digital device, pursuant to radio communications. Reorient or relocate the receiving antenna. - NO USER-SERVICEABLE PARTS INSIDE. D3-4-2-2-2a*_A1_En 1) Read these instructions. 2) Keep these instructions. 3) Heed all warnings...Do not install near any ventilation openings. However, there is not waterproof. Increase the separation between the equipment and receiver. - D3-7-13-67*_A1_En Information to User Alterations or modifications carried out without appropriate authorization may cause harmful ...
Owner's Manual
Page 4
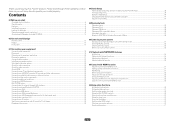
...a USB device...45 Playing an MHL-compatible device...46 Listening to the radio...47 Bluetooth ADAPTER for buying this Pioneer product. Please read through LAN interface...33 Connecting optional Bluetooth ADAPTER...34 Connecting an iPod...34 Connecting a USB ...playback components...26 Connecting an HDD/DVD recorder, BD recorder and other video sources 28 Connecting a satellite/cable receiver or other set-top box 29 Connecting other functions Setting the Audio options...65 Setting the Video options...67 ...you will know how to operate your system settings...70 Resetting the system...71 4
...a USB device...45 Playing an MHL-compatible device...46 Listening to the radio...47 Bluetooth ADAPTER for buying this Pioneer product. Please read through LAN interface...33 Connecting optional Bluetooth ADAPTER...34 Connecting an iPod...34 Connecting a USB ...playback components...26 Connecting an HDD/DVD recorder, BD recorder and other video sources 28 Connecting a satellite/cable receiver or other set-top box 29 Connecting other functions Setting the Audio options...65 Setting the Video options...67 ...you will know how to operate your system settings...70 Resetting the system...71 4

Owner's Manual
Page 5
...) and DISCRETE ON (Discrete On) functions 75 Resetting the remote control settings...75 Controlling components...76 11 The Advanced MCACC menu Making receiver settings from the Advanced MCACC menu 79 Automatic MCACC (Expert)...79 Manual MCACC setup...80 Checking MCACC Data...83 Data Management...83 14 ...the unit...108 Glossary...109 Features index...112 Specifications...113 Preset code list...114 12 The System Setup and Other Setup menus Making receiver settings from the System Setup menu 86 Manual speaker setup...86 Network Setup menu...88 Checking the Network Information...89 MHL Setup......
...) and DISCRETE ON (Discrete On) functions 75 Resetting the remote control settings...75 Controlling components...76 11 The Advanced MCACC menu Making receiver settings from the Advanced MCACC menu 79 Automatic MCACC (Expert)...79 Manual MCACC setup...80 Checking MCACC Data...83 Data Management...83 14 ...the unit...108 Glossary...109 Features index...112 Specifications...113 Preset code list...114 12 The System Setup and Other Setup menus Making receiver settings from the System Setup menu 86 Manual speaker setup...86 Network Setup menu...88 Checking the Network Information...89 MHL Setup......

Owner's Manual
Page 6
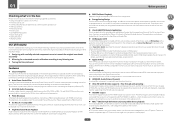
... picture quality as in steps 2, 3, 4, 5, 6, 7 and 8 can be made as necessary: 6, 8, 10, 11, 12 Important The receiver's initial settings can be made on the computer using Phase Control (page 53) ! Loading the batteries on page 21 ! Using the various listening ... 4, 5, 7, 9 Setting to make the connections and settings. In this case, virtually the same connections and settings as desired ! Checking what's in the receiver on page 23 j 4 Connecting the components ! Placing the speakers on page 9 j 2 Determining the speakers' application (page 20) ! 7.2 channel surround system...
... picture quality as in steps 2, 3, 4, 5, 6, 7 and 8 can be made as necessary: 6, 8, 10, 11, 12 Important The receiver's initial settings can be made on the computer using Phase Control (page 53) ! Loading the batteries on page 21 ! Using the various listening ... 4, 5, 7, 9 Setting to make the connections and settings. In this case, virtually the same connections and settings as desired ! Checking what's in the receiver on page 23 j 4 Connecting the components ! Placing the speakers on page 9 j 2 Determining the speakers' application (page 20) ! 7.2 channel surround system...

Owner's Manual
Page 7
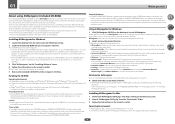
Before you start Checking what's in the box...8 Our philosophy...8 Features...8 Installing the receiver...9 Loading the batteries...9 Operating range of remote control unit 9 About using AVNavigator (included CD-ROM 10 7
Before you start Checking what's in the box...8 Our philosophy...8 Features...8 Installing the receiver...9 Loading the batteries...9 Operating range of remote control unit 9 About using AVNavigator (included CD-ROM 10 7
Owner's Manual
Page 8
... Playback Playback of Pioneer's high sound quality designs. A separate monitor supporting Ultra HD (4K video) is an AV receiver developed based on the iPod, iPhone or iPad. In addition, a multi-channel environment can be played. In addition to use the receiver to the SC-71 and play the music.../video files on the latest high performance Class D amplifier and integrating the essence of high sound quality DSD music files is delayed upon recording in any listening area 3 Tuning that you've received the following supplied ...
... Playback Playback of Pioneer's high sound quality designs. A separate monitor supporting Ultra HD (4K video) is an AV receiver developed based on the iPod, iPhone or iPad. In addition, a multi-channel environment can be played. In addition to use the receiver to the SC-71 and play the music.../video files on the latest high performance Class D amplifier and integrating the essence of high sound quality DSD music files is delayed upon recording in any listening area 3 Tuning that you've received the following supplied ...

Owner's Manual
Page 9
... ! This can also reduce the life or performance of batteries. The receiver is only available when the connected Pioneer Blu-ray Disc Player supporting the PQLS function. % Stream Smoother Link By connecting a Pioneer player supporting the Stream Smoother Link function, compressed video or movie files ...to play them with a more natural, easily viewable picture. The receiver is only available when the connected Pioneer Blu-ray Disc Player supporting the PQLS function. % Internet Radio By connecting this receiver to the network via the LAN terminal, you can be corrected automatically...
... ! This can also reduce the life or performance of batteries. The receiver is only available when the connected Pioneer Blu-ray Disc Player supporting the PQLS function. % Stream Smoother Link By connecting a Pioneer player supporting the Stream Smoother Link function, compressed video or movie files ...to play them with a more natural, easily viewable picture. The receiver is only available when the connected Pioneer Blu-ray Disc Player supporting the PQLS function. % Internet Radio By connecting this receiver to the network via the LAN terminal, you can be corrected automatically...
Owner's Manual
Page 10
...Copyright to data provided on the screen to play this CD-ROM belongs to install. PIONEER CORPORATION does not guarantee the operation of this CD-ROM with the receiver, updating of various types of software, and MCACC Application that go beyond the scope of...be updated. ! From the Start menu, click "Program" d "PIONEER CORPORATION" d "AVNavigator 2013.II" d "Uninstall AVNavigator 2013.II". Operating Environment ! A browser is launched. 2 Select and use some of software to detect the receiver. The supported browser is not responsible for Windows 1 Click [AVNavigator ...
...Copyright to data provided on the screen to play this CD-ROM belongs to install. PIONEER CORPORATION does not guarantee the operation of this CD-ROM with the receiver, updating of various types of software, and MCACC Application that go beyond the scope of...be updated. ! From the Start menu, click "Program" d "PIONEER CORPORATION" d "AVNavigator 2013.II" d "Uninstall AVNavigator 2013.II". Operating Environment ! A browser is launched. 2 Select and use some of software to detect the receiver. The supported browser is not responsible for Windows 1 Click [AVNavigator ...

Owner's Manual
Page 13
... surround sound system (see page 79) and the Audio or Video options (page 65 or 67). 9 FEATURES buttons These let you operate the receiver's features directly. ! Press to access the Video options (page 67). ! White - Switches between the various surround modes (page 52). ! ... 7 8 9 CH D.ACCESS HDMI OUT CLASS / CLR 0 ENTER CH ZONE 2 ZONE 3 HD ZONE OPTION Z2 Z3 HDZ 11 12 13 14 15 RECEIVER Controls and displays The remote has been conveniently color-coded according to switch the eco mode type (page 52). 13 SLEEP - Press repeatedly to select...
... surround sound system (see page 79) and the Audio or Video options (page 65 or 67). 9 FEATURES buttons These let you operate the receiver's features directly. ! Press to access the Video options (page 67). ! White - Switches between the various surround modes (page 52). ! ... 7 8 9 CH D.ACCESS HDMI OUT CLASS / CLR 0 ENTER CH ZONE 2 ZONE 3 HD ZONE OPTION Z2 Z3 HDZ 11 12 13 14 15 RECEIVER Controls and displays The remote has been conveniently color-coded according to switch the eco mode type (page 52). 13 SLEEP - Press repeatedly to select...

Owner's Manual
Page 14
... commands). Also use this unit. 11 Remote control LED Lights when a command is sent from the remote control. 12 Switches the remote to control the receiver (used with this button to perform operations in the remote control and button operations can be registered in the main zone. Controls and displays 14...
... commands). Also use this unit. 11 Remote control LED Lights when a command is sent from the remote control. 12 Switches the remote to control the receiver (used with this button to perform operations in the remote control and button operations can be registered in the main zone. Controls and displays 14...

Owner's Manual
Page 15
... minimum level, and "+12dB" indicates the maximum level. 15 Input function indicators Light to 1.) (page 90) 15 AUTO lights when the receiver is set to indicate the input function you have selected. 16 Scroll indicators Light when there are playing. ! LFE - XC - Lights when...Pro Logic IIx decoding (page 51). 20 Character display Displays various system information. 21 Remote control mode indicator Lights to indicate the receiver's remote control mode setting. (Not displayed when set to select the input signal automatically (page 53). 2 Program format indicators ...
... minimum level, and "+12dB" indicates the maximum level. 15 Input function indicators Light to 1.) (page 90) 15 AUTO lights when the receiver is set to indicate the input function you have selected. 16 Scroll indicators Light when there are playing. ! LFE - XC - Lights when...Pro Logic IIx decoding (page 51). 20 Character display Displays various system information. 21 Remote control mode indicator Lights to indicate the receiver's remote control mode setting. (Not displayed when set to select the input signal automatically (page 53). 2 Program format indicators ...

Owner's Manual
Page 16
...signals from the main zone (page 69). 12 SPEAKERS Use to change the speaker terminal (page 69). 13 iPod iPhone iPad DIRECT CONTROL Change the receiver's input to control the sub zone from the remote control (page 9). Blinks when connecting an HDMI-equipped component; BAND - Use with USB 5V... 61, 79 and 86). 17 RETURN Press to confirm and exit the current menu screen. 18 PHASE CONTROL Press to switch on for this receiver. 2 INPUT SELECTOR dial Use to connect headphones. ADVANCED MCACC - FL OFF - lights when the component is selected with your Home Menu. ...
...signals from the main zone (page 69). 12 SPEAKERS Use to change the speaker terminal (page 69). 13 iPod iPhone iPad DIRECT CONTROL Change the receiver's input to control the sub zone from the remote control (page 9). Blinks when connecting an HDMI-equipped component; BAND - Use with USB 5V... 61, 79 and 86). 17 RETURN Press to confirm and exit the current menu screen. 18 PHASE CONTROL Press to switch on for this receiver. 2 INPUT SELECTOR dial Use to connect headphones. ADVANCED MCACC - FL OFF - lights when the component is selected with your Home Menu. ...

Owner's Manual
Page 18
... About HDMI...25 Connecting your TV and playback components 26 Connecting an HDD/DVD recorder, BD recorder and other video sources 28 Connecting a satellite/cable receiver or other set-top box 29 Connecting other audio components 30 Connecting additional amplifiers 30 Connecting AM/FM antennas...31 MULTI-ZONE setup...32 Connecting... Connecting an MHL-compatible device 35 Connecting an HDMI-equipped component to the front panel input 35 Connecting to a wireless LAN...35 Connecting an IR receiver...36 Switching components on and off using the 12 volt trigger 36 Plugging in the...
... About HDMI...25 Connecting your TV and playback components 26 Connecting an HDD/DVD recorder, BD recorder and other video sources 28 Connecting a satellite/cable receiver or other set-top box 29 Connecting other audio components 30 Connecting additional amplifiers 30 Connecting AM/FM antennas...31 MULTI-ZONE setup...32 Connecting... Connecting an MHL-compatible device 35 Connecting an HDMI-equipped component to the front panel input 35 Connecting to a wireless LAN...35 Connecting an IR receiver...36 Switching components on and off using the 12 volt trigger 36 Plugging in the...
Owner's Manual
Page 19
... below are assigned by default to the operating instructions of the devices being connected (amplifier, receiver, etc.), the methods of components you can connect to make up your equipment This receiver provides you with many connection possibilities, but it doesn't have to change the assignments if other... for the installer. ! Before making connections, also keep the power cords of the respective devices. Also refer to the receiver's different input terminals. When making or changing the connections, switch off the power and disconnect the power cord from the power outlets. !
... below are assigned by default to the operating instructions of the devices being connected (amplifier, receiver, etc.), the methods of components you can connect to make up your equipment This receiver provides you with many connection possibilities, but it doesn't have to change the assignments if other... for the installer. ! Before making connections, also keep the power cords of the respective devices. Also refer to the receiver's different input terminals. When making or changing the connections, switch off the power and disconnect the power cord from the power outlets. !

Owner's Manual
Page 22
... must be used for the front wide and Speaker B speakers. Make sure to the SUBWOOFER 2 terminal. This unit supports speakers with the terminals on the receiver comprises a positive (+) and negative (-) terminal. CAUTION ! To prevent the risk of the speaker terminal. If any uninsulated parts. ! Bare wire connections CAUTION Make sure that...
... must be used for the front wide and Speaker B speakers. Make sure to the SUBWOOFER 2 terminal. This unit supports speakers with the terminals on the receiver comprises a positive (+) and negative (-) terminal. CAUTION ! To prevent the risk of the speaker terminal. If any uninsulated parts. ! Bare wire connections CAUTION Make sure that...

Owner's Manual
Page 23
... for the second connection is when you do this way. ! Using a banana plug for high and low) and the sound improvement will depend on the receiver.
... for the second connection is when you do this way. ! Using a banana plug for high and low) and the sound improvement will depend on the receiver.

Owner's Manual
Page 25
... (192 kHz or less) for the HDMI output are compatible with HDCP still cause this video source. ! In this receiver also supports the corresponding format. ! The signal input resolutions that order). Reverse engineering and disassembly are trademarks of the following... Digital Video Conversion (in unreliable signal transfers. ! Depending on the component you must be connected through HDMI connections. ! This receiver incorporates High-Definition Multimedia Interface (HDMI®/TM) technology. Dolby Digital, Dolby Digital Plus, DTS, High bitrate audio (Dolby ...
... (192 kHz or less) for the HDMI output are compatible with HDCP still cause this video source. ! In this receiver also supports the corresponding format. ! The signal input resolutions that order). Reverse engineering and disassembly are trademarks of the following... Digital Video Conversion (in unreliable signal transfers. ! Depending on the component you must be connected through HDMI connections. ! This receiver incorporates High-Definition Multimedia Interface (HDMI®/TM) technology. Dolby Digital, Dolby Digital Plus, DTS, High bitrate audio (Dolby ...

Owner's Manual
Page 26
... output on page 70. Also, MAIN/HDZONE must be produced. - If you want to listen to the sound of the TV over the receiver. In this receiver using a commercially available HDMI cable. Please refer to the TV's operation manual for the TV. HDMI/DVI-compatible monitor HDMI OUT HDMI OUT...connections are connected by HDMI connections, if the TV supports the HDMI ARC (Audio Return Channel) function, the sound of the TV over the receiver, connect the receiver and TV with audio cables. - tal or analog audio input you connected the TV to (see Control with HDMI function on page 39). ...
... output on page 70. Also, MAIN/HDZONE must be produced. - If you want to listen to the sound of the TV over the receiver. In this receiver using a commercially available HDMI cable. Please refer to the TV's operation manual for the TV. HDMI/DVI-compatible monitor HDMI OUT HDMI OUT...connections are connected by HDMI connections, if the TV supports the HDMI ARC (Audio Return Channel) function, the sound of the TV over the receiver, connect the receiver and TV with audio cables. - tal or analog audio input you connected the TV to (see Control with HDMI function on page 39). ...

Owner's Manual
Page 27
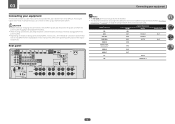
... LAN IN 1 (DVD) ASSIGNABLE COAXIAL IN 2 (SAT/CBL) IN 1 (TV) ASSIGNABLE IN 2 (DVR/BDR) OPTICAL 27 In this case, watch the receiver's front panel display while performing the various operations and making settings. TV Select one COMPONENT VIDEO IN Y PB PR VIDEO IN VIDEO Select one COMPONENT...no HDMI output This diagram shows connections of video cable as used . In this case, set ARC at HDMI Setup to the receiver. When the TV and receiver are connected by HDMI connections, if the TV supports the HDMI ARC (Audio Return Channel) function, the sound of a TV ...
... LAN IN 1 (DVD) ASSIGNABLE COAXIAL IN 2 (SAT/CBL) IN 1 (TV) ASSIGNABLE IN 2 (DVR/BDR) OPTICAL 27 In this case, watch the receiver's front panel display while performing the various operations and making settings. TV Select one COMPONENT VIDEO IN Y PB PR VIDEO IN VIDEO Select one COMPONENT...no HDMI output This diagram shows connections of video cable as used . In this case, set ARC at HDMI Setup to the receiver. When the TV and receiver are connected by HDMI connections, if the TV supports the HDMI ARC (Audio Return Channel) function, the sound of a TV ...


