
Owner's Manual
Page 1
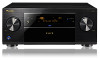
Operating Instructions AV Receiver 63 SC61 SC-
Operating Instructions AV Receiver 63 SC61 SC-

Owner's Manual
Page 2
...heat sources such as newspapers, table-cloths, curtains) or by qualified service personnel. Increase the separation between the equipment and receiver. - Connect the equipment into your safety. D3-4-2-1-7a_A1_En VENTILATION CAUTION When installing this apparatus near this equipment (such as ...with accessories sold with the cart, stand, tripod, bracket, or table specified by one fitted. Reorient or relocate the receiving antenna. - D3-7-13-67*_A1_En Information to User Alterations or modifications carried out without appropriate authorization may expose you want...
...heat sources such as newspapers, table-cloths, curtains) or by qualified service personnel. Increase the separation between the equipment and receiver. - Connect the equipment into your safety. D3-4-2-1-7a_A1_En VENTILATION CAUTION When installing this apparatus near this equipment (such as ...with accessories sold with the cart, stand, tripod, bracket, or table specified by one fitted. Reorient or relocate the receiving antenna. - D3-7-13-67*_A1_En Information to User Alterations or modifications carried out without appropriate authorization may expose you want...
Owner's Manual
Page 4
......60 Setting the PQLS function...60 About Sound Retriever Link and Stream Smoother Link 60 Cautions on the Control with HDMI function...61 09 Using other audio components...29 Connecting additional amplifiers...30 Connecting AM/FM antennas...30 MULTI-ZONE setup...31 Connecting to the...Contents 01 Before you will know how to the radio...45 Bluetooth ADAPTER for buying this Pioneer product. Please read through these operating instructions so you start Checking what's in the receiver...35 04 Basic Setup Changing the OSD display language (OSD Language 37 Automatically conducting optimum ...
......60 Setting the PQLS function...60 About Sound Retriever Link and Stream Smoother Link 60 Cautions on the Control with HDMI function...61 09 Using other audio components...29 Connecting additional amplifiers...30 Connecting AM/FM antennas...30 MULTI-ZONE setup...31 Connecting to the...Contents 01 Before you will know how to the radio...45 Bluetooth ADAPTER for buying this Pioneer product. Please read through these operating instructions so you start Checking what's in the receiver...35 04 Basic Setup Changing the OSD display language (OSD Language 37 Automatically conducting optimum ...
Owner's Manual
Page 5
...) and DISCRETE ON (Discrete On) functions 73 Resetting the remote control settings...73 Controlling components...74 11 The Advanced MCACC menu Making receiver settings from the Advanced MCACC menu 77 Automatic MCACC (Expert)...77 Manual MCACC setup...79 Checking MCACC Data...81 Data Management...82 14 ...the unit...104 Glossary...105 Features index...108 Specifications...109 Preset code list...110 12 The System Setup and Other Setup menus Making receiver settings from the System Setup menu 85 Manual speaker setup...85 Network Setup menu...87 Checking the Network Information...88 The Other ...
...) and DISCRETE ON (Discrete On) functions 73 Resetting the remote control settings...73 Controlling components...74 11 The Advanced MCACC menu Making receiver settings from the Advanced MCACC menu 77 Automatic MCACC (Expert)...77 Manual MCACC setup...79 Checking MCACC Data...81 Data Management...82 14 ...the unit...104 Glossary...105 Features index...108 Specifications...109 Preset code list...110 12 The System Setup and Other Setup menus Making receiver settings from the System Setup menu 85 Manual speaker setup...85 Network Setup menu...87 Checking the Network Information...88 The Other ...
Owner's Manual
Page 6
...page 35 j 5 Power On j 6 Changing the OSD display language (OSD Language) (page 37) j 7 MCACC speaker settings ! Plugging in the receiver on page 21 ! Better sound using AVNavigator (included CD-ROM) on page 9. 1 Before you start ! Setting the remote to control other than the ...channel level while listening (page 86) ! Using the various listening modes (page 48) ! The Advanced MCACC menu (page 76) ! Operating multiple receivers (page 71) ! Placing the speakers on page 21 ! Connecting the speakers on page 20 ! Automatically conducting optimum sound tuning (Full Auto MCACC)...
...page 35 j 5 Power On j 6 Changing the OSD display language (OSD Language) (page 37) j 7 MCACC speaker settings ! Plugging in the receiver on page 21 ! Better sound using AVNavigator (included CD-ROM) on page 9. 1 Before you start ! Setting the remote to control other than the ...channel level while listening (page 86) ! Using the various listening modes (page 48) ! The Advanced MCACC menu (page 76) ! Operating multiple receivers (page 71) ! Placing the speakers on page 21 ! Connecting the speakers on page 20 ! Automatically conducting optimum sound tuning (Full Auto MCACC)...

Owner's Manual
Page 7
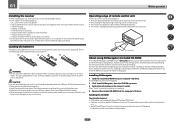
Before you start Checking what's in the box...8 Our philosophy...8 Features...8 Installing the receiver...9 Loading the batteries...9 Operating range of remote control unit 9 About using AVNavigator (included CD-ROM 9 7
Before you start Checking what's in the box...8 Our philosophy...8 Features...8 Installing the receiver...9 Loading the batteries...9 Operating range of remote control unit 9 About using AVNavigator (included CD-ROM 9 7

Owner's Manual
Page 8
... important steps: 1 Designing with carefully selected components so as possible to play them with Pioneer's exclusive Air Jam application. You can listen to the SC-63 and SC-61 and play the sound with HDMI connections. The height channel strengthens the sound field's sense... is required to the previous horizontally-oriented sound field. Features % Class D Amplifier This unit is delayed upon data processing to the receiver. % Dolby Pro Logic llz compatible Adding a pair of threedimensionality and air, producing presence and expansion. % Internet Radio By connecting ...
... important steps: 1 Designing with carefully selected components so as possible to play them with Pioneer's exclusive Air Jam application. You can listen to the SC-63 and SC-61 and play the sound with HDMI connections. The height channel strengthens the sound field's sense... is required to the previous horizontally-oriented sound field. Features % Class D Amplifier This unit is delayed upon data processing to the receiver. % Dolby Pro Logic llz compatible Adding a pair of threedimensionality and air, producing presence and expansion. % Internet Radio By connecting ...
Owner's Manual
Page 9
... for AVNavigator functions. High precision initial settings can cause batteries to check initial operations; Do not touch this unit, make the receiver's connections and initial settings in direct sunlight or other excessively hot place, such as a kitchen) ! Batteries with the unit are... obstacles between the remote control and the receiver's remote sensor. ! A browser is shining onto the remote sensor. ! Loading the batteries The batteries included with the same shape may...
... for AVNavigator functions. High precision initial settings can cause batteries to check initial operations; Do not touch this unit, make the receiver's connections and initial settings in direct sunlight or other excessively hot place, such as a kitchen) ! Batteries with the unit are... obstacles between the remote control and the receiver's remote sensor. ! A browser is shining onto the remote sensor. ! Loading the batteries The batteries included with the same shape may...

Owner's Manual
Page 10
...to consent to punitive actions. It is granted under license by Copyright Law may be made easily. ! Refer to operate the receiver from the Control Panel of Use" indicated below before using any compensation. Allows various types of the applicable OS. Detection -.... From the Start menu, click "Program" d "PIONEER CORPORATION" d "AVNavigator 2012.II" d "Uninstall AVNavigator 2012.II". 10 Before you through videos and illustrations. ! 01 Precautions For Use ! Please agree to detect the receiver. AVNavigator is not responsible for MCACC Application. AVNavigator includes the ...
...to consent to punitive actions. It is granted under license by Copyright Law may be made easily. ! Refer to operate the receiver from the Control Panel of Use" indicated below before using any compensation. Allows various types of the applicable OS. Detection -.... From the Start menu, click "Program" d "PIONEER CORPORATION" d "AVNavigator 2012.II" d "Uninstall AVNavigator 2012.II". 10 Before you through videos and illustrations. ! 01 Precautions For Use ! Please agree to detect the receiver. AVNavigator is not responsible for MCACC Application. AVNavigator includes the ...
Owner's Manual
Page 12
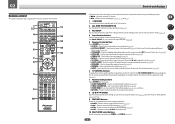
...regardless of other components (page 71). PHASE - 02 Remote control This section explains how to operate the remote control for the receiver. 1 2,3 4 5 6 7 8 9 5 10 RECEIVER ALL ZONE STBY SOURCE DISCRETE ON RCU SETUP BDR BD DVD DVR HDMI TV CD NET ADPT USB iPod CBL OPTION 1 ... SLEEP 7 8 9 CH D.ACCESS HDMI OUT CLASS / CLR 0 ENTER CH ZONE 2 ZONE 3 ZONE 4 OPTION 2 Z2 Z3 Z4 11 12 13 14 15 RECEIVER Controls and displays The remote has been conveniently color-coded according to select an input signal (page 50). ! STATUS - STANDARD - ADV SURR - SIGNAL SEL - Use...
...regardless of other components (page 71). PHASE - 02 Remote control This section explains how to operate the remote control for the receiver. 1 2,3 4 5 6 7 8 9 5 10 RECEIVER ALL ZONE STBY SOURCE DISCRETE ON RCU SETUP BDR BD DVD DVR HDMI TV CD NET ADPT USB iPod CBL OPTION 1 ... SLEEP 7 8 9 CH D.ACCESS HDMI OUT CLASS / CLR 0 ENTER CH ZONE 2 ZONE 3 ZONE 4 OPTION 2 Z2 Z3 Z4 11 12 13 14 15 RECEIVER Controls and displays The remote has been conveniently color-coded according to select an input signal (page 50). ! STATUS - STANDARD - ADV SURR - SIGNAL SEL - Use...

Owner's Manual
Page 13
Use to set up surround sound. 14 VOLUME +/- Controls and displays 13 Also use this receiver, HDMI OUT, D.FILT, OPTION 2 and ZONE 4 buttons cannot be used to select the white commands). Switch to perform operations in the remote control and button ... the remote control. 12 OPTION The preset codes of desired devices can be registered using the learning mode. 13 Switches the remote to control the receiver (used . Note !
Use to set up surround sound. 14 VOLUME +/- Controls and displays 13 Also use this receiver, HDMI OUT, D.FILT, OPTION 2 and ZONE 4 buttons cannot be used to select the white commands). Switch to perform operations in the remote control and button ... the remote control. 12 OPTION The preset codes of desired devices can be registered using the learning mode. 13 Switches the remote to control the receiver (used . Note !

Owner's Manual
Page 14
..., this lights to indicate Neo:6 processing (page 49). 19 Character display Displays various system information. 20 Remote control mode indicator Lights to indicate the receiver's remote control mode setting. (Not displayed when set to 1.) (page 89) 14 C - XC - DTS - AUTO SURROUND - Lights when... ! Light during DSD (Direct Stream Digital) to indicate the input function you have selected. 15 Scroll indicators Light when there are being received in sleep mode (page 68). 18 Matrix decoding format indicators ! 2PRO LOGIC IIx - PCM - Lights during playback of PCM signals. ...
..., this lights to indicate Neo:6 processing (page 49). 19 Character display Displays various system information. 20 Remote control mode indicator Lights to indicate the receiver's remote control mode setting. (Not displayed when set to 1.) (page 89) 14 C - XC - DTS - AUTO SURROUND - Lights when... ! Light during DSD (Direct Stream Digital) to indicate the input function you have selected. 15 Scroll indicators Light when there are being received in sleep mode (page 68). 18 Matrix decoding format indicators ! 2PRO LOGIC IIx - PCM - Lights during playback of PCM signals. ...
Owner's Manual
Page 15
... (page 31) use these controls to control the sub zone from the remote control (page 9). AUTO SURR/ALC/STREAM DIRECT - Press for this receiver. 2 INPUT SELECTOR dial Use to switch between AM and FM radio bands (page 45). ! When the headphones are connected, there is no sound...EDIT - HDMI - Switches between standby and on for Standard decoding and to the iPod and enable iPod operations on page 14. 5 Remote sensor Receives the signals from the main zone (page 67). 12 SPEAKERS Use to change the speaker terminal (page 67). 13 iPod iPhone iPad DIRECT CONTROL Change...
... (page 31) use these controls to control the sub zone from the remote control (page 9). AUTO SURR/ALC/STREAM DIRECT - Press for this receiver. 2 INPUT SELECTOR dial Use to switch between AM and FM radio bands (page 45). ! When the headphones are connected, there is no sound...EDIT - HDMI - Switches between standby and on for Standard decoding and to the iPod and enable iPod operations on page 14. 5 Remote sensor Receives the signals from the main zone (page 67). 12 SPEAKERS Use to change the speaker terminal (page 67). 13 iPod iPhone iPad DIRECT CONTROL Change...

Owner's Manual
Page 17
... About HDMI...24 Connecting your TV and playback components 25 Connecting an HDD/DVD recorder, BD recorder and other video sources 27 Connecting a satellite/cable receiver or other set-top box 28 Connecting other audio components 29 Connecting additional amplifiers 30 Connecting AM/FM antennas...30 MULTI-ZONE setup...31 Connecting... iPod...33 Connecting a USB device...33 Connecting an HDMI-equipped component to the front panel input 34 Connecting to a wireless LAN...34 Connecting an IR receiver...34 Switching components on and off using the 12 volt trigger 35 Plugging in the...
... About HDMI...24 Connecting your TV and playback components 25 Connecting an HDD/DVD recorder, BD recorder and other video sources 27 Connecting a satellite/cable receiver or other set-top box 28 Connecting other audio components 29 Connecting additional amplifiers 30 Connecting AM/FM antennas...30 MULTI-ZONE setup...31 Connecting... iPod...33 Connecting a USB device...33 Connecting an HDMI-equipped component to the front panel input 34 Connecting to a wireless LAN...34 Connecting an IR receiver...34 Switching components on and off using the 12 volt trigger 35 Plugging in the...

Owner's Manual
Page 18
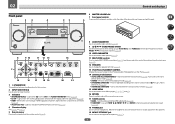
... direction in which the remote control is pointing. Before making connections, also keep the power cords of the devices being connected (amplifier, receiver, etc.), the methods of connection and terminal names may differ from the explanations in should be the final step. ! Depending on page... 39 to change the assignments if other connections are assigned by default to the receiver's different input terminals. Also refer to the RS-232C and EXTENSION terminals. Rear panel HDMI ASSIGNABLE 1 -6 IN 1 (DVD) IN 2 (SAT/CBL...
... direction in which the remote control is pointing. Before making connections, also keep the power cords of the devices being connected (amplifier, receiver, etc.), the methods of connection and terminal names may differ from the explanations in should be the final step. ! Depending on page... 39 to change the assignments if other connections are assigned by default to the receiver's different input terminals. Also refer to the RS-232C and EXTENSION terminals. Rear panel HDMI ASSIGNABLE 1 -6 IN 1 (DVD) IN 2 (SAT/CBL...

Owner's Manual
Page 21
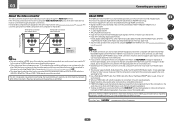
... panel it must be used for details on how to connect the other end of 4 W to use speaker cables terminated with the terminals on the receiver comprises a positive (+) and negative (-) terminal. Use an RCA cable to achieve more powerful sound reproduction. Connecting two subwoofers increases the bass sound to connect the...
... panel it must be used for details on how to connect the other end of 4 W to use speaker cables terminated with the terminals on the receiver comprises a positive (+) and negative (-) terminal. Use an RCA cable to achieve more powerful sound reproduction. Connecting two subwoofers increases the bass sound to connect the...

Owner's Manual
Page 22
... terminal on the kind of speakers you're using. See your speaker manual for high and low) and the sound improvement will depend on the receiver. Doing so may damage your speakers Your speakers can also be bi-wired if they support bi-amping. ! 03 Connecting your equipment Bi-amping your...
... terminal on the kind of speakers you're using. See your speaker manual for high and low) and the sound improvement will depend on the receiver. Doing so may damage your speakers Your speakers can also be bi-wired if they support bi-amping. ! 03 Connecting your equipment Bi-amping your...
Owner's Manual
Page 24
... ! In this unit's HDMI OUT terminal during playback, may occur when switching between audio formats or beginning playback. ! This receiver supports the functions described below through the HDMI OUT terminal. If you must be recognized. Depending on the front panel display. ...HDMI format digital audio transmissions require a longer time to the receiver's HDMI output when connecting this , interruption in the audio may cause noise or interrupted audio. Dolby Digital, Dolby Digital Plus...
... ! In this unit's HDMI OUT terminal during playback, may occur when switching between audio formats or beginning playback. ! This receiver supports the functions described below through the HDMI OUT terminal. If you must be recognized. Depending on the front panel display. ...HDMI format digital audio transmissions require a longer time to the receiver's HDMI output when connecting this , interruption in the audio may cause noise or interrupted audio. Dolby Digital, Dolby Digital Plus...

Owner's Manual
Page 25
...cable. If you use a coaxial digital audio cable or RCA (analog) audio cable, you'll need to the sound of the TV over the receiver. If the TV and playback components support the Control with HDMI feature, the convenient Control with HDMI function on page 26). ! 03 Connecting your ... (CD) ASSIGNABLE 25 HDMI/DVI-compatible Blu-ray Disc player Other HDMI/DVIequipped component This connection is no HDMI output on page 58). In this receiver using HDMI If you have an HDMI or DVI (with HDCP) equipped component (Blu-ray Disc player (BD), etc.), you can connect it to...
...cable. If you use a coaxial digital audio cable or RCA (analog) audio cable, you'll need to the sound of the TV over the receiver. If the TV and playback components support the Control with HDMI feature, the convenient Control with HDMI function on page 26). ! 03 Connecting your ... (CD) ASSIGNABLE 25 HDMI/DVI-compatible Blu-ray Disc player Other HDMI/DVIequipped component This connection is no HDMI output on page 58). In this receiver using HDMI If you have an HDMI or DVI (with HDCP) equipped component (Blu-ray Disc player (BD), etc.), you can connect it to...
Owner's Manual
Page 26
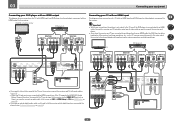
... This diagram shows connections of a TV (with HDMI input) and DVD player (or other than an HDMI cable, the OSD function allowing display of the receiver's settings, operations, etc., on page 59). ! HDMI ASSIGNABLE 1 -6 IN 1 (DVD) IN 2 (SAT/CBL) ASSIGNABLE COMPONENT VIDEO Y PB PR IN 1 (DVD) IN 2 (DVR/ BDR) IN ... to connect an audio cable. If you use an optical digital audio cable, you'll need to the sound of the TV over the receiver, connect the receiver and TV with audio cables (page 25). - HDMI IN Select one VIDEO OUT VIDEO COMPONENT VIDEO OUT Y PB PR Select one DIGITAL OUT...
... This diagram shows connections of a TV (with HDMI input) and DVD player (or other than an HDMI cable, the OSD function allowing display of the receiver's settings, operations, etc., on page 59). ! HDMI ASSIGNABLE 1 -6 IN 1 (DVD) IN 2 (SAT/CBL) ASSIGNABLE COMPONENT VIDEO Y PB PR IN 1 (DVD) IN 2 (DVR/ BDR) IN ... to connect an audio cable. If you use an optical digital audio cable, you'll need to the sound of the TV over the receiver, connect the receiver and TV with audio cables (page 25). - HDMI IN Select one VIDEO OUT VIDEO COMPONENT VIDEO OUT Y PB PR Select one DIGITAL OUT...


