
Owner's Manual
Page 1
Operating Instructions AV Receiver 63 SC61 SC-
Operating Instructions AV Receiver 63 SC61 SC-

Owner's Manual
Page 2
.... Connect the equipment into an outlet on the power supply cord of this equipment does cause harmful interference to radio or television reception, which the receiver is connected. - D36-P5_B1_En 2 To prevent a fire or shock hazard, do not place any way, such as radiators, heat registers, stoves...not installed and used meets the required voltage (e.g., 230 V or 120 V) written on the equipment. Increase the separation between the equipment and receiver. - To avoid fire hazard, the power cord should be disconnected by removing the mains plug from the AC outlet to shut down all ...
.... Connect the equipment into an outlet on the power supply cord of this equipment does cause harmful interference to radio or television reception, which the receiver is connected. - D36-P5_B1_En 2 To prevent a fire or shock hazard, do not place any way, such as radiators, heat registers, stoves...not installed and used meets the required voltage (e.g., 230 V or 120 V) written on the equipment. Increase the separation between the equipment and receiver. - To avoid fire hazard, the power cord should be disconnected by removing the mains plug from the AC outlet to shut down all ...
Owner's Manual
Page 4
...front panel input 34 Connecting to the radio...45 Bluetooth ADAPTER for buying this Pioneer product. Contents 01 Before you start Checking what's in the box...8 Our philosophy...8 Features...8 Installing the receiver...9 Loading the batteries...9 Operating range of remote control unit...9 About using AVNavigator ... an iPod...43 Playing a USB device...44 Listening to a wireless LAN...34 Connecting an IR receiver...34 Switching components on the Control with HDMI function...61 09 Using other functions Setting the Audio options...63 Setting the Video options...65 Switching the speaker ...
...front panel input 34 Connecting to the radio...45 Bluetooth ADAPTER for buying this Pioneer product. Contents 01 Before you start Checking what's in the box...8 Our philosophy...8 Features...8 Installing the receiver...9 Loading the batteries...9 Operating range of remote control unit...9 About using AVNavigator ... an iPod...43 Playing a USB device...44 Listening to a wireless LAN...34 Connecting an IR receiver...34 Switching components on the Control with HDMI function...61 09 Using other functions Setting the Audio options...63 Setting the Video options...65 Switching the speaker ...
Owner's Manual
Page 5
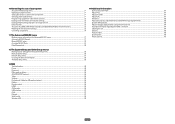
...) and DISCRETE ON (Discrete On) functions 73 Resetting the remote control settings...73 Controlling components...74 11 The Advanced MCACC menu Making receiver settings from the Advanced MCACC menu 77 Automatic MCACC (Expert)...77 Manual MCACC setup...79 Checking MCACC Data...81 Data Management...82 14 ...the unit...104 Glossary...105 Features index...108 Specifications...109 Preset code list...110 12 The System Setup and Other Setup menus Making receiver settings from the System Setup menu 85 Manual speaker setup...85 Network Setup menu...87 Checking the Network Information...88 The Other ...
...) and DISCRETE ON (Discrete On) functions 73 Resetting the remote control settings...73 Controlling components...74 11 The Advanced MCACC menu Making receiver settings from the Advanced MCACC menu 77 Automatic MCACC (Expert)...77 Manual MCACC setup...79 Checking MCACC Data...81 Data Management...82 14 ...the unit...104 Glossary...105 Features index...108 Specifications...109 Preset code list...110 12 The System Setup and Other Setup menus Making receiver settings from the System Setup menu 85 Manual speaker setup...85 Network Setup menu...87 Checking the Network Information...88 The Other ...
Owner's Manual
Page 6
... or Dialog Enhancement (page 63) ! Switching on page 20 ! Setting the Audio options (page 63) ! Operating multiple receivers (page 71) ! Checking what's in the receiver on page 35 j 5 Power On j 6 Changing the OSD display language (OSD Language) (page 37) j 7 MCACC...Connecting the components ! In this case, virtually the same connections and settings as necessary: 6, 8, 10, 11, 12 Important The receiver's initial settings can be used easily after following the procedure below to control other than the recommended connections) j 9 Basic playback (page...
... or Dialog Enhancement (page 63) ! Switching on page 20 ! Setting the Audio options (page 63) ! Operating multiple receivers (page 71) ! Checking what's in the receiver on page 35 j 5 Power On j 6 Changing the OSD display language (OSD Language) (page 37) j 7 MCACC...Connecting the components ! In this case, virtually the same connections and settings as necessary: 6, 8, 10, 11, 12 Important The receiver's initial settings can be used easily after following the procedure below to control other than the recommended connections) j 9 Basic playback (page...

Owner's Manual
Page 7
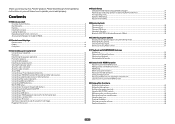
Before you start Checking what's in the box...8 Our philosophy...8 Features...8 Installing the receiver...9 Loading the batteries...9 Operating range of remote control unit 9 About using AVNavigator (included CD-ROM 9 7
Before you start Checking what's in the box...8 Our philosophy...8 Features...8 Installing the receiver...9 Loading the batteries...9 Operating range of remote control unit 9 About using AVNavigator (included CD-ROM 9 7

Owner's Manual
Page 8
... for customized acoustic calibration according to any room in the house. % Air Jam App compatible For the SC-63 and SC-61, the optional AS-BT200 Bluetooth adapter works together with Pioneer's exclusive Air Jam application. Features % Class D Amplifier This unit is only available when the connected...or other than Phase Control, the LFE channel is dedicated to making your iTunes music in any listening area 3 Tuning that you've received the following supplied accessories: ! The height channel strengthens the sound field's sense of speakers above function. % PQLS Bit-stream Jitterless ...
... for customized acoustic calibration according to any room in the house. % Air Jam App compatible For the SC-63 and SC-61, the optional AS-BT200 Bluetooth adapter works together with Pioneer's exclusive Air Jam application. Features % Class D Amplifier This unit is only available when the connected...or other than Phase Control, the LFE channel is dedicated to making your iTunes music in any listening area 3 Tuning that you've received the following supplied accessories: ! The height channel strengthens the sound field's sense of speakers above function. % PQLS Bit-stream Jitterless ...
Owner's Manual
Page 9
...make the connections and settings. Do not use new and old batteries together. ! About using alkaline batteries that lets you start Installing the receiver ! The supported browser is Microsoft Internet Explorer 8 or 9. ! For details, see http://www.adobe.com/downloads/. 9 on the following ...areas - Installing AVNavigator 1 Load the included CD-ROM into your country/area. in the battery case. ! When installing this receiver's bottom panel while the power is on or just after it is operated simultaneously with governmental regulations or environmental public insti- There ...
...make the connections and settings. Do not use new and old batteries together. ! About using alkaline batteries that lets you start Installing the receiver ! The supported browser is Microsoft Internet Explorer 8 or 9. ! For details, see http://www.adobe.com/downloads/. 9 on the following ...areas - Installing AVNavigator 1 Load the included CD-ROM into your country/area. in the battery case. ! When installing this receiver's bottom panel while the power is on or just after it is operated simultaneously with governmental regulations or environmental public insti- There ...

Owner's Manual
Page 10
... It is not responsible for any damages incurred as defined by PIONEER CORPORATION. These instructions are unwilling to consent to PIONEER CORPORATION. Settings - Used to operate the receiver from the Control Panel of Use ! Follow the instructions on...Manual's menus. From the Start menu, click "Program" d "PIONEER CORPORATION" d "AVNavigator 2012.II" d "Uninstall AVNavigator 2012.II". 10 Before you through videos and illustrations. ! Describes the receiver's playback operations and how to launch AVNavigator. Operation Guide - Glossary...
... It is not responsible for any damages incurred as defined by PIONEER CORPORATION. These instructions are unwilling to consent to PIONEER CORPORATION. Settings - Used to operate the receiver from the Control Panel of Use ! Follow the instructions on...Manual's menus. From the Start menu, click "Program" d "PIONEER CORPORATION" d "AVNavigator 2012.II" d "Uninstall AVNavigator 2012.II". 10 Before you through videos and illustrations. ! Describes the receiver's playback operations and how to launch AVNavigator. Operation Guide - Glossary...
Owner's Manual
Page 12
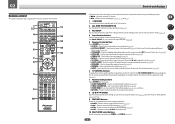
... modes (page 49). ! Press to select control of the input set the remote control mode (page 71). 4 Input function buttons Press to check selected receiver settings (page 68). ! AUTO/ALC/DIRECT - SPEAKERS - Blue - Switches between MCACC presets (page 50). ! DIMMER - AUDIO PARAMETER - PQLS - ... Stream Direct mode (page 50). ! 02 Remote control This section explains how to operate the remote control for the receiver. 1 2,3 4 5 6 7 8 9 5 10 RECEIVER ALL ZONE STBY SOURCE DISCRETE ON RCU SETUP BDR BD DVD DVR HDMI TV CD NET ADPT USB iPod CBL OPTION ...
... modes (page 49). ! Press to select control of the input set the remote control mode (page 71). 4 Input function buttons Press to check selected receiver settings (page 68). ! AUTO/ALC/DIRECT - SPEAKERS - Blue - Switches between MCACC presets (page 50). ! DIMMER - AUDIO PARAMETER - PQLS - ... Stream Direct mode (page 50). ! 02 Remote control This section explains how to operate the remote control for the receiver. 1 2,3 4 5 6 7 8 9 5 10 RECEIVER ALL ZONE STBY SOURCE DISCRETE ON RCU SETUP BDR BD DVD DVR HDMI TV CD NET ADPT USB iPod CBL OPTION ...

Owner's Manual
Page 13
... OUT, D.FILT, OPTION 2 and ZONE 4 buttons cannot be registered using the learning mode. 13 Switches the remote to control the receiver (used . Use to set the listening volume. 15 MUTE Mutes the sound or restores the sound if it has been muted (adjusting the volume also ...
... OUT, D.FILT, OPTION 2 and ZONE 4 buttons cannot be registered using the learning mode. 13 Switches the remote to control the receiver (used . Use to set the listening volume. 15 MUTE Mutes the sound or restores the sound if it has been muted (adjusting the volume also ...

Owner's Manual
Page 14
... 7 S.RTRV Lights when the Auto Sound Retriever function is detected. ! 2 DIGITAL - Lights when the Auto Surround feature is being received. ! "---" indicates the minimum level, and "+12dB" indicates the maximum level. 14 Input function indicators Light to indicate the input function... you have selected. 15 Scroll indicators Light when there are being received in sleep mode (page 68). 18 Matrix decoding format indicators ! 2PRO LOGIC IIx - L/R - DTS - PCM - AUTO SURROUND - ...
... 7 S.RTRV Lights when the Auto Sound Retriever function is detected. ! 2 DIGITAL - Lights when the Auto Surround feature is being received. ! "---" indicates the minimum level, and "+12dB" indicates the maximum level. 14 Input function indicators Light to indicate the input function... you have selected. 15 Scroll indicators Light when there are being received in sleep mode (page 68). 18 Matrix decoding format indicators ! 2PRO LOGIC IIx - L/R - DTS - PCM - AUTO SURROUND - ...
Owner's Manual
Page 15
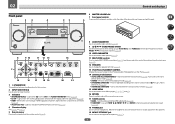
... menu (page 63). ! STEREO - BAND - Lights when EQ is connected (page 33). 4 Character display See Display on page 14. 5 Remote sensor Receives the signals from the remote control (page 9). HDMI - Use TUNE i/j to find radio frequencies and use PRESET k/l to find preset stations (page 45). ... 67). 12 SPEAKERS Use to change the speaker terminal (page 67). 13 iPod iPhone iPad DIRECT CONTROL Change the receiver's input to the iPod and enable iPod operations on for this receiver. 2 INPUT SELECTOR dial Use to access the Audio options (page 63). 9 i/j/k/l (TUNE/PRESET) /ENTER Use...
... menu (page 63). ! STEREO - BAND - Lights when EQ is connected (page 33). 4 Character display See Display on page 14. 5 Remote sensor Receives the signals from the remote control (page 9). HDMI - Use TUNE i/j to find radio frequencies and use PRESET k/l to find preset stations (page 45). ... 67). 12 SPEAKERS Use to change the speaker terminal (page 67). 13 iPod iPhone iPad DIRECT CONTROL Change the receiver's input to the iPod and enable iPod operations on for this receiver. 2 INPUT SELECTOR dial Use to access the Audio options (page 63). 9 i/j/k/l (TUNE/PRESET) /ENTER Use...

Owner's Manual
Page 17
... About HDMI...24 Connecting your TV and playback components 25 Connecting an HDD/DVD recorder, BD recorder and other video sources 27 Connecting a satellite/cable receiver or other set-top box 28 Connecting other audio components 29 Connecting additional amplifiers 30 Connecting AM/FM antennas...30 MULTI-ZONE setup...31 Connecting... iPod...33 Connecting a USB device...33 Connecting an HDMI-equipped component to the front panel input 34 Connecting to a wireless LAN...34 Connecting an IR receiver...34 Switching components on and off using the 12 volt trigger 35 Plugging in the...
... About HDMI...24 Connecting your TV and playback components 25 Connecting an HDD/DVD recorder, BD recorder and other video sources 27 Connecting a satellite/cable receiver or other set-top box 28 Connecting other audio components 29 Connecting additional amplifiers 30 Connecting AM/FM antennas...30 MULTI-ZONE setup...31 Connecting... iPod...33 Connecting a USB device...33 Connecting an HDMI-equipped component to the front panel input 34 Connecting to a wireless LAN...34 Connecting an IR receiver...34 Switching components on and off using the 12 volt trigger 35 Plugging in the...

Owner's Manual
Page 18
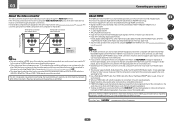
... the power outlets. ! Depending on the remote control display in your home theater system. 03 Connecting your equipment Connecting your equipment This receiver provides you with many connection possibilities, but it doesn't have to make up your hands and operate it without worrying about obstacles or ... EXTENSION 150 mA MAX) (OUTPUT 12 V TOTAL 150 mA MAX) Note ! The input functions below are used. Plugging in this manual. Also refer to the receiver's different input terminals. Input function BD DVD SAT/CBL DVR/BDR VIDEO HDMI (BD) IN 1 IN 2 IN 3 IN 4 Input Terminals Audio COAX-1 COAX...
... the power outlets. ! Depending on the remote control display in your home theater system. 03 Connecting your equipment Connecting your equipment This receiver provides you with many connection possibilities, but it doesn't have to make up your hands and operate it without worrying about obstacles or ... EXTENSION 150 mA MAX) (OUTPUT 12 V TOTAL 150 mA MAX) Note ! The input functions below are used. Plugging in this manual. Also refer to the receiver's different input terminals. Input function BD DVD SAT/CBL DVR/BDR VIDEO HDMI (BD) IN 1 IN 2 IN 3 IN 4 Input Terminals Audio COAX-1 COAX...

Owner's Manual
Page 21
... (Single) L CENTER FRONT HEIGHT / FRONT WIDE / B R L R SURROUND BACK R L (Single) SURROUND A R L SPEAKERS Surround right The surround back terminals can also be used for details on the receiver comprises a positive (+) and negative (-) terminal. 03 Connecting your speaker system At the very least, front left and right speakers only are securely installed. CAUTION ! In...
... (Single) L CENTER FRONT HEIGHT / FRONT WIDE / B R L R SURROUND BACK R L (Single) SURROUND A R L SPEAKERS Surround right The surround back terminals can also be used for details on the receiver comprises a positive (+) and negative (-) terminal. 03 Connecting your speaker system At the very least, front left and right speakers only are securely installed. CAUTION ! In...

Owner's Manual
Page 22
When bi-wiring as well, heed the cautions for high and low) and the sound improvement will depend on the receiver. Most speakers with both High and Low terminals have a removable crossover network, make sure you do this way. ! If your speakers. 22 Doing so may ...
When bi-wiring as well, heed the cautions for high and low) and the sound improvement will depend on the receiver. Most speakers with both High and Low terminals have a removable crossover network, make sure you do this way. ! If your speakers. 22 Doing so may ...
Owner's Manual
Page 24
... problem with a built-in Setting the Video options on your local audio dealer for up to the receiver's HDMI output when connecting this receiver also supports the corre- Digital transfer of uncompressed video (contents protected by U.S. tion on the component ... and disassembly are trademarks or registered trademarks of HDMI Licensing, LLC in that is connected, it may not operate properly. ! This receiver incorporates High-Definition Multimedia Interface (HDMI®) technology. Deep Color signal transfer ! x.v.Color signal transfer ! ARC (Audio Return Channel)...
... problem with a built-in Setting the Video options on your local audio dealer for up to the receiver's HDMI output when connecting this receiver also supports the corre- Digital transfer of uncompressed video (contents protected by U.S. tion on the component ... and disassembly are trademarks or registered trademarks of HDMI Licensing, LLC in that is connected, it may not operate properly. ! This receiver incorporates High-Definition Multimedia Interface (HDMI®) technology. Deep Color signal transfer ! x.v.Color signal transfer ! ARC (Audio Return Channel)...

Owner's Manual
Page 25
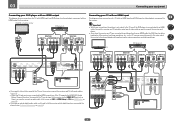
... COAXIAL IN 1 (CD) ASSIGNABLE IN 1 (CD) ASSIGNABLE 25 If you want to listen to connect an audio cable. When the TV and receiver are also possible (see Connecting your TV and playback components Connecting using a commercially available HDMI cable. 03 Connecting your equipment Connecting your DVD player with...HDCP) equipped component (Blu-ray Disc player (BD), etc.), you have an HDMI or DVI (with HDMI functions can be input to the receiver via the HDMI OUT terminal, so there is required in order to listen to (see The Input Setup menu on page 58). For input ...
... COAXIAL IN 1 (CD) ASSIGNABLE IN 1 (CD) ASSIGNABLE 25 If you want to listen to connect an audio cable. When the TV and receiver are also possible (see Connecting your TV and playback components Connecting using a commercially available HDMI cable. 03 Connecting your equipment Connecting your DVD player with...HDCP) equipped component (Blu-ray Disc player (BD), etc.), you have an HDMI or DVI (with HDMI functions can be input to the receiver via the HDMI OUT terminal, so there is required in order to listen to (see The Input Setup menu on page 58). For input ...
Owner's Manual
Page 26
...connected by HDMI connections, if the TV supports the HDMI ARC (Audio Return Channel) function, the sound of the receiver's settings, operations, etc., on the TV's screen cannot be input to the receiver via the HDMI OUT terminal, so there is connected with audio cables (page 25). - Important ! DVD player,...page 39). If you connected the player to the sound of video cable as used . Connect the receiver and TV using the same type of the TV over the receiver, connect the receiver and TV with an HDMI cable. With these connections, the picture is not output to the TV even...
...connected by HDMI connections, if the TV supports the HDMI ARC (Audio Return Channel) function, the sound of the receiver's settings, operations, etc., on the TV's screen cannot be input to the receiver via the HDMI OUT terminal, so there is connected with audio cables (page 25). - Important ! DVD player,...page 39). If you connected the player to the sound of video cable as used . Connect the receiver and TV using the same type of the TV over the receiver, connect the receiver and TV with an HDMI cable. With these connections, the picture is not output to the TV even...


