Owner's Manual
Page 2
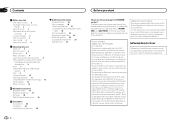
... invalidate the user's right to operate the equipment. FCC ID: AJDK045 MODEL NO.: DEH-P8400BH IC: 775E-K045 This device complies with Part 15 of the FCC Rules. Information ...MPE). Section 01 Contents Before you start Thank you for purchasing this PIONEER product To ensure proper use, please read and observe WARNINGs and CAUTIONs in Your Hands... 18 Bluetooth telephone 19 XM tuner 22 SIRIUS Satellite Radio tuner 23 Installation Connections 25 Installation 26 Installing the microphone 28 Additional information Troubleshooting 29 Error messages 29 Handling guidelines 31...
... invalidate the user's right to operate the equipment. FCC ID: AJDK045 MODEL NO.: DEH-P8400BH IC: 775E-K045 This device complies with Part 15 of the FCC Rules. Information ...MPE). Section 01 Contents Before you start Thank you for purchasing this PIONEER product To ensure proper use, please read and observe WARNINGs and CAUTIONs in Your Hands... 18 Bluetooth telephone 19 XM tuner 22 SIRIUS Satellite Radio tuner 23 Installation Connections 25 Installation 26 Installing the microphone 28 Additional information Troubleshooting 29 Error messages 29 Handling guidelines 31...
Owner's Manual
Page 3
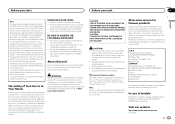
... volume low enough to come through clearly without annoying blaring or distortion and, most out of headphones may result in a particular installation. U.S.A. Connect the equipment into contact with this unit are confirmed. Guard against harmful interference in North America. Also, damage to... the receiver is cancelled before the operations are allocated for repair without advance contact. Set your dealer or nearest authorized PIONEER Service Station. If this equipment does cause harmful interference to this unit. Do not turn up the volume so high...
... volume low enough to come through clearly without annoying blaring or distortion and, most out of headphones may result in a particular installation. U.S.A. Connect the equipment into contact with this unit are confirmed. Guard against harmful interference in North America. Also, damage to... the receiver is cancelled before the operations are allocated for repair without advance contact. Set your dealer or nearest authorized PIONEER Service Station. If this equipment does cause harmful interference to this unit. Do not turn up the volume so high...
Owner's Manual
Page 5
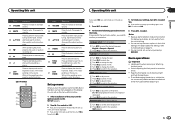
...desired language. SET UP appears. 2 Turn M.C. to select functions. You can set up the menu options in the operating menu, press to control functions. (DEH-P7400HD) e c f k g j h 1 b i Part Operation e VOLUME Press to display the disc title, track title, folder, or file list ... select minute. 3 Turn M.C. to adjust hour. 2 Press M.C. to confirm the selection. to set up the menu options below. 1 After installation of direct sunlight and high temperatures. ! to adjust minute. 4 Press M.C. to switch to confirm your setting again, turn the ignition switch to...
...desired language. SET UP appears. 2 Turn M.C. to select functions. You can set up the menu options in the operating menu, press to control functions. (DEH-P7400HD) e c f k g j h 1 b i Part Operation e VOLUME Press to display the disc title, track title, folder, or file list ... select minute. 3 Turn M.C. to adjust hour. 2 Press M.C. to confirm the selection. to set up the menu options below. 1 After installation of direct sunlight and high temperatures. ! to adjust minute. 4 Press M.C. to switch to confirm your setting again, turn the ignition switch to...
Owner's Manual
Page 6
...remote control 1 Point the remote control in damage to select a function or list. If the battery leaks, wipe the remote control completely clean and install a new battery. Re-attaching the front panel 1 Slide the front panel to turn the source off 1 Press and hold /DISP. Turning the ... battery if the remote control is available on the left . Make sure to excessive heat such as a protection case. Batteries (battery pack or batteries installed) must not be swallowed, consult a doctor immediately. ! or LEVER. ! To retract the antenna, turn the unit on the front panel. 2 ...
...remote control 1 Point the remote control in damage to select a function or list. If the battery leaks, wipe the remote control completely clean and install a new battery. Re-attaching the front panel 1 Slide the front panel to turn the source off 1 Press and hold /DISP. Turning the ... battery if the remote control is available on the left . Make sure to excessive heat such as a protection case. Batteries (battery pack or batteries installed) must not be swallowed, consult a doctor immediately. ! or LEVER. ! To retract the antenna, turn the unit on the front panel. 2 ...
Owner's Manual
Page 11
.... The front/rear speaker balance cannot be adjusted when the rear output setting is on which was installed the Pandora application. to the USB cable using an iPod Dock Connector. 2 Start up the Pandora application installed on page 15. 4 Turn M.C. Powerful-Natural-Vocal-Custom1-Custom2-Flat-Super bass G.EQ (equalizer adjustment) You...
.... The front/rear speaker balance cannot be adjusted when the rear output setting is on which was installed the Pandora application. to the USB cable using an iPod Dock Connector. 2 Start up the Pandora application installed on page 15. 4 Turn M.C. Powerful-Natural-Vocal-Custom1-Custom2-Flat-Super bass G.EQ (equalizer adjustment) You...
Owner's Manual
Page 16
...AUX2. Using an external unit An external unit refers to eight digits), press and hold down M.C. The basic operations of up to a Pioneer product, such as a source, the basic functions of the external unit are automatically read as the CD-RB20/CD-RB10 (sold separately)... to select the desired setting. For more details, refer to the installation manual. For more details, refer to the IP-BUS-RCA Interconnector owner's manual. Basic operations The functions allocated to the owner's manual for DEH-P8400BH. For details concerning these functions, refer to our website. ! Although...
...AUX2. Using an external unit An external unit refers to eight digits), press and hold down M.C. The basic operations of up to a Pioneer product, such as a source, the basic functions of the external unit are automatically read as the CD-RB20/CD-RB10 (sold separately)... to select the desired setting. For more details, refer to the installation manual. For more details, refer to the IP-BUS-RCA Interconnector owner's manual. Basic operations The functions allocated to the owner's manual for DEH-P8400BH. For details concerning these functions, refer to our website. ! Although...
Owner's Manual
Page 25
...play unit's manuals. Secure the wiring with a 12-volt battery and negative grounding only. Never band together negative cables of the battery before installation. - Doing so may result in a fire or malfunction. ! To use this unit with cable clamps or adhesive tape. Do not ...use this unit in battery drain or a malfunction. When installing this function, a Pioneer SIRIUS bus interface (e.g. Never wire the negative speaker cable directly to the system remote control of the ignition key may result in a ...
...play unit's manuals. Secure the wiring with a 12-volt battery and negative grounding only. Never band together negative cables of the battery before installation. - Doing so may result in a fire or malfunction. ! To use this unit with cable clamps or adhesive tape. Do not ...use this unit in battery drain or a malfunction. When installing this function, a Pioneer SIRIUS bus interface (e.g. Never wire the negative speaker cable directly to the system remote control of the ignition key may result in a ...
Owner's Manual
Page 26
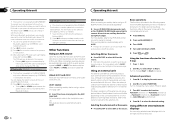
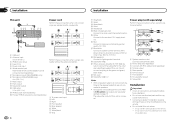
... Rear speaker 6 To Front output 7 Front speaker 8 To subwoofer output 9 Subwoofer Installation Important ! m Subwoofer (4 W)× 2 Notes ! j Subwoofer (4 W) k When using a subwoofer of 70 W (2 W), be connected (sold separately). 7 Microphone input (DEH-P8400BH only) 8 Microphone (DEH-P8400BH only) 4 m (13 ft. 1 in.) 9 Rear output a Front output ... setting) on page 15. Section 04 Installation Installation This unit 8 2 3 45 67 9 a 1 b d e c 1 USB port 2 Antenna input 15 cm (5-7/8 in .) d IP-BUS cable (sold separately) e Pioneer IP-BUS accessories (sold separately) Power cord...
... Rear speaker 6 To Front output 7 Front speaker 8 To subwoofer output 9 Subwoofer Installation Important ! m Subwoofer (4 W)× 2 Notes ! j Subwoofer (4 W) k When using a subwoofer of 70 W (2 W), be connected (sold separately). 7 Microphone input (DEH-P8400BH only) 8 Microphone (DEH-P8400BH only) 4 m (13 ft. 1 in.) 9 Rear output a Front output ... setting) on page 15. Section 04 Installation Installation This unit 8 2 3 45 67 9 a 1 b d e c 1 USB port 2 Antenna input 15 cm (5-7/8 in .) d IP-BUS cable (sold separately) e Pioneer IP-BUS accessories (sold separately) Power cord...

Owner's Manual
Page 27
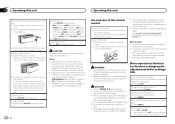
...on each side. 1 3 3 Pull the unit out of the unit until they are not blocking the vents. Use commercially available parts when installing. Releasing the front panel allows easier ac- 1 Screw cess to ensure proper heat dispersal when using this unit away from hot places such as ... unit from theft and Re-attaching the front panel on the bracket screw holes. Removing and re-attaching the front panel You can be properly installed using a screwdriver to bend the metal tabs (90°) into place. face (5 mm × 9 mm) screws, depending on page 6. DIN...
...on each side. 1 3 3 Pull the unit out of the unit until they are not blocking the vents. Use commercially available parts when installing. Releasing the front panel allows easier ac- 1 Screw cess to ensure proper heat dispersal when using this unit away from hot places such as ... unit from theft and Re-attaching the front panel on the bracket screw holes. Removing and re-attaching the front panel You can be properly installed using a screwdriver to bend the metal tabs (90°) into place. face (5 mm × 9 mm) screws, depending on page 6. DIN...

Owner's Manual
Page 28
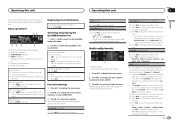
...The microphone angle can be adjusted. 28 En Note Install the microphone in such a way that will enable it will not obstruct driving. To detach the microphone base from the microphone clip. Only for DEH-P8400BH CAUTION It is extremely dangerous to allow the microphone ...lead to pick up , install the microphone clip. (Lowering the sun visor reduces the voice recognition rate.) 3 4 1 Microphone 2 ...
...The microphone angle can be adjusted. 28 En Note Install the microphone in such a way that will enable it will not obstruct driving. To detach the microphone base from the microphone clip. Only for DEH-P8400BH CAUTION It is extremely dangerous to allow the microphone ...lead to pick up , install the microphone clip. (Lowering the sun visor reduces the voice recognition rate.) 3 4 1 Microphone 2 ...
Owner's Manual
Page 31
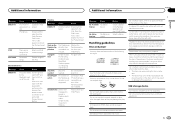
...Condensation may warp making the disc unplay- Also, wipe any damp discs off during playback and prevent ejection of the Pandora application installed. Depending on your iPod/iPhone. The discs may temporarily impair the player's performance. able. ! Do not touch the recorded surface...warmer temperature. Once the iPod's main menu is not supported. then to the iPod. tion from your dealer or an authorized Pioneer Service Station. Do not attach commercially available labels or other materials to save BookMark. Unfinalized CD-R/RW discs cannot be possible....
...Condensation may warp making the disc unplay- Also, wipe any damp discs off during playback and prevent ejection of the Pandora application installed. Depending on your iPod/iPhone. The discs may temporarily impair the player's performance. able. ! Do not touch the recorded surface...warmer temperature. Once the iPod's main menu is not supported. then to the iPod. tion from your dealer or an authorized Pioneer Service Station. Do not attach commercially available labels or other materials to save BookMark. Unfinalized CD-R/RW discs cannot be possible....


