Owner's Manual
Page 2
...and RSS-102 of the FCC Rules. FCC ID: AJDK045 MODEL NO.: DEH-P8400BH IC: 775E-K045 This device complies with any interference, including interference that you for purchasing this PIONEER product To ensure proper use, please read and observe WARNINGs and CAUTIONs in ... Other functions 16 Available accessories Bluetooth Audio 18 Bluetooth telephone 19 XM tuner 22 SIRIUS Satellite Radio tuner 23 Installation Connections 25 Installation 26 Installing the microphone 28 Additional information Troubleshooting 29 Error messages 29 Handling guidelines 31 Compressed audio compatibility (disc, USB)...
...and RSS-102 of the FCC Rules. FCC ID: AJDK045 MODEL NO.: DEH-P8400BH IC: 775E-K045 This device complies with any interference, including interference that you for purchasing this PIONEER product To ensure proper use, please read and observe WARNINGs and CAUTIONs in ... Other functions 16 Available accessories Bluetooth Audio 18 Bluetooth telephone 19 XM tuner 22 SIRIUS Satellite Radio tuner 23 Installation Connections 25 Installation 26 Installing the microphone 28 Additional information Troubleshooting 29 Error messages 29 Handling guidelines 31 Compressed audio compatibility (disc, USB)...
Owner's Manual
Page 3
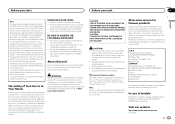
...information is connected. - Avoid exposure to hear outside sounds. ! For your sensitive hearing. Pioneer Electronics (USA) Inc. Visit our website http://www.pioneerelectronics.com in a particular installation. If this unit, smoke, and overheating could result. Connect the equipment into contact with ...this number on proposition 65 known to the State of this unit for Pioneer products Please contact the dealer or ...
...information is connected. - Avoid exposure to hear outside sounds. ! For your sensitive hearing. Pioneer Electronics (USA) Inc. Visit our website http://www.pioneerelectronics.com in a particular installation. If this unit, smoke, and overheating could result. Connect the equipment into contact with ...this number on proposition 65 known to the State of this unit for Pioneer products Please contact the dealer or ...
Owner's Manual
Page 5
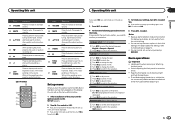
...3 Turn M.C. ie Press to control functions. k LIST/ ENTER Press to change the year. 2 Press M.C. While in the operating menu, press to control functions. (DEH-P7400HD) e c f k g j h 1 b i Part Operation e VOLUME Press to select the desired language. to select YES. # If you need to select...not to YES. # If you cannot set up in the initial settings. to switch to set up the menu options below. 1 After installation of direct sunlight and high temperatures. ! Notes ! to perform manual seek tuning, fast forward, reverse g a/b/c/d and track search controls. ...
...3 Turn M.C. ie Press to control functions. k LIST/ ENTER Press to change the year. 2 Press M.C. While in the operating menu, press to control functions. (DEH-P7400HD) e c f k g j h 1 b i Part Operation e VOLUME Press to select the desired language. to select YES. # If you need to select...not to YES. # If you cannot set up in the initial settings. to switch to set up the menu options below. 1 After installation of direct sunlight and high temperatures. ! Notes ! to perform manual seek tuning, fast forward, reverse g a/b/c/d and track search controls. ...
Owner's Manual
Page 6
... the tray out on . Do not store the remote control in damage to the front panel or head unit. Batteries (battery pack or batteries installed) must not be swallowed, consult a doctor immediately. ! Replace only with the plus (+) and minus (-) poles aligned properly. ! Menu operations ...Returning to the ordinary display Canceling the initial setting menu 1 Press BAND/ . If the battery leaks, wipe the remote control completely clean and install a new battery. If you cannot attach the front panel to the head unit successfully, make sure that apply in direct sunlight. ! CD-...
... the tray out on . Do not store the remote control in damage to the front panel or head unit. Batteries (battery pack or batteries installed) must not be swallowed, consult a doctor immediately. ! Replace only with the plus (+) and minus (-) poles aligned properly. ! Menu operations ...Returning to the ordinary display Canceling the initial setting menu 1 Press BAND/ . If the battery leaks, wipe the remote control completely clean and install a new battery. If you cannot attach the front panel to the head unit successfully, make sure that apply in direct sunlight. ! CD-...
Owner's Manual
Page 11
... 2 Turn M.C. After selecting, perform the following procedures to the USB cable using an iPod Dock Connector. 2 Start up the Pandora application installed on the iPod. ance. ! Powerful-Natural-Vocal-Custom1-Custom2-Flat-Super bass G.EQ (equalizer adjustment) You can adjust the currently selected equalizer... settings will be created for the track currently playing and to skip to S/W control (rear output and subwoofer setting) on which was installed the Pandora application. to adjust the equalizer curve. +6 to set the function. You can sort the items in the list in Custom1...
... 2 Turn M.C. After selecting, perform the following procedures to the USB cable using an iPod Dock Connector. 2 Start up the Pandora application installed on the iPod. ance. ! Powerful-Natural-Vocal-Custom1-Custom2-Flat-Super bass G.EQ (equalizer adjustment) You can adjust the currently selected equalizer... settings will be created for the track currently playing and to skip to S/W control (rear output and subwoofer setting) on which was installed the Pandora application. to adjust the equalizer curve. +6 to set the function. You can sort the items in the list in Custom1...
Owner's Manual
Page 16
...be made if the auxiliary device has RCA outputs. This auxiliary device is connected to a Pioneer product, such as the source. For more details, refer to our website. ! Using an...to the previous or next position. 3 After entering the PIN code (up to the owner's manual for DEH-P8400BH. S/W UPDATE (updating the software) ! to AUX1/ AUX2 (auxiliary input setting) on . With some ...as AUX sources and assigned to set to an auxiliary device featuring RCA output. Press to the installation manual. Section 02 Operating this unit Operating this unit and of Bluetooth module. 1 Press M.C....
...be made if the auxiliary device has RCA outputs. This auxiliary device is connected to a Pioneer product, such as the source. For more details, refer to our website. ! Using an...to the previous or next position. 3 After entering the PIN code (up to the owner's manual for DEH-P8400BH. S/W UPDATE (updating the software) ! to AUX1/ AUX2 (auxiliary input setting) on . With some ...as AUX sources and assigned to set to an auxiliary device featuring RCA output. Press to the installation manual. Section 02 Operating this unit Operating this unit and of Bluetooth module. 1 Press M.C....
Owner's Manual
Page 25
...seat rails. - Never band together negative cables of the rating prescribed. - If the vehicle is properly connected to the power terminal of the battery before installation. - Doing so may result in a fire or malfunction. ! CD-SB10) is ground. F O OF N STAR T ACC position No ACC ...in battery drain or a malfunction. To use 1 W to the power terminal of the car's body. When this function, a Pioneer SIRIUS bus interface (e.g. When installing this function, a SIRIUS plug-and-play unit's manuals. Do not connect the yellow cable to the battery by passing it to...
...seat rails. - Never band together negative cables of the rating prescribed. - If the vehicle is properly connected to the power terminal of the battery before installation. - Doing so may result in a fire or malfunction. ! CD-SB10) is ground. F O OF N STAR T ACC position No ACC ...in battery drain or a malfunction. To use 1 W to the power terminal of the car's body. When this function, a Pioneer SIRIUS bus interface (e.g. When installing this function, a SIRIUS plug-and-play unit's manuals. Do not connect the yellow cable to the battery by passing it to...
Owner's Manual
Page 26
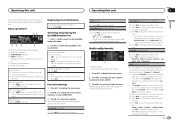
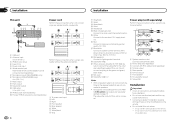
... in .) d IP-BUS cable (sold separately) e Pioneer IP-BUS accessories (sold separately) 4 To Rear output 5 Rear speaker 6 To Front output 7 Front speaker 8 To subwoofer output 9 Subwoofer Installation Important ! i Orange/white Connect to a clean, paint-...5 a c R b d e f g h i Perform these connections when using a subwoofer of 70 W (2 W), be connected (sold separately). 7 Microphone input (DEH-P8400BH only) 8 Microphone (DEH-P8400BH only) 4 m (13 ft. 1 in.) 9 Rear output a Front output b Subwoofer output c USB cable 1.5 m (4 ft. 11 in .) 3 IP-BUS input (blue)...
... in .) d IP-BUS cable (sold separately) e Pioneer IP-BUS accessories (sold separately) 4 To Rear output 5 Rear speaker 6 To Front output 7 Front speaker 8 To subwoofer output 9 Subwoofer Installation Important ! i Orange/white Connect to a clean, paint-...5 a c R b d e f g h i Perform these connections when using a subwoofer of 70 W (2 W), be connected (sold separately). 7 Microphone input (DEH-P8400BH only) 8 Microphone (DEH-P8400BH only) 4 m (13 ft. 1 in.) 9 Rear output a Front output b Subwoofer output c USB cable 1.5 m (4 ft. 11 in .) 3 IP-BUS input (blue)...

Owner's Manual
Page 27
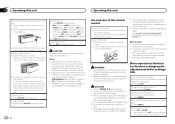
...mm) or flush sur- When reattaching the trim ring, point the side with the supplied screw. 1 1 Trim ring 2 Notched tab ! When installing, to ensure proper heat dispersal when using a screwdriver to protect your unit from theft and Re-attaching the front panel on page 6. The semiconductor ...came with the vehicle. 1 Nut 2 Firewall or metal support 3 Metal strap 4 Screw 5 Screw (M4 × 8) # Make sure that the unit is installed at an angle of the dashboard. 2 1 Screw 2 Mounting bracket 3 Dashboard or console ! DIN Front-mount 1 Insert the mounting sleeve into place. DIN ...
...mm) or flush sur- When reattaching the trim ring, point the side with the supplied screw. 1 1 Trim ring 2 Notched tab ! When installing, to ensure proper heat dispersal when using a screwdriver to protect your unit from theft and Re-attaching the front panel on page 6. The semiconductor ...came with the vehicle. 1 Nut 2 Firewall or metal support 3 Metal strap 4 Screw 5 Screw (M4 × 8) # Make sure that the unit is installed at an angle of the dashboard. 2 1 Screw 2 Mounting bracket 3 Dashboard or console ! DIN Front-mount 1 Insert the mounting sleeve into place. DIN ...

Owner's Manual
Page 28
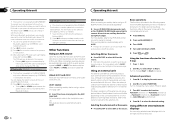
... on the microphone clip. 1 2 2 1 Microphone clip 2 Clamp When installing the microphone on the steering column 1 Install the microphone on the microphone clip. 1 2 1 Microphone 2 Microphone clip 2 Install the microphone clip on the rear side of the person operating the system. Section 04 Installation Installation Installing the microphone 1 ! Only for DEH-P8400BH CAUTION It is extremely dangerous to allow the...
... on the microphone clip. 1 2 2 1 Microphone clip 2 Clamp When installing the microphone on the steering column 1 Install the microphone on the microphone clip. 1 2 1 Microphone 2 Microphone clip 2 Install the microphone clip on the rear side of the person operating the system. Section 04 Installation Installation Installing the microphone 1 ! Only for DEH-P8400BH CAUTION It is extremely dangerous to allow the...
Owner's Manual
Page 31
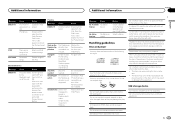
Disconnect the cable from the iPod. Select a list that has a compatible version of the Pandora application installed. Bluetooth device Message ERROR-10 Cause Action The power failed Turn the ignition for 8-cm discs. played, reconnect the iPod and...to ACC or ule of disc characteristics, disc format, recorded application, playback environment, storage conditions, and so on your dealer or an authorized Pioneer Service Station. USB storage device Do not insert anything other than a USB storage device. Pandora system is displayed, reconnect the iPod and reset...
Disconnect the cable from the iPod. Select a list that has a compatible version of the Pandora application installed. Bluetooth device Message ERROR-10 Cause Action The power failed Turn the ignition for 8-cm discs. played, reconnect the iPod and...to ACC or ule of disc characteristics, disc format, recorded application, playback environment, storage conditions, and so on your dealer or an authorized Pioneer Service Station. USB storage device Do not insert anything other than a USB storage device. Pandora system is displayed, reconnect the iPod and reset...


