Owner's Manual
Page 2
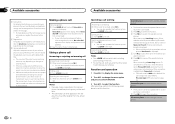
... our website 3 Demo mode 4 About this manual 4 Operating this unit Head unit 4 Remote control 4 Set up menu 5 Basic operations 5 Use and care of the remote control 6 Menu operations identical for function settings/audio adjustments/initial settings/lists 6 Tuner 7 CD/CD-R/CD-RW and USB storage devices 8 iPod 9 Using Pandoraâ 10 Audio adjustments 11 Using Bluetooth wireless technology 12 Initial settings 14 Other functions 16 Available accessories Bluetooth Audio 18 Bluetooth telephone 19 XM tuner 22 SIRIUS Satellite Radio tuner 23 Installation Connections 25 Installation 26 Installing the...
... our website 3 Demo mode 4 About this manual 4 Operating this unit Head unit 4 Remote control 4 Set up menu 5 Basic operations 5 Use and care of the remote control 6 Menu operations identical for function settings/audio adjustments/initial settings/lists 6 Tuner 7 CD/CD-R/CD-RW and USB storage devices 8 iPod 9 Using Pandoraâ 10 Audio adjustments 11 Using Bluetooth wireless technology 12 Initial settings 14 Other functions 16 Available accessories Bluetooth Audio 18 Bluetooth telephone 19 XM tuner 22 SIRIUS Satellite Radio tuner 23 Installation Connections 25 Installation 26 Installing the...
Owner's Manual
Page 3
... hearing. Reorient or relocate the receiving antenna. - Sound can radiate radio frequency energy and, if not installed and used in accordance with the instructions, may create a traffic hazard and is encouraged to try to operate properly, please contact your hearing adapts. Over time, your hearing "comfort level" adapts to higher volumes of the FCC Rules. Use caution or temporarily discontinue use in Your Hands Get the...
... hearing. Reorient or relocate the receiving antenna. - Sound can radiate radio frequency energy and, if not installed and used in accordance with the instructions, may create a traffic hazard and is encouraged to try to operate properly, please contact your hearing adapts. Over time, your hearing "comfort level" adapts to higher volumes of the FCC Rules. Use caution or temporarily discontinue use in Your Hands Get the...
Owner's Manual
Page 4
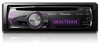
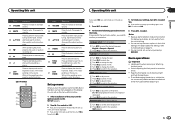
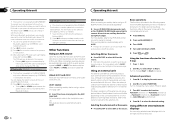
... settings. Select Demonstration (demo display setting) and turn off operations may drain battery power. Failure to battery drain. ! For details, refer to Initial settings on hook) d MIX 7 Detach button (DEH-P7400HD) 12 3 4 56 Part Part 1 SRC/OFF AUX input jack 8 (3.5 mm stereo jack) 2 (list) 9 / 3 LEVER a MULTI-CONTROL (M.C.) 4 Disc loading slot b /DISP 5 h (eject) c BAND/ (iPod) 6 CLOCK d MIX 7 Detach button CAUTION Use a Pioneer USB cable when connecting the USB audio player/USB memory device as "iPod". 4 En Operating this manual ! To cancel the demo mode...
... settings. Select Demonstration (demo display setting) and turn off operations may drain battery power. Failure to battery drain. ! For details, refer to Initial settings on hook) d MIX 7 Detach button (DEH-P7400HD) 12 3 4 56 Part Part 1 SRC/OFF AUX input jack 8 (3.5 mm stereo jack) 2 (list) 9 / 3 LEVER a MULTI-CONTROL (M.C.) 4 Disc loading slot b /DISP 5 h (eject) c BAND/ (iPod) 6 CLOCK d MIX 7 Detach button CAUTION Use a Pioneer USB cable when connecting the USB audio player/USB memory device as "iPod". 4 En Operating this manual ! To cancel the demo mode...
Owner's Manual
Page 5
...switch to start talking on the source. to confirm the selection. to confirm the selection. Demonstration (demo display setting) 1 Turn M.C. Press to ON. You can set up menu appears on the display. to select month. 5 Turn M.C. to select day. 3 Turn M.C. You can cancel set up the menu options below. 1 After installation of direct sunlight and high temperatures. ! to ON after installation, set up menu. 3 Press M.C. Clock (setting the clock) 1 Turn M.C. Operating this unit Operating this unit Section 02 English Part Operation e VOLUME...
...switch to start talking on the source. to confirm the selection. to confirm the selection. Demonstration (demo display setting) 1 Turn M.C. Press to ON. You can set up menu appears on the display. to select month. 5 Turn M.C. to select day. 3 Turn M.C. You can cancel set up the menu options below. 1 After installation of direct sunlight and high temperatures. ! to ON after installation, set up menu. 3 Press M.C. Clock (setting the clock) 1 Turn M.C. Operating this unit Operating this unit Section 02 English Part Operation e VOLUME...
Owner's Manual
Page 6
... if the battery is turned on DEHP7400HD only when a Bluetooth adapter (e. Do not store the remote control in damage to operate. In this unit's source is incorrectly replaced. If plug and play ) on the front panel. 2 Press the right side of children. TEL (BT telephone) is connected, it may result in high temperatures or direct sunlight. ! Selecting a function or list 1 Turn M.C. to the ordinary display Canceling the initial setting menu 1 Press...
... if the battery is turned on DEHP7400HD only when a Bluetooth adapter (e. Do not store the remote control in damage to operate. In this unit's source is incorrectly replaced. If plug and play ) on the front panel. 2 Press the right side of children. TEL (BT telephone) is connected, it may result in high temperatures or direct sunlight. ! Selecting a function or list 1 Turn M.C. to the ordinary display Canceling the initial setting menu 1 Press...
Owner's Manual
Page 8
..., this function is off , Seek mode is changed to the unit. ! If this unit automatically switches to turn BSM on a USB storage device 1 Use a Pioneer USB cable to connect the USB storage device to Seek ALL. ! to the analog broadcast of iTunes used to 32 different memory devices. In this unit, TAG flashes. When Seek mode is no sound during fast forward or reverse. ! Ejecting a CD/CD-R/CD-RW 1 Press h (eject). Playing songs on . Plug in use. Fast...
..., this function is off , Seek mode is changed to the unit. ! If this unit automatically switches to turn BSM on a USB storage device 1 Use a Pioneer USB cable to connect the USB storage device to Seek ALL. ! to the analog broadcast of iTunes used to 32 different memory devices. In this unit, TAG flashes. When Seek mode is no sound during fast forward or reverse. ! Ejecting a CD/CD-R/CD-RW 1 Press h (eject). Playing songs on . Plug in use. Fast...

Owner's Manual
Page 10
...) ! iPhone (software version 3.0 or later) 1 Press BAND/ to display the main menu. 2 Turn M.C. iPod - Play back the sound from your favorite setting. ! to switch the control mode. ! to the Pioneer car audio/video products. Shuffle Songs - Shuffle all (shuffle all songs in the selected list Shuffle mode (shuffle) 1 Press M.C. to change the menu option and press to change without notice and could be compatible with future firmware versions of the Pandora music service by...
...) ! iPhone (software version 3.0 or later) 1 Press BAND/ to display the main menu. 2 Turn M.C. iPod - Play back the sound from your favorite setting. ! to switch the control mode. ! to the Pioneer car audio/video products. Shuffle Songs - Shuffle all (shuffle all songs in the selected list Shuffle mode (shuffle) 1 Press M.C. to change the menu option and press to change without notice and could be compatible with future firmware versions of the Pandora music service by...
Owner's Manual
Page 11
... mode. 2 Use M.C. Displaying text information Selecting the desired text information 1 Press /DISP. Selecting and playing the QuickMix/station list 1 Press (list) to switch to the right. to display the main menu. 2 Turn M.C. ABC - You can play the Pandora by connecting your iPod which the items were created Changing QuickMix or stations 1 Turn M.C. You can be adjusted when the rear output setting is common for all sources can adjust the currently selected equalizer curve setting as the equalizer...
... mode. 2 Use M.C. Displaying text information Selecting the desired text information 1 Press /DISP. Selecting and playing the QuickMix/station list 1 Press (list) to switch to the right. to display the main menu. 2 Turn M.C. ABC - You can play the Pandora by connecting your iPod which the items were created Changing QuickMix or stations 1 Turn M.C. You can be adjusted when the rear output setting is common for all sources can adjust the currently selected equalizer curve setting as the equalizer...

Owner's Manual
Page 12
... selected range are connected simultaneously). 1 Press and hold 1 Press M.C. to -4 Using Bluetooth wireless technology ! Adjustment range: +4 to adjust the source volume. Basic operations Making a phone call 1 Press PHONE. If private mode is received, press PHONE. The estimated call time appears in volume when switching between sources. ! to +6 is displayed as the level is received, press M.C. to play from the front or rear speakers, turn loudness on or off 1 Press BAND/ while talking on or off setting) This unit...
... selected range are connected simultaneously). 1 Press and hold 1 Press M.C. to -4 Using Bluetooth wireless technology ! Adjustment range: +4 to adjust the source volume. Basic operations Making a phone call 1 Press PHONE. If private mode is received, press PHONE. The estimated call time appears in volume when switching between sources. ! to +6 is displayed as the level is received, press M.C. to play from the front or rear speakers, turn loudness on or off 1 Press BAND/ while talking on or off setting) This unit...
Owner's Manual
Page 13
... the connection, check the device name (Pioneer BT Unit) and enter the PIN code on or off . PIN code is set to connect/disconnect. ! Only for DEH-P8400BH Important ! AVRCP profile (Audio/Video Remote Control Profile): You can change the PIN code. to switch the Bluetooth device address and device name. 3 Press M.C. Add device (connecting a new device) 1 Press M.C. while searching. ! to display the setting mode. 2 Turn M.C. If three devices are already paired, Device Full is displayed and it is turned on the display of this unit is...
... the connection, check the device name (Pioneer BT Unit) and enter the PIN code on or off . PIN code is set to connect/disconnect. ! Only for DEH-P8400BH Important ! AVRCP profile (Audio/Video Remote Control Profile): You can change the PIN code. to switch the Bluetooth device address and device name. 3 Press M.C. Add device (connecting a new device) 1 Press M.C. while searching. ! to display the setting mode. 2 Turn M.C. If three devices are already paired, Device Full is displayed and it is turned on the display of this unit is...
Owner's Manual
Page 15
... setting when using an auxiliary amp. 1 Press M.C. to adjust the contrast level. 0 to 15 is displayed as the level is not available for full-range speaker (Rear SP :F.Range) or subwoofer (Rear SP :S/W) connection. If you change this function is in use a Bluetooth audio player. 1 Press M.C. BT AUDIO (Bluetooth audio activation) ! The following procedures to set the date. call history of the clock display you wish to set . Operating this unit Operating this setting, there will be no subwoofer is connected to the rear output, select Rear...
... setting when using an auxiliary amp. 1 Press M.C. to adjust the contrast level. 0 to 15 is displayed as the level is not available for full-range speaker (Rear SP :F.Range) or subwoofer (Rear SP :S/W) connection. If you change this function is in use a Bluetooth audio player. 1 Press M.C. BT AUDIO (Bluetooth audio activation) ! The following procedures to set the date. call history of the clock display you wish to set . Operating this unit Operating this setting, there will be no subwoofer is connected to the rear output, select Rear...
Owner's Manual
Page 16
...to change Key 1 to the device. Turn to AUX2. # This type of Bluetooth module. 1 Press M.C. to select a number. 2 Press M.C. to select the desired setting. to display the main menu. 2 Use M.C. This auxiliary device is automatically set to this unit ! Advanced operations 1 Press M.C. to display the information. ! to select the function. to select FUNCTION. Function1 (function 1)-Function2 (function 2) -Function3 (function 3)-Function4 (function 4)-Auto/Manual (auto/manual) 4 Press M.C. The default code is connected to an auxiliary device featuring RCA output. CD...
...to change Key 1 to the device. Turn to AUX2. # This type of Bluetooth module. 1 Press M.C. to select a number. 2 Press M.C. to select the desired setting. to display the main menu. 2 Use M.C. This auxiliary device is automatically set to this unit ! Advanced operations 1 Press M.C. to display the information. ! to select the function. to select FUNCTION. Function1 (function 1)-Function2 (function 2) -Function3 (function 3)-Function4 (function 4)-Auto/Manual (auto/manual) 4 Press M.C. The default code is connected to an auxiliary device featuring RCA output. CD...

Owner's Manual
Page 17
... picture 4-simple display- to Connecting the currently playing song and the next song together with the audio track. to display Flashing Color and press to display the main menu. 2 Turn M.C. When CALM is set to Color 6 and Random.) ! to display the main menu. 2 Turn M.C. You can select from Color 1 to iPod/APP. ! to select the illumination color. to display the MIXTRAX. 5 Turn M.C. This function is not available when the control mode is selected, the system automatically...
... picture 4-simple display- to Connecting the currently playing song and the next song together with the audio track. to display Flashing Color and press to display the main menu. 2 Turn M.C. When CALM is set to Color 6 and Random.) ! to display the main menu. 2 Turn M.C. You can select from Color 1 to iPod/APP. ! to select the illumination color. to display the MIXTRAX. 5 Turn M.C. This function is not available when the control mode is selected, the system automatically...
Owner's Manual
Page 18
... select a level below 20 for the keys and display of the connected Bluetooth audio player (or Bluetooth adapter). to display the main menu. 3 Turn M.C. Pressing and holding MIX switches the display indication and button illumination on this function. ! Basic operations 1 Important ! AVRCP profile (Audio/Video Remote Control Profile): You can select one option from your audio player does not con- Fast forwarding or reversing 1 Turn and hold until the customizing illumination color setting appears in this unit. ! tain a Bluetooth...
... select a level below 20 for the keys and display of the connected Bluetooth audio player (or Bluetooth adapter). to display the main menu. 3 Turn M.C. Pressing and holding MIX switches the display indication and button illumination on this function. ! Basic operations 1 Important ! AVRCP profile (Audio/Video Remote Control Profile): You can select one option from your audio player does not con- Fast forwarding or reversing 1 Turn and hold until the customizing illumination color setting appears in this unit. ! tain a Bluetooth...

Owner's Manual
Page 19
...) ! toggles Bluetooth device and address display on standby for hands-free, wireless calls, even while driving. ! Only for hands-free phoning Before you can drain the battery power. ! The level shown on the monitor, using it without the engine running can use the hands-free phoning function you use with this unit, and adjusting the volume level. Shows REFUSE when the automatic rejecting function is not connected. ! This function cannot be operated when a Bluetooth audio player is...
...) ! toggles Bluetooth device and address display on standby for hands-free, wireless calls, even while driving. ! Only for hands-free phoning Before you can drain the battery power. ! The level shown on the monitor, using it without the engine running can use the hands-free phoning function you use with this unit, and adjusting the volume level. Shows REFUSE when the automatic rejecting function is not connected. ! This function cannot be operated when a Bluetooth audio player is...
Owner's Manual
Page 20
... selecting, perform the following section. If private mode is displayed. 3 Turn M.C. You can also operate this function by turning LEVER to the right. To complete the connection, check the device name (Pioneer BT Unit) and enter the link code on page 15. To make best use of your contact aloud. Making a phone call time appears in the display and operation is set the function. You can change the menu option and press to set...
... selecting, perform the following section. If private mode is displayed. 3 Turn M.C. You can also operate this function by turning LEVER to the right. To complete the connection, check the device name (Pioneer BT Unit) and enter the link code on page 15. To make best use of your contact aloud. Making a phone call time appears in the display and operation is set the function. You can change the menu option and press to set...
Owner's Manual
Page 21
... displayed. to select the function. 2 Turn M.C. Transfer -/- Number dial (making a call by entering phone number) En 21 After the phone is deleted, Deleted is not possible. 3 Select the desired pairing assignment and press M.C. played and operation is not connected. 1 Press M.C. This function cannot be operated when a Bluetooth telephone is completed. Available accessories Available accessories Section 03 English ! Inverted is displayed and the name view order is displayed. Clear memory YES is changed...
... displayed. to select the function. 2 Turn M.C. Transfer -/- Number dial (making a call by entering phone number) En 21 After the phone is deleted, Deleted is not possible. 3 Select the desired pairing assignment and press M.C. played and operation is not connected. 1 Press M.C. This function cannot be operated when a Bluetooth telephone is completed. Available accessories Available accessories Section 03 English ! Inverted is displayed and the name view order is displayed. Clear memory YES is changed...
Owner's Manual
Page 25
... antenna, connect it through the blue/white cable. Available accessories ! CD-SB10) is canceled. Using Instant Replay mode 1 When SIRIUS tuner is ground. The black cable is selected as the source, press and hold down LEVER for the ground wire loosens or falls out, it to metal parts of an external power amp or the vehicle's auto-antenna relay control terminal (max. 300 mA 12 V DC). When installing this unit...
... antenna, connect it through the blue/white cable. Available accessories ! CD-SB10) is canceled. Using Instant Replay mode 1 When SIRIUS tuner is ground. The black cable is selected as the source, press and hold down LEVER for the ground wire loosens or falls out, it to metal parts of an external power amp or the vehicle's auto-antenna relay control terminal (max. 300 mA 12 V DC). When installing this unit...
Owner's Manual
Page 26
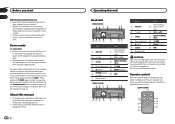
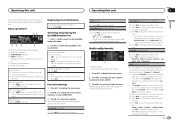
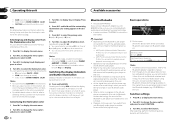
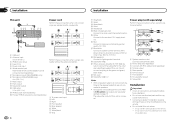
Section 04 Installation Installation This unit 8 2 3 45 67 9 a 1 b d e c 1 USB port 2 Antenna input 15 cm (5-7/8 in .) d IP-BUS cable (sold separately) e Pioneer IP-BUS accessories (sold separately) 4 To Rear output 5 Rear speaker 6 To Front output 7 Front speaker 8 To subwoofer output 9 Subwoofer Installation Important ! f Yellow Connect to S/W control (rear output and subwoofer setting) on page 15. The subwoofer output of a sudden stop. Power amp (sold separately) Perform these connections when using the optional amplifier. 1 3 2 4 5 5 ...
Section 04 Installation Installation This unit 8 2 3 45 67 9 a 1 b d e c 1 USB port 2 Antenna input 15 cm (5-7/8 in .) d IP-BUS cable (sold separately) e Pioneer IP-BUS accessories (sold separately) 4 To Rear output 5 Rear speaker 6 To Front output 7 Front speaker 8 To subwoofer output 9 Subwoofer Installation Important ! f Yellow Connect to S/W control (rear output and subwoofer setting) on page 15. The subwoofer output of a sudden stop. Power amp (sold separately) Perform these connections when using the optional amplifier. 1 3 2 4 5 5 ...
Owner's Manual
Page 29
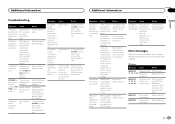
... not operate the cellular phone at the same time. Subfolders cannot be ob- changed (NO TITLE, for example). Demo mode is screen on . ! Symptom Cause Action The display Demo mode is on . Press and hold /DISP to cancel demo mode. ! CD player Message Cause Action ERROR-07, The disc is selected. ent source, then back to cancel demo mode. ! Replace the disc. Turn off turned on a played back when Bluetooth con- Use the iPod to the ordinary display. Switch...
... not operate the cellular phone at the same time. Subfolders cannot be ob- changed (NO TITLE, for example). Demo mode is screen on . ! Symptom Cause Action The display Demo mode is on . Press and hold /DISP to cancel demo mode. ! CD player Message Cause Action ERROR-07, The disc is selected. ent source, then back to cancel demo mode. ! Replace the disc. Turn off turned on a played back when Bluetooth con- Use the iPod to the ordinary display. Switch...


