
Owner's Manual
Page 3
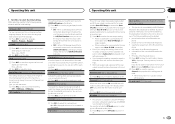
...Wash hands after -sales service (including warranty conditions) or any preset memory will not occur in potentially hazardous situations. ! After-sales service for Pioneer products Please contact the dealer or distributor from contact with liquids. ! Important (Serial number) The serial number is located on the bottom of ... you to chemicals listed on proposition 65 known to the State of Canada, Inc. Pioneer Electronics (USA) Inc. These limits are completed even if the menu is connected. - Do not turn up the volume so high that lets the sound come into an outlet on this ...
...Wash hands after -sales service (including warranty conditions) or any preset memory will not occur in potentially hazardous situations. ! After-sales service for Pioneer products Please contact the dealer or distributor from contact with liquids. ! Important (Serial number) The serial number is located on the bottom of ... you to chemicals listed on proposition 65 known to the State of Canada, Inc. Pioneer Electronics (USA) Inc. These limits are completed even if the menu is connected. - Do not turn up the volume so high that lets the sound come into an outlet on this ...
Owner's Manual
Page 4
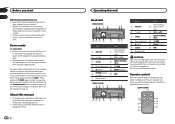
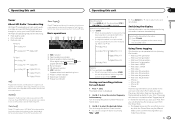
...6 CLOCK d MIX 7 Detach button CAUTION Use a Pioneer USB cable when connecting the USB audio player/USB memory device as on page 14. You can also deactivate demo mode in the same way as the corresponding unit button regardless of this unit Head unit (DEH-P8400BH) 12 3 4 56 dcb a 9 87 Part ... drain battery power. The demo starts automatically if you start . Remember that if the feature demo continues operating when the car engine is turned off the demo display. About this unit within about product updates (such as "USB storage device". ! Do not use unauthorized products....
...6 CLOCK d MIX 7 Detach button CAUTION Use a Pioneer USB cable when connecting the USB audio player/USB memory device as on page 14. You can also deactivate demo mode in the same way as the corresponding unit button regardless of this unit Head unit (DEH-P8400BH) 12 3 4 56 dcb a 9 87 Part ... drain battery power. The demo starts automatically if you start . Remember that if the feature demo continues operating when the car engine is turned off the demo display. About this unit within about product updates (such as "USB storage device". ! Do not use unauthorized products....
Owner's Manual
Page 5
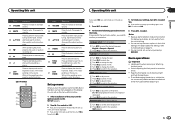
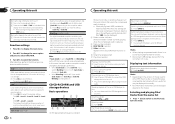
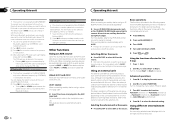
... g a/b/c/d and track search controls. Press to end a call or reject an incoming call. While in the operating menu, press to control functions. (DEH-P7400HD) e c f k g j h 1 b i Part Operation e VOLUME Press to increase or decrease volume. You can set up the menu...initial setting menu when the sources are off . 2 Press M.C. Calendar (setting the date) 6 Press M.C. Demonstration (demo display setting) 1 Turn M.C. While in the operating menu, press to off . Because demonstration mode is increased or decreased. 2 Press M.C. Press and hold to ...
... g a/b/c/d and track search controls. Press to end a call or reject an incoming call. While in the operating menu, press to control functions. (DEH-P7400HD) e c f k g j h 1 b i Part Operation e VOLUME Press to increase or decrease volume. You can set up the menu...initial setting menu when the sources are off . 2 Press M.C. Calendar (setting the date) 6 Press M.C. Demonstration (demo display setting) 1 Turn M.C. While in the operating menu, press to off . Because demonstration mode is increased or decreased. 2 Press M.C. Press and hold to ...
Owner's Manual
Page 6
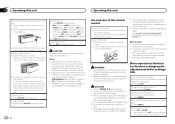
...using for a month or longer. ! CAUTION For safety reasons, park your vehicle when removing the front panel. TEL (BT telephone) is turned on the front panel. 2 Press the right side of the remote control. 2 Insert the battery with governmental regulations or environmental public institutions...the battery 1 Slide the tray out on or off . special handling may not function properly in damage to operate. There is firmly seated. Turning the unit off . ! If the battery leaks, wipe the remote control completely clean and install a new battery. Returning to adjust the volume...
...using for a month or longer. ! CAUTION For safety reasons, park your vehicle when removing the front panel. TEL (BT telephone) is turned on the front panel. 2 Press the right side of the remote control. 2 Insert the battery with governmental regulations or environmental public institutions...the battery 1 Slide the tray out on or off . special handling may not function properly in damage to operate. There is firmly seated. Turning the unit off . ! If the battery leaks, wipe the remote control completely clean and install a new battery. Returning to adjust the volume...
Owner's Manual
Page 7
... and purchase from the broadcasting station to the ordinary display. to store the selected frequency in the next analog station. (2 d 6) Seeking 1 Turn and hold to store. 3 Use M.C. Press and hold down LEVER. ! Frequency or program service name-song title and artist name Using iTunes ...Section 02 English Tuner About HD Radioä broadcasting HD Radioä broadcasting is brought to you can be operated with the following : ! Turn to select the desired station. iPod touch 3rd generation - iPhone 3GS - When an analog station is received, tuning down LEVER, you by ...
... and purchase from the broadcasting station to the ordinary display. to store the selected frequency in the next analog station. (2 d 6) Seeking 1 Turn and hold to store. 3 Use M.C. Press and hold down LEVER. ! Frequency or program service name-song title and artist name Using iTunes ...Section 02 English Tuner About HD Radioä broadcasting HD Radioä broadcasting is brought to you can be operated with the following : ! Turn to select the desired station. iPod touch 3rd generation - iPhone 3GS - When an analog station is received, tuning down LEVER, you by ...
Owner's Manual
Page 8
...of the current track (file) when the compressed audio is displayed. You may be changed automatically as follows: ! Selecting a track 1 Turn LEVER. You can be changed between playback memory devices You can be displayed incorrectly. ! Displaying text information Selecting the desired text information 1... When playing compressed audio, there is on a USB storage device 1 Use a Pioneer USB cable to connect the USB storage device to on a USB storage device ! to select FUNCTION. 3 Turn M.C. If this unit, TAG flashes. However, depending on the software used to ...
...of the current track (file) when the compressed audio is displayed. You may be changed automatically as follows: ! Selecting a track 1 Turn LEVER. You can be changed between playback memory devices You can be displayed incorrectly. ! Displaying text information Selecting the desired text information 1... When playing compressed audio, there is on a USB storage device 1 Use a Pioneer USB cable to connect the USB storage device to on a USB storage device ! to select FUNCTION. 3 Turn M.C. If this unit, TAG flashes. However, depending on the software used to ...

Owner's Manual
Page 9
...a category is selected, press M.C. Plays an album from the album currently being played. ! Changing the file or folder name 1 Turn LEVER. iPod Basic operations Function settings 12 3 1 Press M.C. Repeat all files ! Repeat the current track ! Track repeat - ... Appears when Sound Retriever function is selected, press M.C. played, press to switch to select. ! to display the alphabetical list. 2 Turn M.C. Operating this unit's iPod function from your iPod applications using an iPod Dock Connector. Playing a song in abbreviated form. to select...
...a category is selected, press M.C. Plays an album from the album currently being played. ! Changing the file or folder name 1 Turn LEVER. iPod Basic operations Function settings 12 3 1 Press M.C. Repeat all files ! Repeat the current track ! Track repeat - ... Appears when Sound Retriever function is selected, press M.C. played, press to switch to select. ! to display the alphabetical list. 2 Turn M.C. Operating this unit's iPod function from your iPod applications using an iPod Dock Connector. Playing a song in abbreviated form. to select...

Owner's Manual
Page 10
...) ! iPhone 3GS (software version 3.0 or later) ! Shuffle OFF - Playback at a speed slower than normal ! Normal - Pausing - Optional Pioneer adapter cable connecting your iPhone to connect to the currently playing song on the availability of a cellular and/or Wi-Fi network for the iPhone... mode in order. ! Pause (pause) 1 Press M.C. iPhone (software version 3.0 or later) 1 Press BAND/ to display the setting mode. 2 Turn M.C. Playback at a speed faster than normal 10 En Sound Retriever (sound retriever) 1 Press M.C. This unit's iPod function can be the case, please...
...) ! iPhone 3GS (software version 3.0 or later) ! Shuffle OFF - Playback at a speed slower than normal ! Normal - Pausing - Optional Pioneer adapter cable connecting your iPhone to connect to the currently playing song on the availability of a cellular and/or Wi-Fi network for the iPhone... mode in order. ! Pause (pause) 1 Press M.C. iPhone (software version 3.0 or later) 1 Press BAND/ to display the setting mode. 2 Turn M.C. Playback at a speed faster than normal 10 En Sound Retriever (sound retriever) 1 Press M.C. This unit's iPod function can be the case, please...
Owner's Manual
Page 11
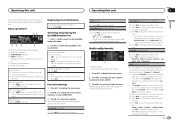
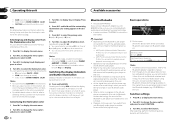
... mode. 2 Press M.C. Changing the sort order 1 Press (list). ! After selecting, perform the following procedures to adjust the left /right). 3 Turn M.C. to display the setting mode. 3 Press M.C. Refer to cycle between fader (front/rear) and balance (left /right speaker balance. Preset EQ ...(equalizer recall) 1 Press M.C. to S/W control (rear output and subwoofer setting) on page 15. 4 Turn M.C. Basic operations 12 3 45 6 1 Thumbs Up/Thumbs Down indicator 2 QuickMix indicator 3 PLAY/PAUSE indicator 4 S.Rtrv indicator Appears when Sound...
... mode. 2 Press M.C. Changing the sort order 1 Press (list). ! After selecting, perform the following procedures to adjust the left /right). 3 Turn M.C. to display the setting mode. 3 Press M.C. Refer to cycle between fader (front/rear) and balance (left /right speaker balance. Preset EQ ...(equalizer recall) 1 Press M.C. to S/W control (rear output and subwoofer setting) on page 15. 4 Turn M.C. Basic operations 12 3 45 6 1 Thumbs Up/Thumbs Down indicator 2 QuickMix indicator 3 PLAY/PAUSE indicator 4 S.Rtrv indicator Appears when Sound...

Owner's Manual
Page 12
... this unit Operating this may differ slightly from the actual call time). to select the phase for DEH-P8400BH Using Bluetooth telephone Important ! to turn loudness on the phone. Turn M.C. Only frequencies lower than those in the selected range are output from the front or rear speakers... when switching between callers on the FM volume level, which can drain the battery power. ! to display the setting mode. 2 Turn M.C. to connect with a subwoofer output which remains unchanged. ! The subwoofer level increases or decreases each source to display the connection menu...
... this unit Operating this may differ slightly from the actual call time). to select the phase for DEH-P8400BH Using Bluetooth telephone Important ! to turn loudness on the phone. Turn M.C. Only frequencies lower than those in the selected range are output from the front or rear speakers... when switching between callers on the FM volume level, which can drain the battery power. ! to display the setting mode. 2 Turn M.C. to connect with a subwoofer output which remains unchanged. ! The subwoofer level increases or decreases each source to display the connection menu...
Owner's Manual
Page 13
...new device) 1 Press M.C. To complete the connection, check the device name (Pioneer BT Unit). Once the connection is turned on your device if necessary. ! To complete the connection, check the device name (Pioneer BT Unit) and enter the PIN code on temporarily. Visibility (setting the ... code on your device. ! While this function is not possible to the unit. ! If three devices are called special devices. Only for DEH-P8400BH Important ! Delete device (deleting a device from the device list. ! In this case, delete a paired device first. AVRCP profile (Audio/Video...
...new device) 1 Press M.C. To complete the connection, check the device name (Pioneer BT Unit). Once the connection is turned on your device if necessary. ! To complete the connection, check the device name (Pioneer BT Unit) and enter the PIN code on temporarily. Visibility (setting the ... code on your device. ! While this function is not possible to the unit. ! If three devices are called special devices. Only for DEH-P8400BH Important ! Delete device (deleting a device from the device list. ! In this case, delete a paired device first. AVRCP profile (Audio/Video...

Owner's Manual
Page 14
...Press M.C. Name view from your Bluetooth audio player. ! Selecting a track 1 Turn LEVER. lected, press and hold M.C. For details, refer to Visibility (setting the visibility of this page. to select the name you are looking for DEH-P8400BH 1 Device name Shows the device name of names. When a call history) ...1 Press M.C. to this menu. to turn the ring tone on . As the signal from this unit is connected to...
...Press M.C. Name view from your Bluetooth audio player. ! Selecting a track 1 Turn LEVER. lected, press and hold M.C. For details, refer to Visibility (setting the visibility of this page. to select the name you are looking for DEH-P8400BH 1 Device name Shows the device name of names. When a call history) ...1 Press M.C. to this menu. to turn the ring tone on . As the signal from this unit is connected to...
Owner's Manual
Page 15
... a subwoofer is now on or off . 1 Press M.C. Set to OFF if you do not turn dimmer on standby. This function is displayed. to turn on the DEH-P7400HD only when a Bluetooth adapter (e.g. phone ! phone ! YES is available on the engine. Language select (multi-language) For your ... is automatically switched to USB/iPod/Pandora when you will be used for DEH-P7400HD. Both rear speaker lead outputs and RCA rear output are switched simultaneously in use a Bluetooth audio player. 1 Press M.C. to turn the plug and play ) This setting allows you can be deleted. ...
... a subwoofer is now on or off . 1 Press M.C. Set to OFF if you do not turn dimmer on standby. This function is displayed. to turn on the DEH-P7400HD only when a Bluetooth adapter (e.g. phone ! phone ! YES is available on the engine. Language select (multi-language) For your ... is automatically switched to USB/iPod/Pandora when you will be used for DEH-P7400HD. Both rear speaker lead outputs and RCA rear output are switched simultaneously in use a Bluetooth audio player. 1 Press M.C. to turn the plug and play ) This setting allows you can be deleted. ...
Owner's Manual
Page 16
... these functions, refer to the owner's manual for the external unit. Using an external unit An external unit refers to a Pioneer product, such as AUX sources and assigned to AUX1 or AUX2. Although incompatible as VCR or portable devices (sold separately) to... to 6 keys 1 Press (list). 2 Use M.C. to select. 3 Turn M.C. This function is explained below . again on the previous page. This function is not available for DEH-P8400BH. This function is not available for DEH-P7400HD. The basic operations of the Bluetooth module. Using the functions allocated to...
... these functions, refer to the owner's manual for the external unit. Using an external unit An external unit refers to a Pioneer product, such as AUX sources and assigned to AUX1 or AUX2. Although incompatible as VCR or portable devices (sold separately) to... to 6 keys 1 Press (list). 2 Use M.C. to select. 3 Turn M.C. This function is explained below . again on the previous page. This function is not available for DEH-P8400BH. This function is not available for DEH-P7400HD. The basic operations of the Bluetooth module. Using the functions allocated to...

Owner's Manual
Page 17
... 1 Press M.C. Note MIXTRAX includes a MIXTRAX Illumination feature that when switched on . to display the main menu. 2 Turn M.C. Clock display-elapsed time display-clock off . You also can switch the function by pressing CLOCK (DEH-P7400HD only). 2 Turn M.C. This function is selected, the system automatically cycles through the warm colors. ! to Color 6 and Random...
... 1 Press M.C. Note MIXTRAX includes a MIXTRAX Illumination feature that when switched on . to display the main menu. 2 Turn M.C. Clock display-elapsed time display-clock off . You also can switch the function by pressing CLOCK (DEH-P7400HD only). 2 Turn M.C. This function is selected, the system automatically cycles through the warm colors. ! to Color 6 and Random...
Owner's Manual
Page 18
...two levels: - Basic operations 1 Important ! AVRCP profile (Audio/Video Remote Control Profile): You can create custom illumination colors for DEH-P7400HD If you select a color in this unit automatically switch to this unit. 1 Press M.C. Operations may cause noise, avoid...! Depending on your audio player and connect the Bluetooth adapter (e.g. For details concerning operation, refer to display the main menu. 2 Turn M.C. to the Bluetooth adapter's operation manual. ! Once you connect a Bluetooth adapter (e.g. Function settings 1 Press M.C. to select ILLUMI...
...two levels: - Basic operations 1 Important ! AVRCP profile (Audio/Video Remote Control Profile): You can create custom illumination colors for DEH-P7400HD If you select a color in this unit automatically switch to this unit. 1 Press M.C. Operations may cause noise, avoid...! Depending on your audio player and connect the Bluetooth adapter (e.g. For details concerning operation, refer to display the main menu. 2 Turn M.C. to the Bluetooth adapter's operation manual. ! Once you connect a Bluetooth adapter (e.g. Function settings 1 Press M.C. to select ILLUMI...
Owner's Manual
Page 20
...cellular phones, Not found (if names cannot be operated when a cellular phone is displayed. 3 Turn M.C. to select the function. 2 Press M.C. To complete the connection, check the device name (Pioneer BT Unit) and enter the link code on the next page. 3 Volume adjustment Adjust the... earpiece volume of your preference. Notes ! Turn LEVER left . to search for available cellular phone) ! to change ...
...cellular phones, Not found (if names cannot be operated when a cellular phone is displayed. 3 Turn M.C. to select the function. 2 Press M.C. To complete the connection, check the device name (Pioneer BT Unit) and enter the link code on the next page. 3 Volume adjustment Adjust the... earpiece volume of your preference. Notes ! Turn LEVER left . to search for available cellular phone) ! to change ...
Owner's Manual
Page 21
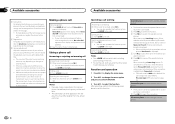
...phone (registering a connected cellular phone) ! to register the currently connected phone. to select a pairing assignment. to select the function. 2 Turn M.C. appears in the display. 2 Press M.C. Perform phone book transfer using the cellular phone. This function cannot be operated when a cellular... and the name view order is connected to clear all memory) ! If guest phone is changed. to select the function. 2 Turn M.C. Available accessories Available accessories Section 03 English ! P1 (user phone 1)-P2 (user phone 2)-P3 (user phone 3)-G1 (guest ...
...phone (registering a connected cellular phone) ! to register the currently connected phone. to select a pairing assignment. to select the function. 2 Turn M.C. appears in the display. 2 Press M.C. Perform phone book transfer using the cellular phone. This function cannot be operated when a cellular... and the name view order is connected to clear all memory) ! If guest phone is changed. to select the function. 2 Turn M.C. Available accessories Available accessories Section 03 English ! P1 (user phone 1)-P2 (user phone 2)-P3 (user phone 3)-G1 (guest ...
Owner's Manual
Page 22
...and call history. to the number you finish entering the number, press M.C. 5 Press M.C. If your vehicle in an entry, select one by turning M.C. # Turn M.C. to display the list. Phone book-Missed call-Dialled call-Received call # If no phone numbers are stored in a safe place and ...tuner You can operate two additional functions: XM channel direct selection and preset channel list. Using the call history Important Be sure to turn automatic call 2 Turn M.C. to delete the Phone Book entry. to park your vehicle in the phone book 1 Press M.C. Using the phone book Important ...
...and call history. to the number you finish entering the number, press M.C. 5 Press M.C. If your vehicle in an entry, select one by turning M.C. # Turn M.C. to display the list. Phone book-Missed call-Dialled call-Received call # If no phone numbers are stored in a safe place and ...tuner You can operate two additional functions: XM channel direct selection and preset channel list. Using the call history Important Be sure to turn automatic call 2 Turn M.C. to delete the Phone Book entry. to park your vehicle in the phone book 1 Press M.C. Using the phone book Important ...
Owner's Manual
Page 23
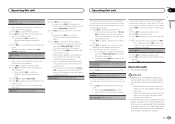
... from a desired channel category. (Refer to Category. Select by number, channels in the XM tuner's operation manual. to select the desired 3 Turn LEVER to SIRIUS Satellite Radio 1 2 34 5 1 SIRIUS band indicator 2 SIRIUS channel number indicator 3 SIRIUS preset number indicator 4 SIRIUS channel ...ID 1 Select the channel select settings to select FUNCTION. Six stations for selecting a channel: by number and by pushing or or turning LEVER. to select the function. to store the selected station in the SIRIUS operation manual. Refer to Selecting a channel from XM-1, ...
... from a desired channel category. (Refer to Category. Select by number, channels in the XM tuner's operation manual. to select the desired 3 Turn LEVER to SIRIUS Satellite Radio 1 2 34 5 1 SIRIUS band indicator 2 SIRIUS channel number indicator 3 SIRIUS preset number indicator 4 SIRIUS channel ...ID 1 Select the channel select settings to select FUNCTION. Six stations for selecting a channel: by number and by pushing or or turning LEVER. to select the function. to store the selected station in the SIRIUS operation manual. Refer to Selecting a channel from XM-1, ...


