Owner's Manual
Page 2
... operations 13 - Introduction of the remote control 9 - Displaying text information on USB portable audio player/ USB memory 19 - Introduction of currently playing artist 23 - Using disc title functions 18 Playing songs on disc 16 - Contents Thank you have finished reading the instructions, keep this manual in a safe place for future reference. Removing the front panel 8 - Head unit 10 - Playing tracks in the current folder 20 - Scanning folders and tracks 18 - Selecting an audio file directly...
... operations 13 - Introduction of the remote control 9 - Displaying text information on USB portable audio player/ USB memory 19 - Introduction of currently playing artist 23 - Using disc title functions 18 Playing songs on disc 16 - Contents Thank you have finished reading the instructions, keep this manual in a safe place for future reference. Removing the front panel 8 - Head unit 10 - Playing tracks in the current folder 20 - Scanning folders and tracks 18 - Selecting an audio file directly...
Owner's Manual
Page 3
... face auto open 30 Switching the auxiliary setting 30 Switching the dimmer setting 30 Adjusting the brightness 31 Setting the rear output and subwoofer controller 31 Switching the sound muting/attenuation 31 Switching the feature demo 32 Switching the reverse mode 32 Switching the ever scroll 32 Activating the BT Audio source 32 Entering PIN code for Bluetooth wireless connection 33 Displaying system version for hands-free phoning 41 - AUX1 source: 34 - AUX2 source: 34 - Setting the AUX title 34 Using the external unit 34 - Function and operation 39 - Taking a phone...
... face auto open 30 Switching the auxiliary setting 30 Switching the dimmer setting 30 Adjusting the brightness 31 Setting the rear output and subwoofer controller 31 Switching the sound muting/attenuation 31 Switching the feature demo 32 Switching the reverse mode 32 Switching the ever scroll 32 Activating the BT Audio source 32 Entering PIN code for Bluetooth wireless connection 33 Displaying system version for hands-free phoning 41 - AUX1 source: 34 - AUX2 source: 34 - Setting the AUX title 34 Using the external unit 34 - Function and operation 39 - Taking a phone...
Owner's Manual
Page 4
...-CD Player 55 - About iPod settings 67 Compressed audio files on the disc 67 - Contents - Registering a connected cellular phone 44 - Using preset numbers 48 - Setting automatic answering 49 - Echo canceling and noise reduction 49 XM tuner 49 - Switching the XM channel select mode 51 - Switching the SIRIUS display 52 - Storing and recalling broadcast stations 52 - Using the Game Alert function 53 - Using CD TEXT functions 55 - Introduction of advanced operations 60 TV tuner 61 - Using disc title functions 58 DVD Player 59 - Basic Operations...
...-CD Player 55 - About iPod settings 67 Compressed audio files on the disc 67 - Contents - Registering a connected cellular phone 44 - Using preset numbers 48 - Setting automatic answering 49 - Echo canceling and noise reduction 49 XM tuner 49 - Switching the XM channel select mode 51 - Switching the SIRIUS display 52 - Storing and recalling broadcast stations 52 - Using the Game Alert function 53 - Using CD TEXT functions 55 - Introduction of advanced operations 60 TV tuner 61 - Using disc title functions 58 DVD Player 59 - Basic Operations...
Owner's Manual
Page 6
... Pioneer (i.e., XM tuner and Sirius satellite tuner which are sold separately) can be controlled by iTunes®. This unit supports only the following . - iPod fifth generation (software version 1.2.1) - The system will create and package over 100 channels of the iPod software. ! Portable audio player compatibility ! This unit can control previous generations iPod models with Dock Connector. ! About AAC This unit plays back AAC files encoded by this unit. Operations may not be connected to use...
... Pioneer (i.e., XM tuner and Sirius satellite tuner which are sold separately) can be controlled by iTunes®. This unit supports only the following . - iPod fifth generation (software version 1.2.1) - The system will create and package over 100 channels of the iPod software. ! Portable audio player compatibility ! This unit can control previous generations iPod models with Dock Connector. ! About AAC This unit plays back AAC files encoded by this unit. Operations may not be connected to use...
Owner's Manual
Page 7
... as loss or theft. 2 Receive updates on the latest products and technologies. 3 Download owner's manuals, order product catalogues, research new products, and much more. See Switching the warning tone on file to help you purchased this unit. You can turn off , the front panel automatically moves. Keep the front panel out of Canada, Inc. After-sales service for Pioneer products Please contact the...
... as loss or theft. 2 Receive updates on the latest products and technologies. 3 Download owner's manuals, order product catalogues, research new products, and much more. See Switching the warning tone on file to help you purchased this unit. You can turn off , the front panel automatically moves. Keep the front panel out of Canada, Inc. After-sales service for Pioneer products Please contact the...
Owner's Manual
Page 10
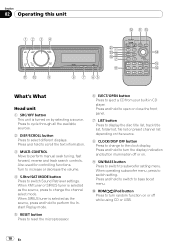
... switch setting. When operating subwoofer menu, press to perform manual seek tuning, fast forward, reverse and track search controls. Press and hold to change to switch Sound Retriever settings. Press and hold to perform the Instant Replay mode. 5 RESET button Press to reset the microprocessor. 6 EJECT/OPEN button Press to subwoofer setting menu. When XM tuner or SIRIUS tuner is selected as the source, press to turn random function on . 9 SW/BASS button Press to switch to eject a CD from your built-in CD player...
... switch setting. When operating subwoofer menu, press to perform manual seek tuning, fast forward, reverse and track search controls. Press and hold to change to switch Sound Retriever settings. Press and hold to perform the Instant Replay mode. 5 RESET button Press to reset the microprocessor. 6 EJECT/OPEN button Press to subwoofer setting menu. When XM tuner or SIRIUS tuner is selected as the source, press to turn random function on . 9 SW/BASS button Press to switch to eject a CD from your built-in CD player...
Owner's Manual
Page 11
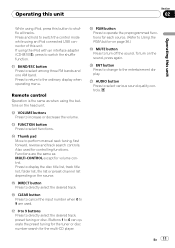
... operate the preset tuning for the tuner or disc number search for controlling functions. Buttons 1 to display the disc title list, track title list, folder list, file list or preset channel list depending on the head unit. i PGM button Press to turn on the sound, press again. f DIRECT button Press to perform manual seek tuning, fast forward, reverse and track search controls. e Thumb pad Move to directly select the desired track. Functions are used for the multi-CD player...
... operate the preset tuning for the tuner or disc number search for controlling functions. Buttons 1 to display the disc title list, track title list, folder list, file list or preset channel list depending on the head unit. i PGM button Press to turn on the sound, press again. f DIRECT button Press to perform manual seek tuning, fast forward, reverse and track search controls. e Thumb pad Move to directly select the desired track. Functions are used for the multi-CD player...

Owner's Manual
Page 25
.... Sub W.2 (subwoofer setting)-Bass (bass boost)-HPF (high pass filter)-SLA (source level adjustment) # You can also select the audio function by pressing AUDIO on the remote control. # You can provide the ideal listening environment in Sub W.1. # When selecting FM as the front/rear speaker balance moves from left or right. The audio menu is displayed. 3 Turn MULTI-CONTROL to the ordinary display. Recalling equalizer curves There are used. # When the rear output setting is Rear SP :S/W, you cannot adjust front/rear speaker balance. Fader (balance adjustment)-Powerful...
.... Sub W.2 (subwoofer setting)-Bass (bass boost)-HPF (high pass filter)-SLA (source level adjustment) # You can also select the audio function by pressing AUDIO on the remote control. # You can provide the ideal listening environment in Sub W.1. # When selecting FM as the front/rear speaker balance moves from left or right. The audio menu is displayed. 3 Turn MULTI-CONTROL to the ordinary display. Recalling equalizer curves There are used. # When the rear output setting is Rear SP :S/W, you cannot adjust front/rear speaker balance. Fader (balance adjustment)-Powerful...
Owner's Manual
Page 29
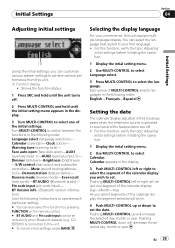
... selection)- Pin code input (pin code input)- For this function, verify the topic Adjusting initial settings before initiating the operation. 1 Display the intial setting menu. 2 Use MULTI-CONTROL to select Language select. 3 Press MULTI-CONTROL to select the language. Pushing MULTI-CONTROL left or right to select the segment of MULTI-CONTROL selects languages in the following instructions to operate each particular setting. # You can also select the function by pressing FUNCTION on the remote control. # BT AUDIO and Pin code input can be selected only when Bluetooth adapter...
... selection)- Pin code input (pin code input)- For this function, verify the topic Adjusting initial settings before initiating the operation. 1 Display the intial setting menu. 2 Use MULTI-CONTROL to select Language select. 3 Press MULTI-CONTROL to select the language. Pushing MULTI-CONTROL left or right to select the segment of MULTI-CONTROL selects languages in the following instructions to operate each particular setting. # You can also select the function by pressing FUNCTION on the remote control. # BT AUDIO and Pin code input can be selected only when Bluetooth adapter...
Owner's Manual
Page 30
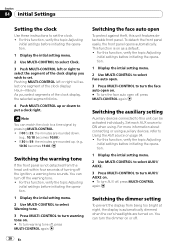
... panel opens automatically. Switching the auxiliary setting Auxiliary devices connected to ON when using auxiliary devices, refer to 29, the minutes are rounded down to turn warning tone off . Set each AUX source to this function, verify the topic Adjusting initial settings before initiating the operation. 1 Display the intial setting menu. 2 Use MULTI-CONTROL to select Warning tone. 3 Press MULTI-CONTROL to 59, the minutes are turned on or off , press MULTI-CONTROL again. 30 En Switching the face auto...
... panel opens automatically. Switching the auxiliary setting Auxiliary devices connected to ON when using auxiliary devices, refer to 29, the minutes are rounded down to turn warning tone off . Set each AUX source to this function, verify the topic Adjusting initial settings before initiating the operation. 1 Display the intial setting menu. 2 Use MULTI-CONTROL to select Warning tone. 3 Press MULTI-CONTROL to 59, the minutes are turned on or off , press MULTI-CONTROL again. 30 En Switching the face auto...

Owner's Manual
Page 31
... dimmer is connected to a subwoofer without using an auxiliary amp. Both rear speaker lead outputs and RCA rear output are displayed and no output unless you change this function, verify the topic Adjusting initial settings before initiating the operation. 1 Display the intial setting menu. 2 Use MULTI-CONTROL to select Dimmer. 3 Press MULTI-CONTROL to Using subwoofer output on . # To turn dimmer on page 27). ! If you switch the rear output setting to Rear SP :S/W, you change this function, verify the topic Adjusting initial settings before initiating the operation. 1 Display...
... dimmer is connected to a subwoofer without using an auxiliary amp. Both rear speaker lead outputs and RCA rear output are displayed and no output unless you change this function, verify the topic Adjusting initial settings before initiating the operation. 1 Display the intial setting menu. 2 Use MULTI-CONTROL to select Dimmer. 3 Press MULTI-CONTROL to Using subwoofer output on . # To turn dimmer on page 27). ! If you switch the rear output setting to Rear SP :S/W, you change this function, verify the topic Adjusting initial settings before initiating the operation. 1 Display...
Owner's Manual
Page 33
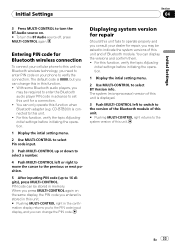
... unit. ! For this function, verify the topic Adjusting initial settings before initiating the operation. 1 Display the intial setting menu. 2 Use MULTI-CONTROL to verify the connection. You can display the versions and confirm them. ! Initial Settings Section 04 Initial Settings 3 Press MULTI-CONTROL to set this unit for a connection. ! Displaying system version for repair Should this unit fails to operate properly and you entered is 0000, but you can change the PIN code. With some Bluetooth audio players...
... unit. ! For this function, verify the topic Adjusting initial settings before initiating the operation. 1 Display the intial setting menu. 2 Use MULTI-CONTROL to verify the connection. You can display the versions and confirm them. ! Initial Settings Section 04 Initial Settings 3 Press MULTI-CONTROL to set this unit for a connection. ! Displaying system version for repair Should this unit fails to operate properly and you entered is 0000, but you can change the PIN code. With some Bluetooth audio players...
Owner's Manual
Page 34
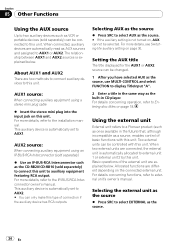
... in CD player. Allocated functions are connected, the external unit is not turned on page 18. For details concerning functions, refer to AUX1. For more details, refer to select AUX as the source. # If the auxiliary setting is automatically allocated to external unit 1 or external unit 2 by this unit. AUX2 source: When connecting auxiliary equipment using a stereo mini plug cable % Insert the stereo mini plug into the input jack on this unit. Setting the AUX title The title displayed...
... in CD player. Allocated functions are connected, the external unit is not turned on page 18. For details concerning functions, refer to AUX1. For more details, refer to select AUX as the source. # If the auxiliary setting is automatically allocated to external unit 1 or external unit 2 by this unit. AUX2 source: When connecting auxiliary equipment using a stereo mini plug cable % Insert the stereo mini plug into the input jack on this unit. Setting the AUX title The title displayed...

Owner's Manual
Page 40
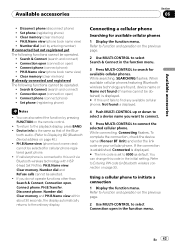
... (Bluetooth Device) address 1 Display the function menu. Stopping playback 1 Display the function menu. Bluetooth Telephone Basic Operations If you use audio players you may differ from this unit. Signal level indicator may need to enter the PIN code into this unit. Section 06 Available accessories Note Before you can connect a cellular phone featuring Bluetooth wireless technology to this unit for hands-free, wireless calls, even while driving. Refer to Function and operation on the previous page. 2 Use MULTI-CONTROL...
... (Bluetooth Device) address 1 Display the function menu. Stopping playback 1 Display the function menu. Bluetooth Telephone Basic Operations If you use audio players you may differ from this unit. Signal level indicator may need to enter the PIN code into this unit. Section 06 Available accessories Note Before you can connect a cellular phone featuring Bluetooth wireless technology to this unit for hands-free, wireless calls, even while driving. Refer to Function and operation on the previous page. 2 Use MULTI-CONTROL...
Owner's Manual
Page 43
... connection, check the device name (Pioneer BT Unit) and enter the link code on the previous page. 2 Use MULTI-CONTROL to this code in the initial setting. PH.B.Name view (phone book name view) ! Connection open (connection open ) ! You can change this unit via Bluetooth wireless technology with HSP (Head Set Profile), PH.B.Name view, Clear memory, Number dial and Refuse calls cannot be selected. ! PH.B.Name view (phone book name view) cannot be operated. ! While searching, SEARCHING flashes. While connecting, Connecting flashes...
... connection, check the device name (Pioneer BT Unit) and enter the link code on the previous page. 2 Use MULTI-CONTROL to this code in the initial setting. PH.B.Name view (phone book name view) ! Connection open (connection open ) ! You can change this unit via Bluetooth wireless technology with HSP (Head Set Profile), PH.B.Name view, Clear memory, Number dial and Refuse calls cannot be selected. ! PH.B.Name view (phone book name view) cannot be operated. ! While searching, SEARCHING flashes. While connecting, Connecting flashes...
Owner's Manual
Page 44
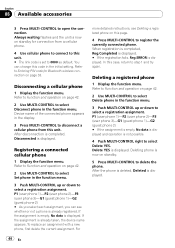
.... 2 Use MULTI-CONTROL to select Set phone in the display. 3 Press MULTI-CONTROL to Entering PIN code for connection from this page. 4 Press MULTI-CONTROL to delete the phone. Device name of the connected phone appears in the function menu. 3 Push MULTI-CONTROL up or down to 0000 as default. Refer to Function and operation on standby. 5 Press MULTI-CONTROL to register the currently connected phone. Deleting a registered phone 1 Display the function menu. Always waiting flashes and the unit...
.... 2 Use MULTI-CONTROL to select Set phone in the display. 3 Press MULTI-CONTROL to Entering PIN code for connection from this page. 4 Press MULTI-CONTROL to delete the phone. Device name of the connected phone appears in the function menu. 3 Push MULTI-CONTROL up or down to 0000 as default. Refer to Function and operation on standby. 5 Press MULTI-CONTROL to register the currently connected phone. Deleting a registered phone 1 Display the function menu. Always waiting flashes and the unit...

Owner's Manual
Page 63
... audio file not protected by DRM Replace disc. The USB device connected to is not supported by audio player/USB Windows Media memory and con- Confirm that is short-circuited. ERROR-15 The inserted disc Replace disc. Connect a USB portable audio player or USB memory that the tor or USB cable USB connector or is USB Mass Storage Class compliant. USB cable is connected Follow the USB memory instructions to ACC able current). The connected Disconnect the USB portable USB portable audio player/ audio player/USB USB memory memory and do consumes more not use...
... audio file not protected by DRM Replace disc. The USB device connected to is not supported by audio player/USB Windows Media memory and con- Confirm that is short-circuited. ERROR-15 The inserted disc Replace disc. Connect a USB portable audio player or USB memory that the tor or USB cable USB connector or is USB Mass Storage Class compliant. USB cable is connected Follow the USB memory instructions to ACC able current). The connected Disconnect the USB portable USB portable audio player/ audio player/USB USB memory memory and do consumes more not use...

Owner's Manual
Page 64
...). Select a list that contains the songs. Use only conventional, fully circular discs. Do not use . 64 En Once iPod main menu is displayed, connect the cable again. Do not insert anything other than a CD into the CD loading slot. ! USB device should be formatted with FAT16 or FAT32 Perform one of following operations. -Turn the ignition switch OFF and back ON. -Disconnect the USB portable audio player/USB memory. -Change to a different source. Reset...
...). Select a list that contains the songs. Use only conventional, fully circular discs. Do not use . 64 En Once iPod main menu is displayed, connect the cable again. Do not insert anything other than a CD into the CD loading slot. ! USB device should be formatted with FAT16 or FAT32 Perform one of following operations. -Turn the ignition switch OFF and back ON. -Disconnect the USB portable audio player/USB memory. -Change to a different source. Reset...
Other Manual
Page 1
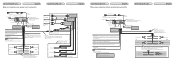
...; Use either from hot places such as illustrated. Never cut the insulation of the power cable of the unit match. 3. To protect the wiring, wrap adhesive tape around them where they are color-coded. Never band together multiple speaker's negative cables. • Control signal is output through a hole into place. Also, never connect it to the antenna booster power supply terminal. • Never connect blue/white cable to a battery...
...; Use either from hot places such as illustrated. Never cut the insulation of the power cable of the unit match. 3. To protect the wiring, wrap adhesive tape around them where they are color-coded. Never band together multiple speaker's negative cables. • Control signal is output through a hole into place. Also, never connect it to the antenna booster power supply terminal. • Never connect blue/white cable to a battery...
Other Manual
Page 2
....) Wired remote input Hard-wired remote control adaptor can be sure to connect with auxiliary device. Note Change the initial setting of this lead to the Audio Mute lead on that equipment. Not used. Perform these connections when using the optional amplifier. Subwoofer Front speaker Rear speaker Subwoofer Front speaker Rear speaker Connecting the unit English When using a subwoofer without using a subwoofer of the power amp or auto-antenna relay control terminal...
....) Wired remote input Hard-wired remote control adaptor can be sure to connect with auxiliary device. Note Change the initial setting of this lead to the Audio Mute lead on that equipment. Not used. Perform these connections when using the optional amplifier. Subwoofer Front speaker Rear speaker Subwoofer Front speaker Rear speaker Connecting the unit English When using a subwoofer without using a subwoofer of the power amp or auto-antenna relay control terminal...


